1. Introduction
This manual provides essential information for the safe and effective operation of your DELIXI DLY-0801B Digital Multimeter. This device is a compact, smart, true RMS multimeter designed for accurate measurement of various electrical parameters in both home and automotive environments. Please read this manual thoroughly before use and retain it for future reference.

Figure 1: DELIXI DLY-0801B Digital Multimeter showing its display, function dial, and key features including measurement ranges.
2. Safety Information
To ensure safe operation, always adhere to the following safety precautions:
- Do not exceed the maximum input values specified for each measurement range.
- Ensure test leads are properly connected and in good condition before each use.
- Do not use the multimeter if it appears damaged or if the battery cover is not securely closed.
- Exercise caution when working with voltages above 30V AC RMS, 42V peak, or 60V DC, as these pose a shock hazard.
- Always disconnect power to the circuit and discharge high-voltage capacitors before measuring resistance, continuity, diodes, or capacitance.
- Replace batteries promptly when the low battery indicator appears to ensure accurate readings.
3. Product Overview and Features
The DELIXI DLY-0801B is equipped with advanced features for versatile electrical testing:
- True RMS Measurement: Provides accurate readings for non-sinusoidal waveforms.
- Auto Range Function: Automatically selects the appropriate measurement range, simplifying operation.
- 6000 Counts Display: High-resolution display for precise readings.
- Non-Contact Voltage (NCV) Detection: Safely detects AC voltage without direct contact.
- Flashlight: Integrated light for working in dimly lit areas.
- Automatic Shutdown: Conserves battery life by powering off after 15 minutes of inactivity.
- Measurement Capabilities: DC/AC Voltage, DC/AC Current, Resistance, Capacitance, Frequency, Duty Cycle, VFC variable frequency voltage.
4. Setup
4.1 Battery Installation
The multimeter requires two AAA batteries for operation.
- Ensure the multimeter is powered off.
- Locate the battery compartment on the rear of the device.
- Open the battery compartment cover.
- Insert two AAA batteries, observing the correct polarity (+/-) as indicated inside the compartment.
- Securely close the battery compartment cover.
Figure 2: Multimeter indicating the use of two AAA batteries.
4.2 Test Lead Connection
Connect the test leads to the appropriate input jacks:
- Insert the black test lead into the COM (Common) jack.
- Insert the red test lead into the VΩHz jack for voltage, resistance, frequency, capacitance, and diode measurements.
- For current measurements (mA/A), insert the red test lead into the 10A MAX or mAμA jack as appropriate for the expected current level.
Figure 3: Multimeter showing the input jacks for test leads (COM, VΩHz, 10A MAX, mAμA).
5. Operating Instructions
5.1 Power On/Off
Rotate the central function dial from the OFF position to any desired measurement function to power on the multimeter. To power off, rotate the dial back to the OFF position.
5.2 Function Selection
The DLY-0801B features both manual and auto-ranging capabilities. Rotate the central dial to select the desired measurement function (e.g., V for voltage, Ω for resistance, A for current, Hz for frequency, NCV for non-contact voltage). The multimeter will typically default to auto-ranging within the selected function.
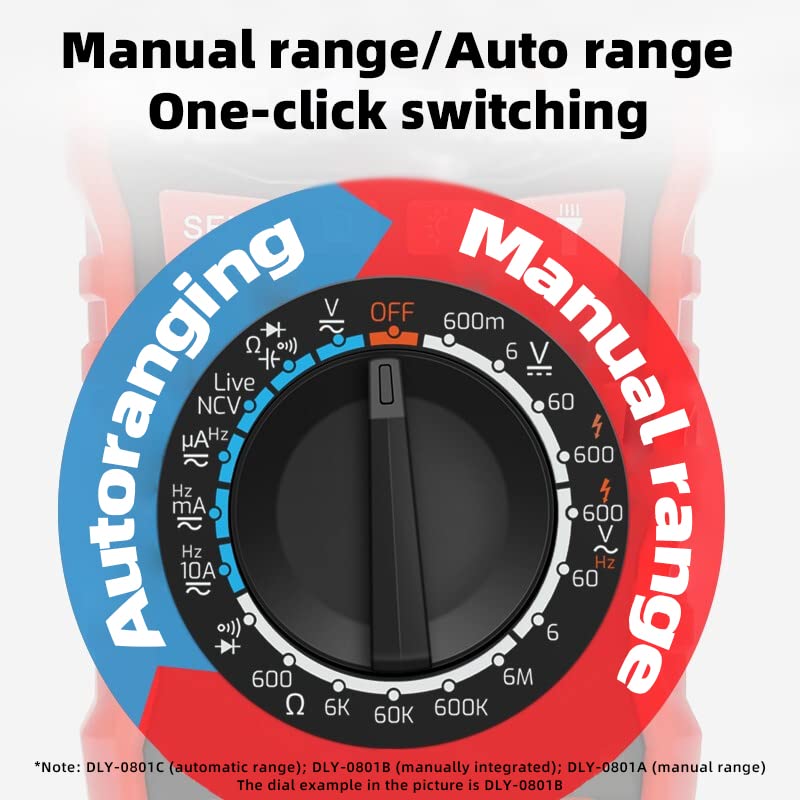
Figure 4: Function dial illustrating the one-click switching between manual and auto-ranging modes.
5.3 Taking Measurements
General Measurement Steps:
- Connect the test leads correctly as described in Section 4.2.
- Rotate the function dial to the desired measurement mode.
- Apply the test leads to the circuit or component under test.
- Read the measurement value on the display.
Specific Measurement Modes:
- Voltage (AC/DC): Select 'V~' for AC voltage or 'V=' for DC voltage. Connect leads in parallel with the circuit.
- Current (AC/DC): Select 'A~' for AC current or 'A=' for DC current. Connect leads in series with the circuit. Ensure correct jack selection (10A MAX or mAμA).
- Resistance (Ω): Select 'Ω'. Connect leads across the component. Ensure power is off and capacitors are discharged.
- Capacitance (F): Select 'F'. Connect leads across the capacitor. Ensure capacitor is discharged.
- Frequency (Hz): Select 'Hz'. Connect leads to the signal source.
- Non-Contact Voltage (NCV): Select 'NCV'. Bring the top of the multimeter near an AC voltage source. The device will indicate voltage presence with an audible alarm and visual indicator.
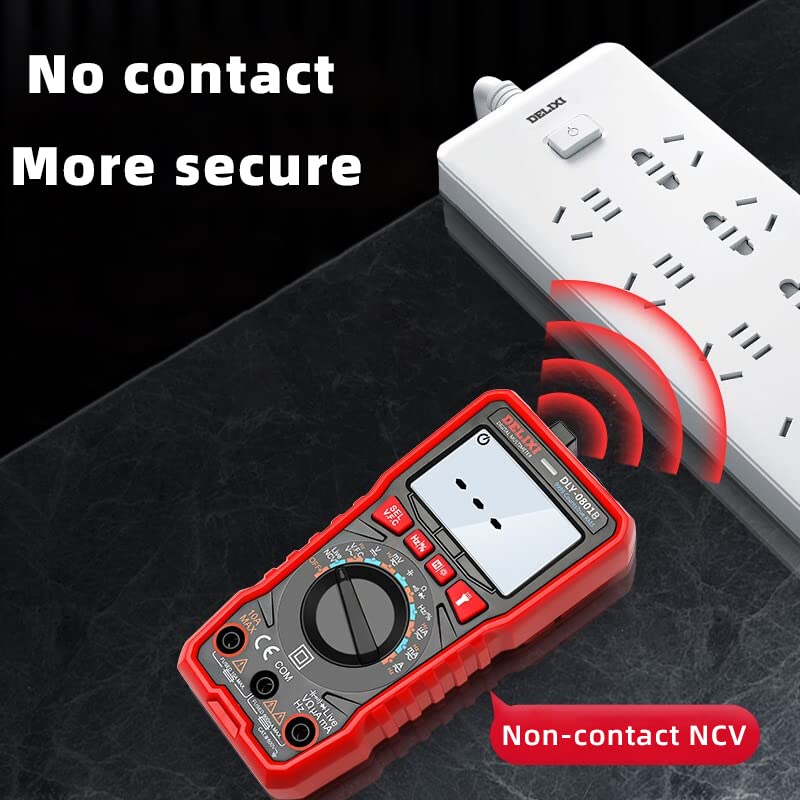
Figure 5: Multimeter demonstrating non-contact voltage (NCV) detection for enhanced safety.
5.4 Warning Indicators
- Over-range Warning: If the measured voltage or current exceeds the set alarm value, the multimeter will emit a continuous buzzer sound.
- Line On-Off Warning: When testing line continuity, the buzzer may sound if the resistance is less than 50Ω.

Figure 6: Visual representation of over-range and line on-off warning indicators on the multimeter display.
5.5 Automatic Shutdown
The multimeter is designed with an energy-saving feature that automatically shuts down the device after approximately 15 minutes of inactivity. This helps to conserve battery life.
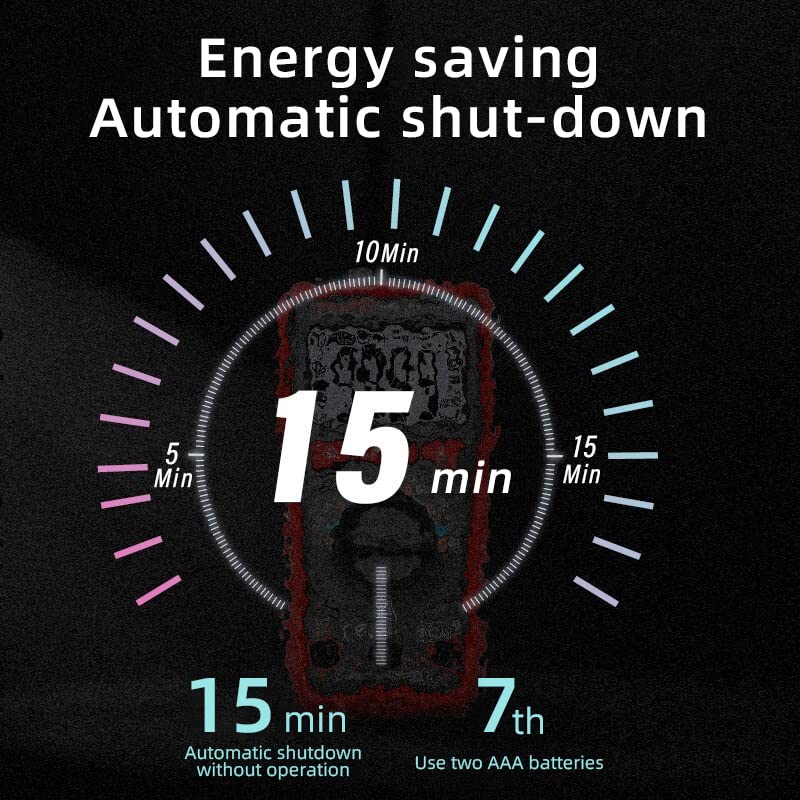
Figure 7: Diagram illustrating the 15-minute automatic shutdown feature for energy saving.
6. Maintenance
6.1 Cleaning
Wipe the case with a damp cloth and mild detergent. Do not use abrasives or solvents. Ensure the device is completely dry before use.
6.2 Battery Replacement
When the low battery indicator appears on the display, replace the batteries as described in Section 4.1. Always use two new AAA batteries.
6.3 Fuse Replacement
If the current measurement function fails, the fuse may need replacement. Fuse replacement should only be performed by qualified personnel. Refer to the specifications for the correct fuse type and rating.
7. Troubleshooting
- No Display: Check battery installation and ensure batteries are not depleted. Replace if necessary.
- Incorrect Readings: Verify test lead connections, ensure the correct function is selected, and check for low battery.
- Current Measurement Not Working: Check the fuse. If blown, replace with a fuse of the correct rating.
- Screen Malfunction: If parts of the screen stop working, contact customer support for assistance.
8. Specifications
| Parameter | Value |
|---|---|
| Brand | DELIXI |
| Model Number | DLY-0801B |
| Power Source | 2 x AAA Batteries |
| Display Counts | 6000 Counts |
| Measurement Type | Digital Multimeter, True RMS |
| DC Voltage Range | 0.1mV - 600V |
| AC Voltage Range | 1mV - 600V |
| DC Current Range | 0.01μA - 10A |
| AC Current Range | 0.01μA - 10A |
| Resistance Range | 0.1Ω - 60MΩ |
| Capacitance Range | 1nF - 60000μF |
| Frequency Range | 10Hz - 10MHz |
| Item Weight | 331 g |
| Included Components | Multimeter, Test Leads |
9. Warranty and Support
For warranty information and technical support, please refer to the documentation provided with your purchase or contact the seller/manufacturer directly. Keep your purchase receipt as proof of purchase.


