Introduction
This manual provides comprehensive instructions for the safe and efficient operation, maintenance, and troubleshooting of your GoGonova 700W HVLP Power Paint Sprayer. Please read this manual thoroughly before initial use to ensure optimal performance and longevity of your device.
Safety Information
WARNING: Always follow basic safety precautions when using electrical appliances to reduce the risk of fire, electric shock, and personal injury.
- Use protective gear, including eye protection, gloves, and a respirator, especially when spraying paints or chemicals.
- Ensure adequate ventilation in the work area to prevent the buildup of hazardous fumes.
- Avoid electrical contact. Do not operate the sprayer in wet conditions or near flammable liquids/gases.
- Regularly inspect and maintain the device, including changing filters as recommended, to ensure safe operation.
- Keep children and pets away from the work area.
For detailed safety guidelines, refer to local regulations and product labels on paints and solvents.
Product Overview
The GoGonova 700W HVLP Power Paint Sprayer is designed for efficient and precise paint application on various surfaces. It features a powerful motor, a large capacity container, and multiple adjustable settings for diverse painting projects.
Components
Familiarize yourself with the main components of your paint sprayer:

Overall View: The complete GoGonova 700W HVLP Power Paint Sprayer, showing the main unit, paint container, and various accessories including nozzles and cleaning tools.

Detailed Components: An exploded view illustrating the motor housing, trigger switch, power cable, 1400ml container, container seal, air cap, union nut, and nozzle.
- Motor Housing: Contains the electric motor and fan.
- Trigger Switch: Activates and deactivates the sprayer.
- Power Cable: Connects the unit to an electrical outlet.
- 1400ml Container: Holds the paint or liquid to be sprayed.
- Container Seal: Ensures an airtight connection between the container and the spray gun.
- Air Cap: Directs the airflow and helps shape the spray pattern.
- Union Nut: Secures the front part of the spray gun to the motor housing.
- Nozzle: Determines the spray output and pattern. The kit includes 1.5mm, 1.8mm, 2.2mm, and 2.6mm nozzles.
- Viscosity Cup: Used to measure paint viscosity for proper dilution.
- Cleaning Brush/Needle: For cleaning nozzles and other small parts.
- Blowing Attachment: For cleaning dust from surfaces before painting.
- Cleaning Attachment: Connects to a water tap for easy cleaning of the sprayer.
Setup
Proper setup is crucial for effective and consistent spraying results.
1. Prepare the Paint
The viscosity of your paint is critical for optimal spraying. Use the included viscosity cup to determine if dilution is necessary.

Paint Dilution: Use the viscosity cup to test paint flow. If the paint runs out in less than 30 seconds, no dilution is needed. If it takes longer than 30 seconds, dilute the paint until it flows within the recommended time.
- Fill the viscosity cup with the paint.
- Measure the time it takes for the paint to completely run out of the cup.
- If the time is less than 30 seconds, no dilution is required.
- If the time is greater than 30 seconds, gradually dilute the paint with the appropriate thinner (water for latex/water-based paints, mineral spirits for oil-based paints) and re-test until the desired viscosity is achieved.
- Pour the prepared paint into the 1400ml container.
2. Assemble the Sprayer
Follow these steps to assemble your paint sprayer:
Video: GoGonova HVLP Power Paint Sprayer Installation. This video demonstrates the step-by-step assembly process, including attaching the container, installing nozzles, and securing components.
- Tighten the spray gun front part to the container securely.
- Select the appropriate nozzle (1.5mm, 1.8mm, 2.2mm, or 2.6mm) based on the paint type and desired spray volume. Smaller nozzles are for thinner paints, larger for thicker paints.
- Install the chosen nozzle into the spray gun head.
- Ensure all connections are tight to prevent leaks and maintain proper air pressure.

Spray Patterns and Nozzles: Visual guide to circular (45°), horizontal (90°), and vertical (180°) spray patterns, along with the four available nozzle sizes (1.5mm, 1.8mm, 2.2mm, 2.6mm).
Operating Instructions
1. Adjust Spray Pattern and Flow
Your sprayer offers three adjustable spray patterns and flexible flow control.
- Spray Patterns: Rotate the air cap to select between circular (45°), horizontal (90°), or vertical (180°) spray patterns. Choose the pattern best suited for your surface (e.g., horizontal for fences, vertical for walls).
- Flow Control: The adjustable flow control knob allows you to regulate the paint output from 0ml/min to 1400ml/min. Turn clockwise for increased flow and counter-clockwise for decreased flow. Test on a scrap piece of material to find the ideal setting.

Flexible Adjustable Flow Control: Demonstrates how turning the knob clockwise increases paint flow and counter-clockwise decreases it.
2. Pre-Spraying Functions
The sprayer includes unique blowing and cleaning functions to prepare your surface and maintain the unit.
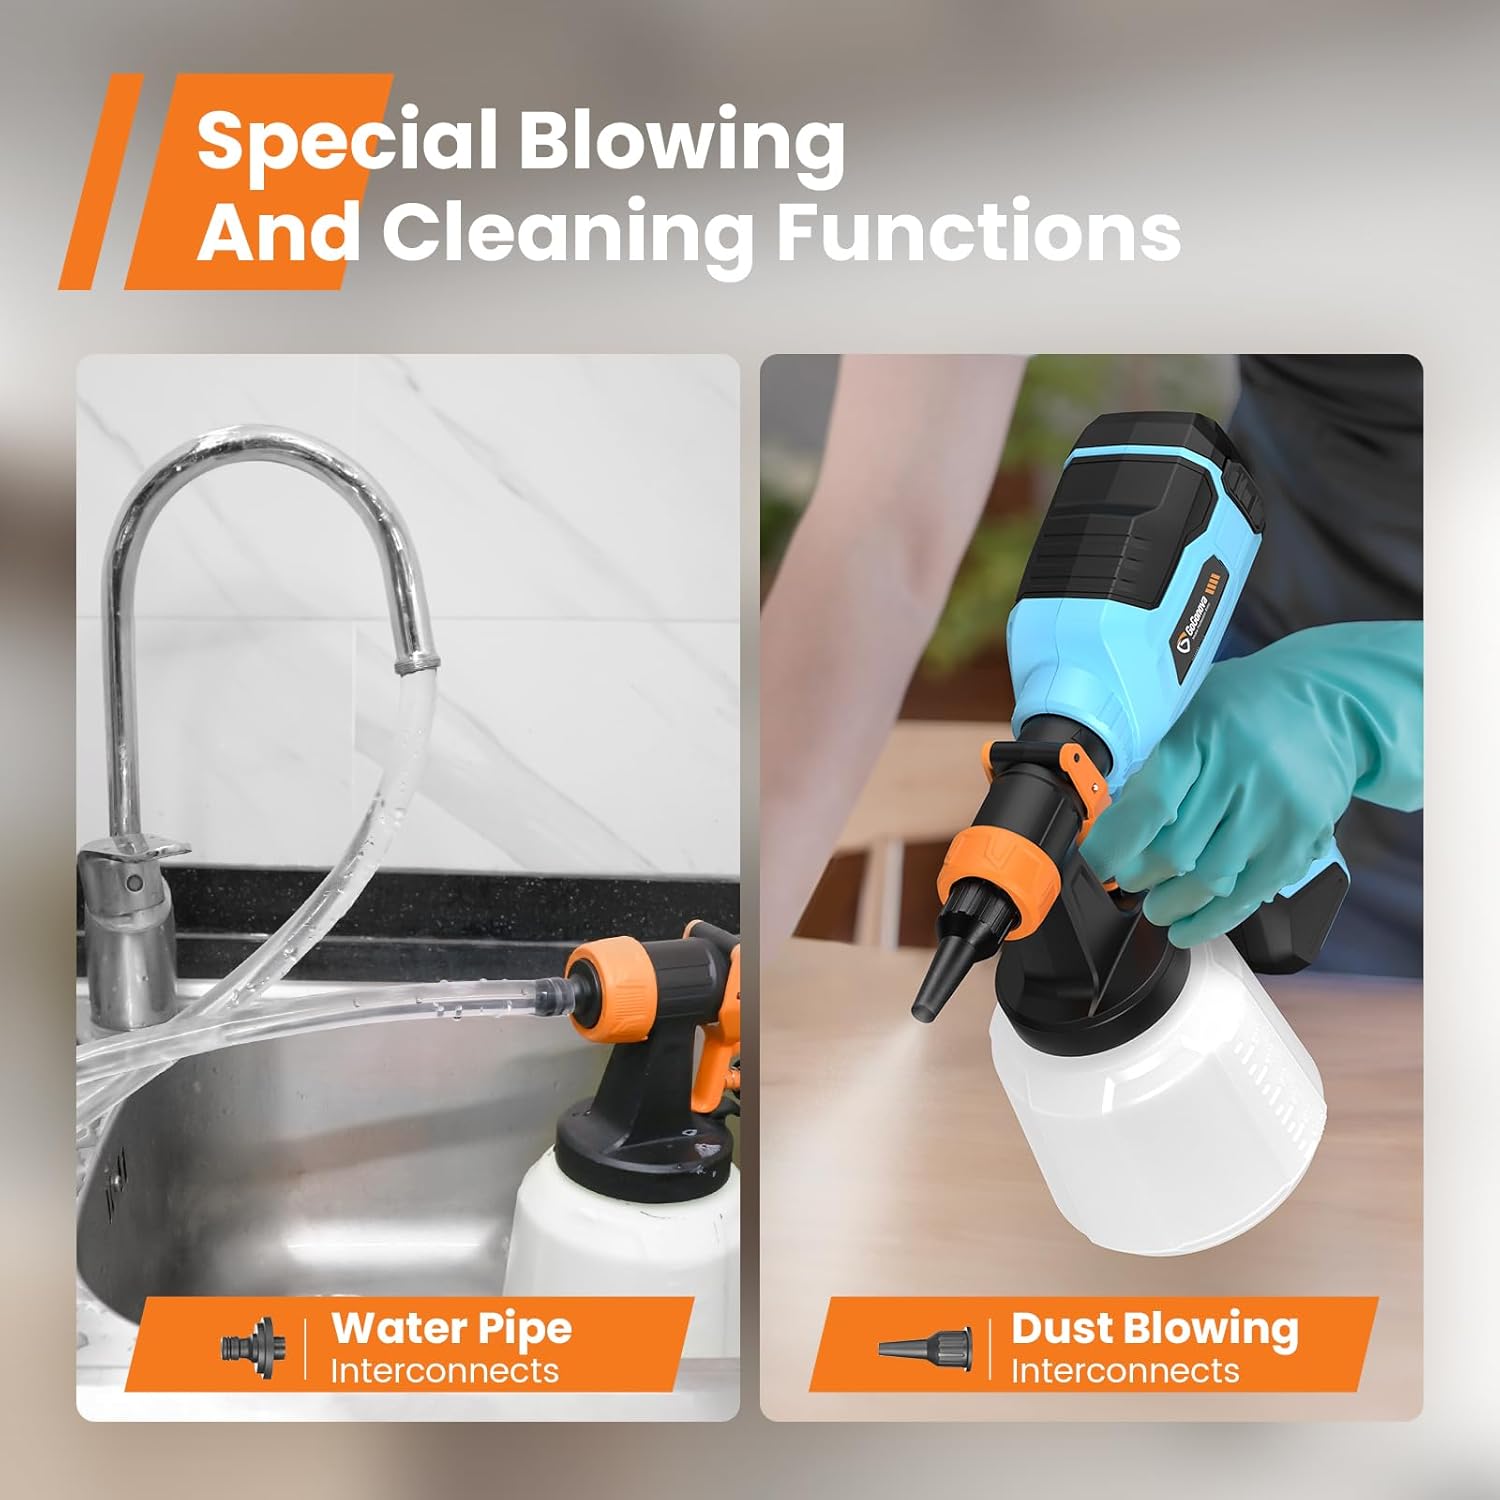
- Blowing Function: Attach the blowing attachment to the sprayer. This function allows you to clean dust and debris from the surface before applying paint, ensuring a smoother finish.
- Cleaning Function (for unit): The cleaning attachment can be connected to a home tap, providing a convenient way to wash the nozzle and container after use.

Special Blowing and Cleaning Functions: Illustrates the water pipe interconnection for cleaning and the dust blowing interconnection for surface preparation.
3. Spraying Technique
- Hold the sprayer perpendicular to the surface, maintaining a consistent distance (typically 6-12 inches) to ensure even coverage.
- Move the sprayer in smooth, even strokes, overlapping each pass by about 50% to avoid streaks.
- Release the trigger at the end of each stroke to prevent paint buildup.
- Apply multiple thin coats rather than one thick coat for a better finish and to prevent drips. Allow adequate drying time between coats.
Maintenance
Regular cleaning and maintenance will extend the life of your paint sprayer and ensure consistent performance.
Cleaning After Use
IMPORTANT: Clean the HVLP paint sprayer immediately after each use to prevent paint from drying and clogging the components.

Prompt Cleaning: Visual steps for cleaning the sprayer components under running water, including the nozzle and container.
- Empty any remaining paint from the container.
- Fill the container with the appropriate cleaning solution (water for water-based paints, mineral spirits or paint thinner for oil-based paints).
- Spray the cleaning solution through the gun until it runs clear.
- Disassemble the spray gun components (nozzle, air cap, container).
- Thoroughly clean all disassembled parts with the cleaning solution and the provided cleaning brush/needle. Pay special attention to the nozzle and air cap to remove any paint residue.
- Rinse all parts with clean water and allow them to dry completely before reassembling or storing.
Filter Maintenance
The sprayer is equipped with a sponge filter to protect the motor. Regularly inspect and clean or replace the filter to maintain optimal performance and prevent motor failure.
Sponge Filter: The internal sponge filter helps reduce dust and dirt from entering the motor, extending the life of the paint gun.
Troubleshooting
This section addresses common issues you might encounter with your paint sprayer.
| Problem | Possible Cause | Solution |
|---|---|---|
| No spray or weak spray |
|
|
| Uneven spray pattern |
|
|
| Paint drips or runs |
|
|
| Motor not running |
|
|
Specifications
| Feature | Detail |
|---|---|
| Brand | GoGonova |
| Model Name | GT26001 |
| Item Model Number | GT26002-AC-EU-A112 |
| Power Source | AC |
| Wattage | 700W |
| Tank Volume | 1400 Milliliters |
| Nozzle Sizes | 1.5mm, 1.8mm, 2.2mm, 2.6mm |
| Spray Patterns | Horizontal, Vertical, Circular |
| Material | Plastic |
| Item Weight | 3.72 pounds |
| Product Dimensions | 5.9"W x 12.2"H |
| Included Components | Cleaning Attachment, Blowing Attachment |
Warranty and Support
For warranty information and customer support, please refer to the documentation included with your purchase or contact GoGonova customer service directly. Contact details are typically provided on the product packaging or the official brand website.
You can also visit the official GoGonova store on Amazon for more information: GoGonova Amazon Store