MAIWO 4 Bay Dock RAID
MAIWO 4 Bay Hard Drive RAID Enclosure User Manual
Model: 4 Bay Dock RAID | Brand: MAIWO
Introduction
This manual provides comprehensive instructions for the installation, operation, and maintenance of your MAIWO 4 Bay Hard Drive RAID Enclosure. Please read this manual thoroughly before using the device to ensure proper functionality and data safety.
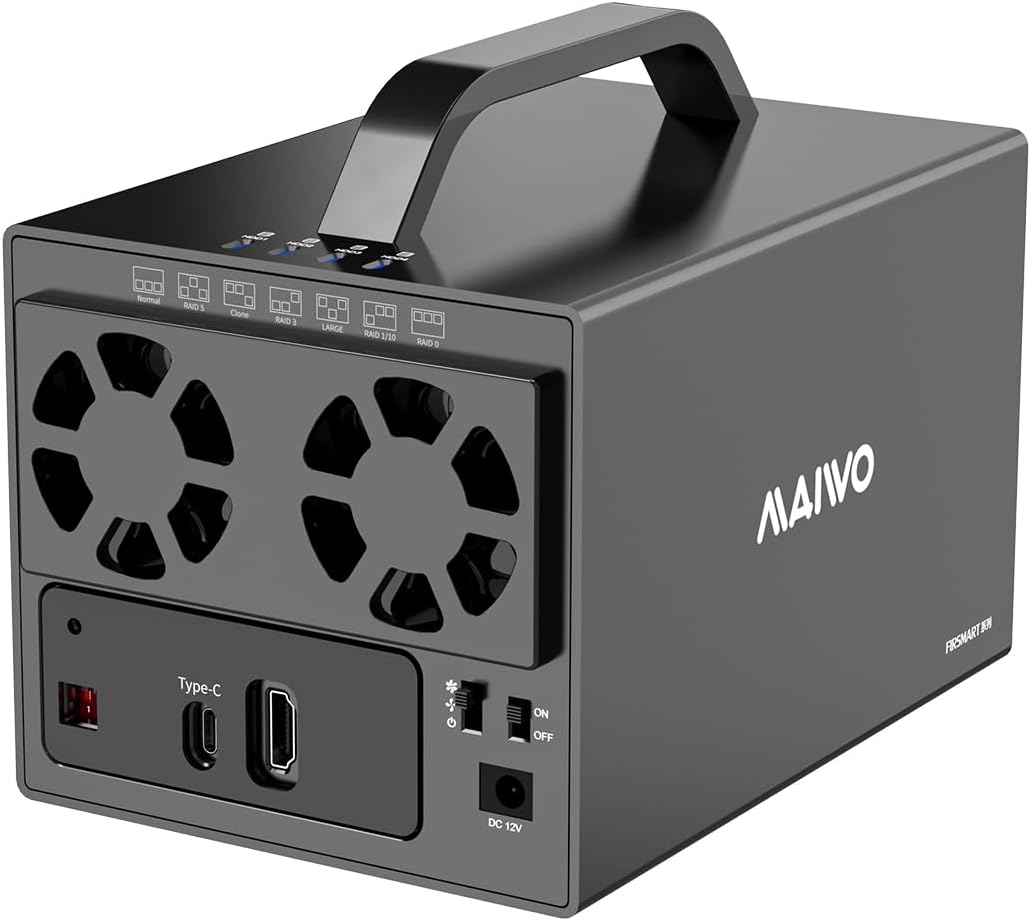
Figure 1: MAIWO 4 Bay Hard Drive RAID Enclosure
Package Contents
Verify that all items are present in the package:
- 1x Hard Drive RAID Enclosure
- USB-C to USB-A Cable
- USB-C to USB-C Cable
- Power Adapter
- Power Adapter Cable
- Screwdriver and Screws
Video 1: Product and Fitting Overview (from 0:00 to 0:05)
This video demonstrates the components included in the MAIWO 4 Bay Hard Drive RAID Enclosure package, such as the enclosure itself, various cables, and the power adapter.
Setup and Installation
1. Hard Drive Installation
- Remove the screws from the enclosure and slide out the middle frame for HDD1/2.
- Insert the 3.5-inch SATA HDD into the middle frame and secure it with screws.
- Repeat for HDD3/4 if applicable.
- Slide the loaded middle frame back into the enclosure.
- Secure the shell and central frame from the bottom with screws.
Video 2: Product Installation (from 0:05 to 1:12)
This video provides a step-by-step guide on how to insert and secure the hard drives into the enclosure, including the use of the provided screwdriver.

Figure 2: Hard Drive Installation Steps
This diagram illustrates the six steps for installing 3.5-inch SATA HDDs into the MAIWO 4 Bay RAID Enclosure, showing how to remove the frame, insert drives, screw them in, and reassemble the unit.
2. Connecting to Your Device
- Connect the appropriate USB-C data cable (USB-C to USB-A or USB-C to USB-C) from the enclosure's Type-C port to your computer or compatible device.
- Connect the power adapter to the DC 12V port on the enclosure and plug it into a power outlet.
- Turn on the power switch on the enclosure.
Operating Instructions
1. Initializing Disks
After connecting the enclosure, you may need to initialize and format the disks for use with your operating system.
- Right-click "This PC" (or "My Computer") and select "Manage".
- In the Computer Management window, navigate to "Disk Management" under "Storage".
- Locate the newly connected disk(s) (often marked as "Unknown" or "Not Initialized"). Right-click the disk and select "Initialize Disk". Choose MBR for disks smaller than 2TB or GPT for disks larger than 2TB.
- After initialization, right-click the unallocated space on the disk and select "New Simple Volume".
- Follow the New Simple Volume Wizard, clicking "Next" through the prompts to assign a drive letter and format the volume (NTFS is recommended for Windows).
- Once formatted, your disk will be ready for use.
Video 3: Initializing Disk (from 1:12 to 1:43)
This video demonstrates the process of initializing and formatting a new disk within Windows Disk Management, including selecting MBR or GPT partition styles and creating a new simple volume.
2. RAID Mode Setting
Important: Changing RAID mode will erase all data on the drives. Please back up your data before proceeding.
The enclosure supports multiple RAID modes: Normal, RAID 0, RAID 1, RAID 3, RAID 5, RAID 10, CLONE, and JBOD. To change the RAID mode:
- Shut off the power to the enclosure using the power switch.
- Use a small tool (like the provided screwdriver) to change the DIP switches on the back of the enclosure to the desired RAID configuration. Refer to the diagram below for switch settings.
- Press and hold the "RESET" button. While holding "RESET", turn the power switch ON.
- Release the "RESET" button when you hear a "Di" sound, indicating successful setting.
- Initialize and partition the disks in Disk Management as described in the "Initializing Disks" section.
Note: Before changing to a different RAID mode, first change the mode to "Normal".

Figure 3: Back Diagram and RAID Mode Switches
This image shows the rear panel of the MAIWO 4 Bay RAID Enclosure, highlighting the Reset button, Type-C port, HDTV port, Fan Switch, Power Switch, DC Power In, and the RAID Mode Switches (DIP switches) with their corresponding labels.

Figure 4: RAID Mode Settings
This diagram illustrates the switch configurations for the 7 supported RAID modes: Normal, RAID 5, Clone, RAID 3, LARGE, RAID 1/10, and RAID 0. It also includes notes on the procedure for setting RAID modes.
Video 4: RAID Mode Setting (from 1:43 to 2:02)
This video demonstrates how to change the RAID mode on the enclosure using the DIP switches and the reset button, emphasizing the data erasure warning.
3. HDTV Screen Expansion
The enclosure features an HDTV port for 4K Ultra HD video output, allowing connection to TVs, computers, and tablets.
- Connect a compatible USB-C to HDTV cable from the enclosure's HDTV port to your display device (e.g., TV, monitor).
- Ensure your device is powered on and the correct input source is selected.
- The screen from your connected device (e.g., smartphone) should now be mirrored or extended to the HDTV.
Video 5: HDTV Screen Expansion (from 2:18 to 2:40)
This video demonstrates how to connect the enclosure to an external display via the HDTV port, showcasing screen mirroring from a mobile device.
Maintenance
Cooling System
The enclosure is equipped with dual ball-bearing fans and honeycomb vents for efficient heat dissipation. The fans are manually controlled.
- To activate the fans, use the fan switch on the back panel.
- The switch has three settings: High, Low, and OFF. Select the appropriate setting based on your cooling needs.

Figure 5: Excellent Cooling System
This image highlights the cooling features of the enclosure, including dual cooling fans, an aluminum alloy shell, and honeycomb holes for improved airflow.
Video 6: 3-Stage Cooling Fan Operation (from 2:02 to 2:17)
This video demonstrates how to operate the 3-stage cooling fan on the MAIWO 4 Bay RAID Enclosure, showing the High, Low, and OFF settings.
Troubleshooting
| Problem | Possible Cause | Solution |
|---|---|---|
| Drives not detected by computer. |
|
|
| Slow data transfer speeds. |
|
|
| Enclosure making loud noises. |
|
|
| HDTV output not working. |
|
|
Specifications
| Feature | Detail |
|---|---|
| Brand | MAIWO |
| Model Number | 4 Bay Dock RAID |
| Material | Aluminum |
| Memory Storage Capacity | 96 TB (Max 24TB per bay) |
| Compatible Devices | MacBook Air, Desktop, Laptop, Notebook, PS5, PS4, Xbox, Smart TV, Router, etc., MacBook Pro |
| Hard Disk Form Factor | 3.5 Inches SATA HDD |
| Data Transfer Rate | 5 Gigabits Per Second (USB 3.1) |
| Hardware Interface | USB 3.1 Type C |
| RAID Modes Supported | RAID 0/1/3/5/10, CLONE, JBOD, NORMAL |
| Video Output | HDTV Port (4K Ultra HD) |
| Cooling System | Dual Cooling Fans with 3-stage switch (High, Low, OFF) |
| Product Dimensions | 7.24 x 5 x 4.53 inches |
| Item Weight | 0.704 ounces |
Warranty and Support
For warranty information or technical support, please refer to the official MAIWO website or contact their customer service directly. You can also find additional resources and FAQs on the MAIWO Store on Amazon.
An official Instructions for Use (IFU) PDF document is also available for download: Download IFU (PDF).
Ask a question about this manual
Ask about setup, troubleshooting, compatibility, parts, safety, or missing instructions. Manuals+ will review the question and use this page’s manual context to help answer it.