Labelife 18482, 18483, 18484 Compatible Label Tapes
Labelife Compatible Label Tape Instruction Manual
Models: 18482, 18483, 18484
Product Overview
This manual provides instructions for the Labelife Compatible Permanent Polyester Label Tapes, designed as replacements for Dymo Rhino industrial label makers. This 12-pack includes three common sizes: 3/8 inch (9mm), 1/2 inch (12mm), and 3/4 inch (19mm), all featuring black text on a white background. These tapes are engineered for durability in harsh industrial environments, offering resistance to water, oil, sun, extreme temperatures, chemicals, fading, abrasion, tearing, and stains. They are suitable for a variety of surfaces including flat, curved, and textured materials.

Image: Overview of the 12-pack Labelife compatible label tapes, showing different widths (3/8, 1/2, 3/4 inch) and their black-on-white appearance.
Setup and Installation
To install the Labelife compatible label tape into your Dymo Rhino label maker, follow these general steps. Always refer to your specific label maker's manual for detailed instructions.
- Open the Label Maker Compartment: Locate and open the tape cartridge compartment on your Dymo Rhino label maker. This is typically on the back or top of the device.
- Insert the Tape Cartridge: Align the Labelife tape cartridge with the guides inside the compartment. Ensure the tape and ribbon are properly seated. The cartridge is designed with fixed holes to ensure correct placement in compatible Dymo Rhino models.
- Close the Compartment: Gently close the tape compartment cover until it clicks into place.
- Check Ribbon Tension (if necessary): If the ribbon appears loose, gently turn the gear on the tape cartridge in the direction indicated (usually clockwise) to tighten the ribbon. This helps prevent printing issues.
- Test Print: Print a short test label to ensure the tape is installed correctly and printing properly.
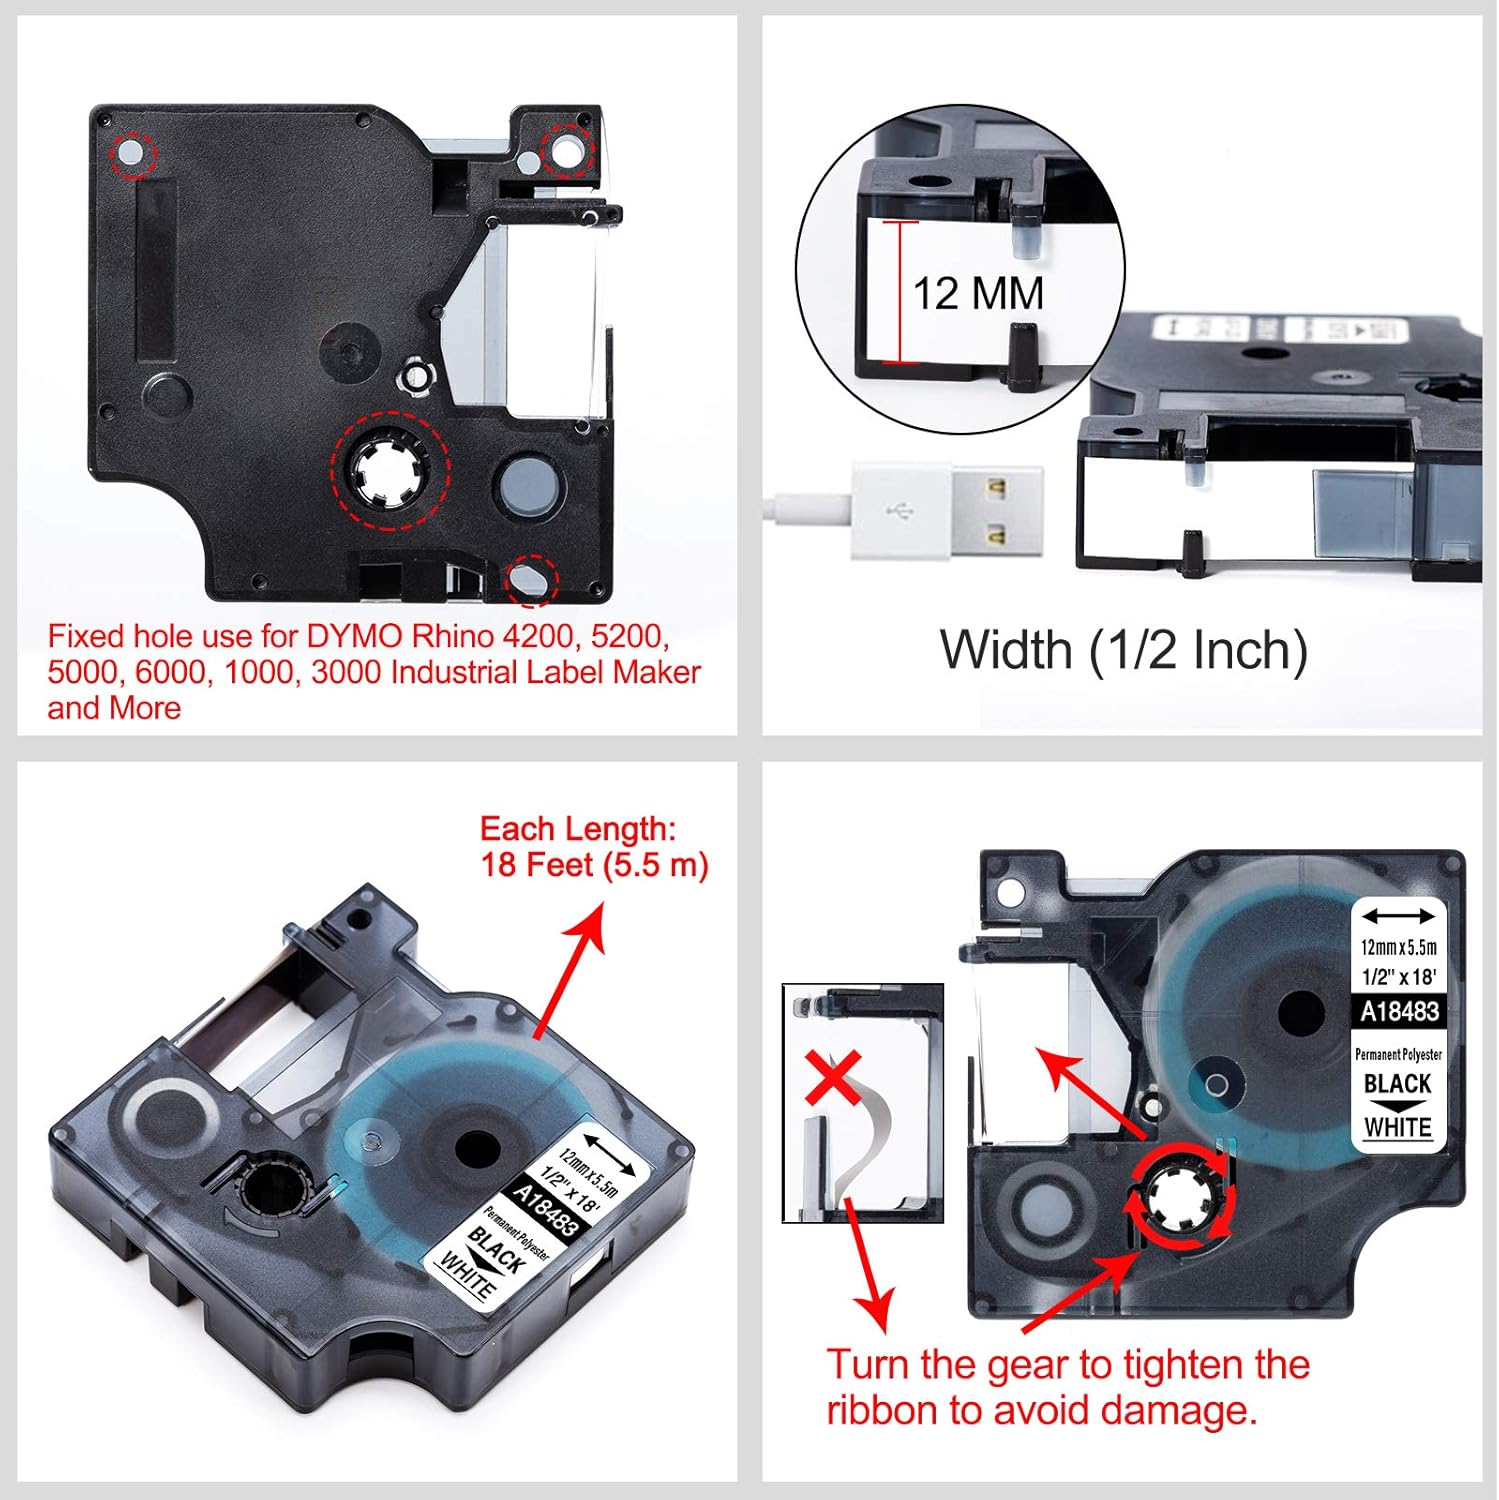
Image: A Labelife tape cartridge being inserted into a Dymo Rhino label maker, illustrating its compatibility with various Rhino models.

Image: Detailed view of a label tape cartridge, highlighting the fixed hole for Dymo Rhino compatibility, the 12mm width, 18 feet length, and an arrow indicating how to turn the gear to tighten the ribbon.
Operating Instructions
Once installed, the Labelife compatible label tapes function identically to original Dymo Rhino tapes. Use your label maker's interface to design and print labels.
- Printing: Follow your label maker's instructions to input text, select fonts, sizes, and any special characters or frames. Initiate the print command.
- Cutting: After printing, use the label maker's built-in cutter to separate the label from the tape roll.
- Peeling the Backing: The Labelife tapes feature a specially designed 2-part peel backing for easy removal. Bend the label slightly along the split line on the back to separate the two halves of the backing, then peel it away.
- Applying Labels: Apply the label to a clean, dry surface. The industrial-strength adhesive ensures strong bonding on various surfaces, including flat, curved, wires, cables, rounded, and textured materials.
- Durability Features: These labels are built to withstand challenging conditions. They are resistant to:
- Water and Oil
- Sun (UV resistance)
- Extreme Temperatures (Heat and Cold)
- Chemicals
- Fading and Abrasion
- Tearing and Stains

Image: Hands demonstrating the "Easy Peel" feature of the label tape, showing how the 2-part backing can be easily separated for application.

Image: Examples of labels applied to a water bottle and a container, highlighting their water and oil resistance, and industrial-strength adhesive for use on flat, curved, wires, cables, rounded, and textured surfaces.

Image: A collage demonstrating the resistance of Labelife tapes to abrasion, fading, extreme temperatures, and various chemicals, with illustrative examples.
Maintenance
Proper storage of your Labelife compatible label tapes will ensure their longevity and optimal performance.
- Storage: Store unused tape cartridges in their original packaging or in a cool, dry place away from direct sunlight and extreme temperatures. This helps preserve the adhesive and tape material.
- Label Maker Care: Regularly clean the print head and tape path of your Dymo Rhino label maker according to its manufacturer's instructions. Dust and debris can affect print quality and tape feeding.
Troubleshooting
If you encounter issues while using your Labelife compatible label tapes, consider the following common solutions:
| Problem | Possible Cause | Solution |
|---|---|---|
| Tape not feeding or jamming | Incorrect cartridge installation; loose ribbon; debris in tape path. | Ensure the cartridge is fully seated. Gently turn the gear on the cartridge to tighten the ribbon (refer to Setup section). Clean the label maker's tape path. |
| Poor print quality (faint, broken lines) | Dirty print head; low battery (for battery-powered label makers); ribbon issue. | Clean the label maker's print head according to its manual. Replace batteries if applicable. Check ribbon tension. |
| Labels not adhering well | Surface is dirty, oily, or wet; extreme temperatures during application. | Ensure the application surface is clean, dry, and smooth. Apply labels at room temperature if possible. Press firmly across the entire label. |
| Label backing difficult to peel | Not utilizing the 2-part backing design. | Gently bend the label along the split line on the back to separate the two halves of the backing, then peel. |
Specifications
- Brand: Labelife
- Product Type: Compatible Permanent Polyester Label Tape
- Color: Black print on White tape
- Sizes Included (12-pack):
- 4 x 3/8 inch (9mm) - Model 18482
- 4 x 1/2 inch (12mm) - Model 18483
- 4 x 3/4 inch (19mm) - Model 18484
- Length per Roll: 18 feet (5.5 meters)
- Material: Permanent Polyester
- Compatibility: Dymo Rhino 5200, 4200, 3000, 1000, 5000, 6000 Rhinopro label printers; Dymo ILP 219, 3M-PL150, 3M-PL200, 3M-PL300, Dymo LabelWriter 450 Duo.
- Key Features: Industrial-strength adhesive, 2-part easy peel backing, waterproof, oil resistant, sun resistant, heat/cold extreme temperatures resistant, chemical resistant, fade resistant, abrasion resistant, tear resistant, stain resistant.
Warranty and Support
Labelife is committed to providing quality products. While specific warranty details are not provided in this manual, customers typically have a 30-day return policy for products purchased through Amazon. For any product inquiries, technical support, or assistance with your Labelife compatible label tapes, please contact Labelife directly through the seller contact options on the platform where you purchased the product.
You can often find seller contact information by navigating to your order history and selecting the option to contact the seller for the specific item.
Ask a question about this manual
Ask about setup, troubleshooting, compatibility, parts, safety, or missing instructions. Manuals+ will review the question and use this page’s manual context to help answer it.