1. Important Safety Instructions
Please read these instructions carefully before using the appliance and retain them for future reference. Incorrect use may result in injury or damage to the appliance.
- Electrical Safety: Ensure the appliance is properly earthed. Do not operate if the power cord or plug is damaged.
- Microwave Energy: Do not attempt to operate this oven with the door open or if the door seals are damaged. Do not place metal containers or objects in the microwave mode.
- Superheated Liquids: Liquids heated in the microwave can boil over unexpectedly. Use caution when removing containers.
- Children Safety: This appliance can be used by children aged 8 years and above and persons with reduced physical, sensory or mental capabilities if they have been given supervision or instruction.
- Cleaning: Regularly clean the appliance to prevent food residue buildup, which can affect performance and safety.
2. Product Overview
The Balay 3CG4172X2 is a 20-liter electronic built-in microwave oven with an integrated grill function, designed for convenient cooking, heating, and defrosting.

Figure 2.1: Front view of the Balay 3CG4172X2 built-in microwave, featuring a black glass door and an electronic control panel on the right.
2.1. Components
- Oven Cavity: 20-liter capacity for various cooking needs.
- Turntable: 25.5 cm diameter glass turntable for even heating.
- Grill Rack: For use with the grill function.
- Electronic Control Panel: Features a digital display and touch controls, including a slider for easy adjustments.
- Door: Left-side opening for convenient access.
2.2. Control Panel

Figure 2.2: Close-up of the electronic control panel, showing the digital display, power level indicators (90W, 180W, 360W, 600W, 800W), function icons, and the slider control.
The control panel allows selection of microwave power levels, grill function, automatic programs, and setting the electronic clock and timer. The slider control provides intuitive adjustment of time and settings.
3. Installation
This appliance is designed for built-in installation without a frame. Ensure adequate ventilation and follow the dimensions provided for cabinet integration.
3.1. Cabinet Dimensions
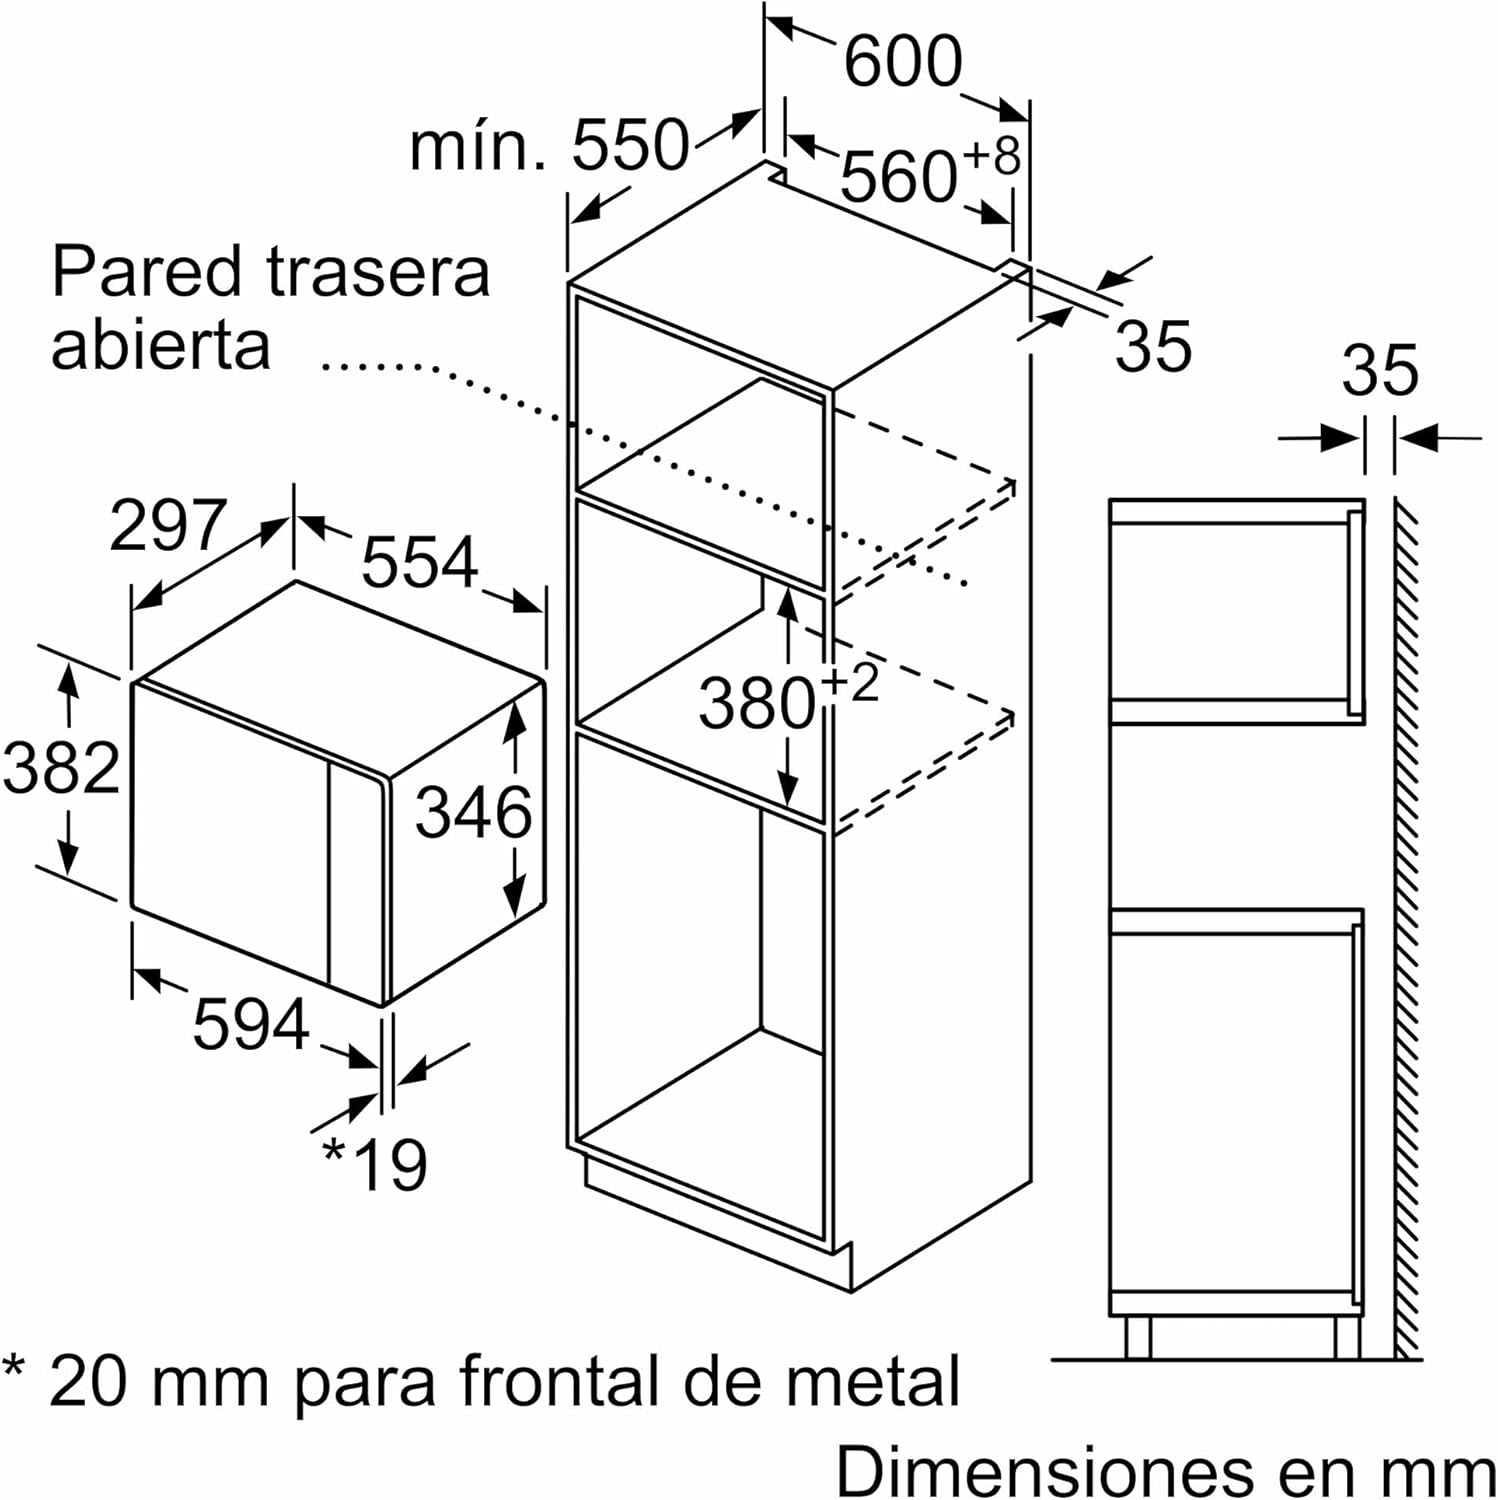
Figure 3.1: Cabinet dimensions for built-in installation. The microwave requires a niche of approximately 380-382 mm height, 560-568 mm width, and a minimum depth of 550 mm.

Figure 3.2: Another view of the cabinet dimensions, indicating the appliance's external dimensions (382mm height, 594mm width, 346mm depth) and required clearances.
3.2. Corner Installation
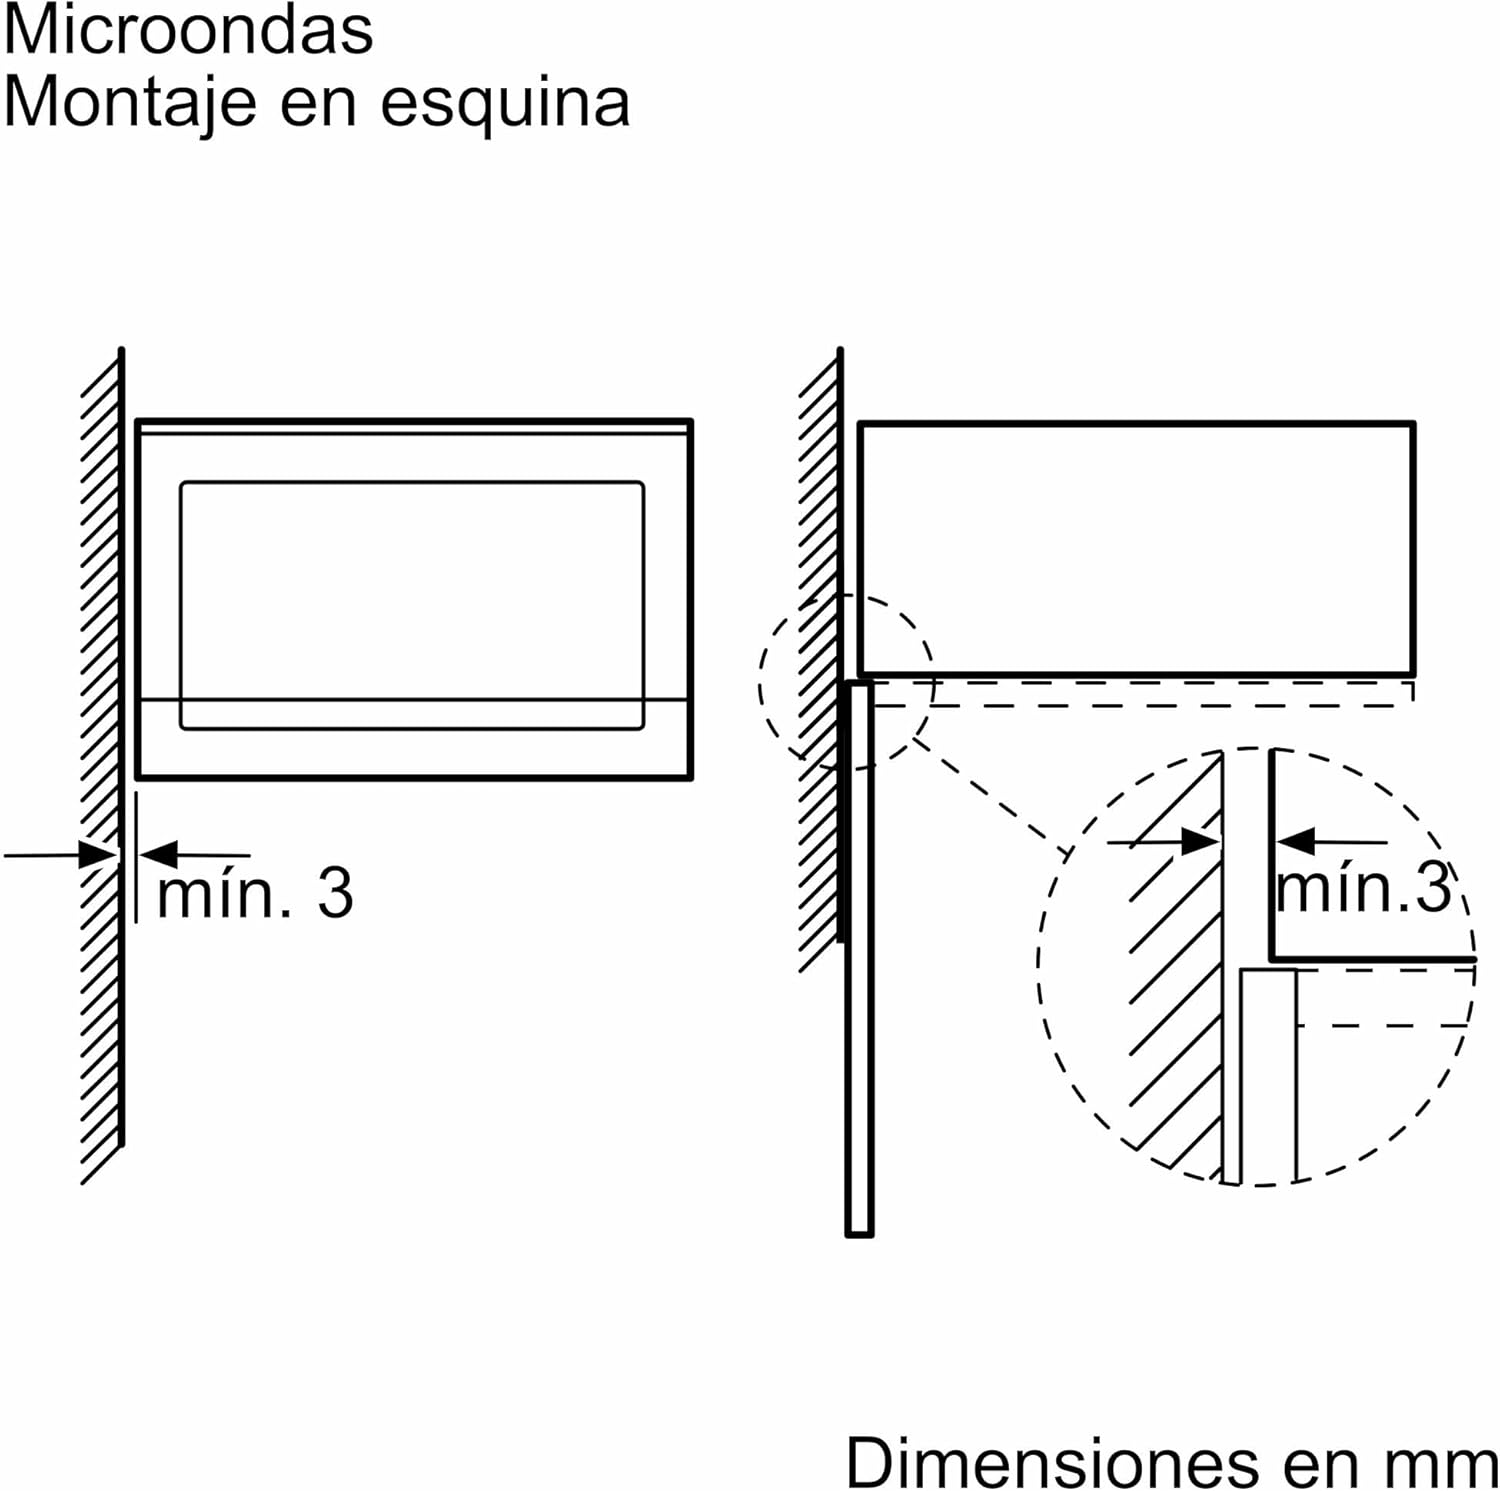
Figure 3.3: For corner installations, ensure a minimum clearance of 3 mm from adjacent walls or cabinets to allow proper door opening and ventilation.
Important: Installation should be performed by a qualified technician. Ensure the appliance is disconnected from the power supply during installation. Do not obstruct ventilation openings.
4. First Use
4.1. Initial Cleaning
Before first use, clean the interior of the microwave oven with a damp cloth and mild detergent. Dry thoroughly.
4.2. Setting the Clock
- Connect the appliance to the power supply. The display will show '0:00' or flash.
- Use the slider control or dedicated buttons to set the current time.
- Confirm the setting by pressing the clock button or waiting a few seconds.
5. Operating Instructions
5.1. Basic Microwave Functions
To heat or cook with microwave power:
- Place food in a microwave-safe container on the turntable.
- Close the oven door.
- Select the desired microwave power level (e.g., 800W for high power).
- Use the slider control to set the cooking time.
- Press the Start button to begin cooking.
5.2. Grill Function
The grill function is ideal for browning and crisping food.
- Place food on the grill rack, which should be placed on the turntable.
- Close the oven door.
- Select the grill function.
- Set the desired grilling time using the slider control.
- Press the Start button.

Figure 5.1: The microwave interior showing the grill rack positioned on the turntable, ready for use with the grill function.
5.3. Automatic Programs
The appliance features automatic cooking and defrosting programs by weight, simplifying meal preparation.
- Place the food in the oven.
- Select the desired automatic program (e.g., for cooking or defrosting).
- Enter the weight of the food as prompted by the display.
- Press Start. The oven will automatically calculate the cooking time and power level.
5.4. Electronic Clock with Start/Stop Programming
The electronic clock allows you to program the start and stop times for cooking, enabling you to prepare meals in advance.
- Set the desired cooking function and duration.
- Access the programming menu (refer to the full manual for specific button sequence).
- Set the desired start and/or end time for the cooking process.
- Confirm the settings. The oven will start or stop automatically at the programmed time.
6. Maintenance and Cleaning
Regular cleaning ensures optimal performance and extends the lifespan of your microwave oven.
6.1. General Cleaning
- Always disconnect the appliance from the power supply before cleaning.
- Clean the interior and exterior surfaces with a soft cloth and mild detergent. Avoid abrasive cleaners or scouring pads.
- Remove and clean the turntable and turntable support regularly. These parts are usually dishwasher safe.
- Wipe the door seals and surrounding areas to remove any food splashes.
6.2. Aqualisis Cleaning Assistant
The Aqualisis cleaning assistant uses water vapor to soften food residues, making cleaning easier and more ecological.

Figure 6.1: The microwave interior highlighting the Aqualisis cleaning process, where water is used to generate steam and loosen food residues.
- Pour approximately 400 ml of water and a drop of dish soap into the bottom of the oven cavity.
- Select the Aqualisis function (refer to the control panel for the specific icon).
- Run the program. The water will evaporate, softening baked-on food.
- Once the program finishes and the oven cools, wipe the interior with a soft cloth.
7. Troubleshooting
If you encounter issues with your appliance, consult the following table before contacting customer service.
| Problem | Possible Cause | Solution |
|---|---|---|
| Appliance does not start | No power supply; Door not closed properly; Program not set. | Check power connection; Close door firmly; Set a program and press Start. |
| Food not heating evenly | Incorrect power level or time; Food not stirred/rotated; Turntable not rotating. | Adjust power/time; Stir/rotate food during cooking; Check turntable placement. |
| Excessive noise during operation | Turntable not correctly placed; Foreign object in cavity. | Reposition turntable; Remove any obstructions. |
| Oven light not working | Bulb faulty. | Contact customer service for bulb replacement. |
8. Technical Specifications
| Feature | Specification |
|---|---|
| Brand | Balay |
| Model Number | 3CG4172X2 |
| Capacity | 20 Liters |
| Microwave Power | 700 Watts |
| Installation Type | Built-in |
| Product Dimensions (H x W x D) | 38.2 x 59.4 x 31.7 cm |
| Weight | 16.2 kg |
| Material | Stainless Steel |
| Special Features | Automatic Cooking, Grill Function, Aqualisis Cleaning, Electronic Clock |
| Country of Origin | Spain |
9. Warranty and Customer Support
This Balay appliance comes with a standard manufacturer's warranty. For detailed information regarding warranty terms and conditions, please refer to the warranty card included with your product or visit the official Balay website.
For technical assistance, spare parts, or to schedule a service appointment, please contact Balay Customer Service. Have your appliance model number (3CG4172X2) and serial number ready when contacting support.
Balay Official Website: www.balay.es


