1. Introduction
This manual provides detailed instructions for the installation, operation, and maintenance of your Lpteso RGBW LED Light Bar and accompanying RGB LED Pods. Please read this manual thoroughly before installation and use to ensure proper function and safety.
The Lpteso lighting system includes a 42-inch RGBW LED light bar and two 4-inch RGB LED pods, designed for off-road and auxiliary lighting applications. It features multiple color options, chasing halo rings, and various flashing modes, controllable via an app or remote.
2. Product Overview
Key Features:
- RGBW LED Technology: Combines RGB (Red, Green, Blue) with White light for a wide spectrum of colors and pure white illumination.
- Chasing RGB Halo Ring: Dynamic lighting effects with 16 solid colors and over 92 strobe flashing modes.
- App and Remote Control: Seamless control of lighting modes, colors, and music synchronization via a dedicated mobile application or included RF remote controller.
- High Performance: IP67 waterproof, dustproof, and shockproof design with a durable die-cast aluminum housing and stainless steel bracket.
- Adjustable Mounting: Brackets allow for approximately 45° adjustment for optimal light positioning.
- Wide Application: Suitable for 10-30V DC systems, including 4x4, off-road vehicles, trucks, SUVs, ATVs, UTVs, and boats.
Package Contents:
- 1 x 42-inch 240W RGB LED Light Bar
- 2 x 4-inch 18W RGB LED Pods Flood Fog Lights
- 1 x Control Box with Rocker Switch and Wiring Harness
- Necessary Mounting Brackets
- 1 x RF Remote Controller
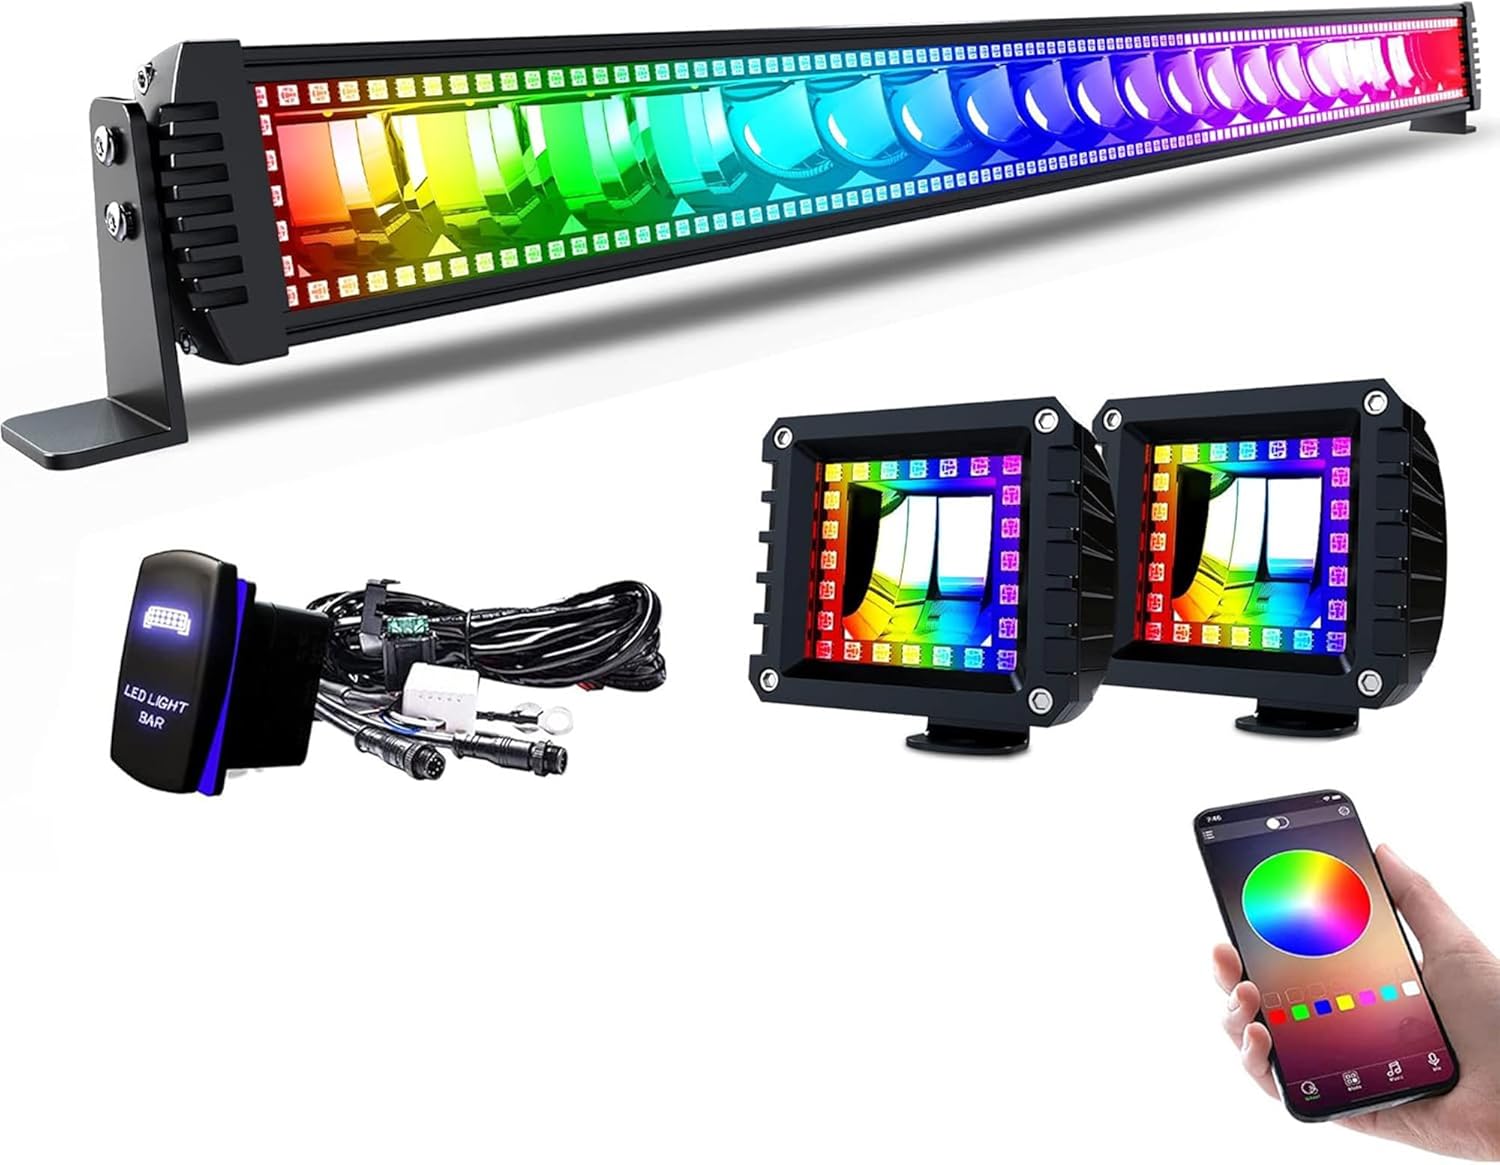
Image 2.1: Contents of the Lpteso RGBW LED Light Bar and Pods kit, including the 42-inch light bar, two 4-inch pods, wiring harness with rocker switch, and remote control.
3. Specifications
| Product Dimensions | 42.72"L x 7.7"W x 4.2"H |
| Light Bar Length | 42 inches |
| LED Pods Size | 4 inches |
| Power (Light Bar) | 240W |
| Power (LED Pods) | 18W each |
| Voltage | 10-30V DC (12V, 24V compatible) |
| Brightness | 240 Lumens (total output) |
| Color | RGB (Red, Green, Blue) + White |
| Material | Die-cast Aluminum Housing, Stainless Steel Bracket |
| Finish Type | Brushed |
| Waterproof Rating | IP67 |
| Bulb Features | Flashing, LED, Remote Control, RGB LED, RGBW |
| Item Weight | 8.98 pounds |
| UPC | 750266970554 |

Image 3.1: Detailed dimensions of the 42-inch Lpteso RGBW LED Light Bar, showing its length, height, and depth.

Image 3.2: Detailed dimensions of the 4-inch Lpteso RGB LED Pods, showing their square shape and depth.
4. Safety Information
- Always disconnect power before installation or maintenance.
- Ensure all wiring connections are secure and properly insulated to prevent short circuits.
- Do not look directly into the light when it is operating, as it can cause eye strain or damage.
- Mount the light bar and pods securely to prevent vibration or detachment during vehicle operation.
- Verify that the operating voltage of your vehicle matches the product specifications (10-30V DC).
- Avoid exposing the control box and wiring connections to excessive moisture or direct water spray, despite the IP67 rating of the lights themselves.
- If condensation is observed inside the light housing, it is recommended to seal the edges with clear caulk to prevent further moisture ingress and potential damage.
5. Installation
General Steps:
- Plan Mounting Location: Determine the desired mounting position for the light bar and pods on your vehicle. Ensure the location provides adequate clearance and does not obstruct vehicle functions or visibility.
- Secure Brackets: Attach the adjustable mounting brackets to the light bar and pods using the provided hardware. The brackets can be adjusted to approximately 45 degrees for optimal beam angle.
- Mount Lights: Securely fasten the light bar and pods to your vehicle using the mounted brackets. Ensure all bolts are tightened to prevent movement.
- Wiring: Refer to the wiring diagram in Section 6 for proper electrical connections. Connect the light bar and pods to the control box and then to your vehicle's 12V or 24V power source.
- Test Functionality: Once all connections are made, test the lights using the rocker switch, remote control, and mobile app to ensure all functions operate correctly.

Image 5.1: Illustration of the light bar's heat sink design and adjustable mounting brackets, highlighting ease of installation.

Image 5.2: Close-up view of the adjustable bracket, demonstrating its rotational capability for precise light positioning.
6. Wiring Diagram
The following diagram illustrates the correct wiring connections for the Lpteso RGBW LED Light Bar and Pods system. Ensure all connections are made securely and follow local electrical codes.

Image 6.1: Wiring diagram showing connections from the +12V and -12V power sources, through a fuse, to the control box (labeled WIFI Controller waterproof), and then to the light bar and two pods. The diagram also shows the rocker switch connected to the control box.
- Connect the positive (+12V) and negative (-12V) wires from your vehicle's power source to the main wiring harness.
- Ensure the fuse is properly installed in the positive line for circuit protection.
- Connect the main harness to the waterproof control box.
- Connect the rocker switch to the designated port on the control box.
- Connect the light bar and the two LED pods to their respective output ports on the control box.
7. Operation
The Lpteso RGBW LED Light Bar and Pods can be controlled via the included RF remote controller or a dedicated mobile application.
Remote Control Operation:
- Initial Pairing: Before using the remote control, press and hold the 'ON' button on the remote until the power is turned on. This pairs the remote with the control box.
- Use the buttons on the remote to select from 16 solid colors, adjust brightness, choose from over 92 strobe flashing modes, and activate music synchronization.
Mobile App Control:
- Download App: Scan the QR code provided below or search for "BLEDIM2" in the App Store (iOS 7.0 and above) or Google Play Store (Android 4.3 and above).
- Connect via Bluetooth/WiFi: Once the app is installed, open it and follow the on-screen instructions to connect to your Lpteso lighting system. The system uses WiFi for control.
- Control Functions: The app allows for comprehensive control, including color selection (16 million colors), music mode, voice responsive features, and customization of chasing and flashing modes.

Image 7.1: QR code for downloading the BLEDIM2 mobile application. Scan this code to access the app on your smartphone.
Direct link to app: http://qr07.cn/A9M4xq

Image 7.2: Example of the mobile app interface controlling the RGB lighting on vehicles, demonstrating multicolor choice, WiFi control, music sync, and voice responsiveness.

Image 7.3: A collage of different RGB lighting modes and solid colors achievable with the Lpteso light bar, showcasing its versatility.
8. Maintenance
- Regular Cleaning: Clean the light bar and pods periodically with a soft cloth and mild soap to remove dirt and debris. Avoid abrasive cleaners that could damage the lens or finish.
- Inspect Wiring: Regularly check all wiring connections for signs of wear, corrosion, or loose connections. Ensure insulation is intact.
- Moisture Check: Periodically inspect the light bar and pods for any signs of moisture ingress or condensation. If detected, consider applying a clear silicone sealant around the seams to enhance waterproofing.
- Bracket Tightness: Verify that mounting brackets remain tight and secure to prevent vibration-induced damage or detachment.

Image 8.1: The light bar partially submerged in water, illustrating its IP67 waterproof capability. Regular checks are still recommended to maintain integrity.
9. Troubleshooting
- Lights Not Turning On:
- Check all power connections and ensure they are secure.
- Verify the fuse in the wiring harness is not blown.
- Ensure the remote control is properly paired by holding the 'ON' button until power is supplied.
- Confirm the vehicle's battery has sufficient charge.
- Inconsistent Color/Mode Operation:
- Ensure the mobile app or remote control is within effective range and has a clear line of sight to the control box.
- Check for any interference from other electronic devices.
- If using the app, ensure your device's Bluetooth/WiFi is enabled and connected to the light system.
- Condensation Inside Light Housing:
- While the product is IP67 rated, extreme temperature changes can sometimes cause condensation.
- If persistent, it is recommended to apply a clear silicone sealant around the edges of the light bar and pods to reinforce the seal.
- Partial Light Failure:
- Inspect for any visible damage to the light bar or pods.
- Check individual wiring connections to the affected sections.
- If the issue persists, contact customer support for further assistance.
10. Warranty and Support
Lpteso provides a 1-year warranty for this product, covering manufacturing defects and malfunctions under normal use. For warranty claims or technical support, please contact Lpteso customer service directly.
Please retain your proof of purchase for warranty validation.


