1. Introduction
The PowMr 60Amp MPPT Solar Charge Controller is an advanced maximum power point tracking (MPPT) charge controller for off-grid photovoltaic (PV) systems. It is designed to ensure the maximum power point of the solar panels is tracked efficiently, maximizing energy harvest. This controller is compatible with 12V, 24V, 36V, and 48V DC system voltages and supports various battery types including sealed lead-acid, flooded, gel, and lithium batteries.
Key Features:
- Excellent Heat Dissipation: Die-cast aluminum design ensures good heat dissipation performance, reduces noise, and saves energy.
- High Efficiency: Innovative MPPT technology with tracking efficiency up to 99% and peak conversion efficiency of 98%.
- Upgraded Design: 0-layer design for easy installation and setup.
- Multifunctional Backlight LCD Display: Displays system operation information, customizable parameters, and error codes.
- Multiple Battery Adaptation: Automatically detects 12V, 24V, 36V, or 48V DC system voltages and is compatible with sealed lead-acid, flooded, gel, or lithium batteries (must be deep cycle).
- 4-Stage Safe Charging: Features Bulk Charge, Boost Charge, Float Charge, and Equalization for rapid, efficient, and safe battery charging.
- Full System Protection: Customizable charging voltages, overcharging, over-discharging, PV array short circuit, PV overcurrent, load overload, load short circuit, PV reverse polarity, battery reverse polarity, and over-temperature protection.

Figure 1: Front view of the PowMr 60Amp MPPT Solar Charge Controller.
2. Safety Information
Please read all instructions and warnings in this manual carefully before installation and operation. Failure to follow these instructions may result in electric shock, fire, or severe injury. Keep this manual for future reference.
- Installation must be performed by qualified personnel.
- Ensure all wiring is correctly sized and properly insulated.
- Disconnect all power sources (solar panels and battery) before installing or servicing the controller.
- Do not disassemble or attempt to repair the controller. Contact customer support for assistance.
- Install the controller in a well-ventilated area, away from flammable materials and direct sunlight.
- Ensure proper grounding of the system.
3. Setup and Installation
Follow these steps for proper installation of your MPPT solar charge controller. Always connect the battery first, then the solar panels, and finally the load.
3.1 Connection Order
- Connect the Battery: Connect the battery to the controller's battery terminals. Ensure correct polarity (+ to + and - to -). The controller will automatically detect the battery voltage.
- Connect the Solar Panels: Connect the solar panels to the controller's PV input terminals. Ensure correct polarity.
- Connect the DC Load (Optional): Connect your DC loads to the controller's load terminals.

Figure 2: Typical system connection diagram for the solar charge controller, showing connections to solar panels, battery bank, inverter, and DC/AC loads.

Figure 3: Detailed view of the controller's terminals for easy and secure connections.
3.2 Mounting
Mount the controller vertically on a solid surface, ensuring adequate air circulation around the unit for optimal heat dissipation. Avoid mounting in direct sunlight or in areas with high humidity.
4. Operating Instructions
The PowMr MPPT Solar Charge Controller features a backlight LCD display and four buttons for easy operation and parameter setting.
4.1 LCD Display and Buttons
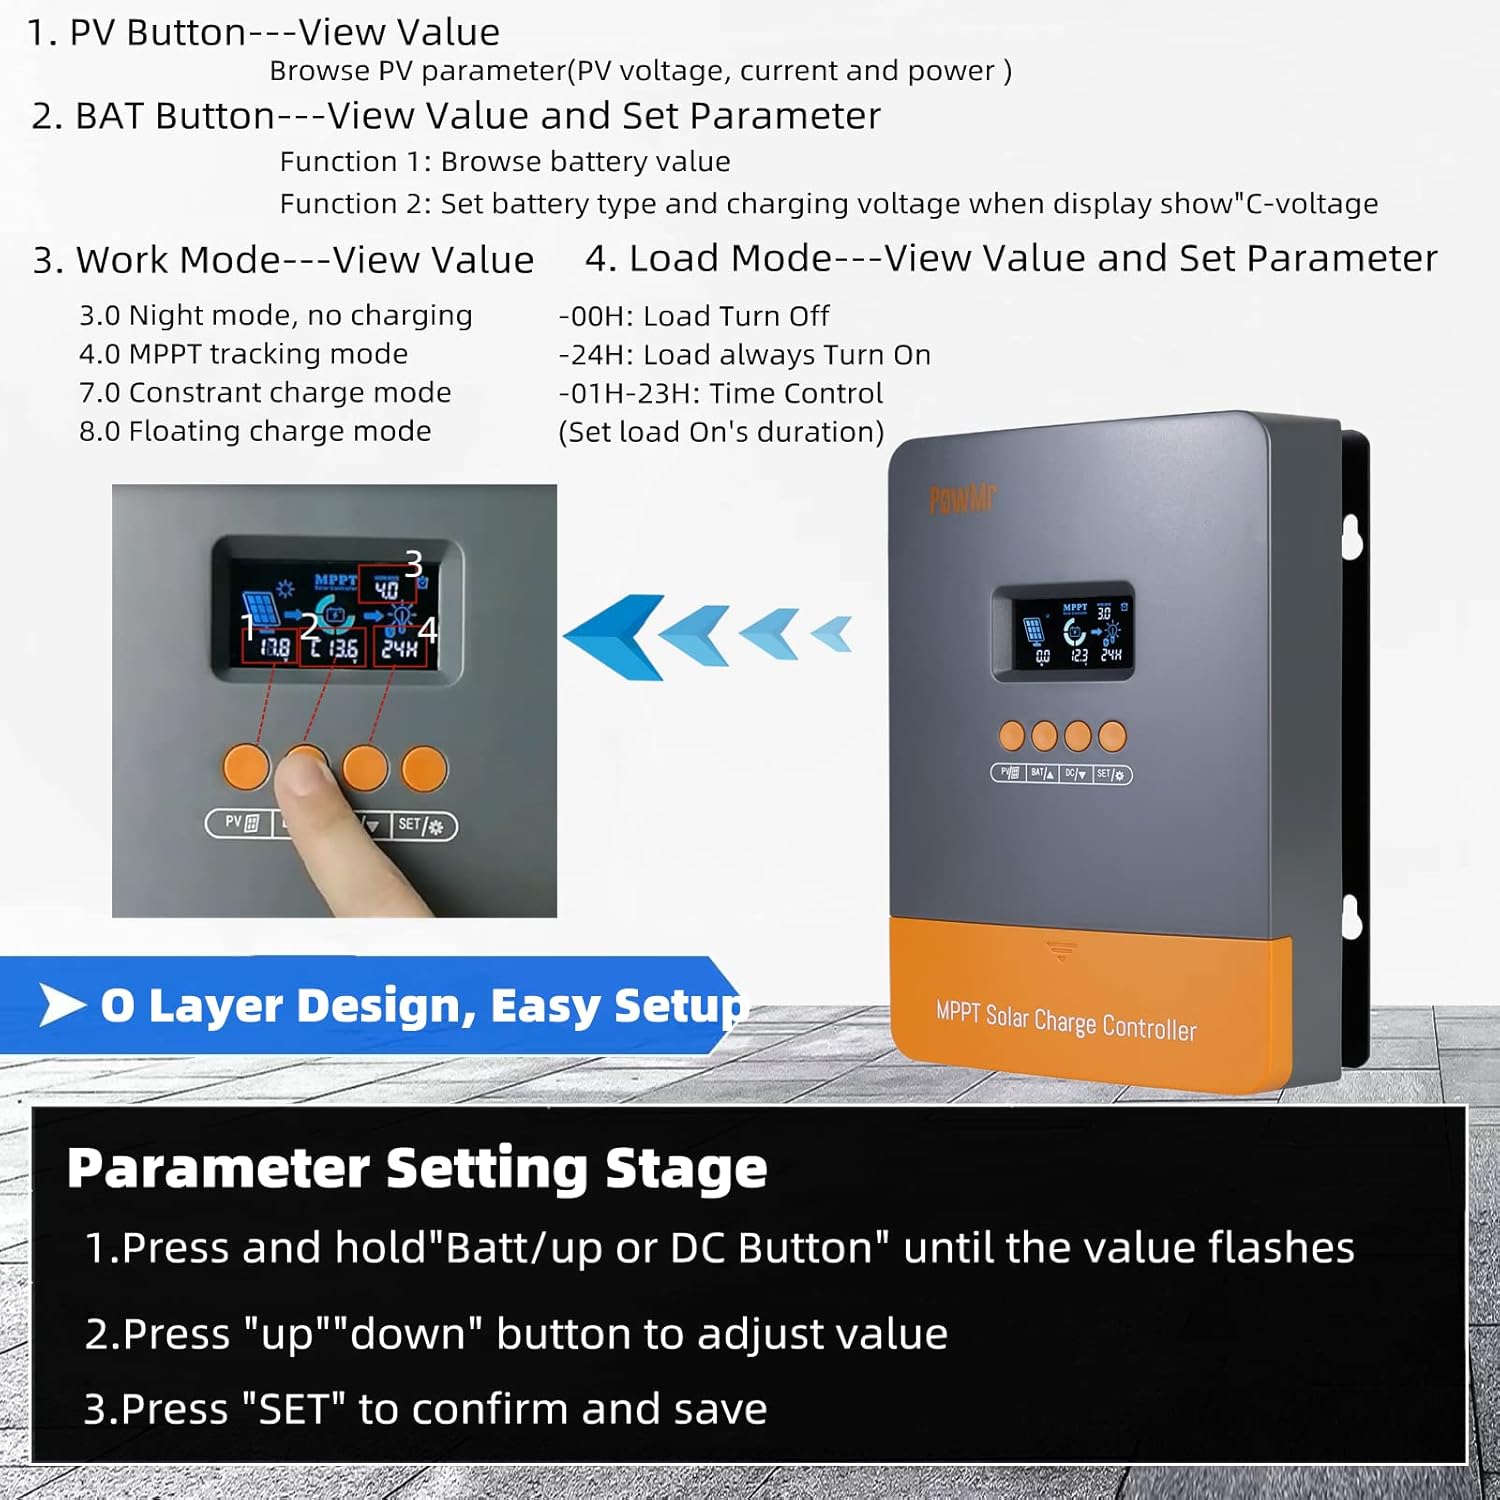
Figure 4: Overview of the LCD display and button functions for viewing values and setting parameters.
- PV Button: View PV voltage, current, and power.
- BAT Button: View battery value and set parameters (e.g., battery type).
- DC/DOWN Button: View value and load mode setting.
- SET Button: Save and reset parameters.
4.2 Parameter Setting
To adjust parameters, follow these steps:
- Press and hold the 'Batt/up' or 'DC' button until the value flashes.
- Press the 'UP' or 'DOWN' button to adjust the value.
- Press 'SET' to confirm and save the new setting.

Figure 5: Visual guide for setting parameters on the LCD display.
4.3 Work Modes and Load Modes
The controller supports various work modes and load modes to suit different application needs.

Figure 6: Explanation of different work modes (Night mode, MPPT tracking, Constant charge, Floating charge) and load modes (Load Turn Off, Load always Turn On, Time Control).
4.4 Battery Charging Stages
The controller employs a 4-stage charging algorithm to optimize battery life and performance.
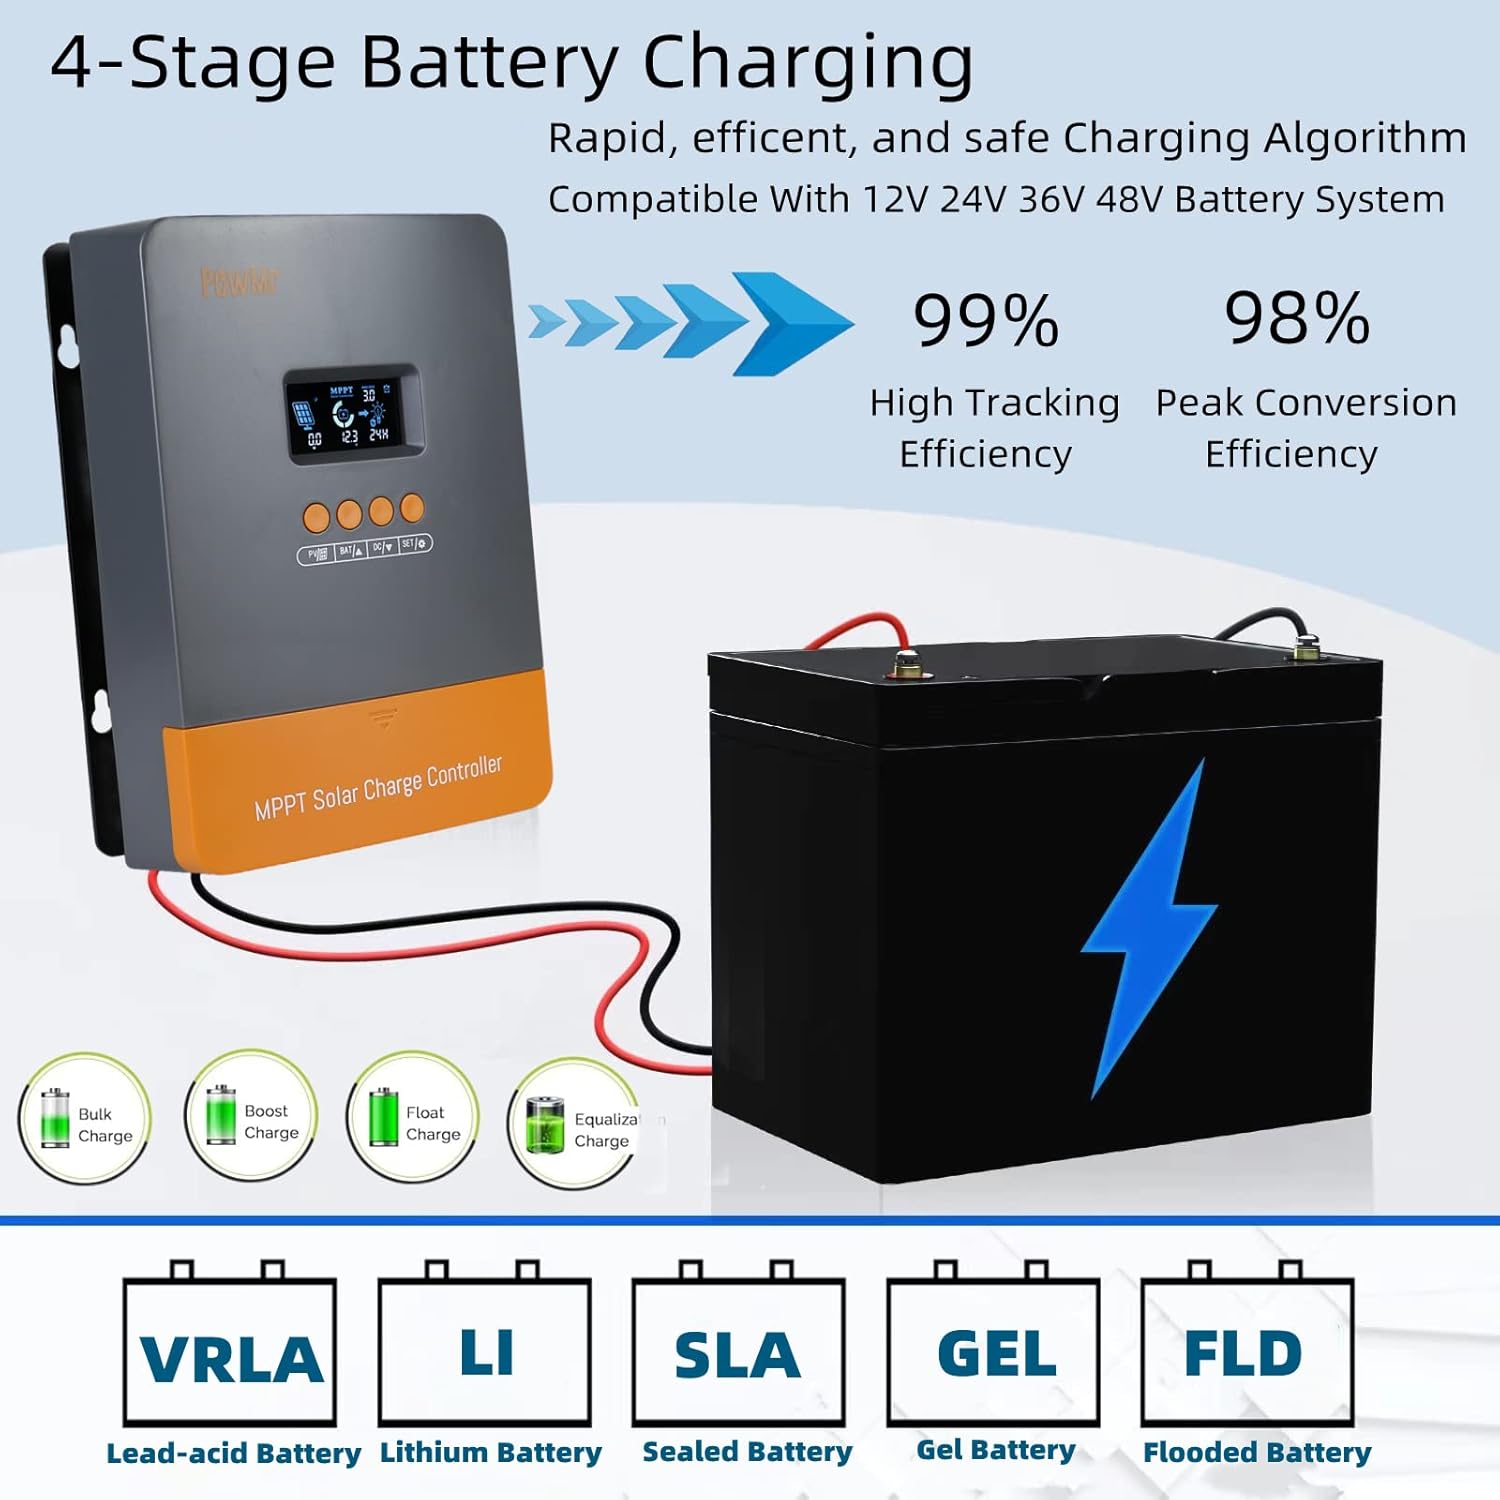
Figure 7: Illustration of the 4-stage battery charging process: Bulk Charge, Boost Charge, Float Charge, and Equalization.
4.5 Product Overview Video
Video 1: An overview of the Upgraded PowMr 60A Solar Charge Controller, demonstrating its features and basic operation.
5. Maintenance
Regular maintenance ensures the longevity and optimal performance of your solar charge controller.
- Cleaning: Periodically clean the exterior of the controller with a dry cloth. Do not use liquid cleaners or solvents.
- Connections: Check all wire connections regularly to ensure they are tight and free from corrosion. Loose connections can cause overheating and damage.
- Ventilation: Ensure the ventilation openings are clear of dust and debris to maintain proper heat dissipation.
- System Monitoring: Regularly monitor the LCD display for any error codes or unusual readings.
6. Troubleshooting
This section provides solutions to common issues you might encounter. For more complex problems, please contact customer support.
| Problem | Possible Cause | Solution |
|---|---|---|
| Controller not turning on | Battery not connected or low voltage; reversed polarity | Ensure battery is connected correctly and has sufficient charge. Check polarity. |
| No charging current from PV | PV panels not connected; insufficient sunlight; PV reversed polarity | Check PV connections and polarity. Ensure panels are receiving adequate sunlight. |
| Load not working | Load disconnected; overload; short circuit; low battery voltage | Check load connections. Reduce load. Check for short circuits. Charge battery. |
| Error code displayed | Specific system fault (e.g., over-voltage, over-current) | Refer to the controller's LCD display for the specific error code and consult the manual's error code section (if available) or contact support. |

Figure 8: The controller includes multiple protection features such as overcharging, PV overcurrent, load overload, and reverse polarity protection.
7. Specifications
| Feature | Specification |
|---|---|
| Display Type | LCD |
| Manufacturer | PowMr |
| Product Dimensions | 8.27 x 7.68 x 4.52 inches (21.01 x 19.51 x 11.48 cm) |
| Item Weight | 3.67 pounds (1.66 kg) |
| ASIN | B09YRQRYRM |
| Batteries required | No (for controller operation, but connects to external batteries) |
| Color | M60 |
| Brand | PowMr |
| Voltage | 48 Volts (DC) - Auto-detects 12V/24V/36V/48V |
| Material | Die-cast Aluminum |
8. Warranty and Support
PowMr products are designed and manufactured to the highest quality standards. For information regarding warranty coverage, returns, or technical support, please refer to the warranty card included with your product or visit the official PowMr website. Keep your purchase receipt as proof of purchase.
9. Contact Information
For further assistance or inquiries, please contact PowMr customer service:
- Website: PowMr Official Store on Amazon
- Refer to your product packaging or included documentation for direct contact details such as email or phone number.


