1. Introduction
The Feker IK75 Pro is a versatile 75% gasket-mounted mechanical keyboard kit designed for customization. It supports three connectivity modes: wired (USB-C), 2.4GHz wireless, and Bluetooth, offering flexibility for various setups. This kit provides a foundation for building a personalized mechanical keyboard, allowing users to choose their preferred switches and keycaps.
This manual provides detailed instructions for assembling, operating, and maintaining your Feker IK75 Pro keyboard kit.
2. Package Contents
Before proceeding with assembly, please verify that all components are present in your package:
- Feker IK75 Pro Keyboard Barebones Kit (PCB, Plate, Case, Gaskets)
- USB-C Cable
- 2.4GHz Wireless Receiver (often stored in the keyboard case)
- Keycap Puller
- Switch Puller (if included)
- User Manual (this document)

Image: Contents of the Feker IK75 Pro keyboard kit package, including the barebones keyboard, USB-C cable, and tools.
3. Key Features
- 75% Layout: Compact design with 83 keys, including a dedicated function row and navigation keys.
- Gasket Mount Structure: Provides a flexible and cushioned typing experience, reducing harsh bottom-out feel.
- Triple Mode Connectivity:
- Wired (USB-C)
- 2.4GHz Wireless
- Bluetooth (up to 3 devices)
- Hot-Swappable Sockets: Compatible with 3-pin and 5-pin mechanical switches, allowing for easy switch changes without soldering.
- RGB Backlighting: Per-key RGB lighting with multiple customizable effects.
- Programmable: Supports custom key assignments and macro creation.
- Volume Knob: Multi-function rotary knob for volume control and other customizable actions.
- Integrated Battery: High-capacity battery for extended wireless use.

Image: The Feker IK75 Pro barebones keyboard kit, illustrating its key features such as 2.4GHz, Type-C, USB-C, Mute Cotton, 8000 mAh battery, Gasket mount, Programmable, and Bluetooth connectivity.
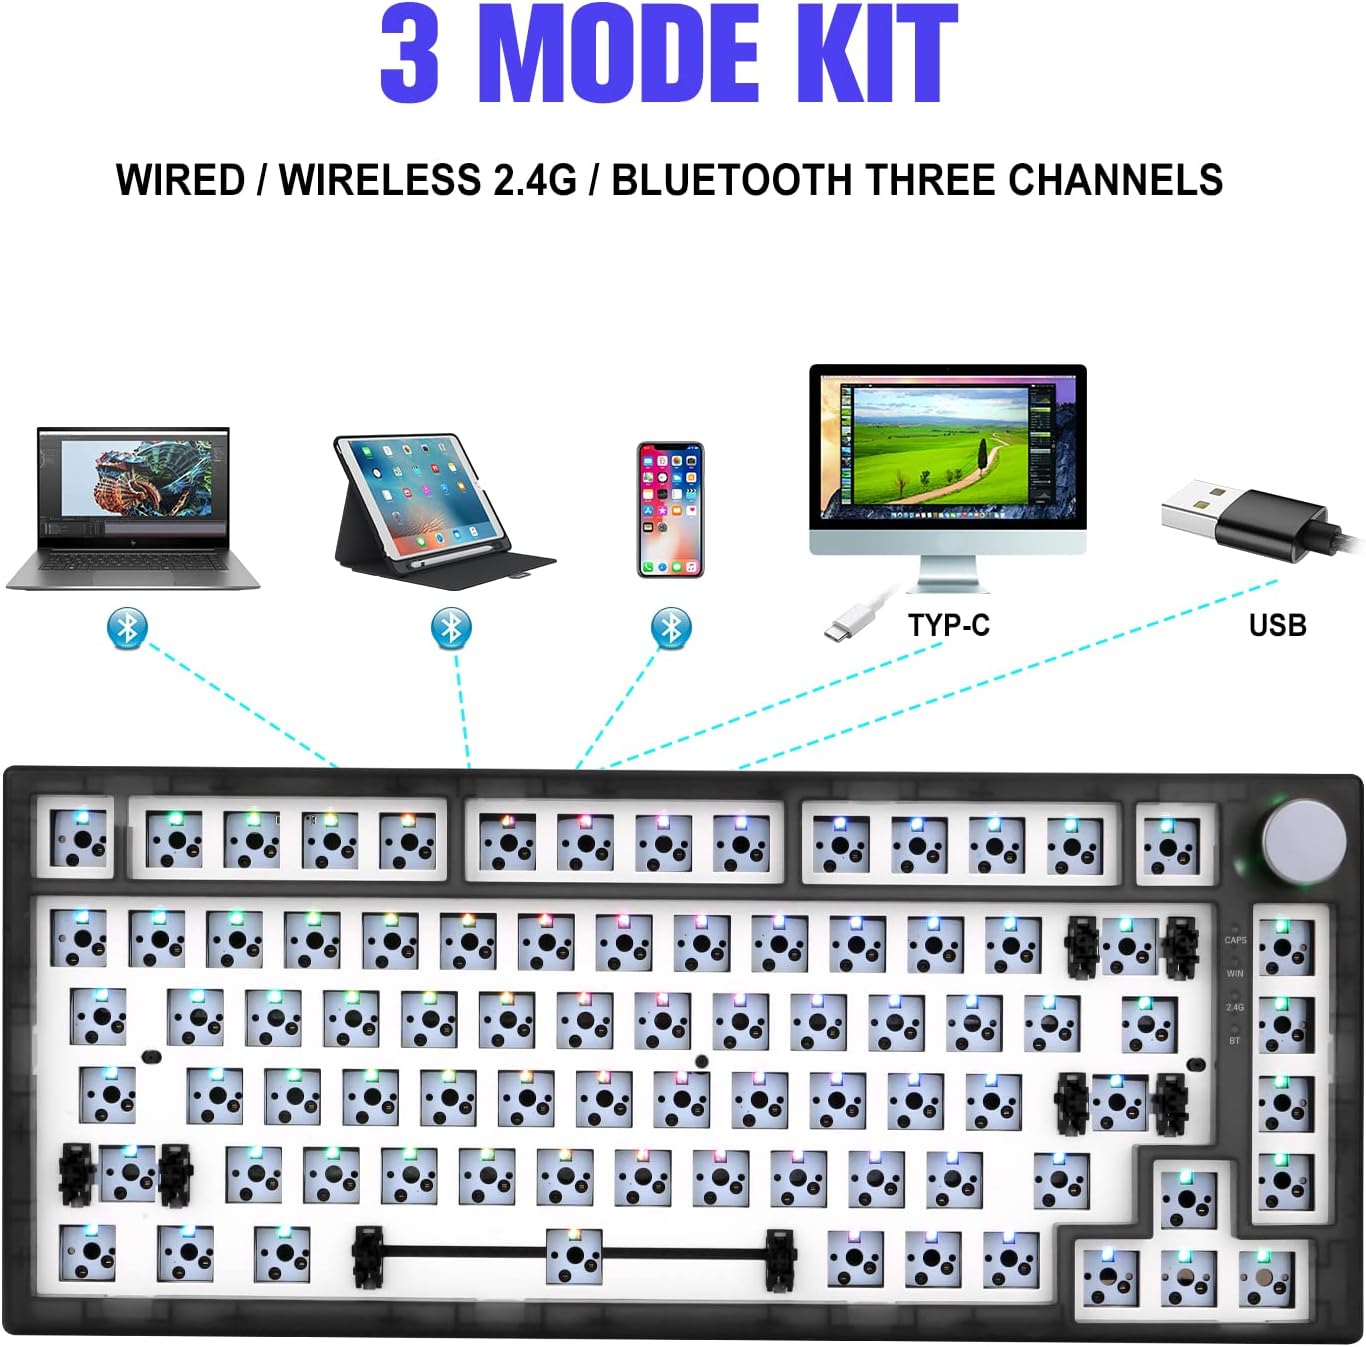
Image: Diagram showing the three connectivity modes of the Feker IK75 Pro: Wired (Type-C/USB), 2.4G Wireless, and Bluetooth, connecting to various devices like laptops, tablets, and smartphones.
4. Setup and Assembly
4.1 Keyboard Assembly
The Feker IK75 Pro is a DIY kit, requiring the installation of mechanical switches and keycaps. Follow these steps for proper assembly:
- Prepare Components: Ensure you have your chosen 3-pin or 5-pin mechanical switches and keycaps ready.
- Install Switches: Align the pins of each mechanical switch with the corresponding holes on the PCB (Printed Circuit Board). Gently press the switch until it clicks into place. Ensure the switch is fully seated and the pins are not bent.
- Install Stabilizers: (If not pre-installed) Ensure stabilizers for larger keys (Spacebar, Shift, Enter, Backspace) are properly clipped into the PCB.
- Install Keycaps: Once all switches are installed, carefully press each keycap onto its corresponding switch stem. Ensure they are firmly attached.

Image: Step-by-step visual guide for installing components into the Feker IK75 Pro keyboard kit, including the PCB, switches, and keycaps.

Image: A fully assembled Feker IK75 Pro keyboard with colorful keycaps and RGB backlighting activated.
4.2 Connectivity Modes
The Feker IK75 Pro supports three connection types. Use the switch located on the back or side of the keyboard to select your desired mode.
4.2.1 Wired Mode (USB-C)
- Connect the provided USB-C cable to the keyboard's USB-C port and the other end to your computer's USB port.
- The keyboard will automatically be recognized by your operating system.
- This mode also charges the keyboard's internal battery.

Image: Close-up view of the USB-C port on the Feker IK75 Pro keyboard, used for wired connection and charging.
4.2.2 2.4GHz Wireless Mode
- Locate the 2.4GHz USB receiver, typically stored in a compartment on the keyboard's underside.
- Plug the receiver into an available USB port on your computer.
- Switch the keyboard to 2.4GHz mode using the selector switch.
- The keyboard should connect automatically.
4.2.3 Bluetooth Mode
- Switch the keyboard to Bluetooth mode using the selector switch.
- On your device (computer, tablet, smartphone), open Bluetooth settings and search for new devices.
- The keyboard should appear as "Feker IK75 Pro" or similar. Select it to pair.
- The keyboard can typically store up to three Bluetooth profiles. Refer to the keyboard's specific key combinations (e.g., Fn + 1, Fn + 2, Fn + 3) to switch between paired devices.

Image: A visual representation of the Feker IK75 Pro connecting to various devices via Bluetooth, 2.4GHz wireless, and wired USB-C.
5. Operation
5.1 Volume Knob Functionality
The rotary knob located on the top right of the keyboard serves multiple functions:
- Rotate Clockwise: Increase volume.
- Rotate Counter-clockwise: Decrease volume.
- Press Down: Mute/Unmute audio.
Additional functions may be programmable via the keyboard's software.

Image: Close-up of the Feker IK75 Pro's multi-function volume knob, showing its rotation and press actions for volume control.

Image: Detailed view of the Feker IK75 Pro's volume knob, highlighting its design and placement on the keyboard.
5.2 RGB Lighting Control
The Feker IK75 Pro features customizable RGB backlighting. Use the following key combinations to control the lighting effects:
- Fn + \: Cycle through different lighting effects.
- Fn + ↑ / ↓: Adjust brightness levels.
- Fn + ← / →: Adjust lighting speed or direction.
- Fn + Del: Change lighting colors (for static modes).
For advanced customization, including per-key lighting and macro programming, download the official Feker software from the manufacturer's website.

Image: The Feker IK75 Pro keyboard showcasing its vibrant RGB backlighting with various colors illuminating the key switches.
5.3 Programmable Keys
The Feker IK75 Pro supports key remapping and macro creation through its dedicated software. This allows users to personalize their typing and gaming experience. Refer to the software's user guide for detailed instructions on programming keys.
6. Maintenance
6.1 Cleaning Your Keyboard
- Keycaps: Use the provided keycap puller to remove keycaps. Clean them with a mild soap solution and a soft cloth, then rinse and dry thoroughly before reattaching.
- Switches and Plate: Use compressed air to remove dust and debris from between the switches. A soft brush can also be used. Avoid spraying liquids directly onto the PCB.
- Case: Wipe the keyboard case with a soft, damp cloth. Avoid harsh chemicals.
6.2 Battery Care
To prolong the life of your keyboard's battery:
- Avoid fully discharging the battery frequently.
- Charge the keyboard using the provided USB-C cable.
- If storing the keyboard for an extended period, charge it to approximately 50% and store in a cool, dry place.

Image: Illustration of a battery icon, representing the Feker IK75 Pro's integrated rechargeable battery.
7. Troubleshooting
| Issue | Possible Cause | Solution |
|---|---|---|
| Keyboard not responding (Wired) | Loose cable, faulty USB port, driver issue. |
|
| 2.4GHz wireless not connecting | Receiver not plugged in, keyboard not in 2.4GHz mode, interference. |
|
| Bluetooth pairing issues | Keyboard not in pairing mode, device Bluetooth off, too many paired devices. |
|
| Keys not registering | Loose switch, faulty switch, software issue. |
|
| RGB lighting not working | Lighting turned off, software conflict. |
|
8. Specifications
| Feature | Detail |
|---|---|
| Model | IK75 |
| Layout | 75% (83 keys) |
| Connectivity | Wired (USB-C), 2.4GHz Wireless, Bluetooth |
| Switch Compatibility | 3-pin/5-pin Hot-swappable |
| Backlighting | RGB |
| Battery Capacity | 8000 mAh (as per product image, actual may vary) |
| Material | Acrylonitrile Butadiene Styrene, Plastic, Stainless Steel |
| Item Weight | 2.68 pounds (approx. 1.22 kg) |
| Package Dimensions | 15.75 x 7.09 x 2.32 inches |
9. Warranty and Support
For warranty information, technical support, or to download the latest software and drivers, please visit the official Feker website or contact your retailer. Keep your purchase receipt for warranty claims.
Manufacturer: Feker
Brand: HELOIA
10. Video Guide
Watch the official video guide for a visual overview of the Feker IK75 Pro keyboard kit, including assembly and feature demonstrations.
Video: An official video demonstrating the Feker IK75 Pro Keyboard DIY Kit, showcasing its features, assembly process, and RGB lighting effects. This video is provided by HELOIA-US.