1. Introduction
This manual provides essential information for the safe and effective installation, operation, and maintenance of the JIAYIN JYPC-4 Series Electromagnetic Plunger Pump. This pump is designed for applications requiring precise water suction and delivery, commonly found in hot water dispensers and similar systems. Please read this manual thoroughly before using the product and retain it for future reference.
2. Product Overview
The JIAYIN JYPC-4 is a compact and efficient electromagnetic plunger pump. Key features include:
- Rated Voltage: AC 100V - 120V, 60Hz, 22W
- Flow Rate: 750 ±15% cc/min
- Working Pressure: ≥1.5 bar
- Working Medium: Water or non-corrosive liquids
- Material: Durable plastic construction
- Drive Mode: Electromagnetic

Figure 1: Angled view of the JIAYIN JYPC-4 Series electromagnetic plunger pump, showing its compact design and main components.
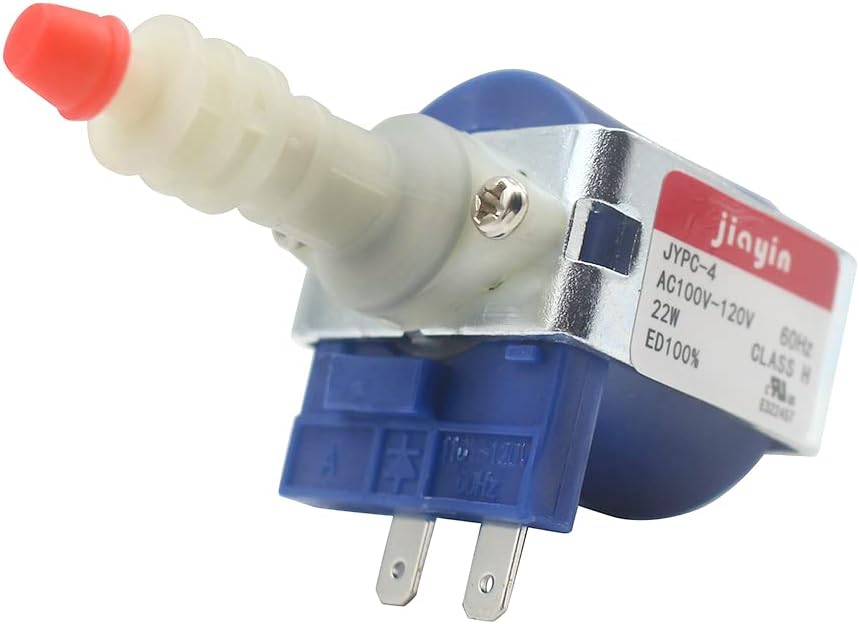
Figure 2: Close-up view of the JIAYIN JYPC-4 pump, highlighting the electrical terminals and the product specification label.

Figure 3: Technical drawing providing detailed dimensions of the JIAYIN JYPC-4 pump in millimeters.
3. Technical Specifications
| Parameter | Value |
|---|---|
| Brand | JIAYIN |
| Model | JYPC-4 |
| Rated Voltage | AC 100V - 120V, 60Hz |
| Power Consumption | 22W |
| Flow Rate | 750 ±15% cc/min |
| Working Pressure | ≥1.5 bar |
| Pump Type | Plunger Pump |
| Pump Shaft Position | Horizontal |
| Impeller Structure | Closed Impeller |
| Number of Impellers | Single Stage |
| Net Weight | 137 ±5g (approx. 4.8 oz) |
| Material | Plastic |
| Insulation Class | H |
| Drive Mode | Electromagnetic |
| Connection Method | Cannula |
| Ambient Temperature | Ta 70℃ (158°F) |
| Fluid Temperature | Tf 60℃ (140°F) |
| UPC | 607469294553 |
4. Safety Instructions
To prevent injury or damage, always observe the following safety precautions:
- Electrical Safety: Ensure the pump is connected to a power source matching the specified voltage (AC 100V-120V, 60Hz). Disconnect power before any installation, maintenance, or troubleshooting.
- Fluid Compatibility: Use only with water or non-corrosive liquids. Using corrosive fluids can damage the pump and void the warranty.
- Temperature Limits: Do not exceed the maximum ambient temperature of 70℃ (158°F) or fluid temperature of 60℃ (140°F).
- Proper Installation: Install the pump securely in a horizontal position as specified. Ensure all connections are tight to prevent leaks.
- Avoid Dry Running: Do not operate the pump without fluid, as this can cause severe damage.
- Ventilation: Ensure adequate ventilation around the pump to prevent overheating.
- Children and Pets: Keep the pump and its components out of reach of children and pets.
5. Setup and Installation
Follow these steps for proper installation:
- Mounting: Securely mount the pump in a horizontal position using appropriate fasteners. Refer to Figure 3 for dimensions and mounting points.
- Fluid Connections: Connect the inlet and outlet tubes to the pump's cannula ports. Ensure a tight fit to prevent leaks. For flow testing, a 13.8-inch silicon tube with an outer diameter of 0.31 inches and an inner diameter of 0.16 inches is recommended for the water inlet port.
- Electrical Connection: Connect the pump to a compatible AC 100V-120V, 60Hz power supply. Ensure wiring is done by a qualified professional if you are unsure.
- Priming (if necessary): Depending on your system, you may need to prime the pump by ensuring the fluid path is filled with liquid before initial operation to prevent dry running.
6. Operation
Once installed and connected, operate the pump as follows:
- Power On: Apply power to the pump. The electromagnetic mechanism will activate, initiating the plunger action.
- Monitor Flow: Observe the fluid flow to ensure it is within the specified range of 750 ±15% cc/min and that the working pressure is maintained at or above 1.5 bar.
- Continuous Operation: The pump is designed for continuous operation (ED100%).
- Power Off: Disconnect power when the pump is not in use or when maintenance is required.
7. Maintenance
Regular maintenance ensures optimal performance and extends the pump's lifespan:
- Cleaning: Periodically inspect the pump for any external dirt or debris. Clean with a soft, damp cloth. Do not use harsh chemicals.
- Connections: Regularly check all fluid and electrical connections for tightness and signs of wear or corrosion.
- Fluid Quality: Ensure the working fluid remains clean and free of particles that could clog the pump. If the fluid contains impurities, consider adding a filter to the system.
- Storage: If storing the pump for an extended period, ensure it is clean, dry, and stored in a cool, dry place away from direct sunlight and extreme temperatures.
8. Troubleshooting
Refer to the table below for common issues and their potential solutions:
| Problem | Possible Cause | Solution |
|---|---|---|
| Pump does not start | No power supply Incorrect voltage Loose electrical connection | Check power source Verify voltage matches pump rating Secure electrical connections |
| Low or no fluid flow | Inlet/outlet clogged Air in the system (not primed) Leak in fluid connections Dry running | Inspect and clear blockages Prime the pump Check and tighten connections Ensure fluid supply is constant |
| Unusual noise during operation | Air in the system Loose mounting Internal obstruction | Bleed air from the system Tighten mounting screws Inspect for foreign objects (disconnect power first) |
| Leakage from connections | Loose connections Damaged tubing/cannula | Tighten all fluid connections Replace damaged tubing or cannula |
9. Warranty and Support
For warranty information or technical support, please contact your retailer or the manufacturer directly. Keep your purchase receipt as proof of purchase. Any unauthorized disassembly or modification of the pump will void the warranty.