Gehavin XHP160-02
Gehavin Rechargeable LED Flashlight XHP160-02 User Manual
Model: XHP160-02
1. Introduction
This manual provides detailed instructions for the safe and effective use of your Gehavin Rechargeable LED Flashlight, Model XHP160-02. Please read this manual thoroughly before operating the device and retain it for future reference.
2. Product Overview
The Gehavin XHP160-02 is a high-performance rechargeable LED flashlight designed for various applications, including home use, camping, hiking, and emergency situations. It features an upgraded XHP160.5 LED chip, multiple lighting modes, a zoom function, and a power bank capability.
Package Contents:
- 1 x Gehavin LED Flashlight (Model XHP160-02)
- 1 x 5000mAh Lithium Ion Battery
- 1 x USB Charging Cable
- 1 x Lanyard
- 1 x User Manual
- 1 x Packing Box
Key Components:
Refer to the image below for an exploded view of the flashlight's components.

Image: Exploded view showing the flashlight's internal and external components, including the LED chip, lens, battery compartment, and control buttons.
- LED Head: Contains the XHP160.5 LED chip and highly transmissive lens.
- Zoom Mechanism: Allows adjustment between spotlight and floodlight.
- Brightness Button: Controls High, Medium, and Low light modes.
- Mode Button: Controls Super Strong, Strobe, and SOS light modes.
- Power Indicator: Displays battery level.
- Charging Port (Type-C): For recharging the flashlight.
- USB Output Port: For using the flashlight as a power bank.
- Battery Compartment: Houses the 5000mAh Lithium Ion battery.
- Tail Cap: Secures the battery and may include a lanyard attachment point.
3. Setup
3.1 Battery Installation
- Unscrew the tail cap of the flashlight by turning it counter-clockwise.
- Insert the provided 5000mAh Lithium Ion battery into the battery compartment with the positive (+) end facing towards the LED head.
- Screw the tail cap back on clockwise until it is securely tightened.
3.2 Initial Charging
Before first use, fully charge the flashlight battery.
- Locate the Type-C charging port on the flashlight body.
- Connect the smaller end of the provided USB charging cable to the flashlight's Type-C port.
- Connect the larger USB-A end of the cable to a compatible USB power adapter (not included) or a computer USB port.
- The power indicator lights will show charging status. A full charge typically takes approximately 4 hours.
- Once fully charged, disconnect the charging cable.
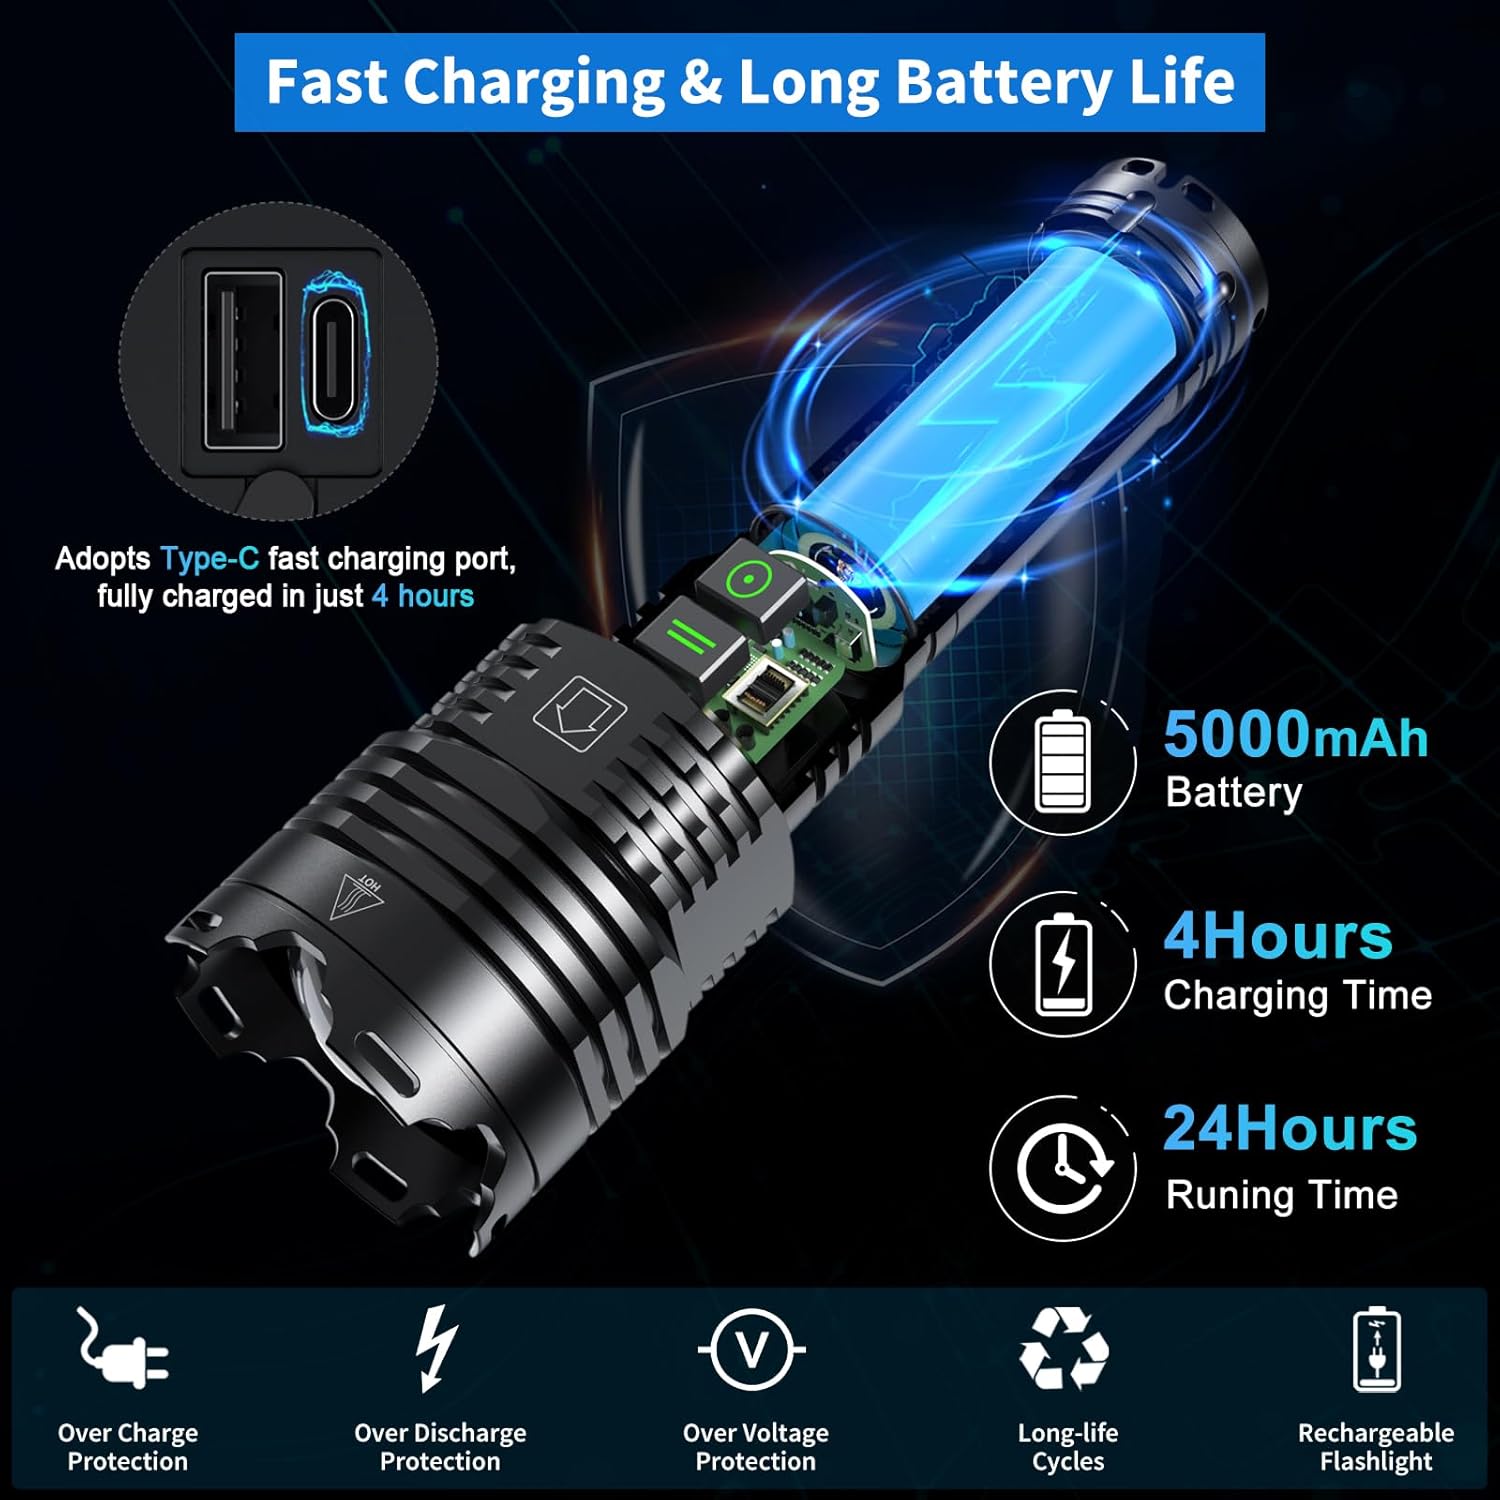
Image: Illustration showing the flashlight connected to a USB-C charging cable, with indicators for 5000mAh battery, 4 hours charging time, and 24 hours running time.
4. Operating Instructions
4.1 Power On/Off and Brightness Modes
The flashlight features a dedicated Brightness Button for standard illumination modes.

Image: Diagram illustrating the Brightness Button controlling High, Medium, and Low modes, and the Mode Button controlling Super Strong, Strobe, and SOS modes. Power indicators are also shown.
- To Turn On: Press the Brightness Button once. The flashlight will turn on in High mode.
- To Cycle Brightness Modes: While the flashlight is on, press the Brightness Button repeatedly to cycle through High → Medium → Low.
- To Turn Off: From any brightness mode, press and hold the Brightness Button for approximately 2 seconds.
4.2 Special Light Modes
The flashlight includes a separate Mode Button for specialized lighting functions.
- To Activate Special Modes: Press the Mode Button once. The flashlight will activate the Super Strong mode.
- To Cycle Special Modes: While in a special mode, press the Mode Button repeatedly to cycle through Super Strong → Strobe → SOS.
- To Exit Special Modes: Press and hold the Mode Button for approximately 2 seconds, or switch to a brightness mode using the Brightness Button.
4.3 Zoom Function (Spotlight/Floodlight)
The flashlight head can be extended or retracted to adjust the beam focus.
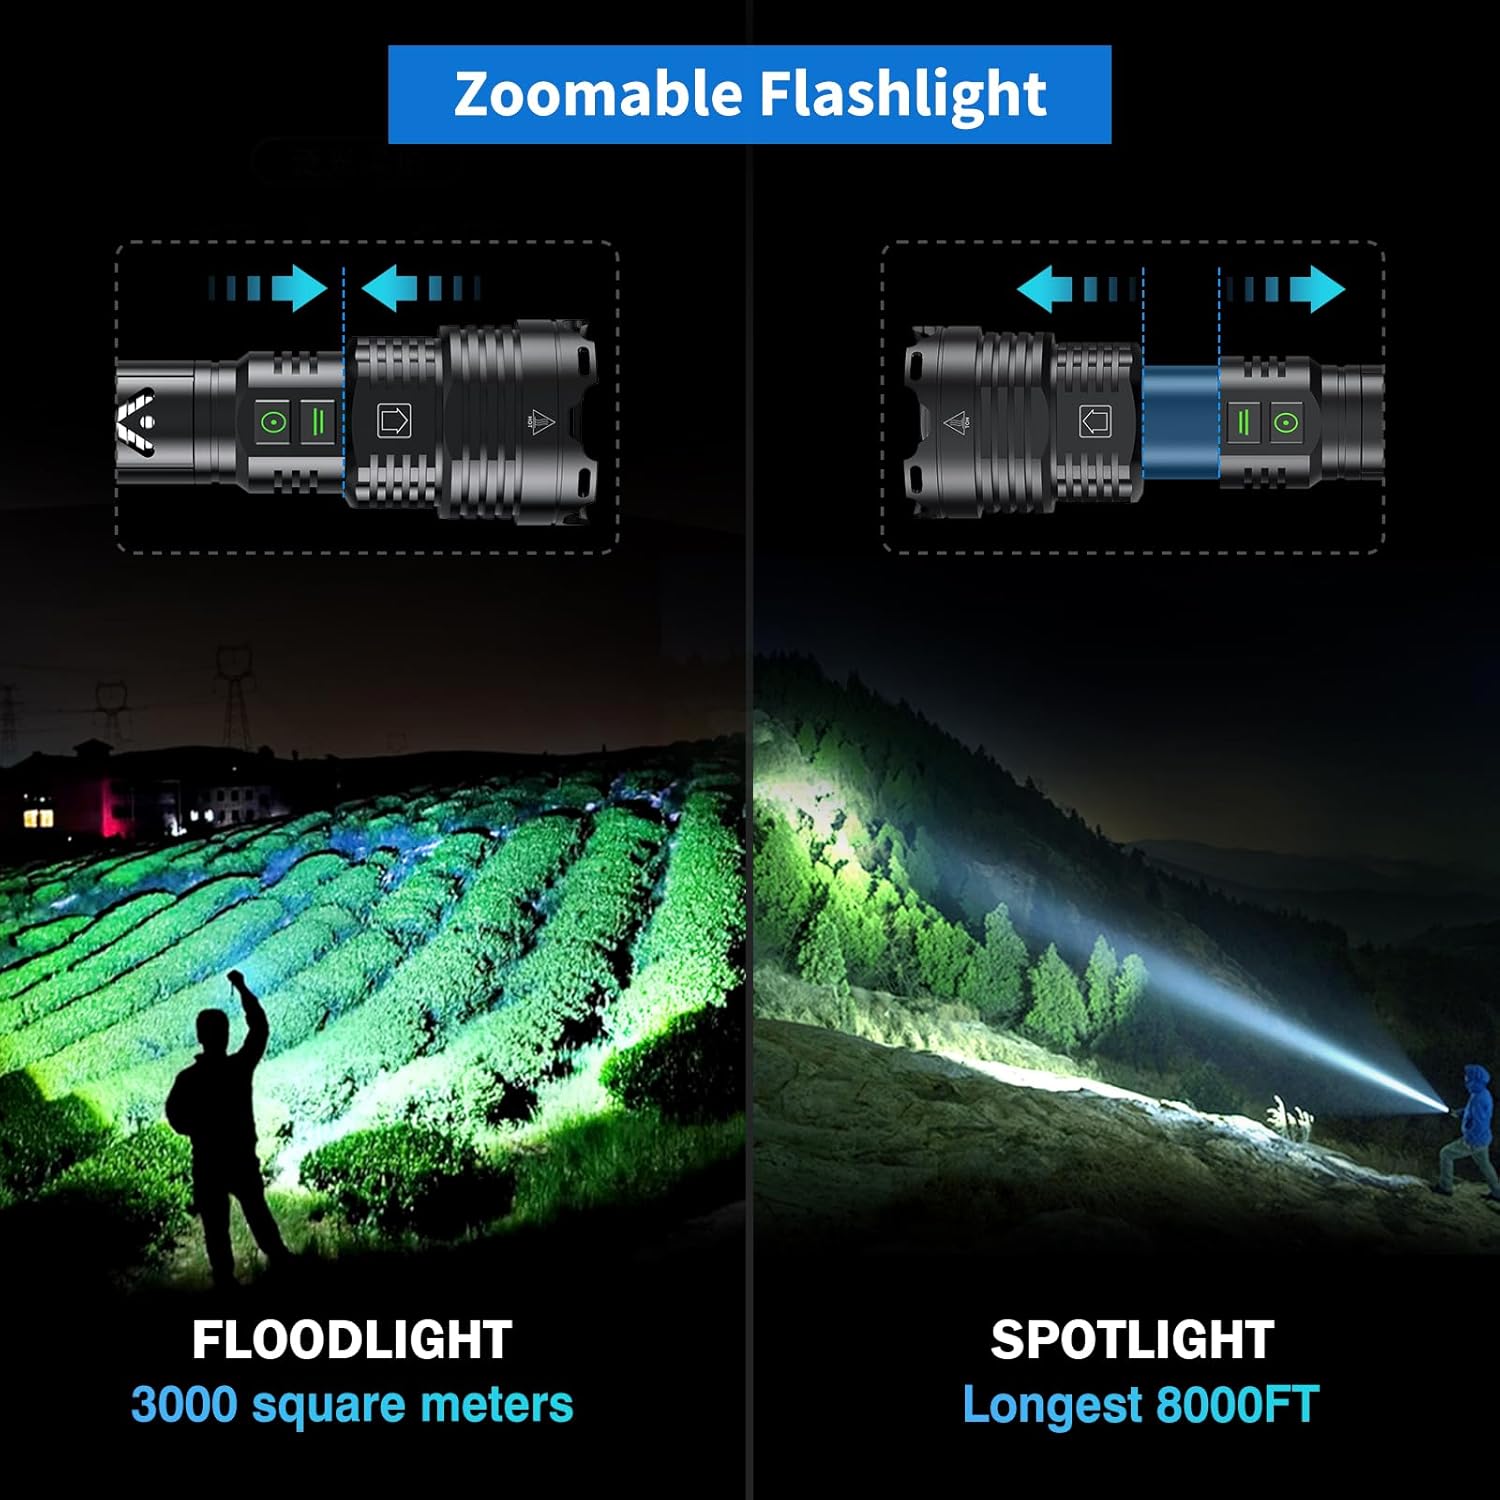
Image: Two scenes demonstrating the flashlight's zoom function. One shows a wide floodlight beam illuminating a large area (3000 square meters), and the other shows a focused spotlight beam reaching a long distance (8000 feet).
- Spotlight: Extend the flashlight head forward to narrow the beam for long-distance illumination (up to 8000 feet).
- Floodlight: Retract the flashlight head backward to widen the beam for broad area illumination (up to 3000 square feet).
4.4 Power Bank Function
The flashlight can be used to charge other USB-powered devices.

Image: The flashlight connected via its USB output port to a smartphone, demonstrating its power bank functionality. Another image shows the flashlight being charged via its Type-C input port.
- Locate the USB output port on the flashlight body.
- Connect your device's charging cable (USB-A to your device's connector) to the flashlight's USB output port.
- The flashlight will begin charging your device.
5. Charging
The Gehavin XHP160-02 flashlight is equipped with a Type-C fast charging port.

Image: A split image showing the flashlight being charged via its USB-C input on the left, and on the right, the flashlight providing power to a smartphone via its USB-A output, functioning as a power bank.
- Use the provided USB Type-C cable for charging.
- Connect to a standard USB power source (e.g., wall adapter, computer, power bank).
- Charging time is approximately 4 hours for a full charge.
- The power indicator lights will show the charging progress.
6. Maintenance
6.1 Cleaning
- Wipe the flashlight body with a soft, damp cloth.
- Do not use abrasive cleaners or solvents.
- Keep the lens clean for optimal light output. Use a lens cleaning cloth if necessary.
6.2 Water Resistance
The flashlight has an IP67 waterproof rating, meaning it is protected from dust and can withstand immersion in water up to 1 meter for 30 minutes.

Image: The flashlight being splashed with water, illustrating its IP67 waterproof, snow protection, and dust-proof capabilities.
- Ensure the charging port cover is securely closed to maintain water resistance.
- Avoid prolonged immersion beyond specified limits.
6.3 Heat Dissipation
The flashlight is designed with a five-section heat dissipation structure to manage heat during high-power operation.

Image: An illustration showing airflow arrows around the flashlight body, indicating its heat dissipation design to prevent overheating during use.
- It is normal for the flashlight body to become warm during extended use, especially in higher brightness modes.
- If the flashlight becomes excessively hot, reduce the brightness mode or turn it off to allow it to cool.
6.4 General Care
- Store the flashlight in a cool, dry place when not in use.
- Avoid dropping the flashlight or subjecting it to severe impacts, although it is designed for impact resistance.
- Do not disassemble the flashlight beyond removing the tail cap for battery access. Unauthorized disassembly voids the warranty.
7. Troubleshooting
| Problem | Possible Cause | Solution |
|---|---|---|
| Flashlight does not turn on. | Low battery or incorrect battery installation. | Charge the battery fully. Ensure the battery is inserted with correct polarity and the tail cap is tightened. |
| Flashlight does not charge. | Charging cable or adapter issue, or port obstruction. | Try a different USB cable and power adapter. Ensure the charging port is clean and free of debris. |
| Light output is dim. | Low battery or dirty lens. | Recharge the battery. Clean the flashlight lens. |
| Flashlight gets hot during use. | Normal operation in high brightness modes. | Reduce brightness mode or turn off the flashlight to allow it to cool. This is expected behavior for high-lumen devices. |
| Cannot switch modes. | Button malfunction or low battery. | Ensure buttons are pressed firmly. Recharge the battery. If the issue persists, contact customer support. |
8. Specifications
| Feature | Detail |
|---|---|
| Model Number | XHP160-02 |
| Brand | Gehavin |
| Light Source Type | XHP160.5 LED |
| Maximum Lumens Output | Up to 5,800,000 Lumens (Super Strong Mode) |
| Light Modes | 6 (High, Medium, Low, Super Strong, Strobe, SOS) |
| Beam Distance | Up to 8000 feet (Spotlight) |
| Battery Type | 1 x 5000mAh Lithium Ion (Included) |
| Charging Port | USB Type-C |
| Charging Time | Approx. 4 hours |
| Running Time | 8-24 hours (depending on mode) |
| Water Resistance | IP67 (Waterproof, Snow protection, Dust-proof) |
| Material | Aluminum Alloy |
| Product Dimensions | 7.67"D x 2.36"W x 1.5"H (19.5cm x 6cm x 3.8cm) |
| Item Weight | 1.34 pounds |
| Special Features | Zoomable, Power Bank Function, Impact Resistant, Heat Dissipation Design |
9. Warranty
The Gehavin XHP160-02 flashlight comes with a standard manufacturer's warranty. Please refer to the warranty card included in your package or contact Gehavin customer support for specific details regarding warranty coverage and duration.
10. Support
For any questions, technical assistance, or warranty claims, please contact Gehavin customer support through the following channels:
- Online Store: Visit the Gehavin Store on Amazon.
- Email: Refer to your product packaging or warranty card for direct email support.
Our customer service team is available to assist you with any product-related inquiries.