Acogedor A401
Acogedor A401 Head Up Display User Manual
OBD and GPS Dual Mode Dual System Car HUD Gauge
1. Introduction
This manual provides detailed instructions for the installation, operation, and maintenance of the Acogedor A401 Head Up Display (HUD). The A401 is a versatile car gauge featuring both OBD (On-Board Diagnostics) and GPS dual-mode functionality, designed to enhance driving safety and provide essential vehicle information directly in the driver's line of sight. It is compatible with all car models.
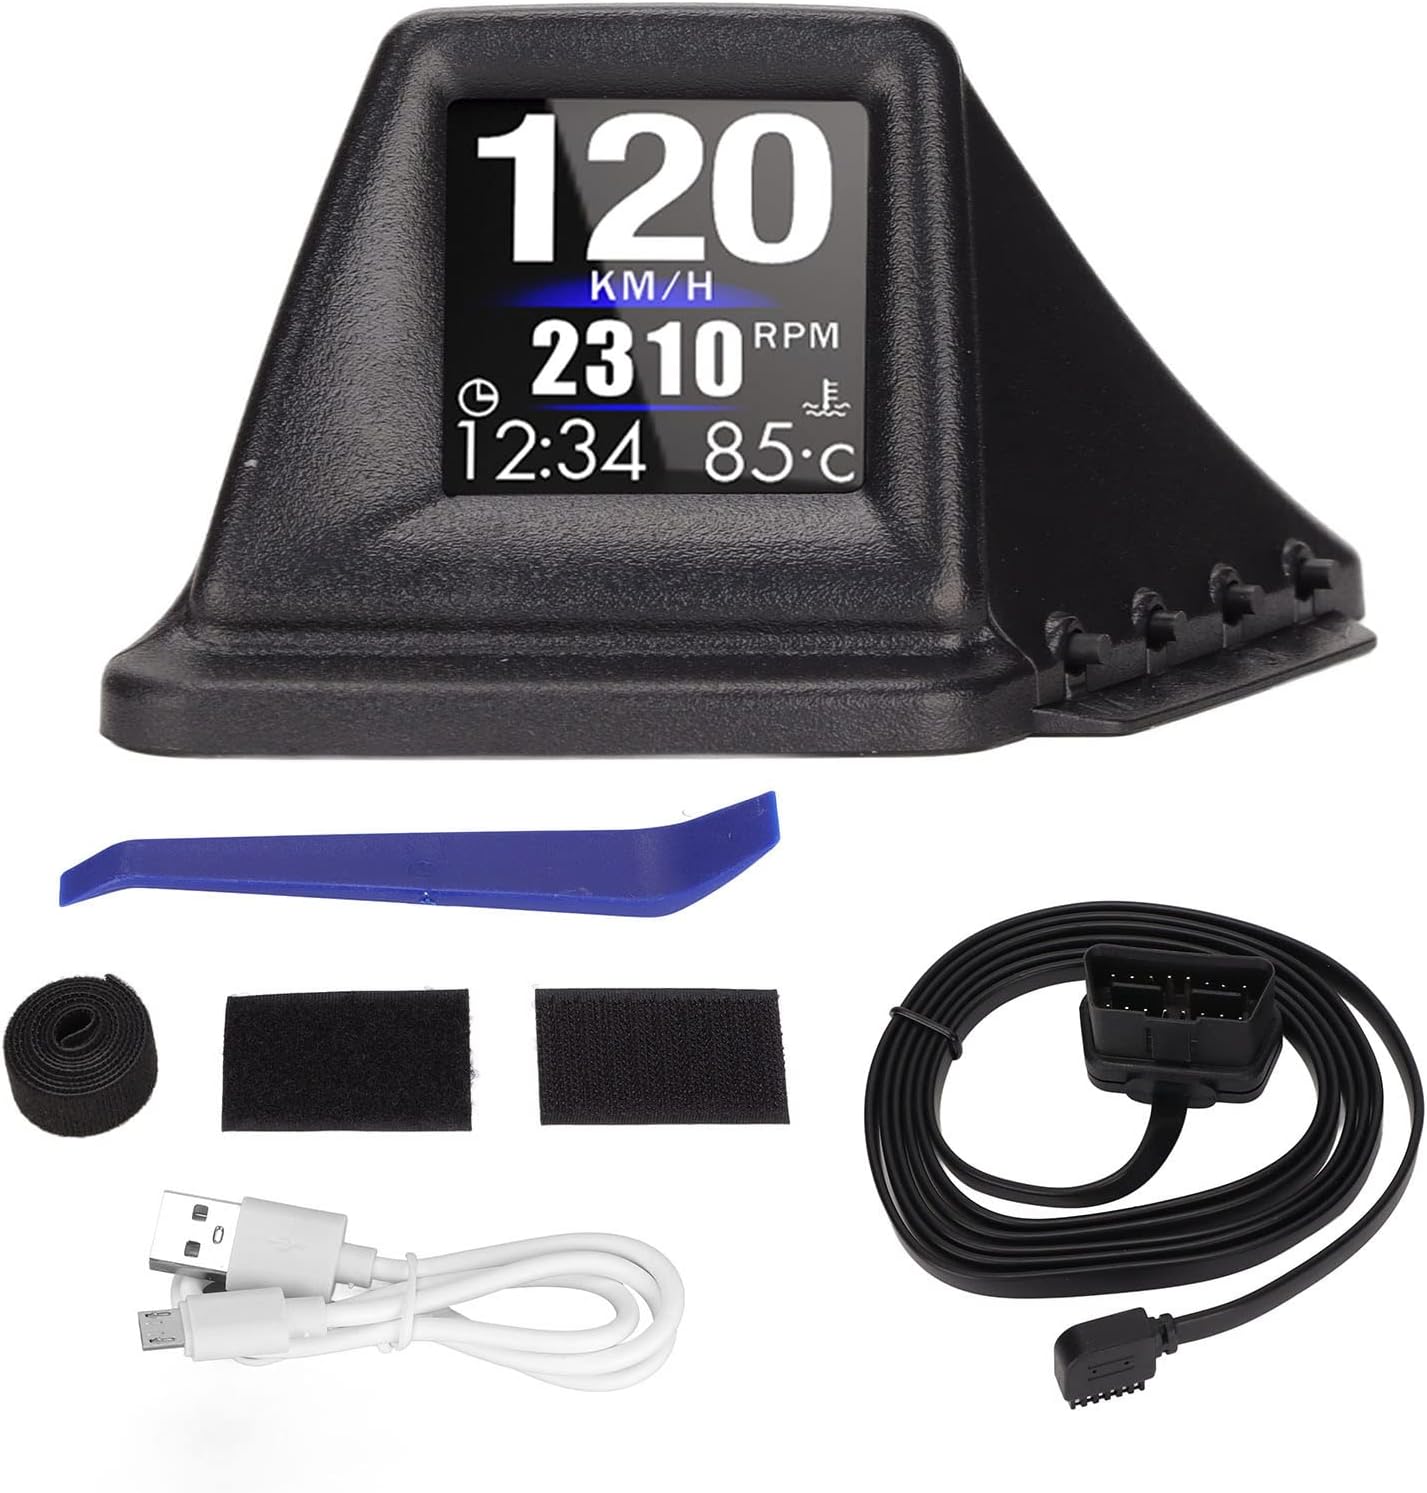
Image 1.1: The Acogedor A401 Head Up Display unit along with its accessories, including the OBD II cable, USB cable, double-sided adhesive, crowbar, and strap.
2. Key Features
- Dual Mode System: Operates in both OBD and GPS modes for comprehensive vehicle data.
- Universal Compatibility: Designed to work with all car models. OBD II system adheres to SAE J1939 protocol.
- Four Alarm Functions: Includes speed alarm, low voltage alarm, water temperature alarm, and RPM alarm to enhance driving safety.
- Multiple Display Interfaces: Offers 8 distinct display interfaces, including simple speed, OBD basic, 6-grid, turbo pressure gauge, acceleration test, brake test, and full function interface.
- Easy Installation: Plug-and-play setup via OBD II interface.
3. Package Contents
Verify that all items listed below are present in your package:
- 1 x Acogedor A401 Car HUD Unit
- 1 x OBD II Cable
- 1 x USB Cable
- 1 x Double-Sided Adhesive Pad
- 1 x Crowbar (for trim removal)
- 1 x Strap
- 1 x User Manual (this document)

Image 3.1: The Acogedor A401 HUD displaying various metrics such as speed (120 km/h), RPM (2310), current time (12:34), and water temperature (85°C).
4. Setup and Installation
The Acogedor A401 HUD offers a straightforward installation process. Follow these steps to set up your device.
4.1 Choosing a Location
Select a flat, stable surface on your dashboard where the HUD will not obstruct your view of the road. Ensure the display is clearly visible from your driving position.

Image 4.1: The Acogedor A401 HUD positioned on a car dashboard, reflecting information onto the windshield, with a driver visible in the rearview mirror.
4.2 Securing the HUD
- Clean the chosen dashboard surface thoroughly to ensure proper adhesion.
- Peel the protective film from one side of the double-sided adhesive pad.
- Attach the adhesive pad to the bottom of the HUD unit.
- Peel the protective film from the other side of the adhesive pad.
- Carefully place the HUD unit on the dashboard in your desired location and press firmly for a few seconds to secure it.
4.3 Connecting the Power and Data Cable
The A401 supports two connection methods: OBD II for vehicle data and GPS for satellite-based data.
4.3.1 OBD II Connection (Recommended for most vehicles)
- Locate your vehicle's OBD II port. This is typically found under the dashboard on the driver's side.
- Connect the provided OBD II cable to the HUD unit's OBD II port.
- Plug the other end of the OBD II cable into your vehicle's OBD II port.
- Use the provided crowbar to carefully tuck the cable along the dashboard edges or under trim panels for a neat installation. Secure with the strap if necessary.
4.3.2 USB Connection (For GPS mode only, if OBD II is not available or preferred)
- Connect the provided USB cable to the HUD unit's USB port.
- Plug the other end of the USB cable into a car USB charger or a USB port in your vehicle.
- Note: In USB mode, the HUD will operate in GPS mode only and will not display OBD-specific data such as RPM, water temperature, or fault codes.

Image 4.2: The underside of the Acogedor A401 HUD, revealing the OBD II port, USB port, and the model number "A401" clearly labeled.
5. Operating Instructions
Once installed and powered on, the Acogedor A401 HUD will automatically detect your vehicle's system and begin displaying information.
5.1 Automatic Mode Switching
The HUD automatically switches between OBD and GPS modes based on the connection. If connected via OBD II, it will prioritize OBD data. If only connected via USB, it will operate in GPS mode.
5.2 Display Interfaces
The A401 offers 8 different display interfaces. Refer to the device's physical buttons (if any, not explicitly mentioned but implied for interface switching) or the on-screen menu for navigation.
- Simple Interface: Displays primary data like speed.
- Single Speed Interface: Focuses solely on vehicle speed.
- OBD Basic Interface: Shows fundamental OBD data.
- 6-Grid Interface: Presents multiple data points in a grid layout.
- Turbo Pressure Gauge: Displays turbo pressure (if applicable to vehicle).
- Acceleration Test: For measuring vehicle acceleration performance.
- Brake Test: For measuring vehicle braking performance.
- Full Function Interface: Combines various data points for a comprehensive view.

Image 5.1: The Acogedor A401 HUD displaying speed, RPM, time, and water temperature, superimposed on a digital background, illustrating its informational capabilities.
5.3 Alarm Functions
The A401 is equipped with four alarm types to alert the driver to critical conditions. These alarms can typically be configured through the device's settings menu.
- Speed Alarm: Alerts when a preset speed limit is exceeded.
- Low Voltage Alarm: Warns of low vehicle battery voltage.
- Water Temperature Alarm: Notifies if engine water temperature becomes too high.
- RPM Alarm: Alerts when engine RPM exceeds a set threshold.
6. Maintenance
To ensure the longevity and optimal performance of your Acogedor A401 HUD, follow these simple maintenance guidelines:
- Cleaning: Use a soft, dry cloth to gently wipe the display screen and the unit's exterior. Avoid abrasive cleaners or solvents, as they may damage the surface.
- Temperature: Do not expose the device to extreme temperatures (very hot or very cold) for extended periods, as this can affect its electronic components.
- Moisture: Keep the device dry. Avoid contact with water or other liquids.
- Cable Management: Ensure cables are not pinched or excessively bent, which could lead to damage.
7. Troubleshooting
If you encounter issues with your Acogedor A401 HUD, refer to the following common problems and solutions:
7.1 No Display / Device Not Powering On
- Check Connection: Ensure the OBD II cable or USB cable is securely connected to both the HUD and the vehicle's port/power source.
- Vehicle Ignition: Confirm that your vehicle's ignition is on. The HUD typically powers on with the vehicle.
- OBD II Port Functionality: If using OBD II, verify that your vehicle's OBD II port is functional (e.g., by testing with another OBD II device).
- Cable Integrity: Inspect the cables for any visible damage.
7.2 Incorrect Speed Reading (GPS Mode)
- GPS Signal: Ensure the device has a clear view of the sky to acquire a strong GPS signal. Obstructions like tunnels or dense urban areas can affect accuracy.
- Calibration: Check the device settings for any speed calibration options.
7.3 No OBD Data (RPM, Water Temp, etc.)
- OBD II Connection: Confirm the OBD II cable is firmly connected.
- Vehicle Compatibility: While designed for all models, some older or non-standard OBD II implementations might have limited data availability.
- Mode Selection: Ensure the device is operating in OBD mode.
- Fault Clearing: The device description mentions "fault clearing" as an OBD function. If a fault code is present, clearing it might resolve some data display issues. Consult your vehicle's manual or a mechanic if persistent fault codes appear.
7.4 Alarms Not Functioning
- Settings: Verify that the alarm thresholds are correctly set in the device's menu.
- Volume: Check if the alarm volume is audible.
8. Specifications
| Feature | Detail |
|---|---|
| Model | A401 |
| Brand | Acogedor |
| Material | PC+ABS (Acrylonitrile Butadiene Styrene) |
| Color | Black |
| System Modes | OBD II, GPS (Dual Mode Dual System) |
| OBD Functions | Speed, clock, RPM, water temperature, voltage, fuel consumption, driving time, single mileage, compass, altitude, turbine pressure, acceleration test, brake test, fault clearing |
| GPS Functions | Speed, clock, travel time, number of satellites, altitude, single mileage, compass, turbine pressure, acceleration test, braking test |
| Alarm Types | Speed alarm, low voltage alarm, water temperature alarm, RPM alarm |
| Compatibility | Fit for all car models |
| Item Weight | 200 g |
| Parcel Dimensions | 11.5 x 11.4 x 7.6 cm |
9. Support and Warranty
For technical support or warranty inquiries regarding your Acogedor A401 Head Up Display, please refer to the contact information provided with your purchase or visit the official Acogedor store.
Related Documents - A401
 |
RYSJM P17 OBD Multifunctional LCD Gauge User Manual User manual for the RYSJM P17 OBD Multifunctional LCD Gauge. Includes setup instructions, button functions, system settings, and troubleshooting for OBD and GPS modes. |
 |
User Guide for 85mm GPS Speedometer with Tire Pressure Multi-Function Gauge This user guide provides instructions for installing and operating the 85mm GPS Speedometer with Tire Pressure Multi-Function Gauge. It covers parameter settings, wiring diagrams, and important notes for proper usage. |
 |
OBD Smart Gauge P26 User Manual Comprehensive user manual for the RYSJM P26 OBD Smart Gauge, covering installation, settings, calibration, and troubleshooting for OBD and GPS modes. |
 |
MAIMEIMI M24 HUD Head-up Display User Manual Comprehensive user manual for the MAIMEIMI M24 Head-up Display (HUD). Learn about its features, dual OBD+GPS system, function display, button operations, system settings, and troubleshooting tips for optimal vehicle integration. |
 |
JUMUNION Car HUD User Manual User manual and operating instructions for the JUMUNION Car HUD, including setup and safety precautions. |
 |
H2 Head-up Display User Manual User manual for the H2 Head-up Display (HUD), providing instructions on appearance, function description, first use, setting modes, and factory reset. Features include speed display, compass, and adjustable brightness. |
Ask a question about this manual
Ask about setup, troubleshooting, compatibility, parts, safety, or missing instructions. Manuals+ will review the question and use this page’s manual context to help answer it.