1. Product Overview
The Yasorn eMylo DC 12V 1-Channel RF Wireless Remote Control Switch is designed to provide wireless control over various electrical appliances. This system operates on a 433Mhz RF frequency, offering reliable signal transmission and control over a significant distance. It supports multiple operating modes, including momentary, latched, and toggle, to suit different application requirements.

Image: eMylo RF Wireless Remote Control Switch (receiver module) and two remote transmitters.
2. Safety Information
- Ensure all power is disconnected before installation or maintenance to prevent electric shock.
- This device operates on DC 12V. Verify your power source matches the device's voltage requirements.
- Do not exceed the maximum current rating of 10 Amps for the relay.
- Installation should be performed by a qualified individual if you are unsure about electrical wiring.
- Keep the device away from water and high humidity environments.
3. Package Contents
Verify that all items are present in your package:
- 1 x eMylo DC 12V 1-Channel RF Wireless Relay Receiver Module
- 2 x Remote Control Transmitters (433Mhz)
4. Product Features
- RF Remote Control: 433Mhz wireless technology for controlling lamps or other household electric appliances with long control distance, sensitivity, high anti-interference performance, and stability.
- Excellent Stability: The relay module provides high signal sensitivity and resistance to interference. Supports two operating modes: momentary and toggle.
- Strong Signal: Capable of transmitting through walls, floors, and doors, allowing control from any location within a reliable range.
- Flexibility & Wide Application: Utilizes non-directional wireless encoding technology for independent control without mutual interference. Suitable for industrial control, security systems, lighting, motors, and various remote control applications.
- Easy Setup: Programmable RF receiver and transmitter can be flexibly configured in quantity and operating modes to meet diverse usage requirements.
5. Product Components and Dimensions

Image: Dimensions of the receiver module (50mm x 36mm x 23mm) and the remote control (60mm x 35mm).

Image: Internal view of the receiver module, showing the relay, terminal block, and antenna.
Receiver Module Terminals:
- IN+ / IN-: Power input terminals for the receiver module (DC 12V).
- NO: Normally Open contact of the relay.
- COM: Common contact of the relay.
- NC: Normally Closed contact of the relay.
6. Setup and Installation
6.1 Wiring Instructions
Before wiring, ensure the power supply is disconnected. The receiver module requires a DC 12V power input. The relay contacts (NO, COM, NC) are separate from the power input and can switch a different voltage/current, provided it's within the relay's specifications (max 10A, 12V DC).

Image: Wiring diagrams for connecting the receiver module to a light source. Diagram I shows wiring for a DC load, and Diagram II shows wiring for an AC 110V/240V load (using the relay contacts).
- Power Input: Connect your DC 12V power supply to the IN+ (positive) and IN- (negative) terminals of the receiver module. This powers the receiver.
- Load Connection (DC Load Example):
- Connect the positive (+) terminal of your DC 12V load (e.g., a light) to the NO (Normally Open) terminal of the receiver.
- Connect the negative (-) terminal of your DC 12V load to the negative (-) terminal of your DC 12V power supply.
- Connect the positive (+) terminal of your DC 12V power supply to the COM (Common) terminal of the receiver.
- Load Connection (AC Load Example - for reference, ensure relay rating is suitable):
- Connect the Live wire of your AC power source to the COM (Common) terminal of the receiver.
- Connect one terminal of your AC load (e.g., a light) to the NO (Normally Open) terminal of the receiver.
- Connect the other terminal of your AC load to the Neutral wire of your AC power source.
- The NC (Normally Closed) terminal can be used if you require the load to be ON when the relay is inactive and OFF when activated.
6.2 Operating Modes
The receiver supports three operating modes: Momentary, Latched, and Toggle. The unit may come pre-programmed for Toggle mode. You can program the desired mode by following the pairing instructions.
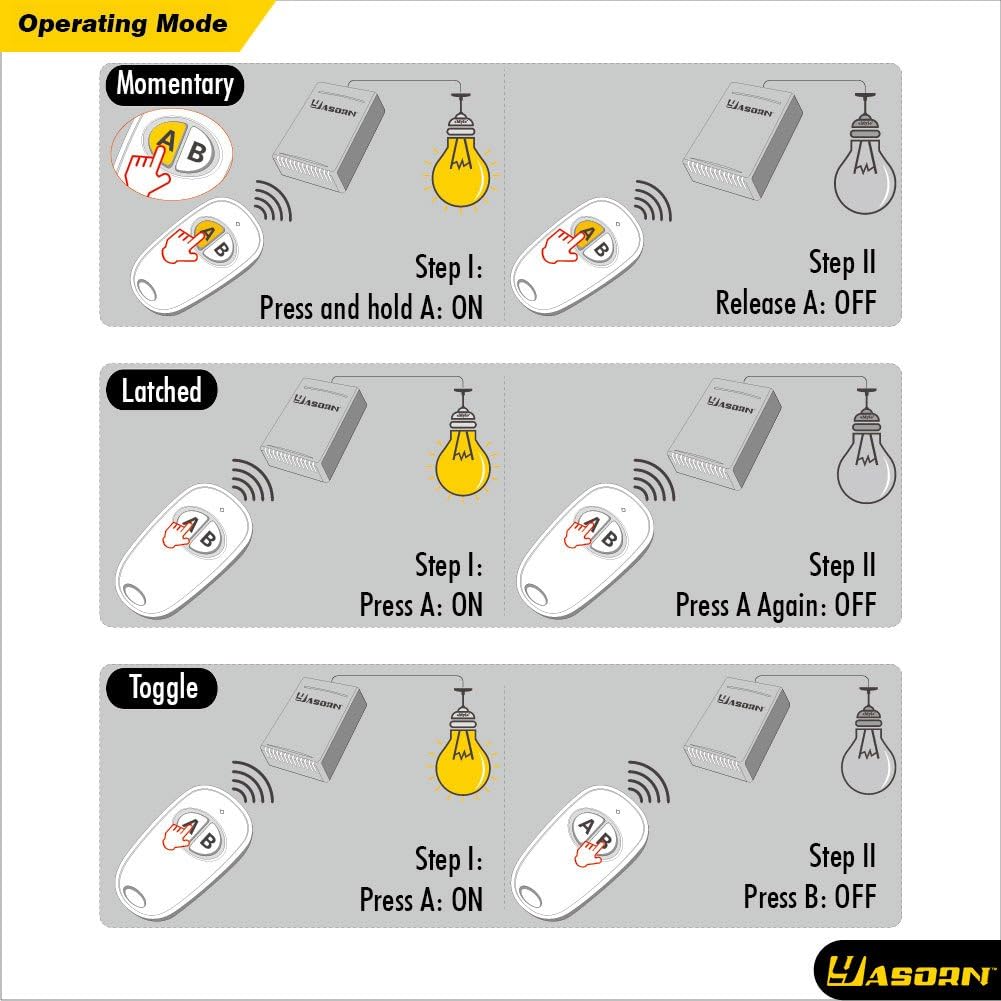
Image: Visual representation of different control types, including Momentary, Latched, and Toggle.
- Momentary Mode (Jog): The relay activates only while the remote button is pressed and held. It deactivates upon release. (Corresponds to "Jog: flash once" during programming).
- Latched Mode: Pressing the remote button once activates the relay, and it remains ON. To turn it OFF, power to the receiver must be disconnected and reconnected. (Corresponds to "Latched: flash twice" during programming).
- Toggle Mode: Pressing the remote button once activates the relay. Pressing the same button again deactivates it. Each press alternates the relay state. (Corresponds to "Toggle: flash three times" during programming).

Image: Table showing settable modes based on key and channel numbers. For a 1-button, 1-channel setup, Momentary and Latched are settable. For 2-buttons, 1-channel, Momentary, Latched, and Toggle are settable.
6.3 Pairing Transmitter and Receiver
The transmitter and receiver may come pre-paired from the factory. If not, or if you need to change the operating mode, follow these steps. You will need to open the receiver casing to access the programming button and indicator lights.

Image: Step-by-step guide for connecting power, clearing code, choosing operating mode, and pairing the transmitter.
- Connect Power: Ensure the receiver is connected to a DC 12V power source. The green power indicator will turn on.
- Clear Code (Optional, if issues arise or for fresh pairing): Press and hold the programming button on the receiver for approximately 5 seconds until the red signal indicator turns ON and then OFF. Release the button. This clears all previously paired transmitters.
- Choose Operating Mode:
- Press the programming button for a few seconds until the red and green indicators start to flash.
- Release the button when the indicators blink once for Momentary Mode.
- Release the button when the indicators blink twice for Latched Mode.
- Release the button when the indicators blink three times for Toggle Mode.
- Pair Transmitter:
- While the red indicator is lit (after choosing the operating mode), press the desired button on your remote control transmitter.
- The red indicator on the receiver will blink once and then go out, indicating successful pairing.
- You will hear a click sound from the relay. The pairing process is complete.
7. Operating Instructions
Once the receiver is wired and paired with the remote control, you can operate your connected appliance wirelessly.
- Momentary Mode: Press and hold the remote button to activate the connected device. Release the button to deactivate.
- Latched Mode: Press the remote button once to activate the connected device. The device will remain ON until power to the receiver is cycled (turned off and on).
- Toggle Mode: Press the remote button once to activate the connected device. Press the same button again to deactivate it.
The effective range of the remote control can vary depending on environmental factors such as walls, floors, and other obstructions.
8. Maintenance
- Cleaning: Use a dry, soft cloth to clean the receiver and remote control. Do not use liquid cleaners or solvents.
- Battery Replacement (Remote): If the remote control's range decreases or it stops responding, the battery may need replacement. Refer to the remote's specific instructions for battery type and replacement procedure.
- Environmental Conditions: Avoid exposing the device to extreme temperatures, direct sunlight, or high humidity.
9. Troubleshooting
| Problem | Possible Cause | Solution |
|---|---|---|
| Device does not respond to remote. |
|
|
| Short operating range. |
|
|
| Relay activates for only a few seconds in Momentary mode. | This is the intended behavior for Momentary mode. | If continuous activation is needed, consider using Toggle or Latched mode, or ensure the remote button is held for the desired duration. |
| Wiring confusion or difficulty. | Misunderstanding of IN terminals vs. COM/NO/NC terminals. | Review Section 6.1 carefully. Remember IN terminals power the receiver, while COM/NO/NC switch the load. Ensure correct voltage (12V DC) is supplied to the IN terminals. |
10. Specifications
| Specification | Value |
|---|---|
| Brand | Yasorn |
| Model Number | YSL116D4N-FBA |
| Receiver Input Voltage | DC 12V |
| Operating Frequency | 433Mhz |
| Relay Contact Type | Normally Open (NO), Common (COM), Normally Closed (NC) |
| Maximum Switching Current | 10 Amps |
| Maximum Switching Voltage | 12 Volts (DC) |
| Operation Mode | Momentary, Latched, Toggle (programmable) |
| Mounting Type | Wall Mount |
| Upper Temperature Rating | 70 Degrees Celsius |
| Material | Silver (Contact Material) |
11. Warranty and Support
For warranty information and technical support, please refer to the manufacturer's official website or contact the seller directly. Keep your purchase receipt for warranty claims.
Manufacturer: Yasorn