1. Introduction
This manual provides essential instructions for the safe and efficient operation, installation, and maintenance of your Treeligo 12V/24V Truck Parking Air Conditioner Unit, Model EAC1009.W.12. Please read this manual thoroughly before using the product and retain it for future reference. This unit is designed to provide fast cooling for various vehicles including RVs, trucks, farm cars, vans, excavators, buses, and pickups.

Image 1.1: Treeligo 12V/24V Truck Parking Air Conditioner Unit.
2. Product Features
- Efficient Cooling: Provides 8800 BTU cooling power for rapid temperature reduction.
- Long Operation Time: Capable of 6-8 hours of continuous use (tested with a 480 AH battery).
- Advanced Compressor: Features a 20CC Scroll Compressor for superior cooling capacity compared to rotary compressors.
- Multiple Control Options: Operable via both remote control and a built-in control panel.
- Easy Installation: Designed for hung-on installation with upgraded connectors for simplified setup.
- Low Noise Operation: Engineered for quiet performance, ensuring minimal disturbance.
- Battery Powered: Operates on 12V or 24V DC power, making it suitable for various vehicle types without fuel consumption.

Image 2.1: Key features and compressor comparison.

Image 2.2: Low noise operation for comfortable rest.
3. Package Contents
Upon unpacking, please verify that all the following components are included and in good condition:
- Indoor Unit (Evaporator)
- Outdoor Unit (Condenser)
- Remote Control
- Connecting Hoses and Wires
- Mounting Hardware (screws, brackets, seals)
- Drainage Hose
- User Manual

Image 3.1: Complete package contents.
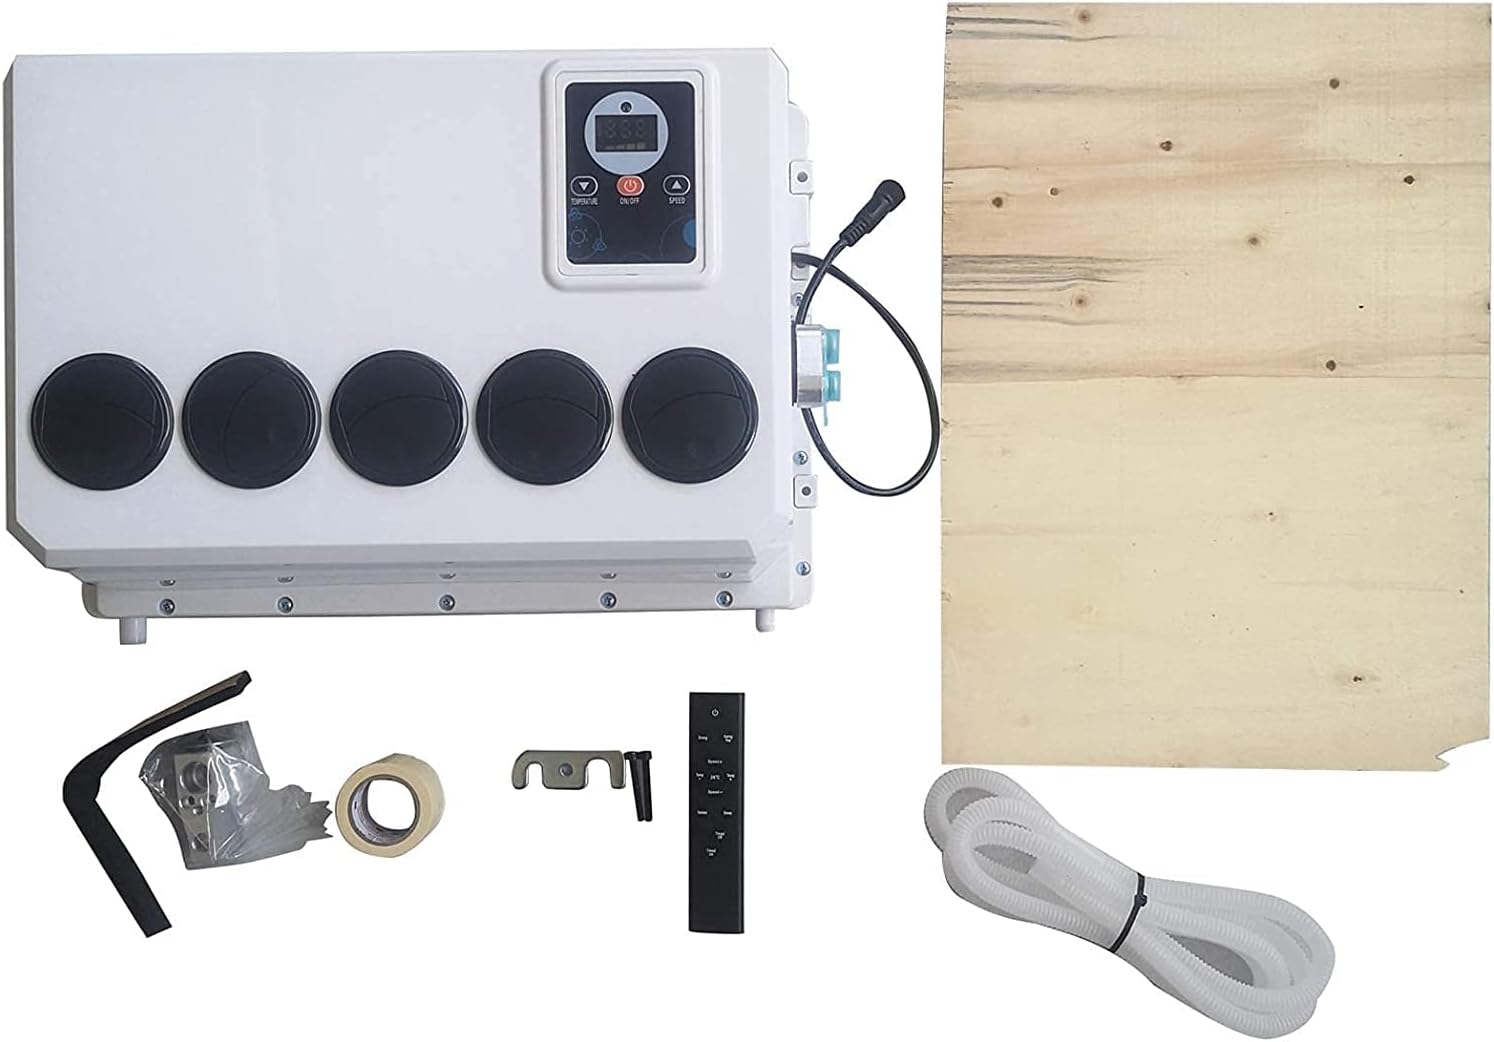
Image 3.2: Detailed view of accessories.
4. Specifications
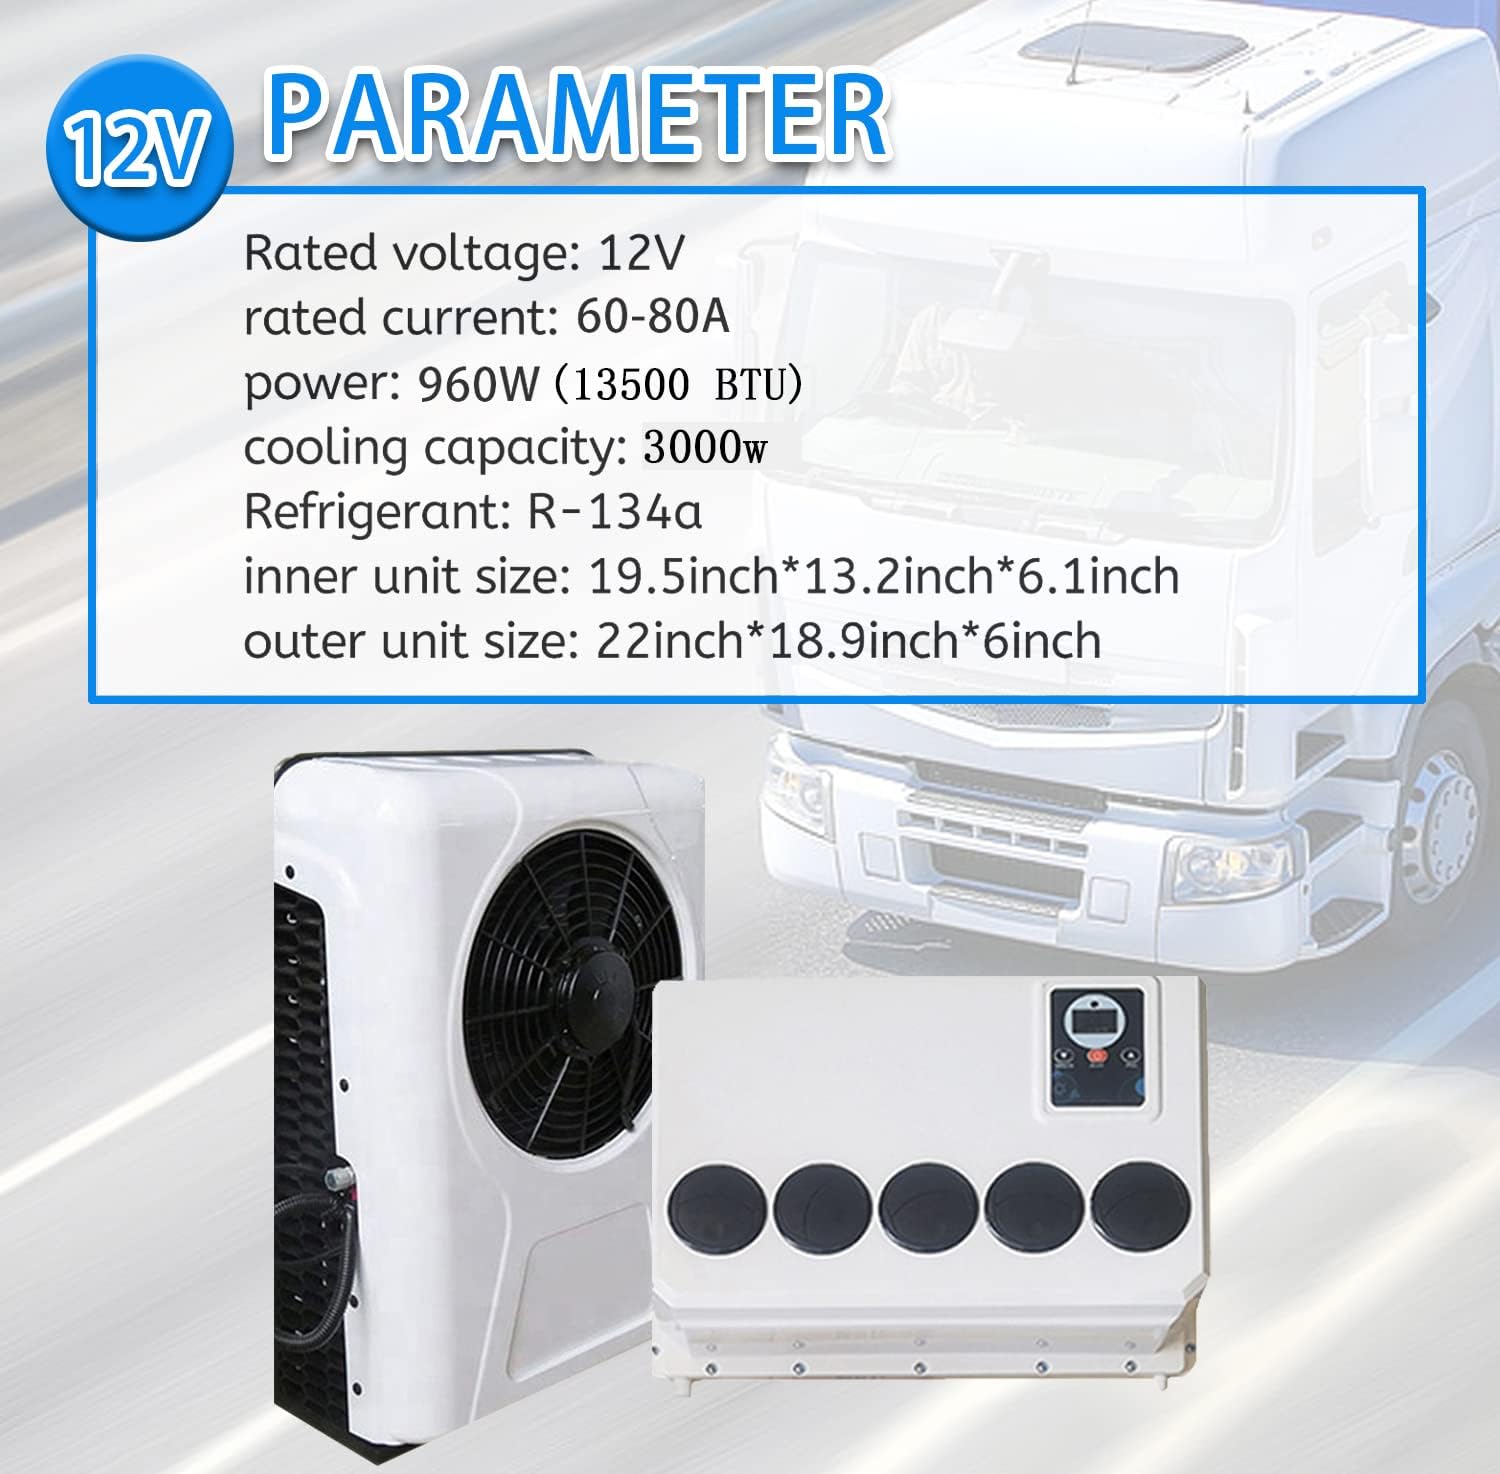
Image 4.1: Product parameters.
| Feature | Specification |
|---|---|
| Brand | Treeligo |
| Model Number | EAC1009.W.12 |
| Rated Voltage | 12V / 24V (as per model variant) |
| Rated Current | 60-80A (for 12V) |
| Power | 960W (13500 BTU) |
| Cooling Capacity | 3000W (8800 BTU) |
| Refrigerant | R-134A |
| Indoor Unit Dimensions | 19.5 x 13.2 x 6.1 inches |
| Outdoor Unit Dimensions | 22 x 18.9 x 6 inches |
| Installation Type | Split System, Hung-on |
| Form Factor | Mini-Split |
| Power Source | Battery Powered |
5. Safety Information
Please observe the following safety precautions to prevent injury and damage to the unit:
- Ensure the unit is installed by a qualified professional to prevent electrical hazards or refrigerant leaks.
- Do not attempt to modify or repair the unit yourself. Contact qualified service personnel.
- Ensure proper ventilation around the outdoor unit to prevent overheating.
- Keep flammable materials away from the unit.
- Verify that the power supply voltage matches the unit's requirements (12V or 24V).
- Disconnect power before performing any maintenance or cleaning.
6. Setup and Installation
The Treeligo Air Conditioner Unit is designed for hung-on installation. Due to the complexity involving refrigerant lines and electrical connections, professional installation is highly recommended to ensure proper function and safety.
General Installation Guidelines:
- Mounting: Securely mount the indoor and outdoor units in their designated locations, ensuring stable support and proper drainage for the indoor unit.
- Connecting Lines: Connect the refrigerant lines between the indoor and outdoor units. Ensure all connections are tight and leak-free.
- Electrical Wiring: Connect the power and control wiring according to the wiring diagram provided with the unit. Ensure correct voltage (12V or 24V) and proper grounding.
- Vacuum and Charge: Evacuate the refrigerant lines to remove air and moisture, then charge the system with the specified amount of R-134A refrigerant. This step requires specialized tools and expertise.
- Test Operation: After installation, perform a test run to verify all functions are working correctly and there are no leaks.
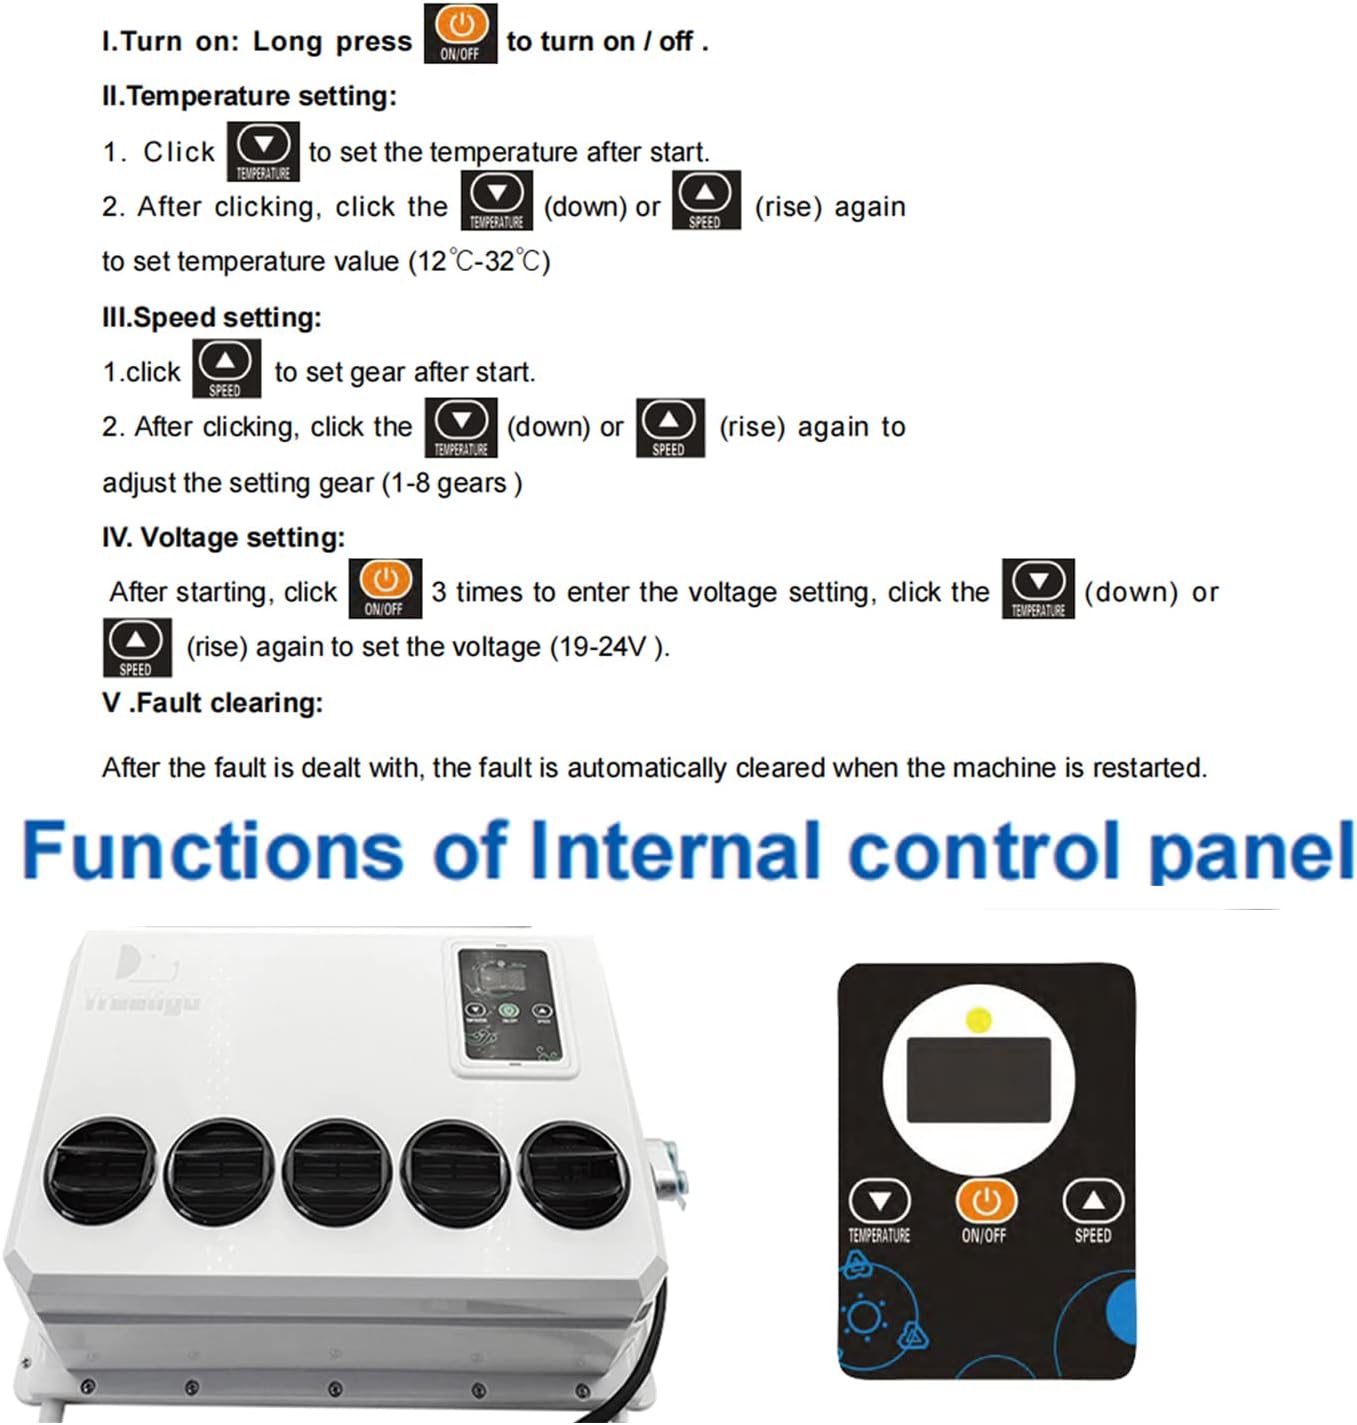
Image 6.1: Example of indoor unit installation and upgraded connectors.

Image 6.2: Installation features and control options.
7. Operating Instructions
The unit can be controlled via the internal control panel or the provided remote control.

Image 7.1: Control panel and remote functions.
I. Turn On/Off:
- Long press the ON/OFF button to turn the unit on or off.
II. Temperature Setting:
- After starting the unit, click the TEMPERATURE button to enter temperature setting mode.
- Click the DOWN (▼) or UP (▲) button to adjust the temperature value (range: 12℃ - 32℃).
III. Speed Setting:
- After starting the unit, click the SPEED button to enter speed setting mode.
- Click the DOWN (▼) or UP (▲) button to adjust the fan speed (1-8 gears).
IV. Voltage Setting:
- After starting, click the ON/OFF button 3 times to enter the voltage setting mode.
- Click the DOWN (▼) or UP (▲) button to set the voltage (range: 19V - 24V).
8. Maintenance
Regular maintenance ensures the longevity and optimal performance of your air conditioner unit.
- Clean Filters: Periodically clean or replace the air filters in the indoor unit to maintain airflow and cooling efficiency.
- Inspect Coils: Check the outdoor unit's condenser coils for dirt and debris. Clean gently with a soft brush or water if necessary.
- Check Connections: Regularly inspect all electrical and refrigerant connections for signs of wear, corrosion, or leaks.
- Drainage: Ensure the drainage hose is clear and free of obstructions to prevent water buildup.
- Professional Check-up: Consider an annual professional inspection to check refrigerant levels and overall system health.
9. Troubleshooting
If you encounter issues with your unit, refer to the following common troubleshooting steps:
- Unit Not Turning On:
- Check power connections and battery charge.
- Ensure the ON/OFF button is pressed correctly.
- Insufficient Cooling:
- Clean air filters.
- Check for obstructions around the outdoor unit.
- Verify temperature settings are appropriate.
- Ensure doors and windows of the vehicle are closed.
- Low refrigerant levels may require professional service.
- Unusual Noises:
- Check for loose parts or debris in the fan.
- If noise persists, contact support.
- Fault Clearing:
- If a fault occurs, it is automatically cleared when the machine is restarted after the issue has been resolved.
For persistent problems, please contact Treeligo customer support.
10. Warranty and Support
For warranty information and customer support, please refer to the documentation included with your purchase or visit the official Treeligo store online.
Treeligo Official Store: Visit the Treeligo Store on Amazon
11. Product Application
The Treeligo EAC1009 unit is versatile and suitable for a wide range of vehicles requiring auxiliary cooling.

Image 11.1: Diverse applications for Treeligo air conditioning units.
12. Official Product Videos
No official seller videos were found for this product in the provided data.


