Rolanstar CPT017-YW-RR
Rolanstar L-Shaped Gaming Desk User Manual
Model: CPT017-YW-RR
Introduction
Thank you for choosing the Rolanstar L-Shaped Gaming Desk. This manual provides detailed instructions for assembly, operation, maintenance, and troubleshooting to ensure you get the most out of your new desk. Designed for both gaming and office use, this desk offers ample workspace, integrated power solutions, and customizable LED lighting to enhance your environment.

Image: The Rolanstar L-Shaped Gaming Desk, showcasing its rustic brown finish, black metal frame, integrated power strip, and under-desk storage shelves. The LED lighting beneath the monitor stand is illuminated in a blue hue.
Safety Information
- Read all instructions carefully before assembly and use.
- Keep all small parts and packaging materials away from children and pets to prevent choking hazards.
- Ensure all screws and fasteners are securely tightened before use. Periodically check and re-tighten as needed.
- Do not overload the desk. Refer to specifications for weight limits.
- Place the desk on a level surface to prevent tipping. Adjustable leg pads are provided for stability on uneven floors.
- Do not expose the desk to excessive moisture or direct sunlight.
- Use only the provided power strip and LED light components. Do not modify electrical components.
Package Contents
Before beginning assembly, verify that all parts listed below are present and undamaged. If any parts are missing or damaged, please contact customer support.
- Desktop Panels (L-shaped sections, corner piece)
- Metal Frame Components (Legs, support bars)
- Monitor Stand Panels
- Storage Shelf Panels
- Integrated Power Strip with 4 Outlets and 2 USB Ports
- RGB LED Strip Lights
- 44-Key RF Remote Control for LED Lights
- Assembly Hardware (Screws, bolts, nuts, washers)
- Assembly Tools (Hex key/Allen wrench)
- Adjustable Leg Pads
- Instruction Manual
Setup and Assembly
Assembly typically takes 1-2 hours. It is recommended to have two people for easier assembly. Lay out all components on a soft, clean surface to prevent scratches.
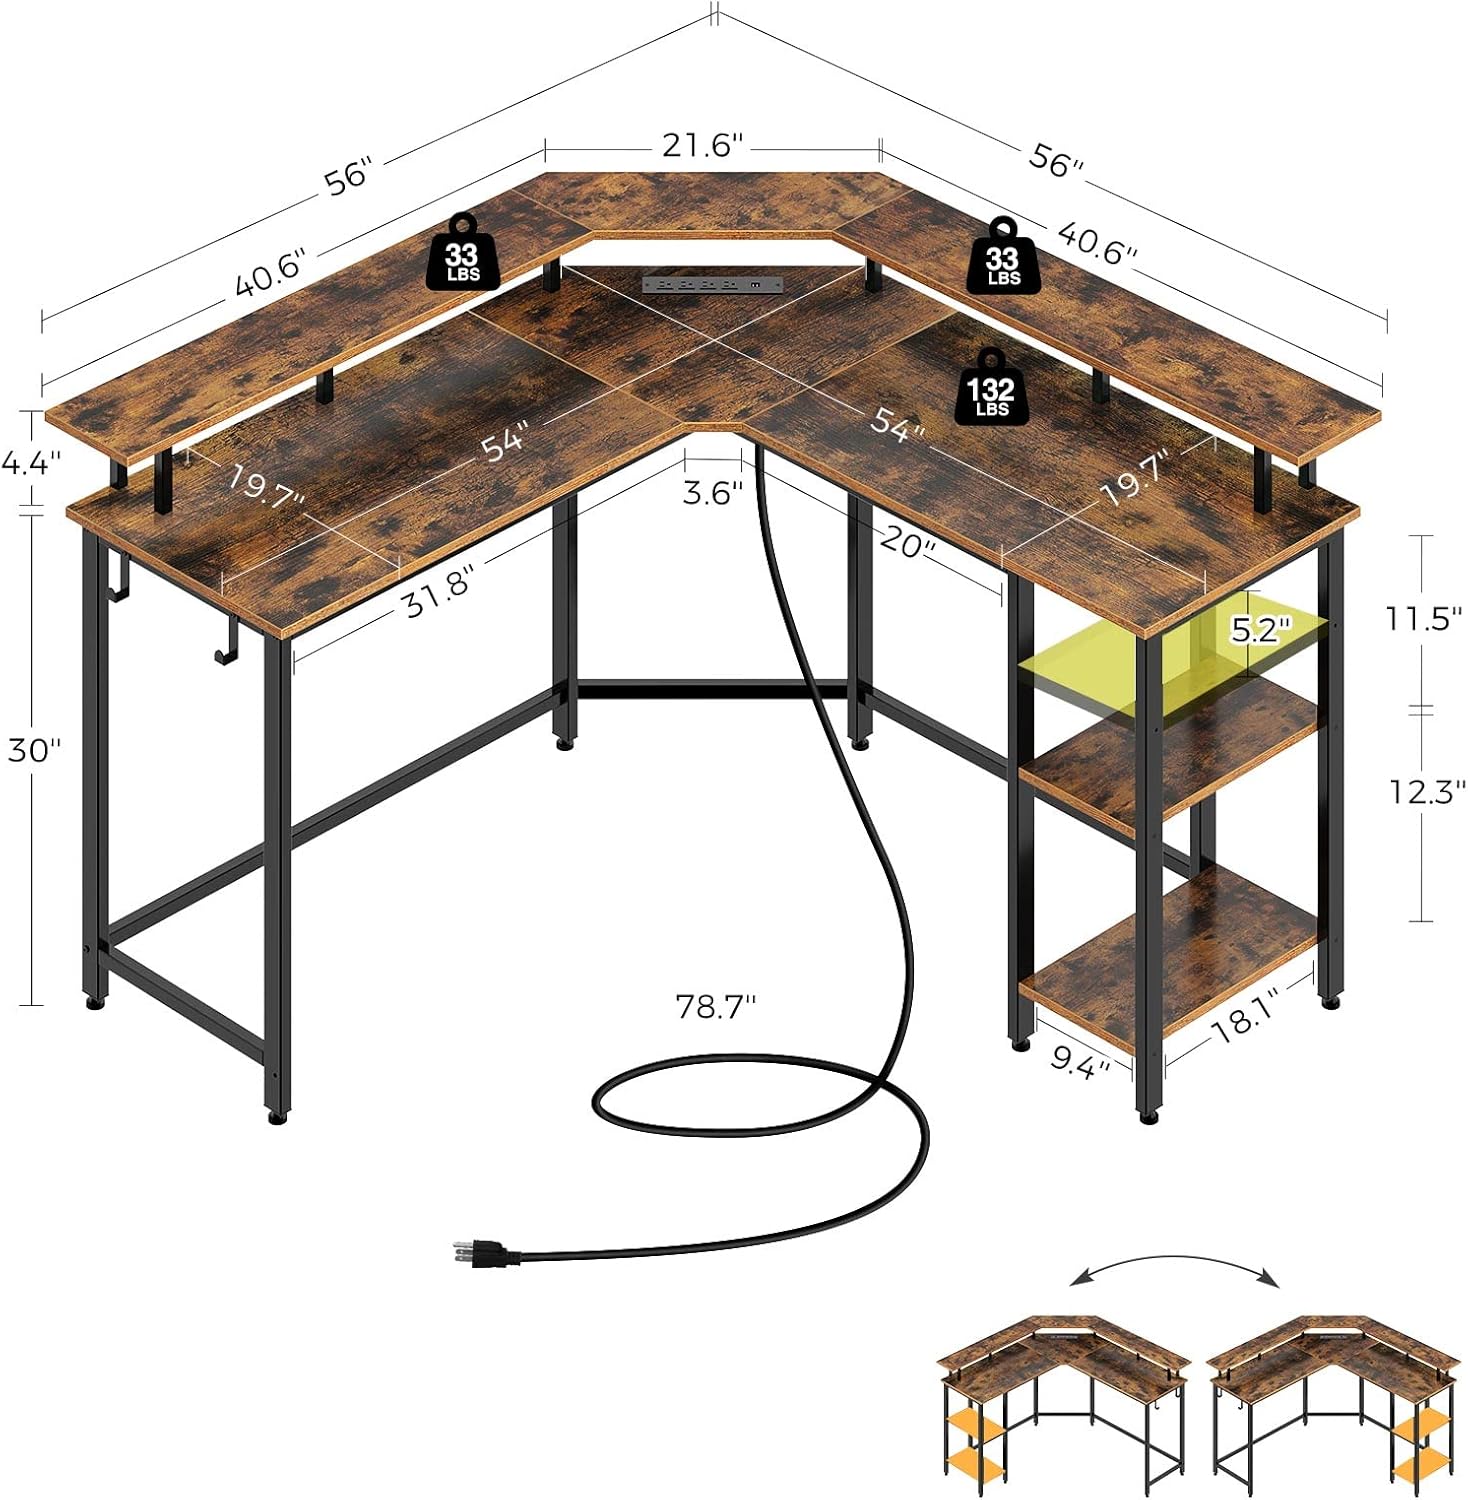
Image: A detailed diagram illustrating the dimensions of the L-shaped desk (56 inches by 56 inches, 19.7 inches deep, 30 inches high) and the various components including the desktop panels, monitor stands, and storage shelves. It also shows the reversible configuration options.
- Unpack and Identify Parts: Carefully remove all components from the packaging. Compare them with the parts list and diagrams in the manual to ensure everything is present.
- Assemble the Metal Frame: Begin by connecting the main metal frame components using the provided screws. Important: Keep all screws loose during initial assembly. This allows for slight adjustments and easier alignment of holes.
- Attach Desktop Panels: Place the L-shaped desktop panels onto the assembled frame. Secure them with screws. Ensure the corner piece aligns correctly.
- Install Monitor Stand and Storage Shelves: Attach the monitor stand panels to the designated positions on the desktop. Note that the monitor stand is detachable. Install the storage shelf panels to the side frame. The storage shelf is freely adjustable, allowing you to customize its height or placement for your main computer tower or other items.
- Connect Power Strip and LED Lights: Integrate the power strip into the designated slot on the desktop. Attach the RGB LED strip lights to the underside of the monitor stand or desired location using the adhesive backing. Connect the LED lights to the power source.
- Final Tightening and Adjustment: Once all components are in place and aligned, systematically tighten all screws. Attach the adjustable leg pads to the bottom of the desk legs to ensure stability on uneven surfaces.
Note on Reversibility: This desk is designed to be reversible, allowing you to configure the L-shape to either the left or right side to best fit your space. Follow the instructions carefully to achieve your desired orientation.
Operating Instructions
Integrated Power Strip

Image: A close-up view of the integrated power strip, showing its four AC outlets and two USB charging ports, with devices plugged in.
The desk includes a built-in power strip with 4 standard AC outlets and 2 USB charging ports. Simply plug the desk's main power cord into a wall outlet. You can then conveniently power your computer, monitors, and charge your mobile devices directly from the desk.
RGB LED Strip Lights

Image: A graphic illustrating the features of the RGB LED strip lights, including a color wheel showing 20 color options, a 44-key RF remote control, and icons representing 5 dynamic modes.
The RGB LED strip lights offer customizable ambient lighting. Use the included 44-key RF remote control to:
- Select from 20 static colors.
- Choose from 5 dynamic lighting modes (e.g., flash, strobe, fade).
- Adjust brightness and speed of dynamic modes.
- The lights feature a memory function, retaining your last selected mode when powered off and on.
Monitor Stand and Storage Shelves

Image: An aerial view of the L-shaped desk, highlighting its spacious design and ability to accommodate multiple monitors, a keyboard, mouse, and other office or gaming accessories.
The detachable monitor stand elevates your screens to an ergonomic viewing height, reducing neck strain. The under-desk storage shelves provide convenient space for your computer tower, books, or other items, helping to keep your workspace organized.
Maintenance
- Cleaning: Wipe the desk surfaces with a soft, damp cloth. Avoid harsh chemicals or abrasive cleaners that could damage the finish.
- Dusting: Regularly dust the desk and LED strips to maintain appearance and functionality.
- Fastener Check: Periodically check all screws and bolts to ensure they remain tight. Re-tighten as necessary to maintain stability.
- Cable Management: Organize cables to prevent tangles and reduce strain on power cords.
Troubleshooting
| Problem | Possible Cause | Solution |
|---|---|---|
| Desk wobbles or is unstable. | Loose fasteners; uneven floor; incorrect assembly. | Ensure all screws are fully tightened. Adjust the leg pads to level the desk on uneven surfaces. Review assembly steps. |
| LED lights not working. | Power connection issue; remote battery low; LED strip damaged. | Check if the LED strip is properly connected to the power source. Replace remote battery. Contact support if strip is damaged. |
| Power outlets/USB ports not working. | Desk not plugged into wall outlet; power strip switch off; circuit breaker tripped. | Ensure the desk's main power cord is securely plugged into a functioning wall outlet. Check if the power strip has an on/off switch and it's in the 'on' position. Reset your home's circuit breaker if necessary. |
| Difficulty aligning screw holes during assembly. | Screws tightened too early; incorrect part orientation. | Loosen all screws slightly to allow for adjustment. Ensure parts are oriented correctly as per the assembly diagrams. Tighten all screws only after all parts are loosely assembled and aligned. |
Specifications
| Feature | Detail |
|---|---|
| Model Number | CPT017-YW-RR |
| Dimensions (L x W x H) | 142.24 cm x 142.24 cm x 87.38 cm (56 in x 56 in x 34.4 in) |
| Depth | 50 cm (19.7 in) |
| Weight | 22.68 kg (50 lbs) |
| Material | Engineered Wood (Laminated), Steel Frame |
| Color | Rustic Brown |
| Power Outlets | 4 AC Outlets |
| USB Ports | 2 USB Ports |
| LED Lights | RGB, 20 Colors, 5 Dynamic Modes, 44-Key RF Remote, Memory Function |
| Special Features | Reversible Design, Detachable Monitor Stand, Adjustable Storage Shelf, Adjustable Leg Pads |
Warranty and Support
Rolanstar products are manufactured with quality and durability in mind. For specific warranty information, please refer to the documentation included with your purchase or visit the official Rolanstar website. If you encounter any issues or have questions regarding your L-Shaped Gaming Desk, please contact Rolanstar customer support for assistance.
For further assistance, please visit: Rolanstar Brand Store on Amazon
Ask a question about this manual
Ask about setup, troubleshooting, compatibility, parts, safety, or missing instructions. Manuals+ will review the question and use this page’s manual context to help answer it.