Graigar HAT560N
Smartgen HAT560N Intelligent ATS Controller User Manual
Model: HAT560N | Brand: Graigar
Introduction
The Smartgen HAT560N series ATS controller is an intelligent dual-supply module designed for automatic transfer systems (ATS). It integrates digital, intelligent, and networking capabilities to provide automatic measurement and control, reducing the potential for incorrect operations. This controller is an ideal solution for various ATS applications.
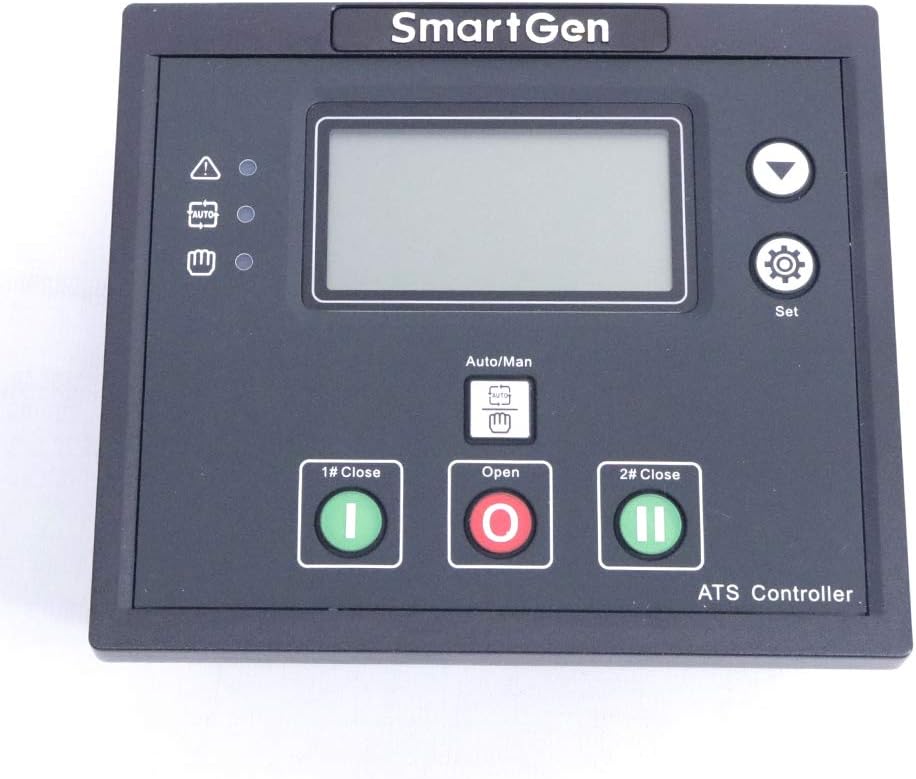
Figure 1: Front view of the HAT560N controller, showing the LCD display, control buttons, and status indicators.
Equipped with a powerful microprocessor, the HAT560N ensures precise voltage measurement (2-way-3-phase/single phase) and accurate judgment. It activates corresponding digital output ports upon detection of abnormal conditions such as over/under voltage, over/under frequency, or loss of phase.
Key Features
- Intelligent dual-supply module with configurable functions.
- Automatic measurement, LCD display (132x64), and digital communication.
- Precision voltage measurement for 2-way-3-phase/single phase systems.
- Protection features: Over/under voltage, loss of phase, reverse phase sequence, over/under frequency.
- Supports Automatic and Manual operating modes.
- Compatible with specialized ATS, Contactor ATS, Air break ATS, and other switch types (PC Two-stage, PC Three-stage, CB, CC switch).
- Compact structure, advanced circuits, simple wiring, and high reliability.
- All parameters can be set on-site with password protection.
- Genset commissioning can be set to On-load or Off-load mode.
Setup and Installation
Proper installation of the HAT560N controller is crucial for its optimal performance and safety. Ensure all power sources are disconnected before beginning installation.
Physical Installation
The controller is designed for panel mounting. Refer to the dimensions below for panel cutout requirements.
- Case Dimensions: 139mm (L) x 120mm (W) x 48mm (D)
- Panel Cutout: 130mm (L) x 111mm (W)

Figure 2: The HAT560N controller showing the included mounting screws for panel installation.
Wiring Connections
The HAT560N controller features clearly labeled terminals for various connections, including DC power supply, AC voltage inputs, auxiliary outputs, and control signals. Adhere to local electrical codes and safety standards during wiring.

Figure 3: Rear view of the HAT560N controller, detailing the terminal blocks for power, inputs, and outputs.
Key wiring terminals include:
- DC Supply: DC (8-35)V. Connect to terminals B- and B+.
- Alternator Voltage Input: (30-360)V (ph-N). Connect to A1, B1, C1, N1 for 1# AC Voltage Input and A2, B2, C2, N2 for 2# AC Voltage Input.
- Auxiliary Outputs: AUX. OUTPUT1 (7A), AUX. OUTPUT2 (7A), AUX. OUTPUT3 (16A), AUX. OUTPUT4 (16A).
- Close Outputs: 1# CLOSE OUTPUT (16A), 2# CLOSE OUTPUT (16A).
- Close Inputs: 1# CLOSE INPUT, 2# CLOSE INPUT.
- Auxiliary Inputs: AUX. INPUT1, AUX. INPUT2.
- Communication Interface: LINK (for monitoring and programming).
Ensure all connections are secure and correctly polarized to prevent damage to the controller or connected equipment.
Operating Instructions
The HAT560N controller provides intuitive operation through its LCD display and push-buttons.
Control Panel Overview
The front panel features an LCD screen for displaying system status and parameters, along with navigation and control buttons.

Figure 4: Angled view of the HAT560N control panel, highlighting the LCD and button layout.
Key controls include:
- LCD Display: Shows system status, voltage, frequency, and other parameters.
- Auto/Man Button: Toggles between Automatic and Manual operating modes.
- 1# Close Button (Green): Manually closes the first power source switch.
- Open Button (Red): Manually opens the currently closed power source switch.
- 2# Close Button (Green): Manually closes the second power source switch.
- Set Button (Gear Icon): Accesses parameter settings menu.
- Up/Down Arrows: Navigates through menus and adjusts parameter values.
Modes of Operation
The controller supports two primary operating modes:
- Automatic Mode: The controller automatically monitors the power sources and initiates transfer based on pre-set parameters and detected abnormalities.
- Manual Mode: Allows the user to manually control the transfer switches using the "1# Close", "Open", and "2# Close" buttons.
Parameter Settings
All operational parameters can be configured directly on the unit. Access the settings menu using the "Set" button. The controller features two different password levels to ensure that only authorized personnel can modify critical settings. During commissioning, the genset can be configured to operate in either On-load or Off-load mode as required by the application.
Maintenance
Regular maintenance ensures the longevity and reliable operation of your HAT560N controller.
- Cleaning: Periodically clean the exterior of the controller with a soft, dry cloth. Do not use abrasive cleaners or solvents.
- Connections: Routinely check all wiring connections for tightness and signs of corrosion. Loose connections can lead to intermittent operation or damage.
- Firmware Updates: Check the manufacturer's website for any available firmware updates that may improve performance or add new features.
- Environmental Conditions: Ensure the operating environment remains within the specified temperature range of -25°C to +70°C and is free from excessive dust or moisture.
Troubleshooting
This section provides guidance on common issues you might encounter with the HAT560N controller.
| Problem | Possible Cause | Solution |
|---|---|---|
| Controller not powering on | No DC power supply; Incorrect wiring; Blown fuse. | Check DC input voltage (8-35V); Verify wiring to B- and B+ terminals; Inspect and replace fuse if necessary. |
| ATS not transferring automatically | Controller in Manual mode; Incorrect parameter settings; Faulty voltage input. | Switch to Automatic mode; Review and adjust transfer parameters; Check AC voltage input connections and values. |
| Over/Under Voltage Alarm | Actual voltage outside set limits; Sensor malfunction. | Verify actual power source voltage; Adjust voltage protection parameters if necessary; Contact support if issue persists. |
| Loss of Phase Alarm | One or more phases missing from input. | Check all phase connections (A, B, C) for the affected power source. |
For issues not listed here, or if troubleshooting steps do not resolve the problem, please contact technical support.
Technical Specifications
The following table details the technical specifications of the Smartgen HAT560N Intelligent ATS Controller.
| Parameter | Value |
|---|---|
| Display | LCD (132*64) |
| Language | Chinese & English |
| AC System | 1P2W/2P3W/3P3W/3P4W |
| Alternator Voltage (ph-N) | (30~360)V |
| Alternator Frequency | 50/60Hz |
| Monitor Interface | LINK |
| Programmable Interface | LINK |
| RTC (Real Time Clock) | Yes |
| Scheduled Start Genset | Yes |
| Circulate Start Genset | Yes |
| Switch Over Priority | Yes |
| Applicable Switch Type | PC Two-stage, PC Three-stage, CB and CC switch |
| DC Supply | DC (8-35)V |
| Case Dimensions | 139*120*48 mm |
| Panel Cutout | 130*111 mm |
| Operating Temperature | (-25~+70)℃ |
| Material | Plastic |
| Color | Black |
Warranty and Support
The Smartgen HAT560N Intelligent ATS Controller is manufactured to high-quality standards. For specific warranty terms and conditions, please refer to the documentation provided with your purchase or contact the manufacturer directly.
For technical assistance, troubleshooting beyond this manual, or inquiries regarding parts and service, please contact Graigar customer support. Ensure you have your product model number (HAT560N) and any relevant purchase information ready when contacting support.
Manufacturer: Graigar
Model Number: HAT560N
ASIN: B09Y5H7CK5
UPC: 07993828007000125
Ask a question about this manual
Ask about setup, troubleshooting, compatibility, parts, safety, or missing instructions. Manuals+ will review the question and use this page’s manual context to help answer it.