1. Introduction
The OBDMONSTER 12V Car Battery and Alternator Tester is designed to provide quick and accurate diagnostics of your vehicle's 12V battery and charging system. This device helps determine the health of your battery and the functionality of your alternator, assisting you in deciding whether a battery needs replacement or simply recharging. It is suitable for various 12V charging systems, including regular flooded, AGM flat plate, AGM spiral, and GEL batteries found in vehicles, forklifts, hybrid cars, SUVs, pickups, boats, RVs, and motorcycles.
This manual provides essential information for the safe and effective use of your tester. Please read it thoroughly before operation.

Image 1.1: The OBDMONSTER 12V Battery Tester in use, highlighting its compatibility with 12V systems.
2. Safety Information
Always observe the following safety precautions when working with automotive batteries:
- Wear appropriate eye protection (safety glasses) and protective gloves.
- Ensure adequate ventilation when working with batteries, as they can emit explosive gases.
- Avoid sparks, flames, and smoking near batteries.
- Do not touch battery acid. If contact occurs, flush immediately with water and seek medical attention.
- Ensure the tester's clamps are connected correctly (red to positive, black to negative) to prevent damage to the device or battery. The device features reverse polarity protection.
- Keep the tester and cables away from moving engine parts and hot surfaces.
3. Product Overview
The OBDMONSTER 12V Car Battery and Alternator Tester features a compact design with six LED indicators for clear status display. It is equipped with pure copper wire and clamps for excellent conductivity and sensitivity.

Image 3.1: Front view of the OBDMONSTER 12V Car Battery and Alternator Tester.
3.1 LED Indicators
The tester provides intuitive feedback through its LED lights:
- Alternator State: Indicates the condition of your alternator based on measured voltage.
- Battery State: Displays the battery power level based on its status.
- Check Before Charge: Indicates if the battery is in good condition or if it may be dead.

Image 3.2: Explanation of the LED indicators for Alternator State, Battery State, and Check Before Charge.
4. Setup
To prepare the OBDMONSTER 12V Car Battery and Alternator Tester for use:
- Ensure the vehicle's ignition is off for battery tests, or on for alternator tests as specified in the operating instructions.
- Connect the red clamp to the positive (+) battery terminal.
- Connect the black clamp to the negative (-) battery terminal.
- The tester will power on automatically once connected.

Image 4.1: Correct connection of the tester's clamps to a car battery.
5. Operating Instructions
5.1 Battery Test (Engine OFF)
To test the battery's state:
- Ensure the vehicle's engine is turned OFF.
- Connect the red clamp to the positive (+) terminal and the black clamp to the negative (-) terminal of the battery.
- The "OK" light will illuminate, followed by the battery state indicators.
- Observe the "Battery State" LEDs (Full, Middle, Low) to determine the battery's charge level.

Image 5.1: Battery Check results indicating Full or Low charge.
5.2 Alternator Test (Engine ON)
To test the alternator's state:
- Ensure the vehicle's engine is turned ON.
- Connect the red clamp to the positive (+) terminal and the black clamp to the negative (-) terminal of the battery.
- The "OK" light will illuminate, followed by the alternator state indicators.
- Observe the "Alternator State" LEDs (Good, Fault) to determine the alternator's condition.
Image 5.2: Alternator Check results indicating Good or Faulty operation.
5.3 Charge Check (Engine OFF & External Power Source ON)
To check the charging process:
- Ensure the vehicle's engine is turned OFF.
- Connect an external power source (charger) to the battery and turn it ON.
- Connect the red clamp to the positive (+) terminal and the black clamp to the negative (-) terminal of the battery.
- The "OK" light will illuminate, followed by the battery state indicators.
- A gradual increase in the battery status LEDs (from Low to Full) indicates the battery is being charged.
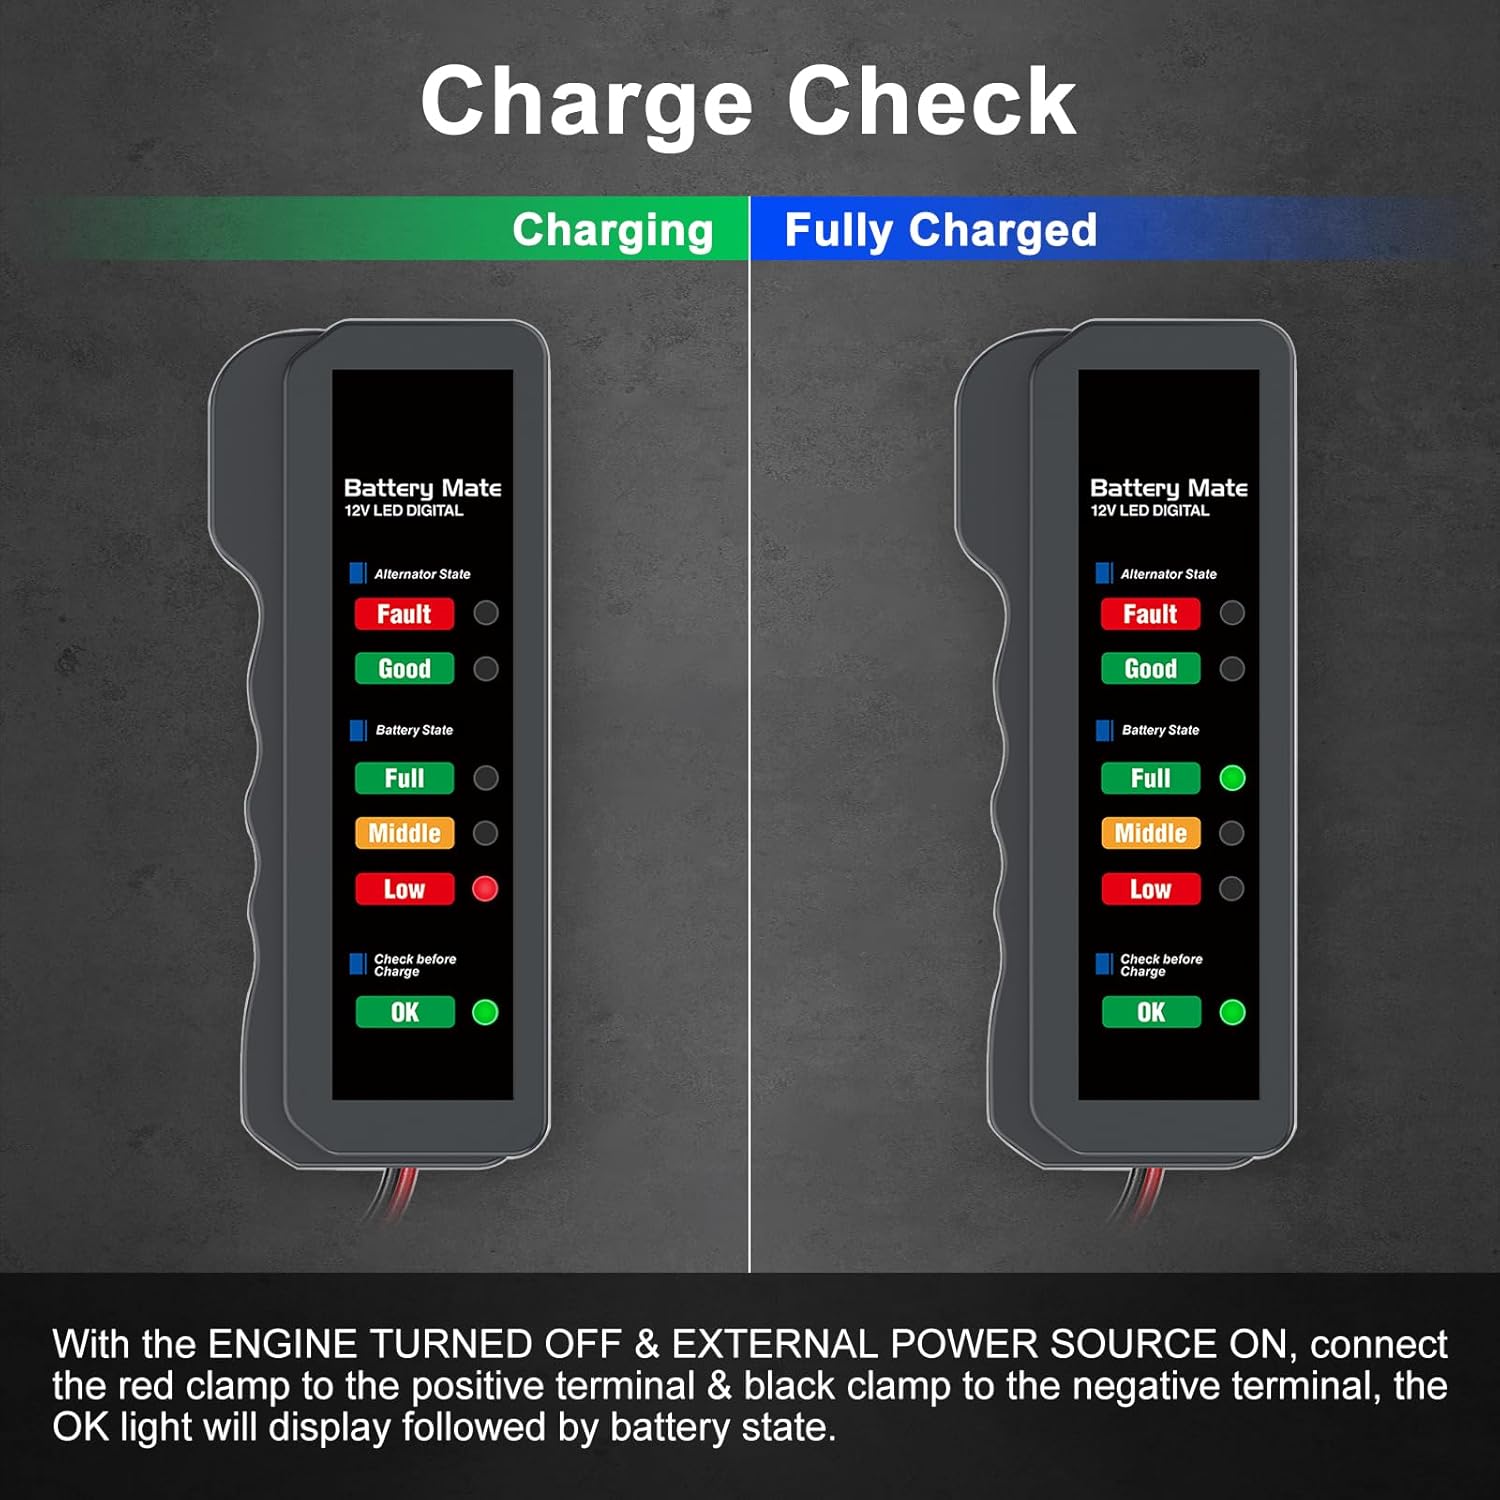
Image 5.3: Charge Check results indicating charging progress or fully charged status.
5.4 Interpreting LED Indicators and Voltage Ranges
The tester uses a series of LEDs to indicate battery and alternator status based on voltage levels:
- 0V-4V: Product cannot start. Battery icon with question mark. (Display 1)
- 4.1V-11V: "OK" light flashes, other lights off. Battery icon with exclamation mark. (Display 2)
- 11.1V-11.5V: "LOW" light flashes, "OK" light is on. Battery icon with low charge. (Display 3)
- 11.6V-12V: "MIDDLE" light flashes, "LOW" light is on. Battery icon with medium charge. (Display 4)
- 12.1V-13V: "FULL" light flashes, "MIDDLE" light is on. Battery icon with high charge. (Display 5)
- 13.1V-13.9V: "GOOD" light flashes, "FULL" light is on. Battery icon fully charged. (Display 6)
- 14V-15.7V: "FAULT" lights flashing, "GOOD" lights are on. Battery icon with question mark. (Display 7)

Display 1 (0V-4V)

Display 2 (4.1V-11V)

Display 3 (11.1V-11.5V)

Display 4 (11.6V-12V)

Display 5 (12.1V-13V)

Display 6 (13.1V-13.9V)

Display 7 (14V-15.7V)
6. Maintenance
- Clean the tester with a soft, dry cloth. Do not use abrasive cleaners or solvents.
- Inspect the cables and clamps regularly for any signs of damage or wear. Replace if necessary.
- Store the tester in a dry, cool place, away from direct sunlight and extreme temperatures.
- Ensure the clamps are clean and free of corrosion for optimal conductivity.
7. Troubleshooting
- Tester does not light up: Ensure the clamps are securely connected to the correct battery terminals. Check for corrosion on battery terminals or clamps that might impede connection.
- Inaccurate readings: Ensure the battery terminals are clean. The tester is designed for 12V systems; ensure your battery is 12V.
- Testing a dead battery: This device does not require a built-in battery. However, if testing a completely dead battery (0V-4V range), it may not provide a full diagnosis. It is recommended to charge the battery first if it is completely discharged before testing.
- Flickering lights: Refer to Section 5.4 for detailed interpretation of flashing LED indicators, which often signify specific voltage ranges or conditions.
8. Specifications
| Feature | Specification |
|---|---|
| Model Number | OBDMONSTER-310 |
| Brand | OBDMONSTER |
| Power Source | Battery Powered (from tested battery) |
| Compatible Battery Voltage | 12V |
| Compatible Battery Types | Regular flooded, AGM flat plate, AGM spiral, GEL |
| Item Weight | 0.04 Kilograms (1.41 ounces) |
| Package Dimensions | 4.76 x 2.99 x 1.54 inches |
| Cord Length | 9.84 inches |

Image 8.1: Product dimensions for the OBDMONSTER 12V Battery Tester.

Image 8.2: The tester is compatible with SUVs, cars, and motorcycles.
9. Warranty and Support
OBDMONSTER is committed to providing reliable products and customer satisfaction. This product comes with a worry-free purchase guarantee.
For any questions or assistance regarding your OBDMONSTER 12V Car Battery and Alternator Tester, please contact our professional technical support team. We aim to help solve any issues within 24 hours.
Contact information can typically be found through your purchase platform or the official OBDMONSTER website.