1. Introduction
This manual provides comprehensive instructions for the installation, operation, and maintenance of your VISVIC Dash Cam XW211-A. This device is designed to record driving footage from multiple perspectives, enhancing safety and providing evidence in case of incidents. Please read this manual thoroughly before use to ensure proper functionality and to maximize your experience with the product.
2. Package Contents
Verify that all items listed below are included in your package:
- VISVIC Dash Cam Main Unit (with front and interior cameras)
- Rear Camera
- Suction Cup Mount
- Car Charger (Cigarette Lighter Adapter)
- USB Cable
- User Manual
- 3M Adhesive Pads (for rear camera mounting)
- Cable Management Tool
- 32GB Micro SD Card

3. Product Features
- 3-Lens Camera System: Records simultaneously from front, inside, and rear perspectives.
- 1080P HD 4-Inch Screen: Full-HD video resolution (1920x1080) with a 170° wide-angle lens for comprehensive coverage.
- Night Vision & Picture-in-Picture: Automatic exposure adjustment in low light and simultaneous display of front and rear views.
- G-Sensor: Automatically detects sudden acceleration, braking, or collisions, locking critical footage to prevent overwriting.
- Loop Seamless Recording: Continuously records by overwriting the oldest footage when the memory card is full, ensuring uninterrupted recording.
- Parking Monitor: Monitors the vehicle for impacts while parked.
- Motion Detector: Initiates recording when motion is detected.

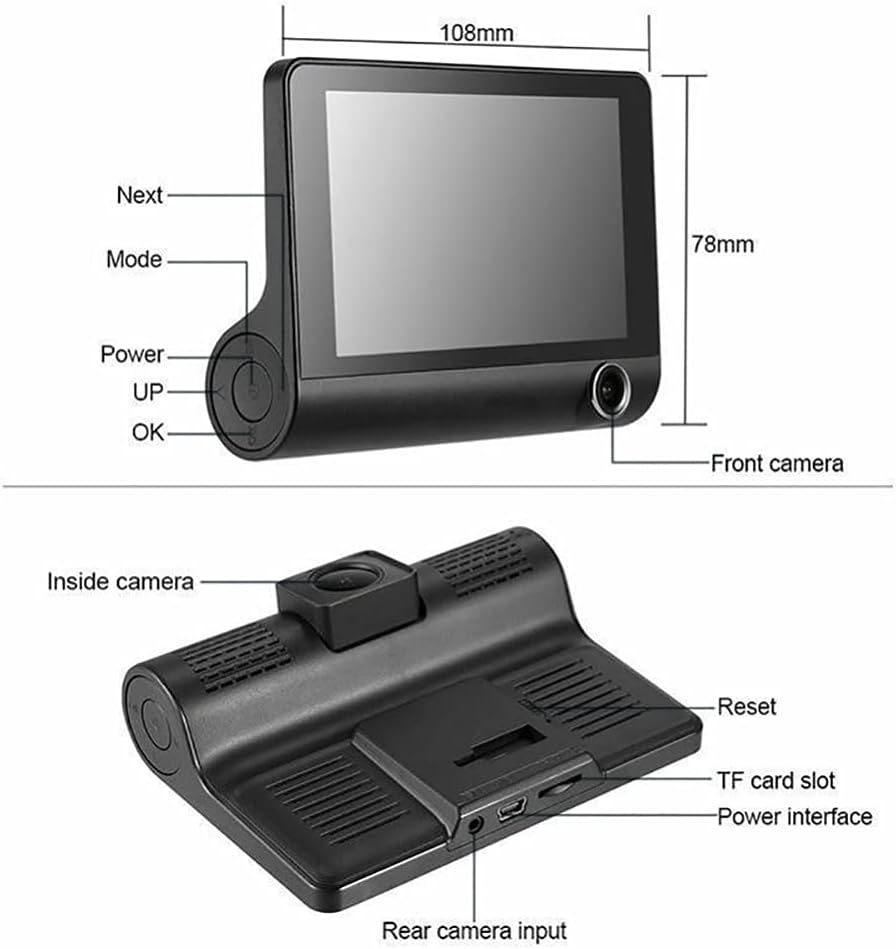
4. Product Diagram and Components
Familiarize yourself with the main unit and its connections:

5. Setup and Installation
5.1 Main Unit Installation
- Clean the windshield area where the dash cam will be mounted to ensure strong adhesion.
- Attach the suction cup mount to the main dash cam unit.
- Secure the suction cup mount to the cleaned area on your windshield, ensuring it does not obstruct your view.
- Insert the provided 32GB Micro SD card into the TF card slot on the main unit.
- Connect the car charger to the dash cam's power interface and plug the other end into your vehicle's cigarette lighter socket.
5.2 Rear Camera Installation
- Determine the optimal mounting location for the rear camera, typically above the license plate or on the rear windshield.
- The rear camera can be mounted using either the provided 3M adhesive pads or screws (not included, but bracket supports).
- Route the rear camera cable from the back of the vehicle to the main dash cam unit. Use the cable management tool to tuck the cable neatly along the vehicle's interior trim.
- Connect the rear camera cable to the "Rear camera input" port on the main dash cam unit.
- If you wish for the rear camera display to automatically switch to full screen when reversing, connect the red wire from the rear camera cable to your vehicle's reverse light power supply. (This step is optional if you only require continuous rear recording).

6. Operating Instructions
6.1 Power On/Off
- The dash cam will automatically power on and begin recording when your vehicle's ignition is turned on.
- It will automatically power off when the ignition is turned off.
- To manually power on/off, press and hold the Power button located on the side of the main unit.
6.2 Menu Navigation
- Use the Mode button to switch between video recording, photo mode, and playback mode.
- In menu settings, use the Up and Down buttons to navigate options.
- Press the OK button to confirm a selection.
- The Lock button can be used to manually protect current recording files.
6.3 Display Modes
The 4-inch screen supports various display modes:
- Front camera view only.
- Interior camera view only.
- Rear camera view only.
- Picture-in-Picture (PIP) mode, showing front view with a smaller inset of interior or rear view.
- Simultaneous display of all three cameras (front, interior, rear).

7. Key Features Explained
7.1 G-Sensor (Gravity Sensor)
The built-in G-Sensor detects sudden movements, such as impacts or rapid acceleration/deceleration. When triggered, it automatically locks the current video segment, preventing it from being overwritten by loop recording. This ensures crucial footage from an accident is preserved.
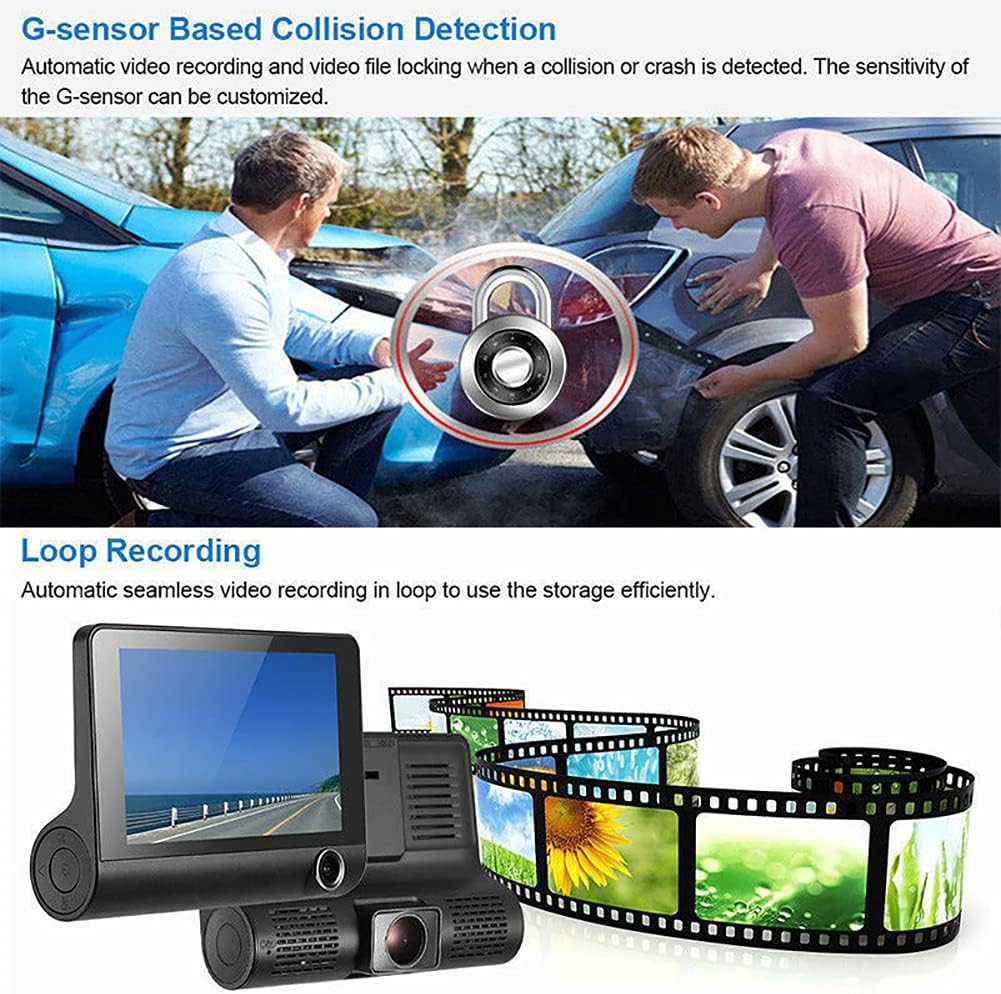
7.2 Loop Seamless Recording
This function allows the dash cam to record continuously. When the Micro SD card reaches its storage limit, the oldest unlocked video files are automatically overwritten by new recordings. This ensures that recording never stops due to a full memory card.

7.3 Night Vision
The dash cam is equipped with night vision capabilities that automatically enhance exposure in low-light conditions. This allows for clear video capture of both the road ahead and the vehicle's interior, even at night.

7.4 Parking Monitor
When enabled, the parking monitor feature allows the dash cam to detect impacts or vibrations while your vehicle is parked. If an event is detected, the camera will automatically record a short video segment, providing surveillance even when you're away from your vehicle.
8. Troubleshooting
- Camera not powering on: Ensure the car charger is securely plugged into both the dash cam and the vehicle's power outlet. Check if the vehicle's ignition is on.
- Recording stops unexpectedly: Verify that a Micro SD card is inserted and properly formatted. Ensure the card is not full (loop recording should prevent this, but check for locked files).
- Poor video quality: Clean the camera lenses. Check the resolution settings in the menu. Ensure the windshield area is clean.
- Rear camera not displaying: Check the cable connection between the rear camera and the main unit.
- Buttons unresponsive: Use a thin object (like a paperclip) to press the Reset button (refer to Figure 4.1 for location).
9. Specifications
| Feature | Detail |
|---|---|
| Product Dimensions | 7.87 x 4.72 x 2.76 inches |
| Item Weight | 13.7 ounces |
| Model Number | XW211-A |
| Connectivity Technology | USB |
| Special Feature | Reverse Assist |
| Video Capture Resolution | 1080p |
| Mounting Type | Suction Mount |
| Field Of View | 170 Degrees |
| Control Method | Touch |
10. Official Product Video
Watch this short video for a visual overview of the product's appearance and texture:
11. Warranty and Support
For warranty information or technical support, please refer to the contact details provided on the product packaging or visit the official VISVIC website. Keep your purchase receipt as proof of purchase.