Introduction
The TP-Link EAP610 is an AX1800 Ceiling Mount Wi-Fi 6 Access Point designed to provide ultra-fast and reliable wireless connectivity for various business environments, including offices, hotels, classrooms, and cafes. It integrates seamlessly into the Omada Software Defined Networking (SDN) platform, offering centralized cloud management and advanced wireless technologies.

Figure 1: TP-Link EAP610 AX1800 Wireless Access Point
Key Features:
- Ultra-Fast True Wi-Fi 6 Speeds: Boosts dual-band Wi-Fi speeds up to 1800 Mbps (1201 Mbps on 5GHz, 574 Mbps on 2.4GHz) with 1024-QAM, Long OFDM Symbol, and 4 Spatial streams for increased multi-user throughput.
- Ultra-Slim Design: Compact and elegant design for simple installation and seamless blending into any modern environment.
- Integrated into Omada SDN: Part of the Omada Software Defined Networking platform, integrating access points, switches, and gateways with multiple control options (Hardware, Software, or Cloud-based controllers). Standalone mode is also supported.
- Cloud Access & Omada App: Enables centralized cloud management of the entire network from different sites, controlled from a single interface anywhere, anytime via remote cloud access and the Omada app.
- Advanced Wireless Technologies: Supports Mesh WiFi, Seamless Roaming (requires Omada SDN controllers), WPA3, Band Steering, Load Balancing, Airtime Fairness, and Beamforming.
- Multiple Powering Options: Supports 802.3at PoE+, 48V/0.5A Passive PoE, and 12V/1.5A DC power supply for flexible deployment.

Figure 2: Comparison of AX1800 Wi-Fi 6 speeds with standard AC EAP.

Figure 3: EAP610 V2 dimensions and available power input options.
What's in the Box
The TP-Link EAP610 package includes all necessary components for installation and operation:
- EAP610 V2 Access Point
- 12V / 1.5A DC Power Adapter
- Ceiling/Wall Mounting Kits (screws and anchors)
- Installation Guide

Figure 4: EAP610 V2 unit and its mounting plate.
Setup
Physical Installation:
The EAP610 V2 can be mounted on a ceiling or wall using the provided mounting kits. Its compact design allows for discreet placement. Ensure the chosen location provides optimal Wi-Fi coverage and has access to a network drop.
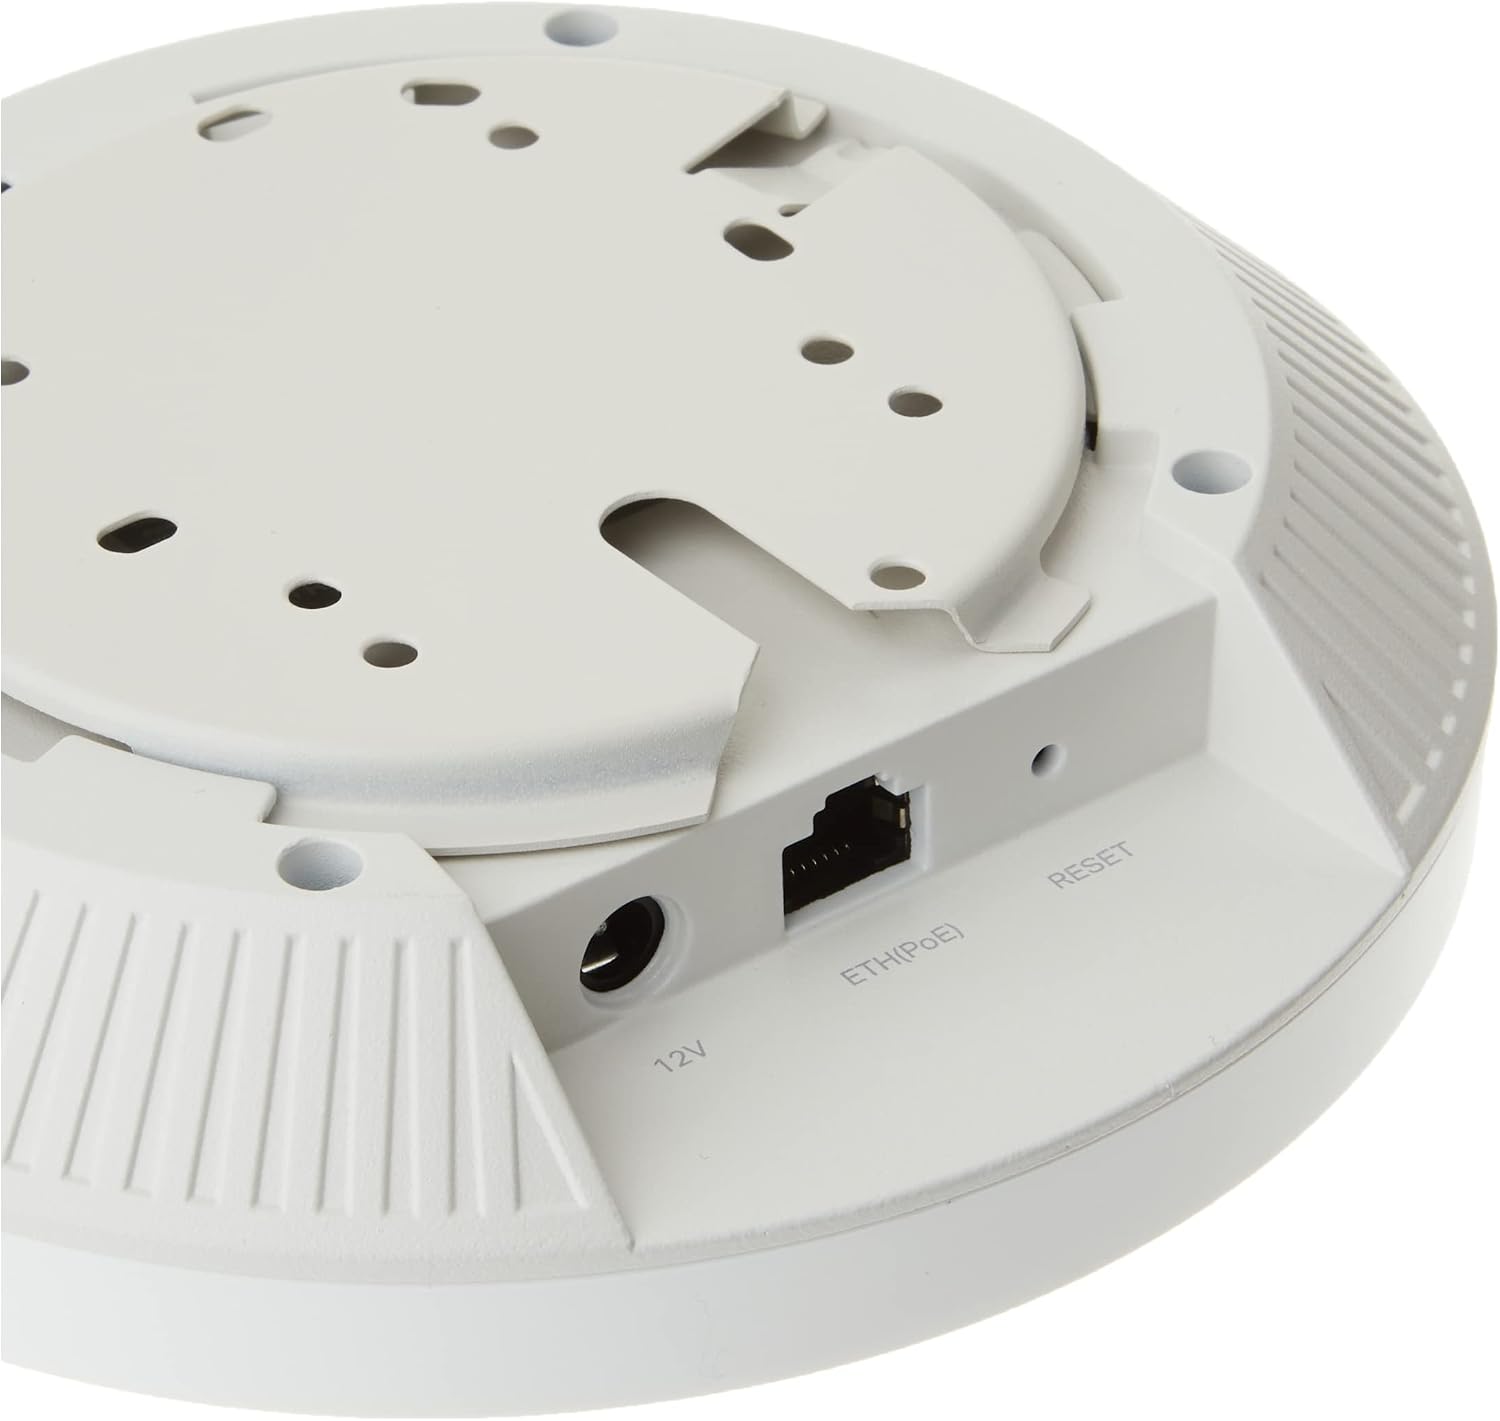
Figure 5: Rear view of the EAP610 V2 showing the 12V DC, ETH(PoE), and Reset ports.
Powering Options:
- Power over Ethernet (PoE+): Connect the EAP610 to a PoE+ switch (802.3at compliant) or a Passive PoE adapter (e.g., TP-Link TL-PoE4824G) using an Ethernet cable. This method simplifies deployment by delivering both power and data over a single cable.
- DC Power Adapter: Use the included 12V / 1.5A DC power adapter by plugging it into the DC port on the access point and a power outlet.
Configuration:
The EAP610 can be quickly set up using the Omada app. Simply launch the app, scan the S/N code on the package, and follow the on-screen instructions. For detailed setup procedures, refer to the official User Manual (PDF) available at User Manual (PDF).
Video 1: Product Overview of the TP-Link EAP610, demonstrating its features and components.
Operating the EAP610
Omada SDN Integration:
The EAP610 is designed to work within the Omada SDN ecosystem, providing a unified management interface for your entire network. This allows for centralized control of access points, switches, and gateways, simplifying network administration and monitoring.

Figure 6: Omada SDN platform illustrating flexible management options including hardware, software, and cloud controllers.
Seamless Roaming:
When used with Omada SDN controllers, the EAP610 supports seamless roaming, allowing devices to automatically switch between access points as you move, ensuring an uninterrupted connection. This is ideal for large areas or multi-story buildings where continuous Wi-Fi coverage is essential.

Figure 7: Diagram illustrating seamless roaming capability across multiple access points within a building.
Cloud Management and App Control:
Manage your network remotely via the Omada Cloud and the Omada app. This provides a single interface to control and monitor your network devices from anywhere, at any time, offering convenience and flexibility for business owners.

Figure 8: Overview of the Omada cloud solution for business networking, showing various integrated devices and management interfaces.
Video 2: Official video from TP-Link demonstrating how to upgrade your business WiFi with Omada.
Maintenance
To ensure optimal performance and longevity of your TP-Link EAP610, regular maintenance is recommended:
- Keep Clean: Periodically wipe the device with a soft, dry cloth to remove dust. Ensure ventilation slots are clear of obstructions.
- Firmware Updates: Check the TP-Link website regularly for firmware updates. Keeping the firmware updated ensures you have the latest features, security patches, and performance improvements.
- Proper Ventilation: Ensure the access point is installed in a location with adequate airflow to prevent overheating.
- Environmental Conditions: Avoid exposing the device to extreme temperatures, humidity, or direct sunlight.
Troubleshooting
If you encounter issues with your TP-Link EAP610, consider the following troubleshooting steps:
- No Power/LED Off: Verify that the power adapter is securely connected to the EAP610 and a working power outlet, or that the PoE connection is active and providing power.
- No Internet Access: Check the Ethernet cable connection to the access point and ensure your router or network gateway has internet connectivity. Confirm that the EAP610 is properly configured within the Omada SDN controller or in standalone mode.
- Weak Wi-Fi Signal: Ensure the access point is centrally located and free from obstructions. Consider adding more EAPs for larger areas or areas with many walls.
- Slow Speeds: Check for network congestion or interference. Ensure your client devices support Wi-Fi 6 for optimal performance. Verify that the EAP610's firmware is up to date.
- Cannot Access Omada App/Controller: Ensure the EAP610 is connected to the network and the controller (hardware, software, or cloud) is running and accessible.
- Resetting the Device: If issues persist, you may need to perform a factory reset. Locate the reset button (refer to Figure 5) and press and hold it for approximately 5-10 seconds until the LED behavior changes, then release.
For more in-depth troubleshooting or persistent issues, please refer to the comprehensive User Manual or contact TP-Link Technical Support.
Specifications
| Attribute | Value |
|---|---|
| Product Dimensions | 6.3 x 6.3 x 1.32 inches |
| Item Weight | 13.7 ounces |
| ASIN | B09XM74VQL |
| Item Model Number | EAP610 V2 |
| Manufacturer | TP-Link |
| Country of Origin | Vietnam |
| Brand | TP-Link |
| Model Name | EAP610 V2 |
| Special Feature | WPS |
| Frequency Band Class | Dual-Band |
| Wireless Communication Standard | 802.11ax |
| Compatible Devices | Personal Computer |
| Frequency | 5 GHz |
| Recommended Uses For Product | Home, Business |
| Connectivity Technology | Ethernet |
Warranty and Support
The TP-Link EAP610 V2 is backed by an industry-leading 5-year warranty, ensuring long-term reliability and peace of mind. Free technical support is available from 6 AM to 6 PM PST, Monday to Friday.
For further assistance, detailed guides, or to contact support, please visit the official TP-Link website or refer to the comprehensive User Manual (PDF) provided with your product or available online at User Manual (PDF).