1. Introduction
This manual provides detailed instructions for the setup, operation, and maintenance of your ENDGAME GEAR XSTRM USB RGB Microphone. Please read this manual thoroughly before using the product to ensure optimal performance and longevity.

Figure 1: ENDGAME GEAR XSTRM USB RGB Microphone (White)
2. What's in the Box
Verify that all components are present in the packaging:
- ENDGAME GEAR XSTRM USB RGB Microphone
- Integrated Metal Stand
- Magnetic Pop Filter
- USB-C to USB-A Cable

Figure 2: Microphone with included magnetic pop filter and USB-C port.
3. Key Features
- Cardioid Polar Pattern: Focuses audio capture on sounds directly in front of the microphone, minimizing background noise.
- AI Noise Cancellation: Advanced artificial intelligence actively removes unwanted background sounds for clearer voice transmission.
- Integrated Shock Mount: Suspends the microphone to absorb vibrations and prevent handling noise.
- Magnetic Pop Filter: Effectively reduces plosive sounds (P, T, K, B, D, G) for smoother audio.
- LED Gain Indicator: Visual feedback to monitor input volume levels, helping prevent clipping.
- Tap-to-Mute Function: A simple tap on the top of the microphone instantly mutes or unmutes the audio output.
- Customizable RGB Lighting: Features 12 different honeycomb-pattern lighting modes, from static colors to dynamic effects.
- Gold-Plated Capsule: A 20-millimeter gold-plated capsule ensures natural voice resonance and high-fidelity audio capture.
- High-Resolution Audio: Supports 24-bit resolution and a 192 kHz sampling rate for detailed sound recording.
- Versatile Mounting: Includes a metal stand and a 3/8-inch thread for compatibility with conventional tripods or boom arms.
- USB-C Connectivity: Modern and reliable USB-C connection for easy plug-and-play setup.

Figure 3: Microphone highlighting RGB lighting and LED gain indicator.

Figure 4: Illustration of the shock mount and pop filter for noise reduction.
4. Setup Guide
- Unpack the Microphone: Carefully remove the ENDGAME GEAR XSTRM microphone and its components from the packaging.
- Attach Pop Filter: The magnetic pop filter can be easily attached to the front of the microphone. Ensure it is securely in place.
- Position the Microphone:
- For desktop use, place the microphone with its integrated metal stand on a stable, flat surface.
- For boom arm mounting, unscrew the microphone from its stand and attach it to a conventional tripod or boom arm using the integrated 3/8-inch thread.
- Connect to Computer: Connect the USB-C end of the provided cable to the USB-C port on the microphone. Connect the USB-A end to an available USB port on your PC.
- Driver Installation: The microphone is plug-and-play and typically does not require additional driver installation. Your operating system should automatically detect and configure the device.
- Select as Input Device:
- Windows: Go to Settings > System > Sound. Under "Input," select "ENDGAME GEAR XSTRM" as your input device.
- macOS: Go to System Settings > Sound > Input. Select "ENDGAME GEAR XSTRM" from the list of devices.

Figure 5: USB-C connection point on the microphone.
5. Operating Instructions
5.1. Adjusting Gain (Input Volume)
The microphone features an integrated gain control knob, typically located on the front or side. Rotate the knob to adjust the microphone's input sensitivity. The LED gain indicator will provide visual feedback:
- Green/Blue LEDs: Optimal input level.
- Red LEDs: Input level is too high, potentially causing audio clipping. Reduce gain.
The G-sensor automatically adjusts the LED indicator orientation if the microphone is mounted upside down.
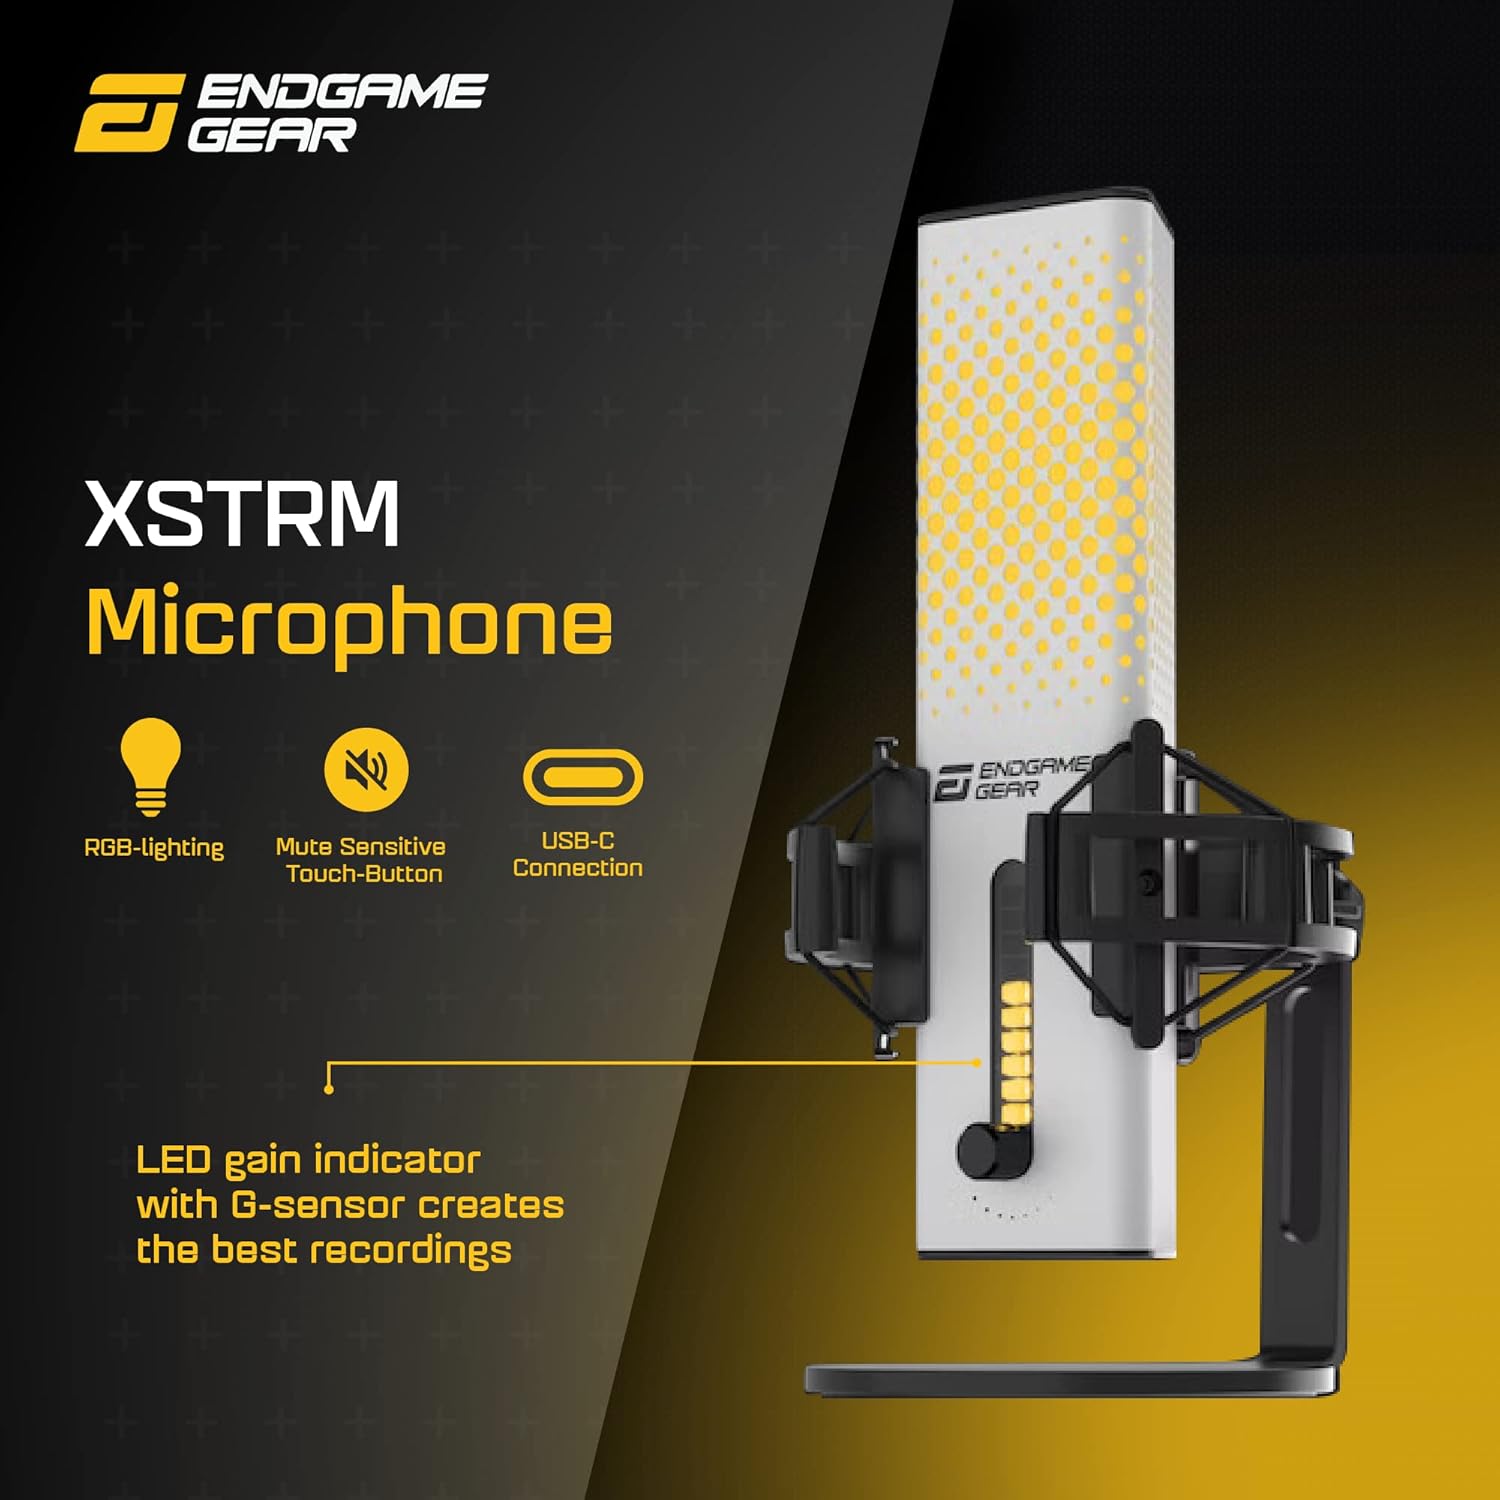
Figure 6: Microphone showing the LED gain indicator and control knob.
5.2. Mute Function
To mute the microphone, gently tap the top surface of the microphone. The LED indicator will typically change to red or a specific color to indicate that the microphone is muted. Tap again to unmute.
5.3. RGB Lighting Control
The ENDGAME GEAR XSTRM microphone offers 12 different honeycomb-pattern RGB lighting modes. Specific controls for cycling through modes or turning off the lighting may be available via a dedicated button or software (if applicable). Refer to the product's official website for any accompanying software.
6. Maintenance
- Cleaning: Use a soft, dry cloth to wipe the microphone's surface. Avoid using harsh chemicals, solvents, or abrasive materials, as these can damage the finish or internal components.
- Pop Filter: The magnetic pop filter can be gently removed and cleaned with a soft, damp cloth if necessary. Ensure it is completely dry before reattaching.
- Storage: When not in use for extended periods, store the microphone in a clean, dry environment away from extreme temperatures and direct sunlight.
- Avoid Drops: The microphone contains sensitive electronic components. Avoid dropping or subjecting it to strong impacts.
7. Troubleshooting
| Problem | Possible Cause | Solution |
|---|---|---|
| No sound output from microphone. |
|
|
| Audio sounds distorted or too loud. |
|
|
| Background noise is audible. |
|
|
| RGB lighting not working. |
|
|
8. Specifications
| Feature | Detail |
|---|---|
| Brand | ENDGAME GEAR |
| Model Name | XSTRM |
| Model Number | EGG-XST-WHT |
| Connectivity Technology | USB |
| Connector Type | USB Type-A (via supplied cable) |
| Polar Pattern | Unidirectional (Cardioid) |
| Audio Sensitivity | 36 Decibels |
| Signal-to-Noise Ratio | 80 dB |
| Audible Noise | 20 Decibels |
| Hardware Platform | PC |
| Color | White |
| Enclosure Material | Metal |
| Item Weight | 1.8 Pounds (approx. 820g) |
| Item Dimensions (LxWxH) | 4.72 x 6.1 x 9.84 inches (12 x 15.5 x 25 cm) |
| Special Features | Integrated Stand, AI Noise Cancellation, RGB Lighting, Tap-to-Mute, LED Gain Indicator, Pop Filter |
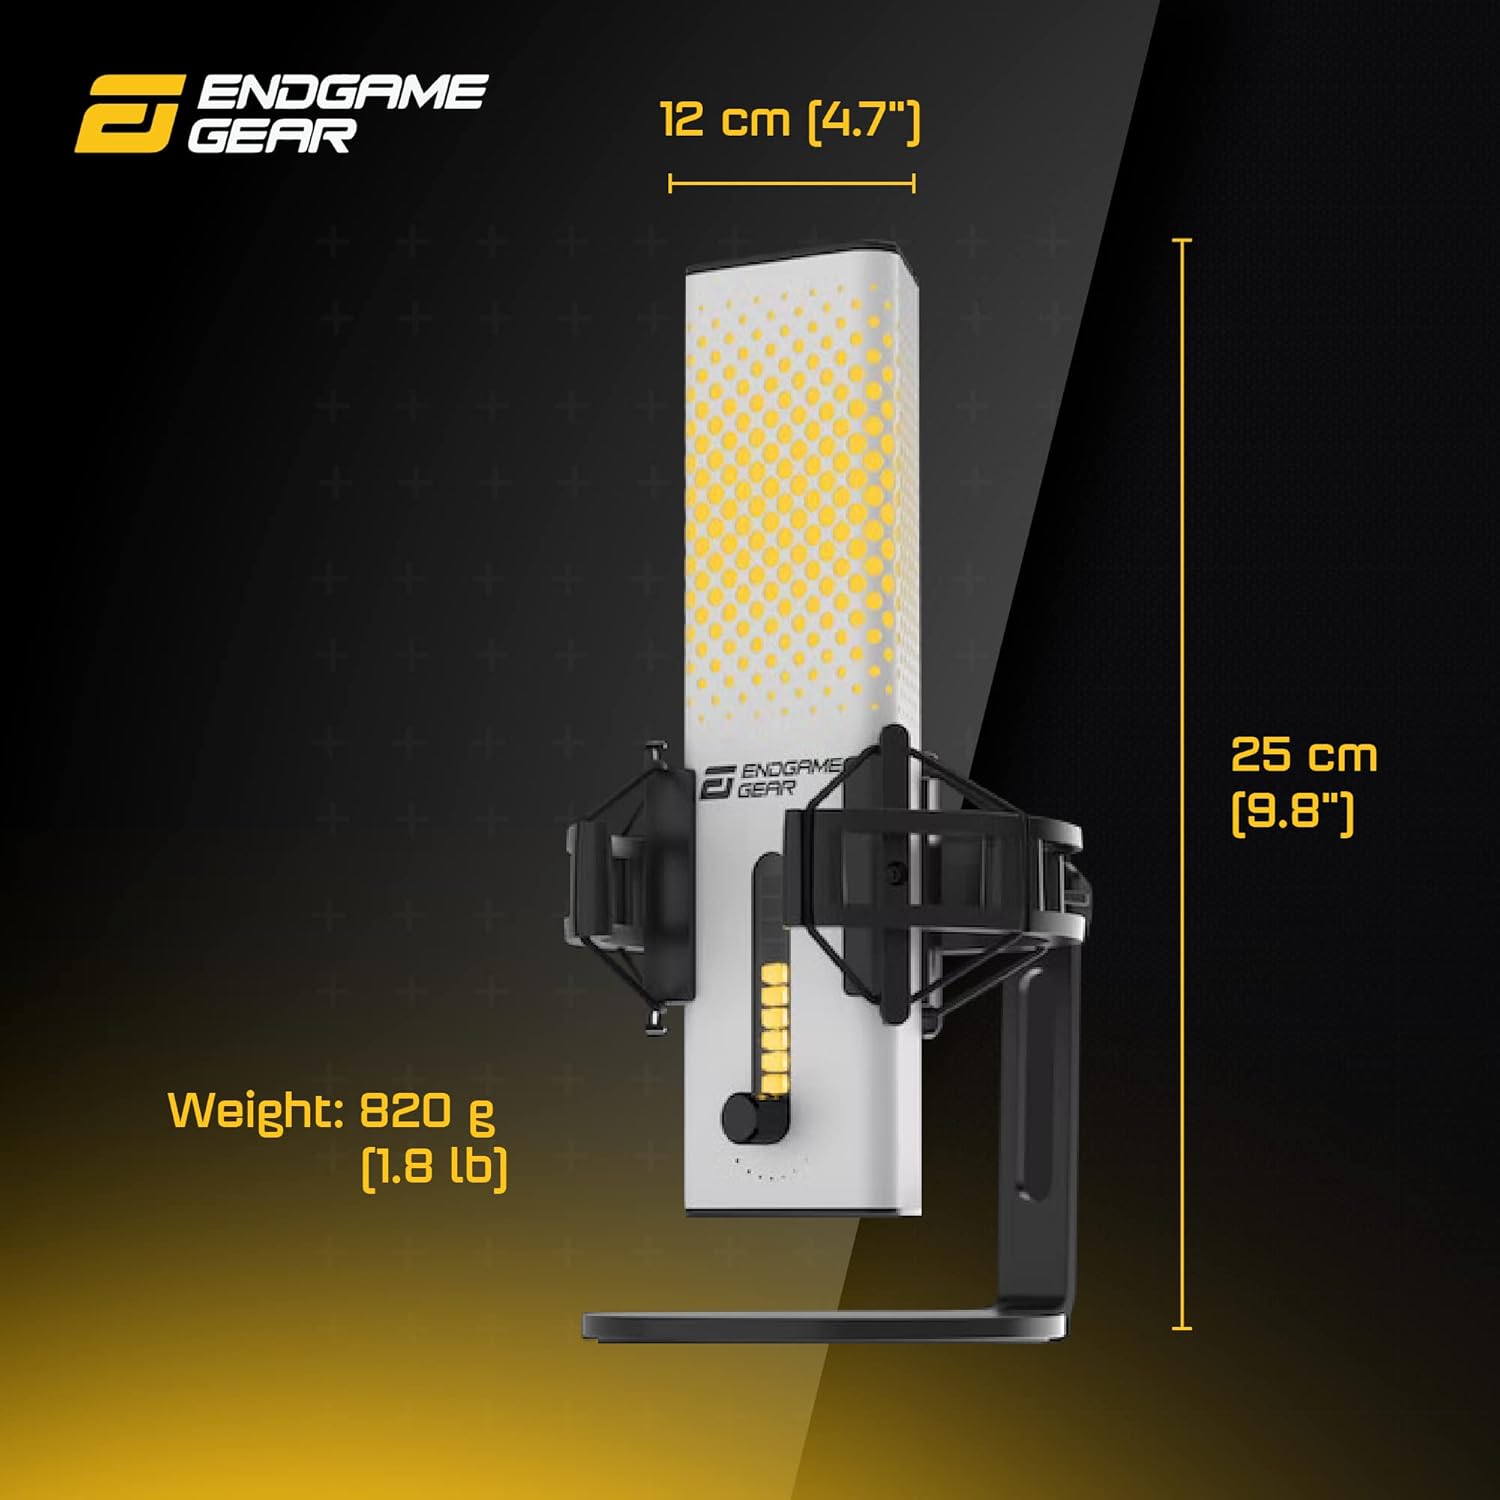
Figure 7: Physical dimensions and weight of the microphone.
9. Warranty and Support
9.1. Limited Warranty
The ENDGAME GEAR XSTRM USB RGB Microphone comes with a Limited Warranty. For specific terms, conditions, and duration of the warranty, please refer to the warranty card included with your product or visit the official ENDGAME GEAR website. Keep your proof of purchase for warranty claims.
9.2. Customer Support
For technical assistance, troubleshooting, or product inquiries, please contact ENDGAME GEAR customer support through their official website. You may find FAQs, driver downloads, and contact information there.
Official Website: www.endgamegear.com