KHTD B09XH1WH56
KHTD Commercial Deep Fryer with Basket
Model: B09XH1WH56
Brand: KHTD
1. Introduction
This manual provides essential instructions for the safe and efficient operation, maintenance, and care of your KHTD Commercial Deep Fryer. Please read this manual thoroughly before initial use and retain it for future reference.

Image 1.1: KHTD Commercial Deep Fryer in operation, showcasing its dual-basket design and various fried foods.
2. Safety Instructions
WARNING: Improper use can lead to fire, electric shock, or serious injury. Always follow basic safety precautions.
- Read all instructions before using the appliance.
- Do not touch hot surfaces. Use handles or knobs.
- To protect against electric shock, do not immerse cords, plugs, or the heating element in water or other liquid.
- Close supervision is necessary when any appliance is used by or near children.
- Unplug from outlet when not in use and before cleaning. Allow to cool before putting on or taking off parts, and before cleaning the appliance.
- Do not operate any appliance with a damaged cord or plug, or after the appliance malfunctions or has been damaged in any manner.
- The use of accessory attachments not recommended by the appliance manufacturer may cause injuries.
- Do not use outdoors.
- Do not let cord hang over edge of table or counter, or touch hot surfaces.
- Do not place on or near a hot gas or electric burner, or in a heated oven.
- Extreme caution must be used when moving an appliance containing hot oil or other hot liquids.
- Always attach plug to appliance first, then plug cord into the wall outlet. To disconnect, turn any control to “off,” then remove plug from wall outlet.
- Do not use appliance for other than intended use.
- It is forbidden to dry heat the empty oil tank, which can cause damage to the unit. Always add an appropriate amount of oil before heating.
3. Product Components
The KHTD Commercial Deep Fryer consists of several key components designed for efficient and safe frying. Familiarize yourself with each part before assembly and operation.
- Stainless Steel Housing: The main body of the fryer, providing durability and stability.
- Oil Tanks (2x 10.7QT/12L): Removable tanks for holding frying oil. Feature convenient handle design for easy handling.
- Heating Elements (2x 1700W): "U" shaped elements for quick and even heating.
- Control Panels: Each tank has an independent control panel with temperature knob, power indicator, and heating indicator.
- Frying Baskets (2x 6.35QT): Square mesh design with lengthened handles for safe food handling.
- Lids: Stainless steel lids with convenient handles to cover the oil tanks.
- Residue Plates: Placed at the bottom of the oil tanks to collect food debris.
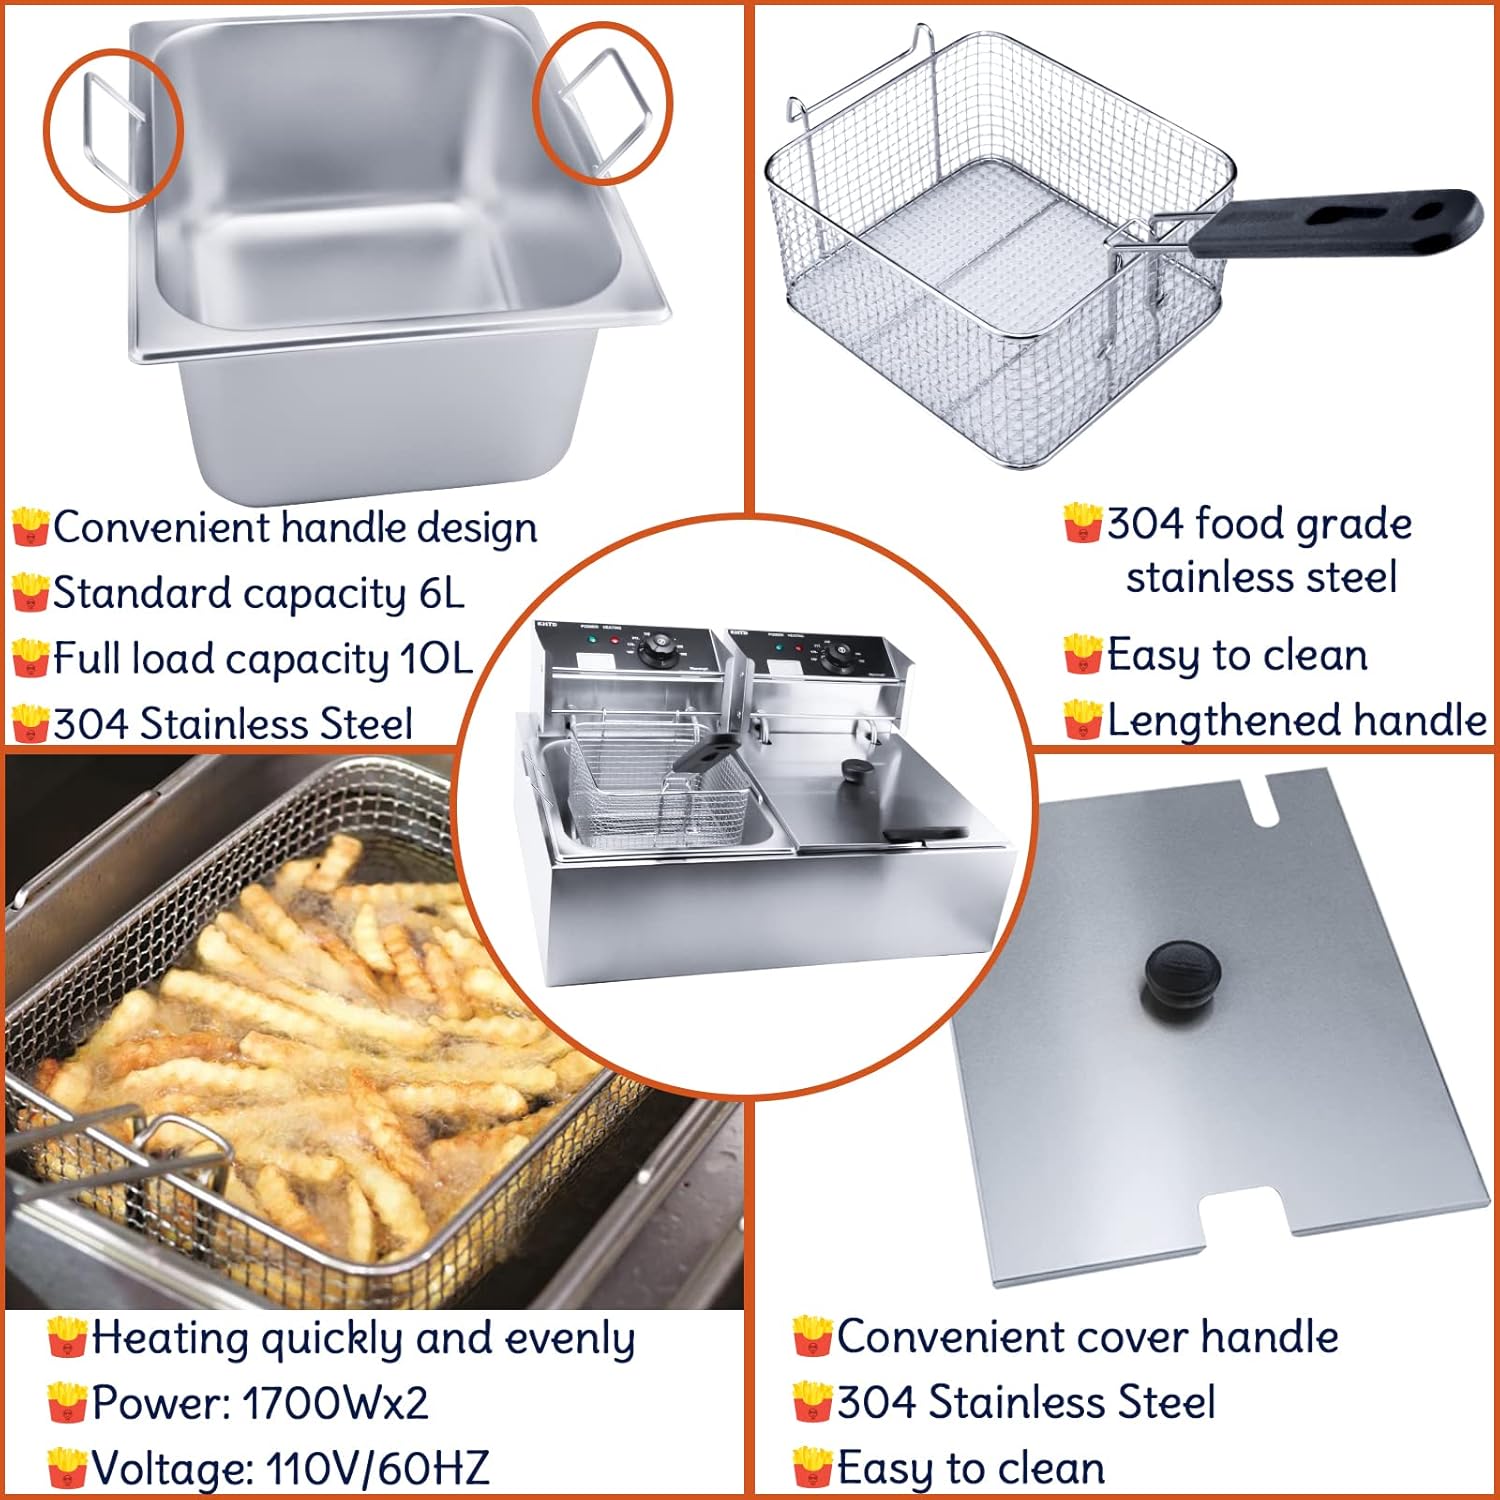
Image 3.1: Detailed view of the fryer's components, highlighting the oil tank, basket, heating pipe, and lid.
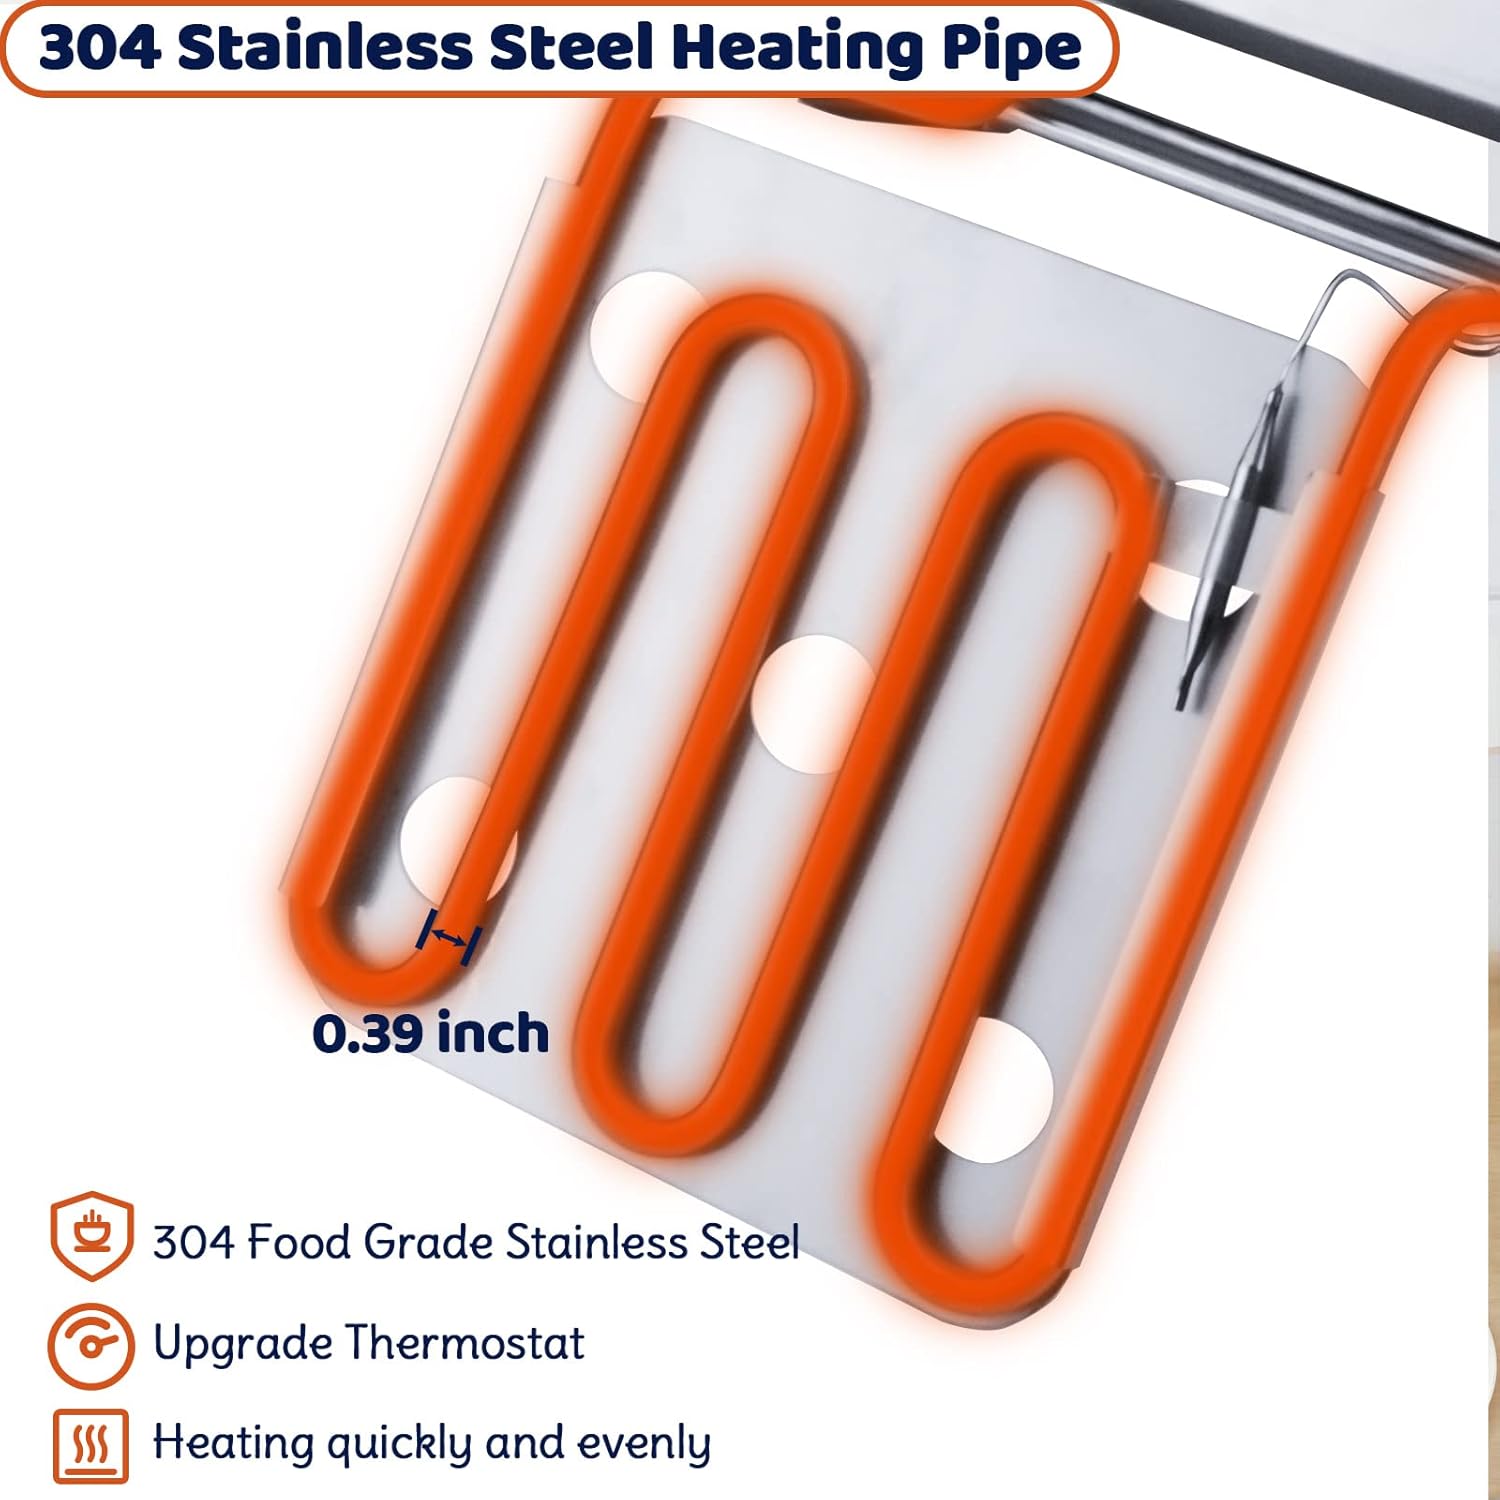
Image 3.2: Close-up of the 304 Stainless Steel Heating Pipe, designed for quick and even heating.
4. Setup Instructions
- Unpack Components: Carefully remove all parts from the packaging. Ensure all components listed in Section 3 are present and undamaged.
- Place Residue Plates: Insert the residue plates into the bottom of each oil tank.
- Install Oil Tanks: Place the two stainless steel oil tanks into the main housing. Ensure they are seated securely.
- Install Heating Elements/Control Panels: Position each heating element assembly (which includes the control panel) over its respective oil tank. The heating pipes should extend into the oil tank. Secure the control panel by sliding it down into the designated slots on the back of the fryer unit.
Video 4.1: This video demonstrates the assembly process of the KHTD Commercial Deep Fryer, including placing the oil tanks and installing the heating elements/control panels.
- Assemble Frying Baskets: Attach the handles to the frying baskets. Ensure the handles are securely locked into place.
Video 4.2: This video illustrates the correct method for installing the handles onto the frying baskets.
- Place Frying Baskets: Place the assembled frying baskets into the oil tanks.
- Connect Power: Plug each control panel's power cord into a suitable electrical outlet. The fryer features double power plugs for individual control of each tank.
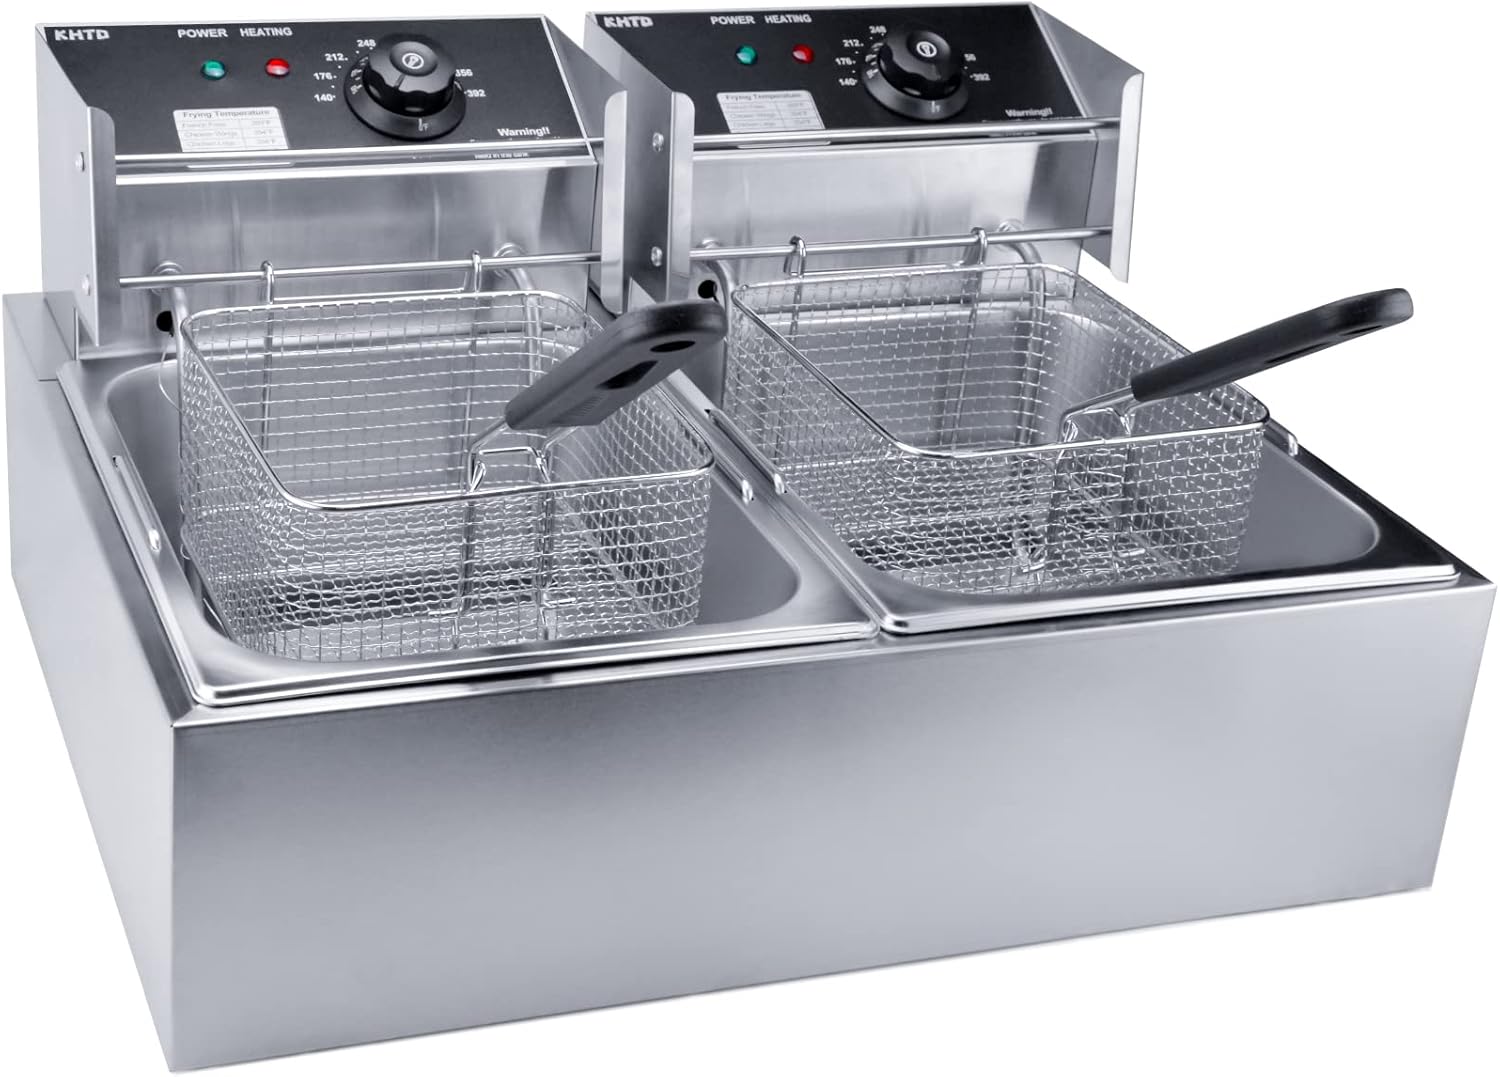
Image 4.1: The KHTD Deep Fryer fully assembled with baskets in place.
5. Operating Instructions
- Add Oil: Ensure the fryer is unplugged. Pour cooking oil into each tank, ensuring the oil level is between the minimum and maximum fill lines (if present). Do not overfill or underfill.
- Plug In: Connect the power cords to appropriate electrical outlets.
- Set Temperature: Turn the temperature knob on the control panel to your desired frying temperature. The heating indicator light will illuminate, indicating that the oil is heating.
- Preheat: Allow the oil to preheat to the set temperature. The heating indicator light will turn off once the target temperature is reached and will cycle on and off to maintain the temperature.
- Place Food in Basket: Carefully place food into the frying basket. Do not overload the basket.
- Lower Basket: Slowly lower the basket containing food into the hot oil.
- Fry Food: Fry food until it reaches the desired crispness and doneness. Refer to the temperature guide below for common foods.
- Remove Food: Carefully lift the basket from the oil. Use the hanging basket hook to allow excess oil to drain back into the tank.
- Serve: Transfer fried food to a serving dish.
- Turn Off: After use, turn the temperature knob to the 'OFF' position and unplug the fryer from the wall outlet.
Recommended Frying Temperatures
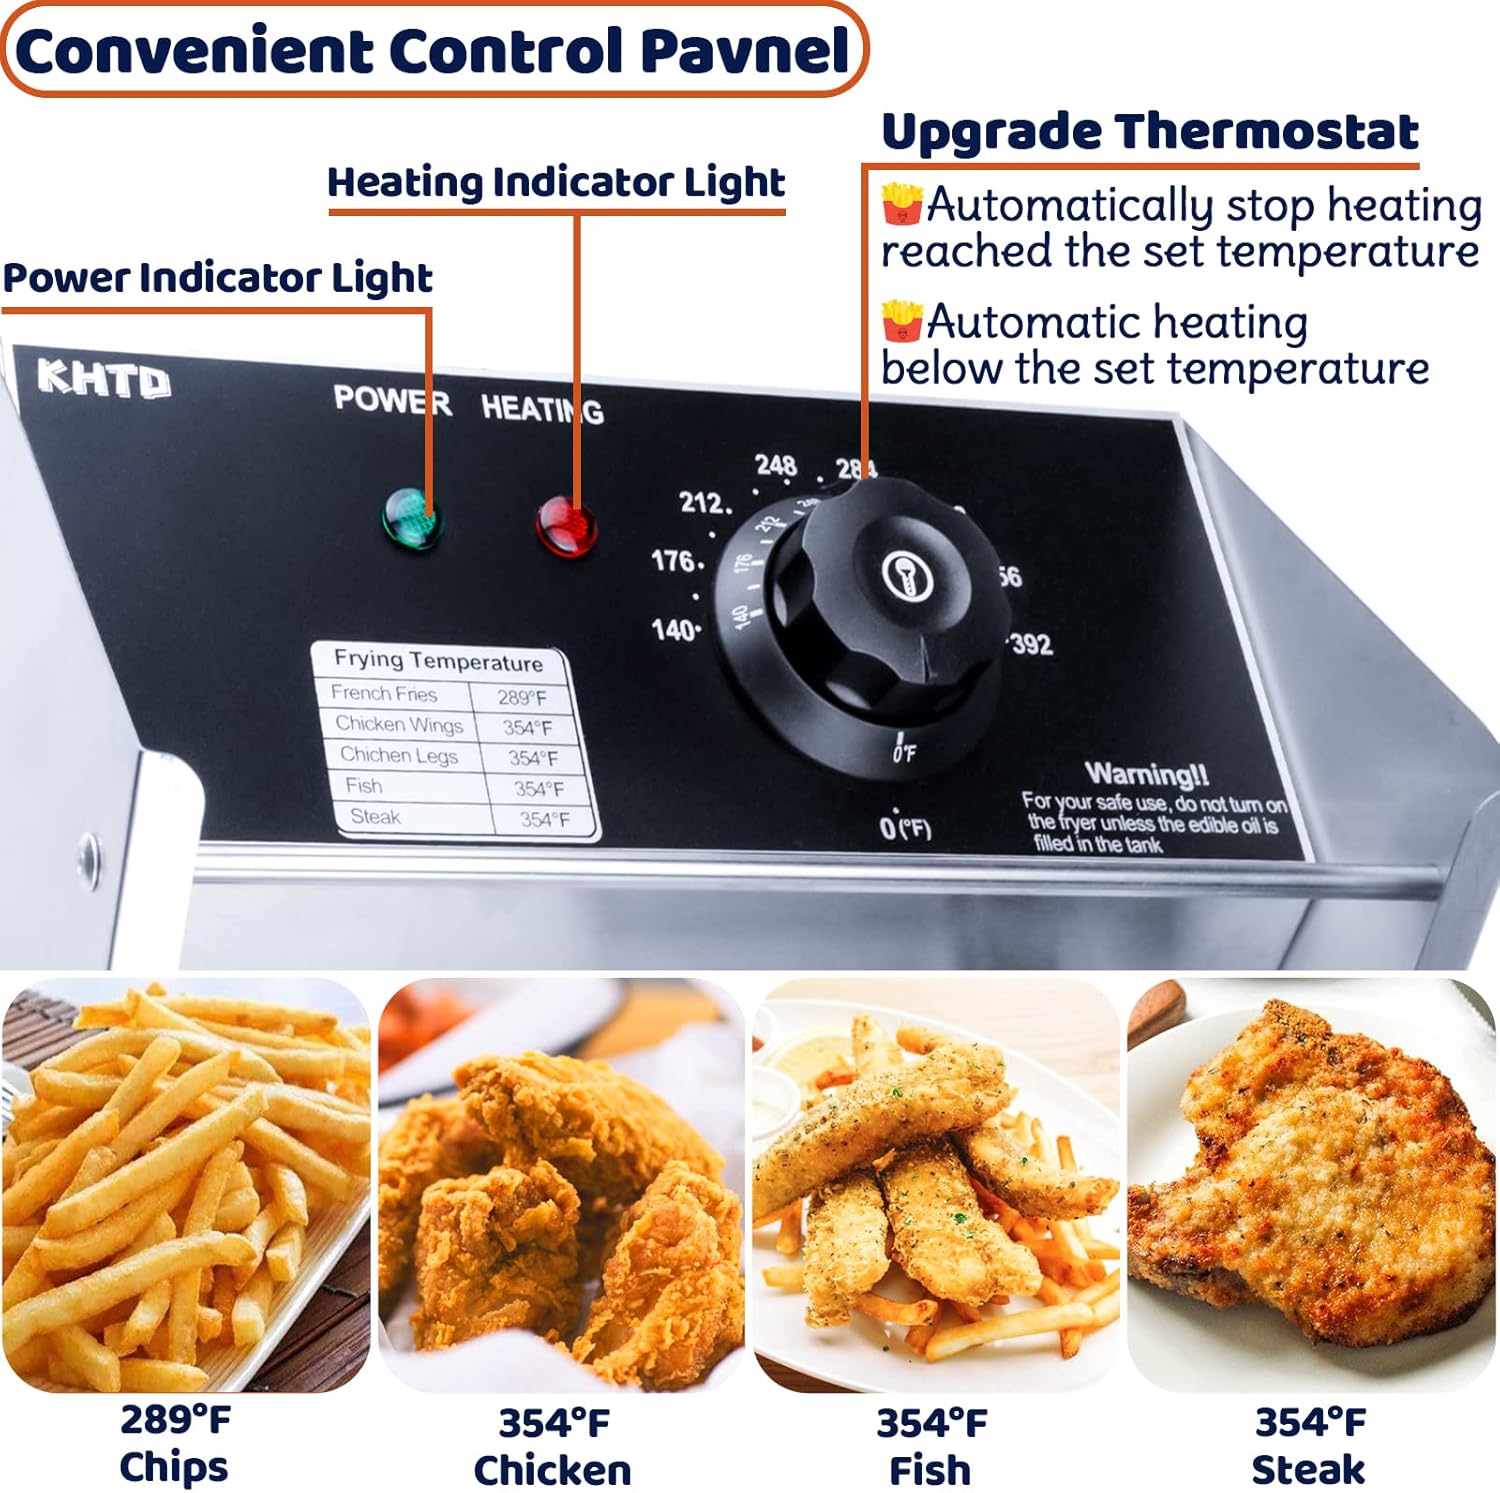
Image 5.1: Control panel with a guide for recommended frying temperatures for various food items.
| Food Item | Temperature |
|---|---|
| French Fries | 289°F (143°C) |
| Chicken Wings | 354°F (179°C) |
| Chicken Legs | 354°F (179°C) |
| Fish | 354°F (179°C) |
| Steak | 354°F (179°C) |
6. Maintenance and Cleaning
Regular cleaning and maintenance will extend the life of your deep fryer and ensure safe operation.
- Cool Down: Always allow the oil and fryer to cool completely before cleaning.
- Drain Oil: Carefully drain used oil from the tanks. Dispose of oil responsibly.
- Disassemble: Remove the heating elements/control panels, oil tanks, baskets, and residue plates.
- Clean Components:
- Oil Tanks, Baskets, Lids, Residue Plates: These parts are detachable and can be washed with warm, soapy water. Rinse thoroughly and dry completely.
- Heating Elements/Control Panels: The heating element and control panel unit should not be immersed in water. Wipe the heating elements with a damp cloth. Clean the control panel surface with a damp cloth and mild detergent, then dry immediately.
- Reassemble: Once all parts are clean and dry, reassemble the fryer by following the setup instructions in reverse order.
7. Troubleshooting
If you encounter issues with your deep fryer, refer to the following common problems and solutions:
- Fryer does not heat:
- Ensure the fryer is properly plugged into a working electrical outlet.
- Check if the temperature knob is set to a desired temperature above the current oil temperature.
- Verify that the heating element is correctly installed and making proper contact.
- Check your circuit breaker. The 3400W unit may require dedicated circuits for each tank if both are used simultaneously.
- Oil not heating evenly:
- Ensure the oil level is appropriate.
- The "U" shaped heating element is designed for even distribution; if issues persist, contact customer support.
- Food is not crispy:
- Ensure the oil is at the correct temperature before adding food.
- Avoid overloading the basket, as this can lower oil temperature significantly.
- Ensure food is dry before frying to prevent excess moisture from lowering oil temperature.
8. Specifications
| Feature | Specification |
|---|---|
| Brand | KHTD |
| Model | B09XH1WH56 |
| Material | Stainless Steel |
| Color | Silver |
| Product Dimensions (D x W x H) | 16.5" x 21.6" x 11.5" |
| Item Weight | 15.5 Pounds |
| Wattage | 3400 watts (1700W x 2) |
| Oil Capacity | 12.7 QT (12L) total (2x 6L tanks) |
| Temperature Range | 140°F (60°C) to 390°F (200°C) |
| UPC | 783919605770 |
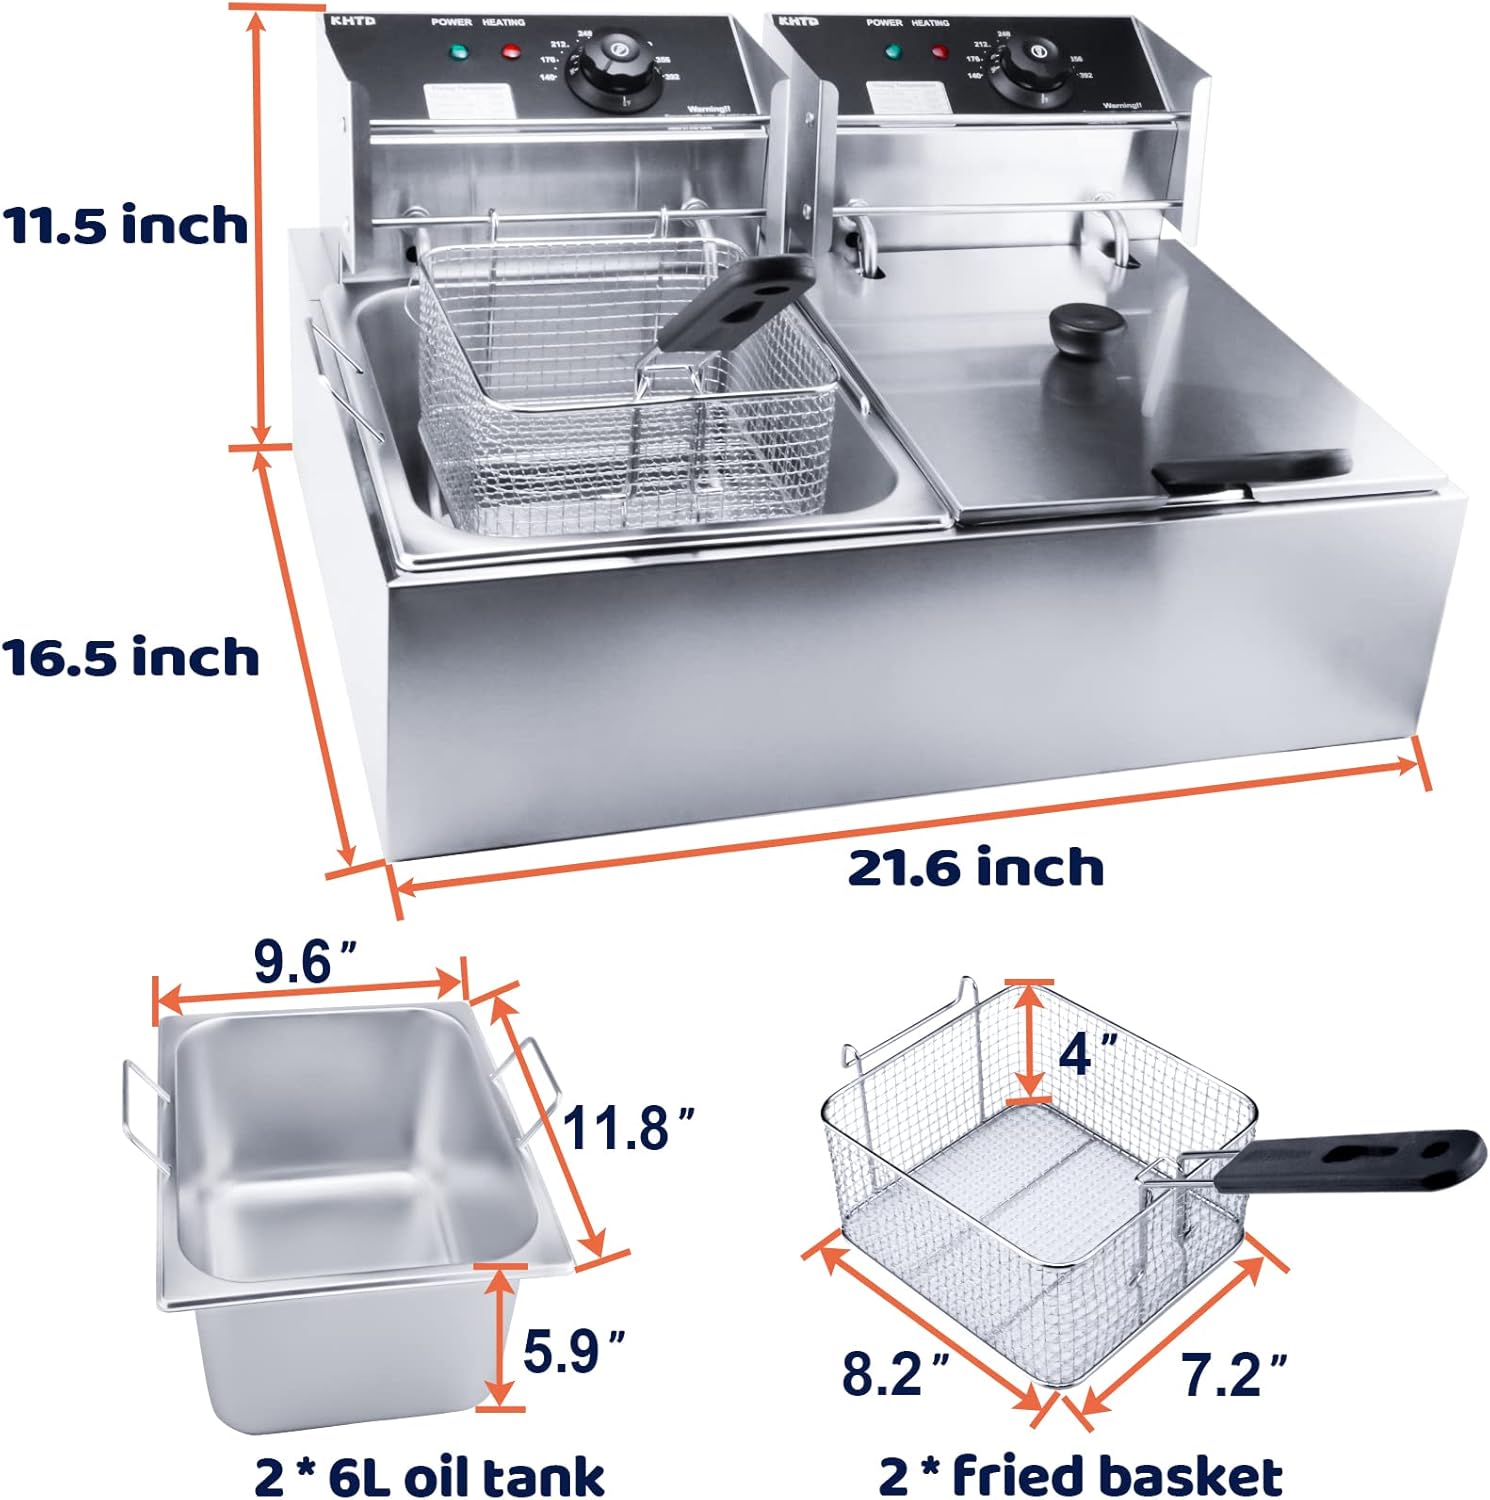
Image 8.1: Dimensional diagram of the KHTD Deep Fryer and its components.
9. Warranty and Support
For warranty information, product support, or to inquire about replacement parts, please refer to the contact information provided at the point of purchase or visit the official KHTD website. Protection plans may be available for extended coverage.
Ask a question about this manual
Ask about setup, troubleshooting, compatibility, parts, safety, or missing instructions. Manuals+ will review the question and use this page’s manual context to help answer it.