1. Introduction
Thank you for purchasing the Depusheng U6 Audio Mixer. This 6-channel DJ sound controller is designed for versatile audio mixing, recording, and live streaming applications. It features a built-in USB audio interface, Bluetooth connectivity, and U-Disk playback/recording capabilities. This manual provides essential information for safe operation, setup, and optimal performance of your device. Please read it thoroughly before use and retain it for future reference.
2. Safety Information
- Power Source: Use only the specified power adapter or a compatible USB power source. Ensure the voltage matches the device requirements.
- Water and Moisture: Do not expose the mixer to water, rain, or excessive moisture. Avoid placing liquid-filled objects on the unit.
- Ventilation: Ensure proper ventilation. Do not block ventilation openings.
- Heat: Keep the unit away from heat sources such as radiators, heat registers, stoves, or other heat-producing appliances.
- Cleaning: Clean only with a dry cloth. Do not use liquid cleaners or aerosol cleaners.
- Servicing: Do not attempt to service this product yourself. Refer all servicing to qualified service personnel.
- Phantom Power: When using condenser microphones, ensure +48V phantom power is activated only when necessary and that the microphone is compatible.
3. Package Contents
Please check that all the following items are included in your package:
- Depusheng U6 Audio Mixer
- USB Power Cable
- User Manual
4. Product Overview
The Depusheng U6 is a compact 6-channel mixer designed for various audio applications. It features multiple input and output options, integrated effects, and digital connectivity.
4.1 Front Panel Controls and Connections
The front panel provides access to all mixing controls and primary input/output ports.

Image Description: A detailed view of the Depusheng U6 Audio Mixer's front panel, showing all knobs, faders, buttons, and the digital display for USB/Bluetooth functions. Key controls include GAIN, HIGH, LOW, EFX, PEAK, VOL for each channel, along with DELAY, REPEAT, and MAIN volume controls. The USB port and Bluetooth indicator are also visible.
- MIC/LINE Inputs (Channels 1-4): Combo jacks supporting both XLR and 1/4" (6.35mm) inputs for microphones or line-level instruments.
- +48V PHANTOM: Button to activate +48V phantom power for condenser microphones on channels 1-4.
- GAIN: Adjusts the input sensitivity for each channel.
- HIGH/LOW: 2-band equalizer for adjusting treble and bass frequencies for each channel.
- EFX: Sends signal to the built-in effects processor (DELAY/REPEAT).
- PEAK LED: Illuminates when the input signal is too high, indicating potential clipping.
- VOL: Channel volume control.
- S/S (Stereo Input 5/6): 1/4" stereo inputs for connecting line-level devices.
- REC/MAIN OUT (RCA): Stereo RCA outputs for recording or connecting to external devices.
- MAIN OUT (1/4"): Stereo 1/4" outputs for connecting to power amplifiers or active speakers.
- USB Port: For U-Disk playback/recording and connection to a computer as an audio interface.
- MODE/BT (Bluetooth): Button to switch between USB, Bluetooth, and other modes.
- PLAY/PAUSE, PREVIOUS, NEXT: Controls for U-Disk and Bluetooth playback.
- DELAY/REPEAT: Controls for adjusting the built-in delay effect.
- CLIP LED: Indicates output signal clipping.
- POWER LED: Indicates the unit is powered on.
- MAIN: Master volume control for the main output.
- PHONE: Headphone volume control.
- Headphone Jack: 1/4" stereo output for monitoring.
4.2 Input Interface Types

Image Description: Close-up view of the input jacks on the Depusheng U6 Audio Mixer, illustrating both the 6.5mm (1/4 inch) and XLR connection types for microphones and line-level devices. This image highlights the versatility of the combo input jacks.
- 6.5mm (1/4") Interface: For connecting instruments or line-level audio sources.
- XLR Interface: For connecting microphones, providing a balanced connection.
5. Setup
5.1 Powering the Mixer
The Depusheng U6 mixer can be powered via its USB port.

Image Description: This image demonstrates two methods of powering the Depusheng U6 Audio Mixer via USB: connecting it to a computer's USB port or to a portable power bank. This highlights the flexibility of its power options.
- Connect the provided USB cable to the mixer's USB power input.
- Connect the other end of the USB cable to a computer's USB port or a USB power adapter (not included) connected to a wall outlet, or a power bank.
- The POWER LED on the mixer will illuminate when power is supplied.
5.2 Basic Connections
Refer to the diagram below for typical connection setups.

Image Description: A comprehensive diagram illustrating various connection possibilities for the Depusheng U6 Audio Mixer. It shows connections for a computer, condenser microphone, dynamic microphone, wireless microphone receiver, power amplifier, passive speakers, and headphones, demonstrating a complete audio setup.
- Microphones: Connect dynamic or condenser microphones to the MIC/LINE inputs (Channels 1-4) using XLR cables. Activate +48V phantom power for condenser microphones.
- Instruments/Line Devices: Connect instruments or other line-level devices to the MIC/LINE inputs (Channels 1-4) using 1/4" cables, or to the S/S (Stereo Input 5/6) using 1/4" stereo cables.
- Output to Speakers/Amplifier: Connect the MAIN OUT (1/4") to your power amplifier or active speakers.
- Headphones: Connect headphones to the PHONE jack for monitoring.
- Computer: Connect the mixer's USB port to your computer for use as an audio interface.
6. Operating Instructions
6.1 Wireless Bluetooth Streaming
The U6 mixer supports wireless Bluetooth audio streaming from compatible devices.
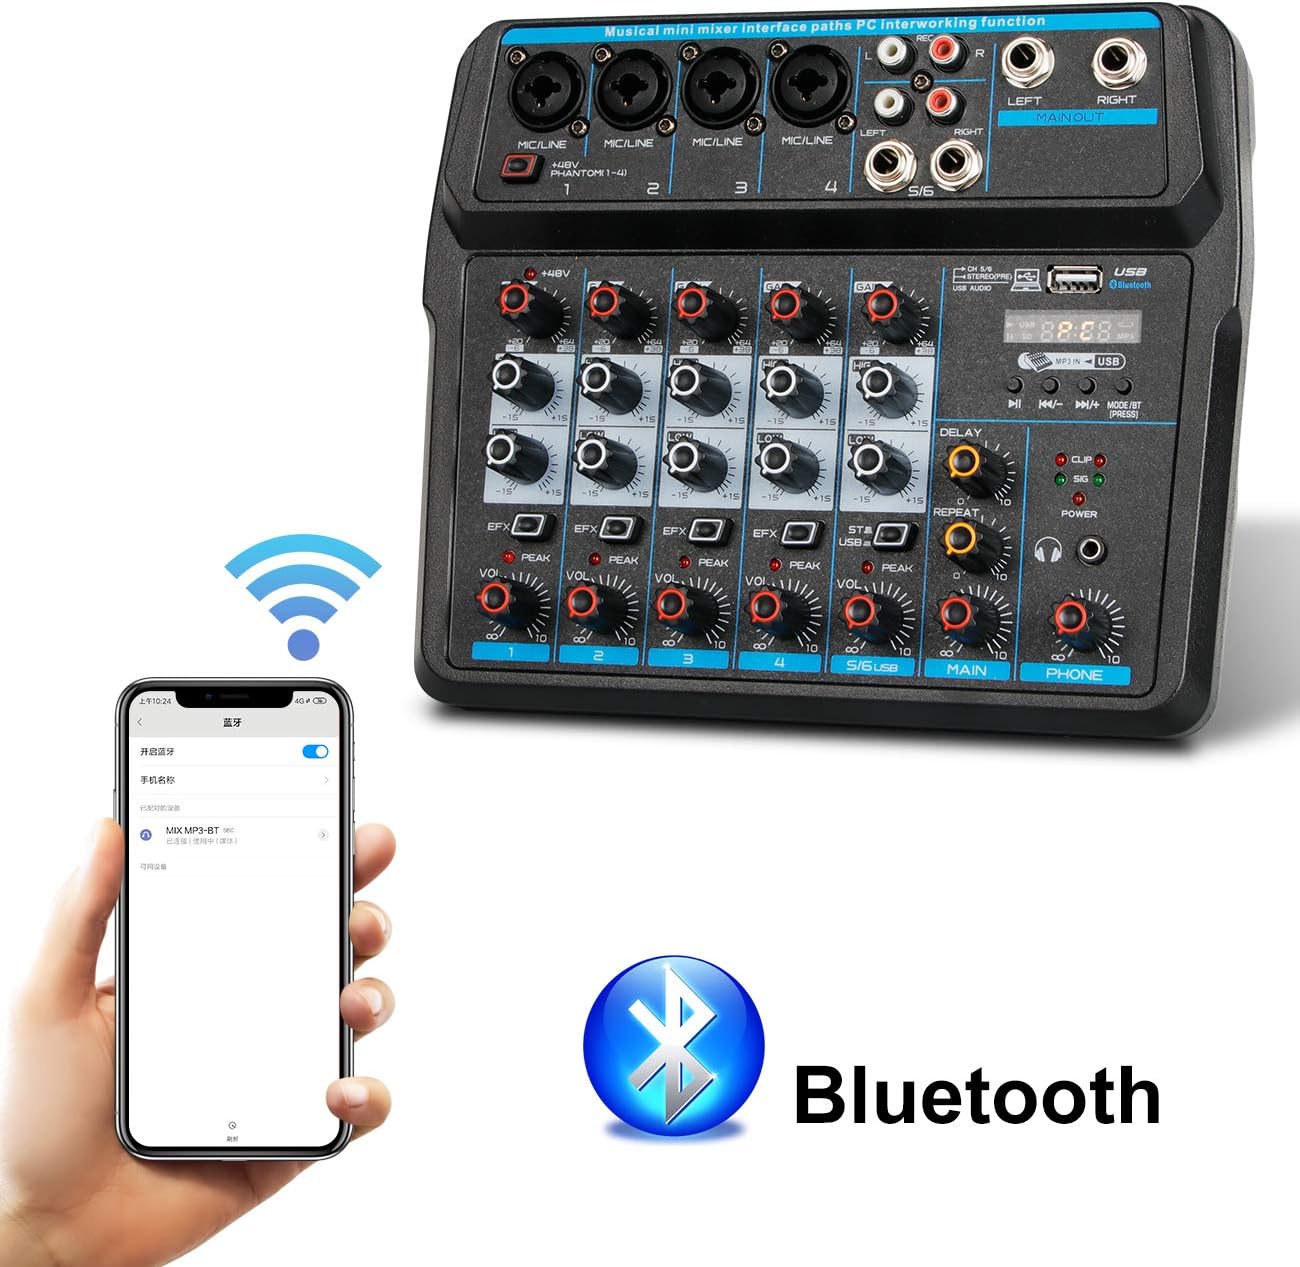
Image Description: This image shows a smartphone displaying its Bluetooth settings, with the Depusheng U6 Audio Mixer (labeled 'U6 MP3-BT') available for connection. A large Bluetooth logo is also present, indicating the wireless connectivity feature.
- Press the MODE/BT button on the mixer until the Bluetooth indicator lights up and the display shows 'BT'.
- On your mobile device (smartphone, tablet, etc.), enable Bluetooth and search for available devices.
- Select 'U6 MP3-BT' from the list to pair.
- Once paired, you can stream audio wirelessly from your device to the mixer. Bluetooth operates effectively within approximately 1.5 feet.
6.2 USB Audio Interface (PC Recording/Playback)
The U6 mixer can function as an external sound card for your computer.

Image Description: This diagram illustrates how to connect the Depusheng U6 Audio Mixer to a laptop via USB for both playback and recording. It shows audio signals flowing from the computer to the mixer (background music) and from the mixer to the computer (for recording), with a close-up of the USB connection port on the mixer.
- Connect the mixer to your PC using a USB cable.
- The mixer will be recognized as a USB audio device by your computer.
- In your computer's sound settings or DAW (Digital Audio Workstation) software (e.g., Pro Tools, Logic Pro X, GarageBand, Audacity), select the U6 mixer as the input and output audio device.
- You can now record audio from the mixer's inputs to your computer or play back audio from your computer through the mixer.
6.3 U-Disk Playback and Recording
The mixer supports direct playback of audio files from a USB flash drive (U-Disk) and recording to it.

Image Description: This image highlights the U-Disk functionality of the Depusheng U6 Audio Mixer. It shows a USB flash drive inserted into the mixer's USB port, with text indicating its capabilities: 1. Play MP3/WAV/WMA/FLAC files, and 2. Record audio. The mixer's digital display shows '88:88', likely indicating playback time or a menu option.
- Playback: Insert a U-Disk containing audio files (MP3/WAV/WMA/FLAC) into the USB port. The mixer will automatically switch to U-Disk mode or you may need to press MODE/BT. Use the PLAY/PAUSE, PREVIOUS, and NEXT buttons to control playback.
- Recording: To record to a U-Disk, ensure it is inserted and the mixer is in U-Disk mode. Follow the specific recording instructions in the full manual (if available) or typically press and hold the PLAY/PAUSE button to initiate recording.
6.4 Using Effects (DELAY and REPEAT)
The U6 mixer includes built-in DELAY and REPEAT effects to enhance your audio.
- Use the EFX knob on each channel to send a portion of that channel's signal to the effects processor.
- Adjust the DELAY knob to control the delay time of the effect.
- Adjust the REPEAT knob to control the number of repetitions of the delay effect.
- The overall level of the effects return can be controlled via a dedicated EFX return knob (if present) or integrated into the main mix.
7. Maintenance
- Cleaning: Use a soft, dry cloth to clean the surface of the mixer. Do not use abrasive cleaners, waxes, or solvents.
- Storage: When not in use for extended periods, store the mixer in a cool, dry place, away from direct sunlight and extreme temperatures.
- Cable Care: Always grasp the connector, not the cable, when unplugging. Avoid bending or kinking cables excessively.
8. Troubleshooting
If you encounter issues with your Depusheng U6 Audio Mixer, refer to the following common problems and solutions:
| Problem | Possible Cause | Solution |
|---|---|---|
| No sound output |
|
|
| Microphone not working |
|
|
| Bluetooth not connecting |
|
|
| USB recording/playback issues |
|
|
9. Specifications
| Feature | Specification |
|---|---|
| Brand | Depusheng |
| Model Number | U6 |
| Number of Channels | 6 |
| Connectivity Technology | Bluetooth, USB |
| Audio Input | XLR, 1/4" (6.35mm) |
| Power Source | USB Cable |
| Item Weight | 1.02 Kilograms |
| Package Dimensions | 29.3 x 24.3 x 9.2 cm |
| Hardware Interface | Bluetooth |
10. Warranty and Support
Depusheng products are designed for reliability and performance. This product comes with a standard manufacturer's warranty. For specific warranty terms and conditions, please refer to the documentation provided at the time of purchase or contact your retailer.
If you require technical support or have questions not covered in this manual, please contact Depusheng customer service through the retailer where you purchased the product. Please have your model number (U6) and purchase information ready.