1. Important Safety Instructions
Please read all instructions carefully before using the appliance and retain them for future reference. Incorrect operation can cause personal injury and property damage.
- Always ensure the appliance is placed on a stable, heat-resistant surface.
- Do not immerse the heating element, cord, or plug in water or other liquids.
- Keep children and pets away from the appliance during operation.
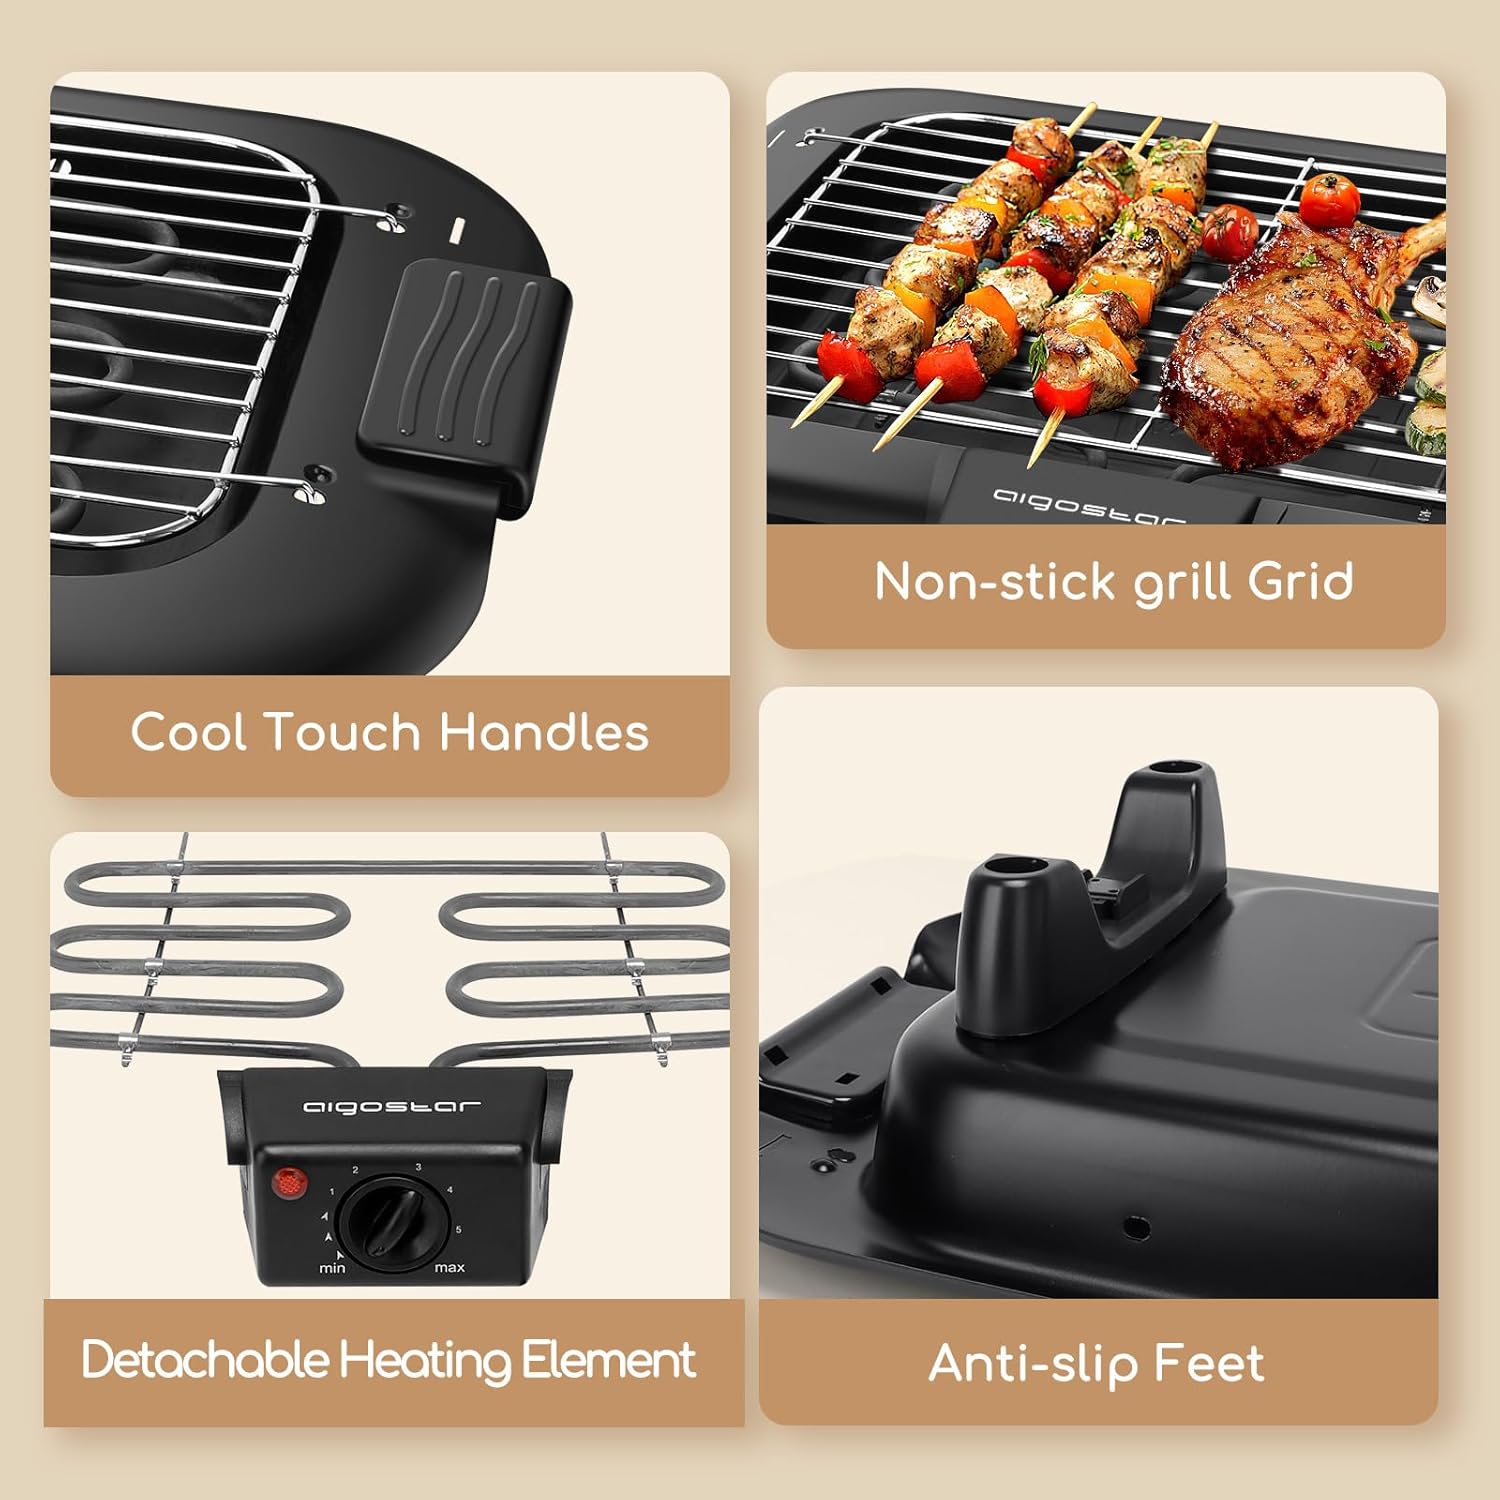
- Do not touch hot surfaces. Use handles or oven mitts.
- Unplug from the outlet when not in use and before cleaning. Allow to cool before handling or cleaning parts.
- Do not operate any appliance with a damaged cord or plug, or after the appliance malfunctions or has been damaged in any manner.
- Ensure the drip tray is filled with water before use to reduce smoke and facilitate cleaning.
- This appliance is for household use only. Do not use outdoors without proper protection from elements.
- Do not use abrasive cleaners or scouring pads on the non-stick grill surface.
- The appliance features a safety micro-switch; ensure all components are correctly assembled for operation.
2. Product Overview and Components
The Aigostar Portable Electric Barbecue is designed for convenient grilling with adjustable temperature and easy-to-clean components.


Key Components:
- Grill Rack: Stainless steel, non-stick surface for cooking.
- Heating Element: 2000W U-shaped heating tube, removable for cleaning.
- Drip Tray: Removable tray to collect grease and hold water for smoke reduction.
- Temperature Control Unit: Features a dial for 5-level temperature adjustment and an indicator light.
- Cool-Touch Handles: Integrated handles for safe handling.
- Adjustable Height Mechanism: Allows for two cooking positions (fast or slow).
- Safety Micro-switch: Ensures the appliance only operates when correctly assembled.
- Anti-slip Feet: Provides stability during use.
3. Setup and Assembly
The barbecue requires minimal assembly. Follow these steps before first use:
- Place the main body of the barbecue on a flat, stable, and heat-resistant surface.
- Insert the removable drip tray into the base of the barbecue. Ensure it is correctly seated.
- Fill the drip tray with approximately 700-800ml of water. This helps reduce smoke and makes cleaning easier.
- Attach the heating element unit to the main body. Ensure it clicks securely into place, activating the safety micro-switch.
- Place the stainless steel grill rack onto the heating element supports. You can choose between two height levels for different cooking intensities.

4. Operating Instructions
Follow these steps for safe and effective grilling:
- Preparation: Ensure the barbecue is assembled correctly with water in the drip tray.
- Plug In: Connect the power cord to a suitable 240V electrical outlet.
- Set Temperature: Turn the temperature control dial to your desired setting (1-5). The indicator light will illuminate, signaling that the heating element is active.
- Preheat: Allow the grill to preheat for 5-10 minutes until the grill rack is hot. The indicator light will turn off when the set temperature is reached, and cycle on/off during cooking to maintain heat.
- Place Food: Carefully place food onto the hot grill rack.
- Adjust Height (Optional): For faster cooking or searing, use the higher grill position. For slower cooking or keeping food warm, use the lower position.
- Monitor Cooking: Turn food as needed for even cooking.
- Finish Cooking: Once food is cooked, turn the temperature dial to "OFF" and unplug the appliance.


5. Cleaning and Maintenance
Regular cleaning ensures optimal performance and extends the life of your barbecue.
- Unplug and Cool: Always unplug the appliance from the power outlet and allow it to cool completely before cleaning.
- Disassemble: Carefully remove the grill rack and the heating element unit.
- Clean Grill Rack: Wash the stainless steel grill rack with warm, soapy water. For stubborn residue, soak it before cleaning. Avoid abrasive scrubbers to protect the non-stick properties.
- Clean Drip Tray: Empty any remaining water and grease from the drip tray. Wash it with warm, soapy water.
- Clean Heating Element: DO NOT IMMERSE THE HEATING ELEMENT UNIT IN WATER. Wipe the heating element and the control unit with a damp cloth. Ensure it is completely dry before reassembly or storage.
- Clean Base: Wipe the exterior of the barbecue base with a damp cloth.
- Dry and Store: Ensure all parts are thoroughly dry before reassembling and storing the barbecue in a cool, dry place.

6. Troubleshooting
If you encounter issues with your Aigostar Electric Barbecue, refer to the following common problems and solutions:
| Problem | Possible Cause | Solution |
|---|---|---|
| Appliance does not turn on. |
|
|
| Grill is not heating sufficiently. |
|
|
| Excessive smoke during cooking. |
|
|
7. Specifications
- Model: SF20250917B09X5QG2RL
- Brand: Aigostar
- Power: 2000W
- Voltage: 240V
- Cooking Surface Dimensions: 36 x 21 cm (756 cm²)
- Overall Dimensions (L x W x H): Approximately 50 x 35 x 15 cm (Note: 150cm height from specifications seems to be an error or refers to an optional stand not included in the main product images. The product is designed to be portable and compact.)
- Weight: 1.96 kg
- Temperature Levels: 5 adjustable settings
- Material: Stainless steel grill, heat-resistant handles, non-stick finish.
- Components: Removable grill rack, heating element, drip tray.
- Special Features: Safety micro-switch, indicator light, adjustable height (2 positions), portable design.
8. Warranty and Support
For warranty information or technical support, please refer to the documentation included with your purchase or contact Aigostar customer service directly. Keep your proof of purchase for any warranty claims.
You can often find contact details on the official Aigostar website or through your retailer.