micfuns M4
Audio Mixer M4 Channels 48V Studio Karaoke Portable Bluetooth Live DJ Console User Manual
1. Product Overview
The micfuns M4 Audio Mixer is a professional 4-channel mixing console designed for studio, karaoke, live performances, and DJ applications. It offers high headroom and intuitive functionality, making it suitable for both beginners and experienced users. Key features include 48V phantom power, Bluetooth connectivity, USB audio interface, and versatile input/output options.

Figure 1.1: Front view of the micfuns M4 Audio Mixer.
2. Key Features
- 4-Channel Input: Includes 2 mono inputs (XLR/1/4'' Plug) with 48V phantom power and 1 stereo/USB/Bluetooth input with 6.3mm XLR and RCA sockets.
- 48V Phantom Power: Essential for connecting condenser microphones, ensuring clear and powerful vocal and instrumental sound.
- Bluetooth Wireless Connection: Seamlessly stream audio from smartphones, tablets, and computers for mixing.
- USB Audio Interface: Connects to PC or laptop for direct recording and playback, functioning as an external sound card.
- Built-in Recording Control: Allows direct recording to a USB flash drive.
- Real-time Monitoring: Dedicated headphone output for monitoring audio.
- Effect Console: Integrated effects for enhancing audio output.

Figure 2.1: Overview of the M4 mixer's main features including USB, computer power, and Bluetooth.
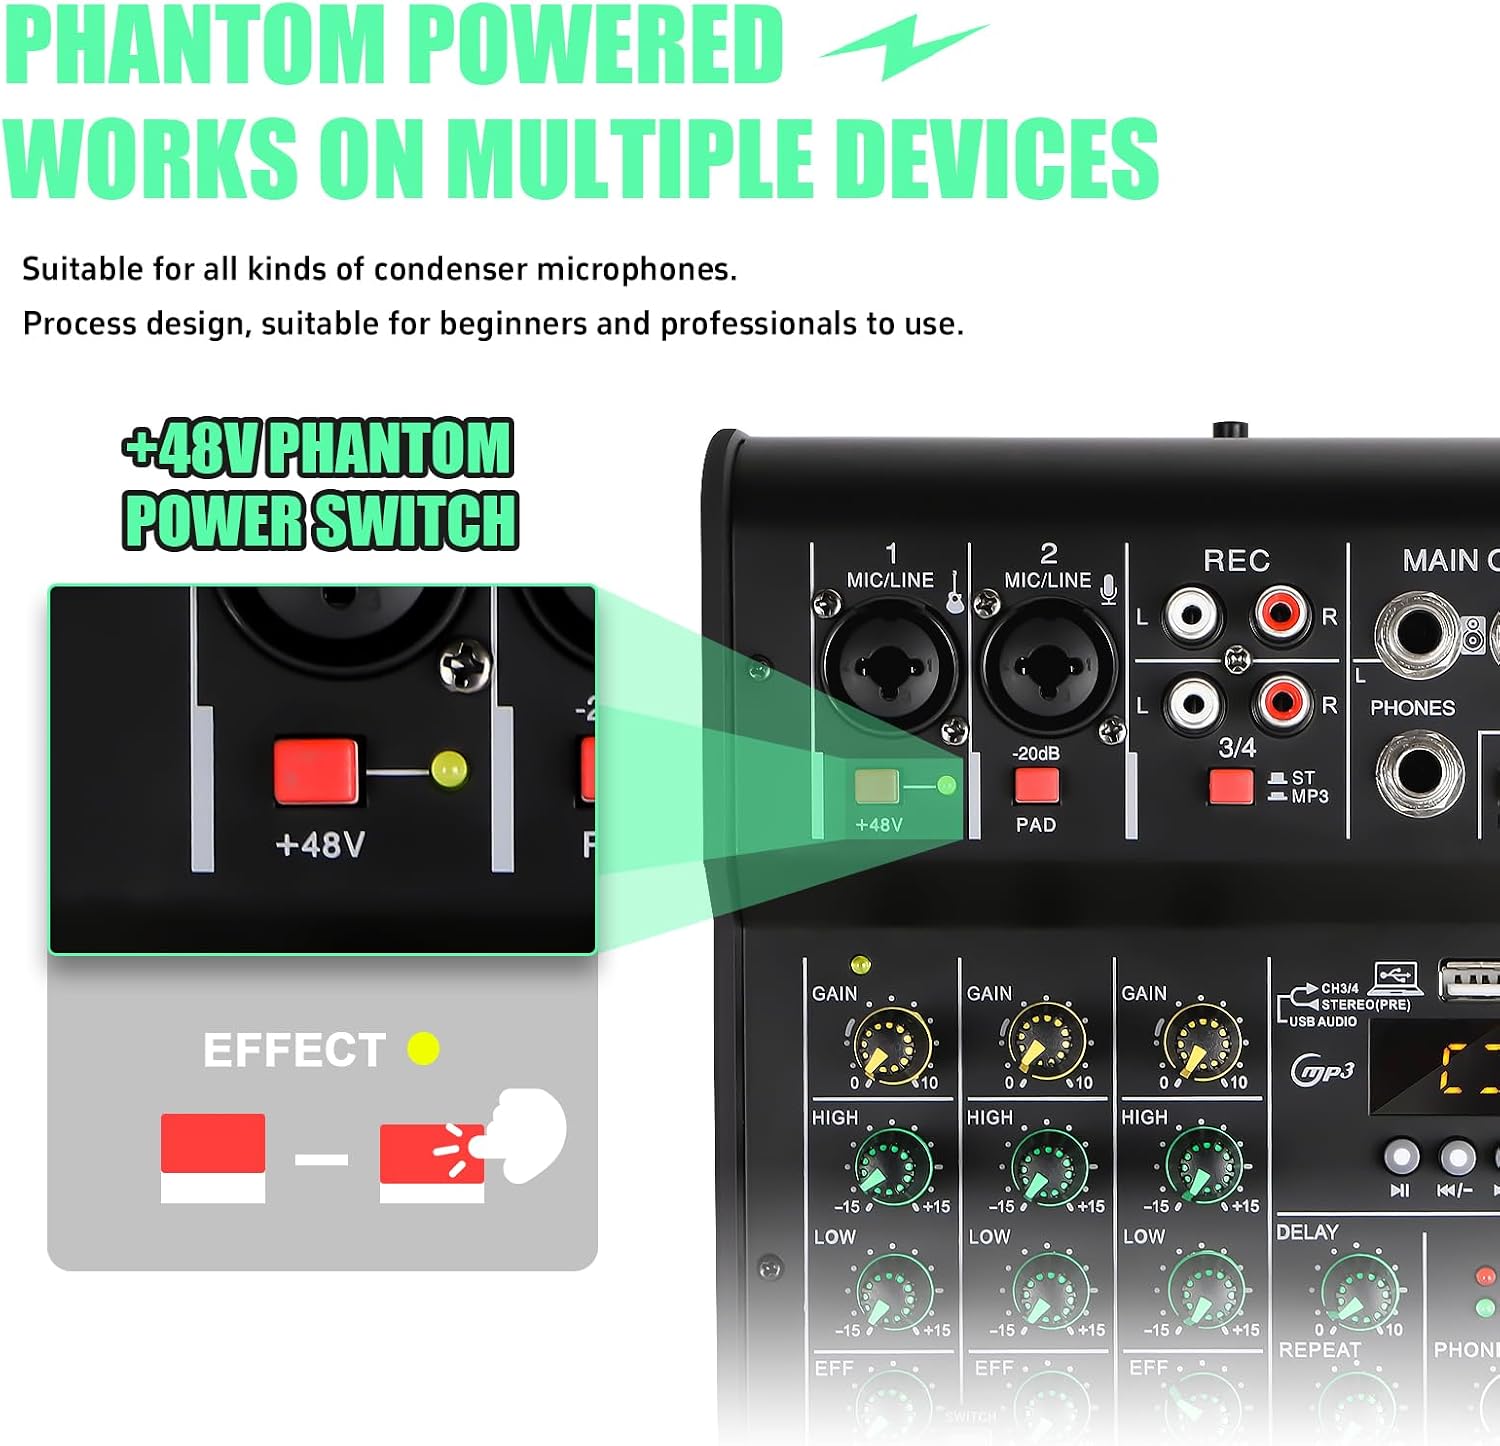
Figure 2.2: Detail showing the 48V Phantom Power switch, essential for condenser microphones.

Figure 2.3: Detailed view of various functions including Bluetooth connection, 48V phantom power, function effect console, computer recording, and treble/midrange/bass controls.
3. Product Diagram and Controls
Familiarize yourself with the various inputs, outputs, and controls on your M4 Audio Mixer.

Figure 3.1: Labeled diagram of the M4 mixer's front panel controls and connections.
Front Panel Controls:
- MIC/LINE Inputs (1 & 2): Combo XLR/TRS jacks for microphones or line-level instruments.
- +48V Phantom Power Switch: Activates phantom power for condenser microphones.
- PAD Switch (-20dB): Attenuates input signal by 20dB for high-output sources.
- GAIN Adjustment: Controls the input sensitivity for each channel.
- HIGH/LOW (EQ): Treble and Bass equalization controls for each channel.
- EFF (Effect Send): Adjusts the amount of signal sent to the internal effect processor.
- PEAK Indicator: Lights up when the input signal is too high, indicating potential clipping.
- Channel Volume (1, 2, 3/4 MP3): Adjusts the volume of individual input channels.
- DELAY Control: Adjusts the delay effect parameters.
- REPEAT Control: Adjusts the repeat parameter for the delay effect.
- PHONES Volume: Controls the volume of the headphone output.
- MAIN Volume: Controls the overall output volume of the mixer.
- USB Input: For connecting USB flash drives for playback or recording.
- Function Control Panel: Buttons for mode selection (Bluetooth, USB), playback control (play/pause, skip), and recording.
Rear Panel Connections:

Figure 3.2: Rear panel connections including power input and USB socket.
- REC (RCA L/R): Stereo RCA outputs for recording.
- MAIN OUT (TRS L/R): Main stereo outputs for connecting to amplifiers or powered speakers.
- PHONES (TRS): Headphone output.
- 3/4 ST MP3 (RCA L/R): Stereo RCA inputs for external devices.
- POWER Input: For connecting the power adapter.
- USB Socket: For connecting to a computer (USB Audio) or for power.
4. Connections and Setup
Follow these steps to set up your M4 Audio Mixer and connect your devices.

Figure 4.1: Diagram illustrating various device connections to the M4 mixer, including microphones, instruments, computers, and speakers.
- Power Connection: Connect the provided power adapter to the POWER input on the rear panel and plug it into a suitable power outlet.
- Main Output Connection: Connect the MAIN OUT (L/R) jacks to your amplifier, powered speakers, or recording interface using TRS cables.
- Microphone/Instrument Connection:
- For microphones, connect via the XLR input. If using a condenser microphone, activate the +48V phantom power switch.
- For line-level instruments (e.g., electronic keyboard, guitar with pre-amp), connect via the 1/4'' TRS input.
- Stereo Input Connection: Use the 3/4 ST MP3 RCA inputs to connect external stereo devices like CD players or other audio sources.
- Headphone Connection: Plug your headphones into the PHONES jack for monitoring.
- USB Connection (for PC/Laptop): Connect the USB socket on the rear panel to your computer using a USB cable. The mixer will function as an audio interface.
- USB Flash Drive: Insert a FAT32 formatted USB flash drive into the front panel USB port for direct recording or playback.

Figure 4.2: Examples of common device connections to the M4 mixer, including computer, loudspeaker, headphones, and phone.
5. Operating Instructions
Basic Operation:
- Power On: Ensure all connections are secure, then turn on the mixer using the POWER switch.
- Adjusting Input Gain: For each active channel, slowly increase the GAIN knob until the PEAK indicator flashes only occasionally during the loudest parts of the signal. If it stays lit, reduce the gain.
- Equalization (EQ): Use the HIGH and LOW knobs to adjust the tone of each channel. Turn clockwise to boost frequencies, counter-clockwise to cut.
- Applying Effects: Turn the EFF knob on each channel to send signal to the internal effect processor. Adjust the DELAY and REPEAT knobs to fine-tune the effect.
- Monitoring: Adjust the PHONES volume knob to set the desired listening level for your headphones.
- Main Output Level: Use the MAIN volume knob to control the overall output level sent to your speakers or recording device.
Bluetooth Operation:
- Press the 'MODE/BT' button on the function control panel until 'BLUE' or 'BT' appears on the display.
- On your Bluetooth-enabled device (smartphone, tablet), search for available devices and select 'M4 Mixer' (or similar name).
- Once paired, audio from your device will play through the mixer. Adjust its volume using the '3/4 MP3' channel volume knob.
USB Playback/Recording:
- Playback: Insert a USB flash drive containing MP3 files into the USB port. The mixer will automatically start playing. Use the playback control buttons (play/pause, skip) to navigate.
- Recording: With a FAT32 formatted USB flash drive inserted, press and hold the 'MODE/REC' button to start recording. Press again to stop. The recorded file will be saved on the USB drive.
6. Troubleshooting
| Problem | Possible Cause | Solution |
|---|---|---|
| No sound output | Power off; Main volume too low; Incorrect connections; Input gain too low. | Check power, increase MAIN volume, verify all cables, increase channel GAIN. |
| Distorted sound | Input gain too high (PEAK light constantly on); Cables faulty. | Reduce GAIN until PEAK light flashes only occasionally. Check/replace cables. |
| Microphone not working (condenser mic) | 48V phantom power not activated. | Ensure +48V phantom power switch is ON. |
| Bluetooth not connecting | Mixer not in Bluetooth mode; Device not discoverable. | Press MODE/BT button until 'BLUE' or 'BT' appears. Ensure Bluetooth is enabled on your device and it's in pairing mode. |
| USB recording not working | USB drive not FAT32 formatted; Drive full; Recording not initiated correctly. | Format USB drive to FAT32. Check available space. Press and hold MODE/REC button to start recording. |
7. Specifications
| Feature | Detail |
|---|---|
| Model Number | M4 |
| Number of Channels | 4 |
| Phantom Power | 48V |
| Connectivity Technology | Bluetooth, USB |
| Hardware Interface | Bluetooth 3.0 |
| Power Source | Corded Electric |
| Product Dimensions | 9 x 25 x 25 cm |
| Item Weight | 1.01 kg |
8. Care and Maintenance
- Cleaning: Use a soft, dry cloth to clean the exterior of the mixer. Do not use liquid cleaners or solvents.
- Storage: Store the mixer in a cool, dry place away from direct sunlight and extreme temperatures.
- Handling: Avoid dropping or subjecting the mixer to strong impacts.
- Ventilation: Ensure proper ventilation around the unit to prevent overheating.
9. Warranty and Support
For warranty information and technical support, please refer to the documentation provided with your purchase or visit the official micfuns website. Keep your proof of purchase for any warranty claims.
Ask a question about this manual
Ask about setup, troubleshooting, compatibility, parts, safety, or missing instructions. Manuals+ will review the question and use this page’s manual context to help answer it.