Introduction
Thank you for choosing the EFAN 550W Electric Paint Sprayer. This manual provides essential information for the safe and efficient operation, maintenance, and troubleshooting of your paint sprayer. Please read these instructions carefully before use and retain them for future reference.
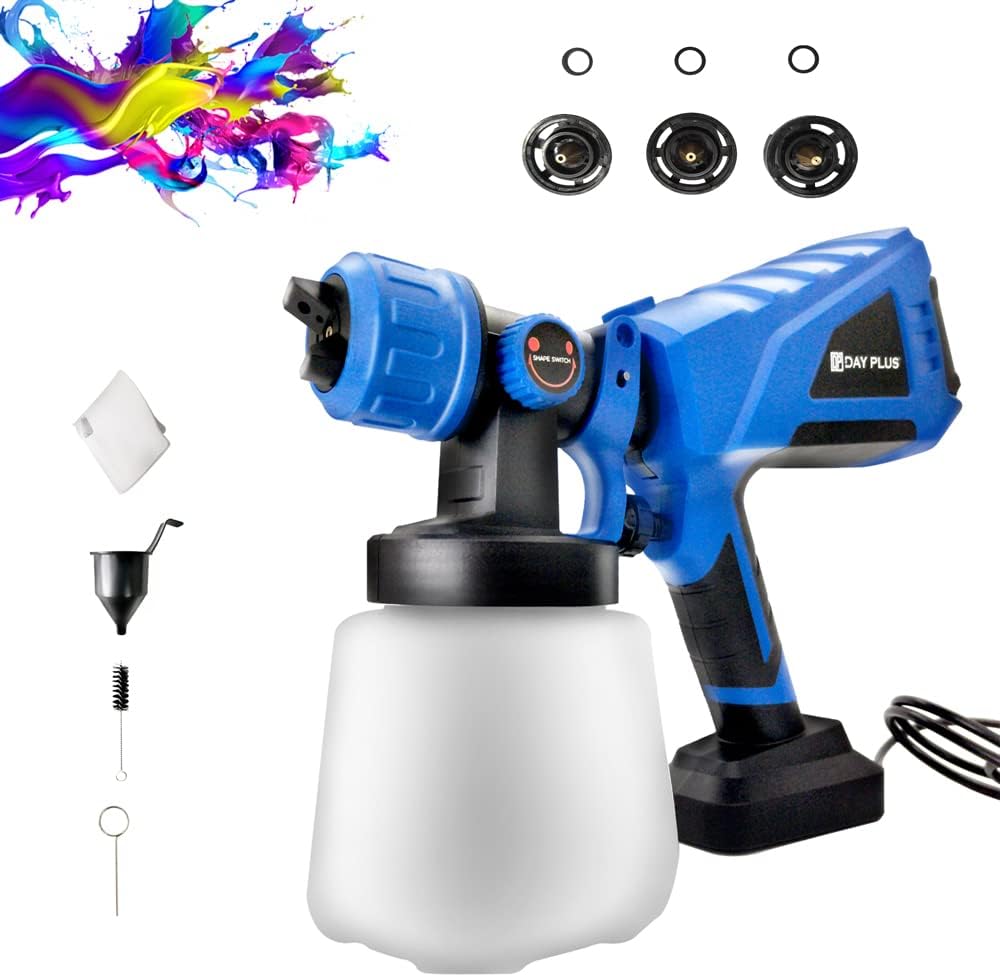
Image: The EFAN 550W Electric Paint Sprayer shown with its various accessories, including nozzles, cleaning tools, and a viscosity cup.
Important Safety Instructions
Always observe basic safety precautions to reduce the risk of fire, electric shock, and personal injury when using this product.
- Read All Instructions: Familiarize yourself with the controls and proper use of the equipment.
- Ventilation: Use in a well-ventilated area. Paint fumes can be hazardous.
- Personal Protective Equipment: Always wear eye protection (safety glasses), a respirator or mask, and gloves. Protect skin and clothing.
- Flammable Materials: Do not spray flammable liquids near open flames, pilot lights, or other ignition sources.
- Electrical Safety: Ensure the power cord is in good condition. Do not operate in wet conditions.
- Children and Bystanders: Keep children and bystanders away from the operating area.
- Cleaning: Always disconnect power before cleaning or performing maintenance.
Product Overview and Components
The EFAN 550W Electric Paint Sprayer is designed for various painting projects. Understanding its components is crucial for correct operation.
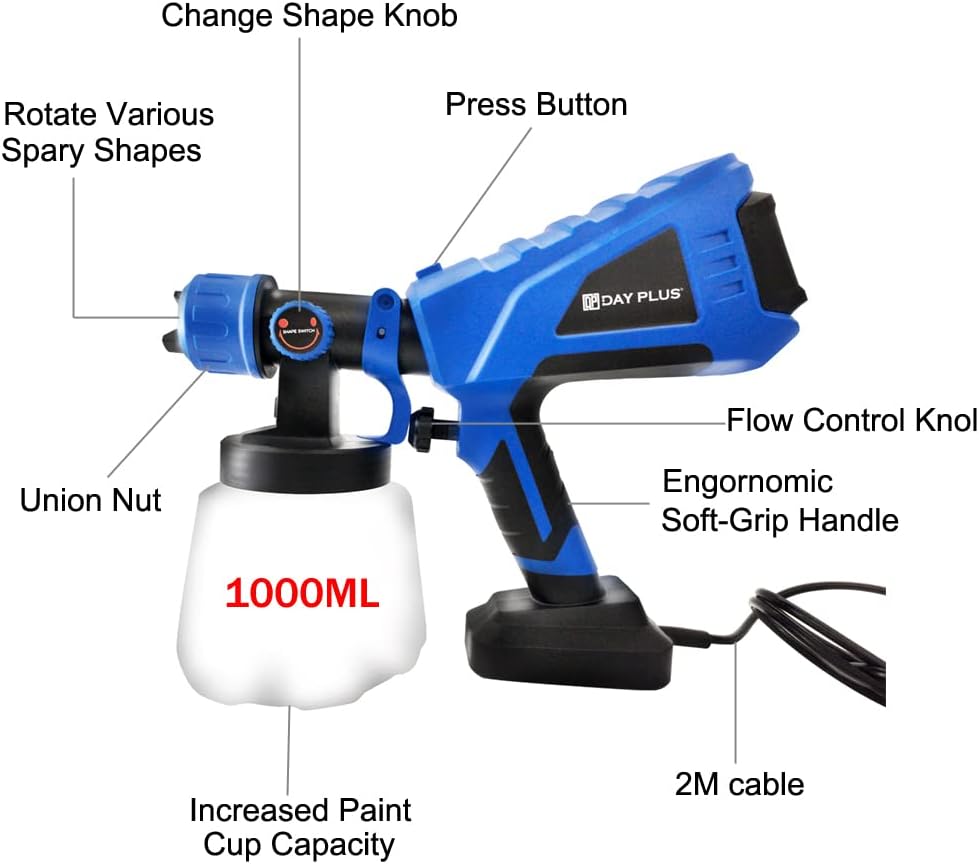
Image: A detailed diagram labeling the key components of the paint sprayer, including the Change Shape Knob, Press Button, Flow Control Knob, Ergonomic Soft-Grip Handle, Union Nut, 1000ML Paint Cup, and 2M Cable.
Key Components:
- Change Shape Knob: Adjusts the spray pattern.
- Press Button: Power switch for operation.
- Flow Control Knob: Regulates the paint output volume.
- Ergonomic Soft-Grip Handle: Provides comfortable handling.
- Union Nut: Secures the front assembly to the motor housing.
- 1000ML Paint Cup: Detachable container for paint.
- 2M Cable: Power supply cable.
- Fast Cooling Air Inlet: Located at the rear, designed to dissipate heat and protect the motor.
Specifications
| Feature | Specification |
|---|---|
| Motor Power | 550W |
| Max. Flow Rate | 1000ml/min |
| Paint Cup Capacity | 1000 ML |
| No Load Speed | 32000 RPM |
| Max. Viscosity | 100 DIN-Secs |
| Nozzle Sizes | 1.2mm, 1.8mm, 2.5mm, 3.0mm (anti-corrosion POM material) |
| Cable Length | 2M |
| Recommended Spray Distance | 10 ~ 30 CM |
| Applicable Paints | Oil paint, acrylic paint, water-based paint, diluted paint |
Setup
1. Preparing the Paint
Proper paint preparation is crucial for optimal spraying results and to prevent clogging.
- Viscosity Test: Use the included viscosity measuring cup to test the paint. Fill the cup with paint and time how long it takes for the paint to flow out completely. The recommended flow time is 20-45 seconds (maximum 100 DIN-Secs).
- Thinning: If the paint is too thick (flows out too slowly), thin it according to the paint manufacturer's recommendations. Use the appropriate thinner for your paint type (e.g., water for water-based paints, mineral spirits for oil-based paints). Mix thoroughly.
- Filtering: Pour the prepared paint through a filter (e.g., a paint strainer or universal filter paper) into the paint cup to remove any impurities that could clog the nozzle.

Image: Demonstrates how to measure paint viscosity using the provided cup and how to filter paint to remove impurities before spraying.
2. Assembly
Ensure the sprayer is unplugged before assembly.
- Attach the paint cup to the main sprayer body by screwing it firmly into place.
- Select the appropriate nozzle for your paint and project. The sprayer comes with 1.2mm, 1.8mm, 2.5mm, and 3.0mm nozzles.
- Insert the chosen nozzle into the front assembly and secure it with the union nut.
3. Nozzle Selection and Spray Pattern Adjustment
The sprayer offers three spray patterns and four nozzle sizes for versatility.
- Nozzle Sizes: Choose a smaller nozzle (e.g., 1.2mm, 1.8mm) for thinner paints and finer finishes. Use larger nozzles (e.g., 2.5mm, 3.0mm) for thicker paints and broader coverage.
- Spray Pattern Adjustment: Rotate the 'Change Shape Knob' (air cap ears) on the front of the sprayer to select your desired pattern:

Image: Illustrates the three adjustable spray patterns: Vertical 90°, Circular 45°, and Horizontal 180°, achieved by rotating the nozzle cap.
- Vertical 90°: For horizontal surfaces.
- Circular 45°: For small areas or detailed work.
- Horizontal 180°: For vertical surfaces.
Operating Instructions
1. Filling the Paint Container
- Ensure the paint is properly thinned and filtered as described in the Setup section.
- Unscrew the paint cup from the sprayer.
- Carefully pour the prepared paint into the 1000ML paint cup. Do not overfill.
- Screw the paint cup back onto the sprayer body securely.
2. Starting the Sprayer
- Plug the power cord into a suitable electrical outlet.
- Press the 'Press Button' (power switch) to turn on the sprayer. The motor will start.
3. Spraying Technique
Practice on a piece of cardboard or scrap material before spraying your actual project.
- Distance: Maintain a consistent distance of 10-30 cm (4-12 inches) from the surface.
- Movement: Move the sprayer in smooth, even strokes, parallel to the surface. Overlap each pass by about one-third to ensure even coverage.
- Trigger Control: Press the trigger fully to start spraying and release it at the end of each stroke.
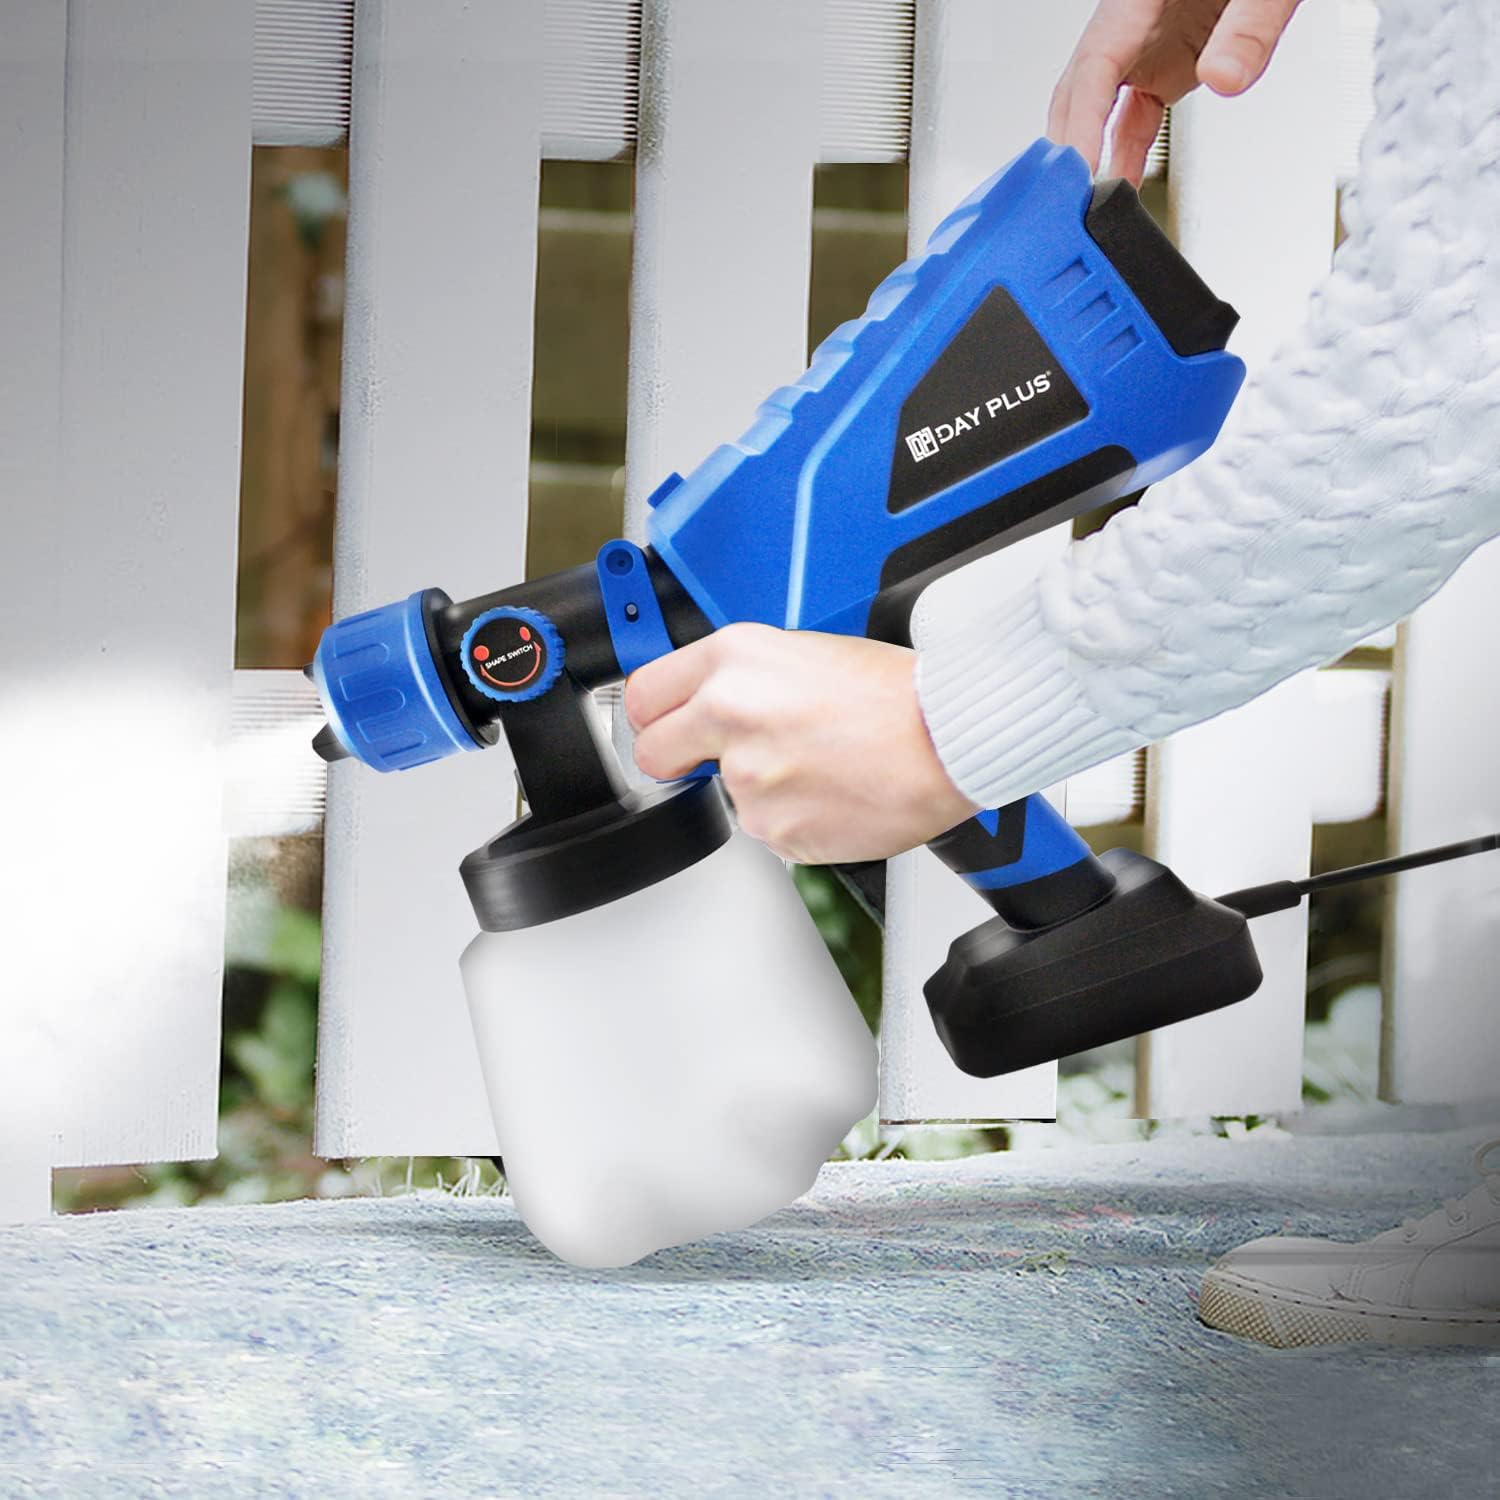
Image: A user demonstrating the application of paint on a fence using the EFAN electric paint sprayer, highlighting its suitability for various home projects.
4. Adjusting Flow Rate
The 'Flow Control Knob' allows you to precisely control the amount of paint being sprayed.

Image: Illustrates the 'Adjustable Valve Flow Control Knob' and how to rotate it to adjust the paint flow rate from 0ml/min to 1000ml/min, allowing for precise control over paint output.
- Rotate the knob clockwise to decrease the paint flow.
- Rotate the knob counter-clockwise to increase the paint flow.
- Adjust the flow rate to match the paint viscosity and desired coverage. Start with a lower setting and gradually increase if needed.
Maintenance and Cleaning
Thorough cleaning after each use is essential to prevent paint from drying and clogging the sprayer, ensuring its longevity and performance.

Image: A sequence of images demonstrating the cleaning process for the paint sprayer, including rinsing the nozzle, cleaning the internal components with a needle, and scrubbing the paint cup and tube with a brush.
- Disconnect Power: Always unplug the sprayer from the power outlet before cleaning.
- Empty Paint Cup: Unscrew the paint cup and pour any remaining paint back into its original container.
- Initial Rinse: Fill the paint cup with the appropriate cleaning solution (water for water-based paints, mineral spirits for oil-based paints). Reattach the cup and spray the cleaning solution into a waste container until it runs clear.
- Disassemble and Clean:
- Unscrew the paint cup and detach the front nozzle assembly.
- Thoroughly clean the paint cup, suction tube, and nozzle assembly with the cleaning solution and the provided cleaning brush.
- Use the cleaning needle to clear any blockages in the nozzle orifice.
- Wipe down the exterior of the sprayer with a damp cloth. Do not immerse the motor unit in liquid.
- Dry and Store: Ensure all components are completely dry before reassembling and storing the sprayer in a clean, dry place, away from direct sunlight and extreme temperatures.
Troubleshooting
Refer to this section for common issues and their solutions.
| Problem | Possible Cause | Solution |
|---|---|---|
| No spray or weak spray |
|
|
| Uneven spray pattern |
|
|
| Paint dripping |
|
|
| Motor not starting |
|
|
Warranty and Support
The EFAN 550W Electric Paint Sprayer is covered by a manufacturer's warranty against defects in materials and workmanship. Please refer to your purchase documentation for specific warranty terms and duration.
For technical assistance, spare parts, or warranty claims, please contact EFAN customer support through your retailer or the official EFAN website. Have your model number (PQJ) and purchase date ready when contacting support.