YIHUA 938BD-I
YIHUA 938BD-I 2-in-1 Hot Air Rework and Soldering Station User Manual
Model: 938BD-I | Brand: YIHUA
1. Introduction
The YIHUA 938BD-I is a versatile 2-in-1 hot air rework and soldering station designed for precision electronic work. It integrates both hot air and soldering iron functions into a single compact unit, featuring a car-style LCD display for real-time temperature and power readouts. This manual provides essential information for the safe and effective operation, maintenance, and troubleshooting of your device.

Image 1.1: The YIHUA 938BD-I station with its hot air gun, soldering iron, X2 holder, various nozzles, and solder wire.

Image 1.2: Overview of the station's dual functionality, highlighting the hot air rework and soldering capabilities.
2. Safety Instructions
- Always operate the station in a well-ventilated area to avoid inhaling fumes.
- Ensure the power supply matches the specified voltage (230V AC for EU plug).
- Do not touch the hot air gun nozzle or soldering iron tip directly during or immediately after use, as they reach high temperatures.
- Place the hot air gun in its holder when not in use to activate standby mode and prevent accidental burns.
- Keep flammable materials away from the work area.
- Disconnect the power plug before cleaning or maintenance.
- This device is not intended for use by persons with reduced physical, sensory, or mental capabilities unless supervised or instructed by a responsible person.
3. Package Contents
Verify that all the following components are included in your package:
- 1x YIHUA 938BD-I Station Unit
- 1x Soldering Iron
- 1x Hot Air Gun
- 3x Soldering Iron Tips
- 3x Hot Air Nozzles
- 1x ESD Safe Tweezers
- 1x Desoldering Pump
- 1x X-2 Holder System (with cleaning sponge and brass wool tip cleaner)

Image 3.1: All components included with the YIHUA 938BD-I station.
4. Product Overview and Features
The YIHUA 938BD-I station is equipped with advanced features to enhance soldering and rework efficiency:
- Real-Time Display: The car-style LCD provides real-time power indication and displays both the set and actual temperatures for precise control.
- PID Temperature Control: Both the hot air gun and soldering iron utilize PID programming for stable and accurate temperature maintenance.
- 110W EVO Heating Element: Ensures rapid heating and quick heat recovery for the soldering iron.
- Soldering Iron Sleep Mode: Automatically enters a 10-minute sleep mode when idle, reducing wear and power consumption.
- Hot Air Safety/Standby: The hot air gun automatically cools down and enters standby when placed in its holder, enhancing safety and extending element life.
- Digital Temperature Calibration: Allows for precise adjustment of temperature readings.
- X2 Storage System: A stable, multi-functional holder for the soldering iron, integrating cleaning tools and storage for tips and solder wire.

Image 4.1: The LCD display showing real-time temperature, sleep mode status, and dynamic air volume indicators.
5. Setup
- Unpack Components: Carefully remove all items from the packaging and verify against the package contents list.
- Position the Station: Place the main unit on a stable, heat-resistant surface in a well-ventilated area.
- Connect Hot Air Gun: Plug the hot air gun connector into the designated port on the front of the main unit. Ensure it is securely fastened.
- Connect Soldering Iron: Plug the soldering iron connector into its designated port on the front of the main unit.
- Assemble X2 Holder: Assemble the X2 multi-function holder. Place the cleaning sponge and brass wool into their respective compartments. Position the holder next to the main unit.
- Connect Power: Insert the power cord into the back of the main unit and then plug it into a 230V AC power outlet.

Image 5.1: The hot air gun correctly placed in its holder, which activates standby mode.
6. Operating Instructions
6.1. Hot Air Rework Station
- Power On: Flip the main power switch located on the side of the unit.
- Select Hot Air Function: Use the control knob or buttons to select the hot air function.
- Set Temperature: Adjust the temperature using the rotary knob. The range is 100 °C to 480 °C. The LCD will display both the set and actual temperatures.
- Set Airflow: Adjust the airflow using the dedicated control.
- Operation: Once the desired temperature is reached, remove the hot air gun from its holder to begin operation.
- In-Holder Standby: When finished, place the hot air gun back into its holder. It will automatically cool down to 100 °C and enter standby mode.
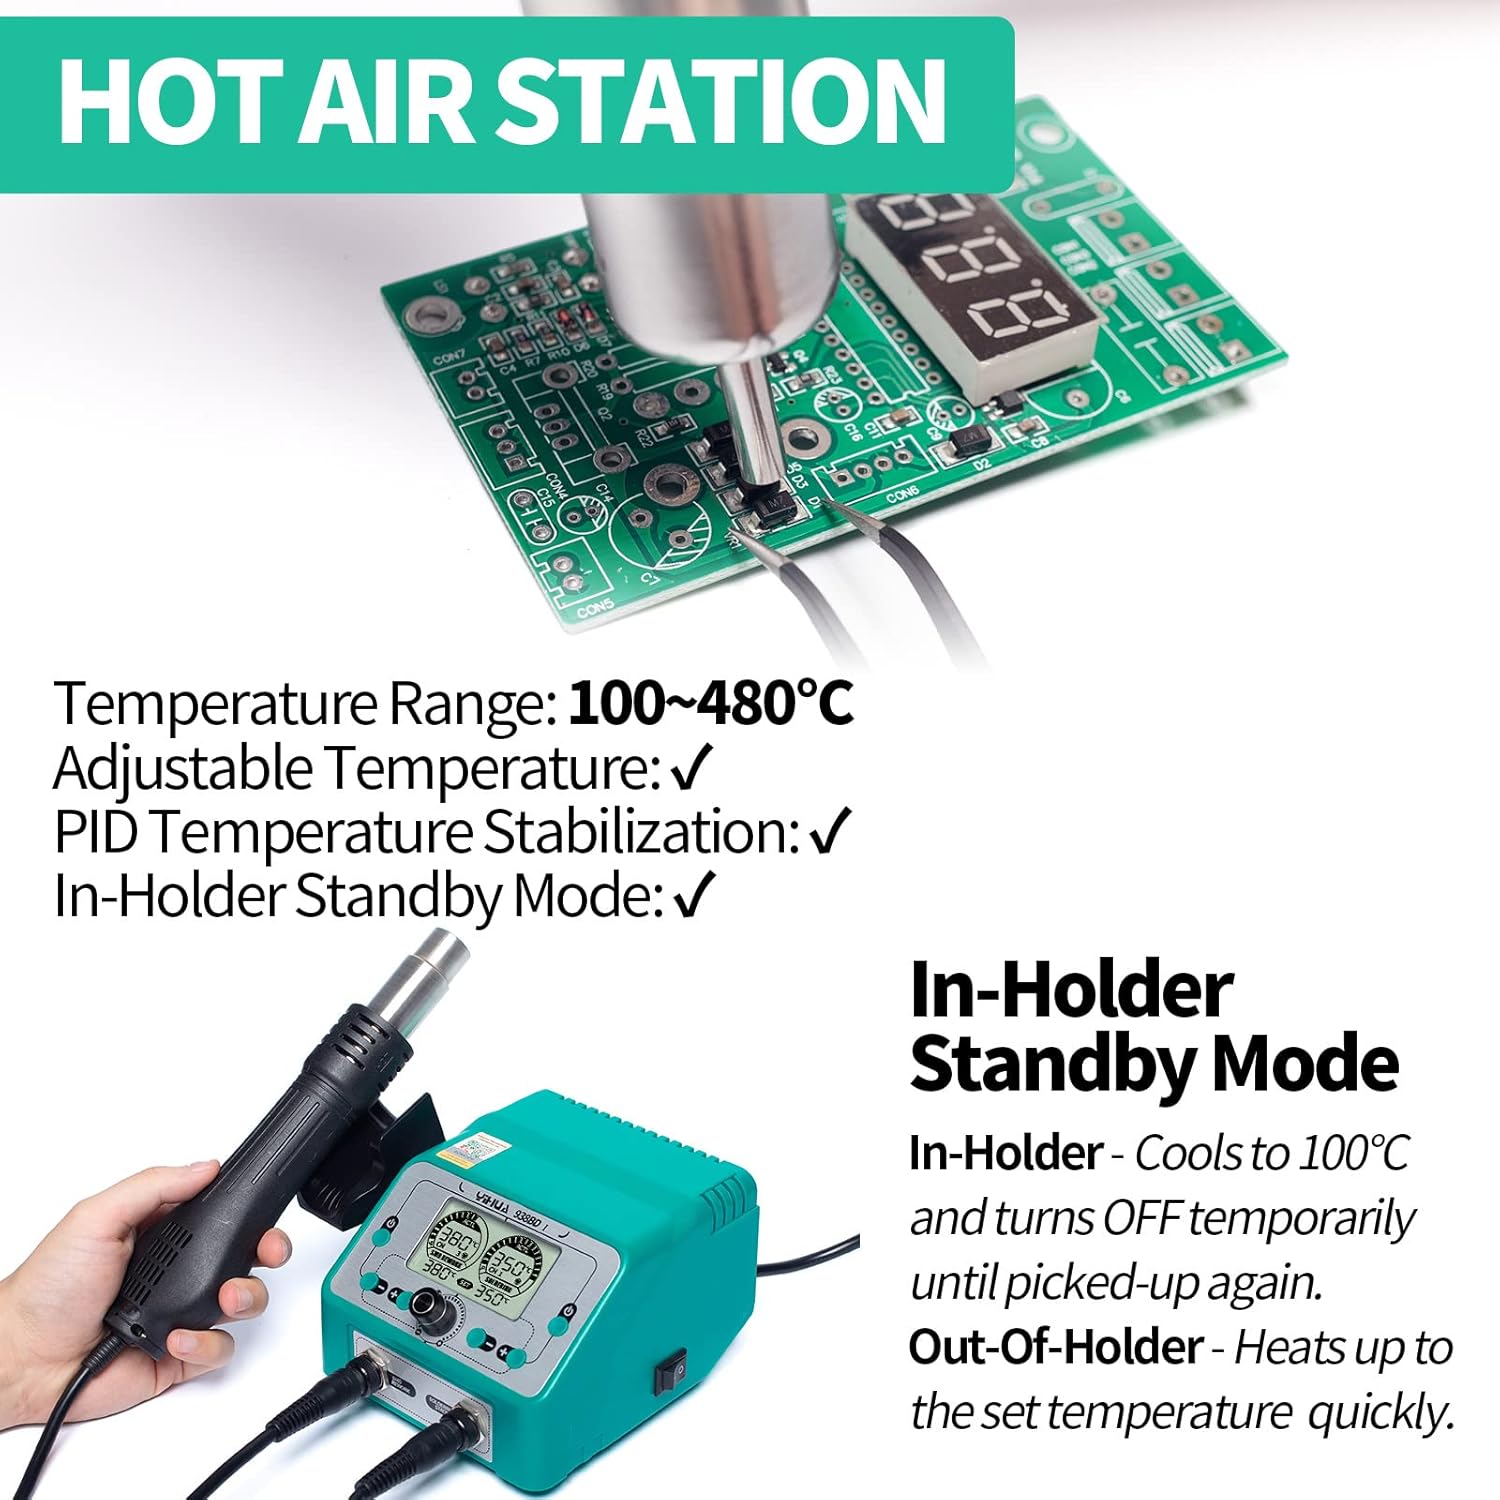
Image 6.1: The hot air gun in its holder, demonstrating the automatic standby feature.
6.2. Soldering Station
- Power On: Ensure the main power switch is on.
- Select Soldering Function: Use the control knob or buttons to select the soldering iron function.
- Set Temperature: Adjust the temperature using the rotary knob. The range is 200 °C to 480 °C. The LCD will display both the set and actual temperatures.
- Operation: Allow the soldering iron to heat up to the set temperature. The 110W EVO heating element ensures quick heating.
- 10-Minute Sleep Mode: If the soldering iron remains idle in its holder for 10 minutes, it will automatically enter sleep mode, reducing its temperature to 200 °C to conserve energy and prolong tip life. It quickly heats back up when picked up.

Image 6.2: The soldering iron in its sleep mode, idling at a lower temperature.
6.3. Temperature Adjustment and Calibration
- Adjusting Temperature: Use the main rotary knob to increase or decrease the set temperature for both the hot air gun and soldering iron. The display will update in real-time.
- Digital Calibration: The station supports digital temperature calibration. Refer to the detailed instructions in the full user manual for the specific steps to perform calibration, typically involving a temperature sensor and adjustment via the unit's interface.

Image 6.3: Adjusting the temperature setting using the rotary knob.

Image 6.4: Performing digital temperature calibration for accuracy.
7. Maintenance
7.1. Cleaning and Care
Regular cleaning ensures optimal performance and longevity of your station:
- Soldering Iron Tip Cleaning: Use the included brass wool tip cleaner to remove oxidation and excess solder from the soldering iron tip. Dampen the cleaning sponge with water for additional cleaning.
- X2 Holder: The X2 holder system is designed for easy cleaning. Periodically clean the protective base tray and ensure the sponge and brass wool are free of debris.
- General Cleaning: Wipe the main unit and tools with a soft, dry cloth. Do not use abrasive cleaners or solvents.

Image 7.1: The X2 holder system, showing integrated cleaning sponge, brass wool, and storage for tips and solder wire.
7.2. Tip Replacement
Soldering iron tips are consumable parts and should be replaced when they show signs of wear or corrosion that affect performance.
- Ensure the soldering iron is cool before attempting to replace the tip.
- Unscrew the retaining nut or collar to remove the old tip.
- Insert the new tip and secure it by tightening the retaining nut/collar.
- Always use genuine YIHUA replacement tips for optimal performance.

Image 7.2: Example of compatible soldering tips for replacement.
8. Troubleshooting
This section addresses common issues you might encounter:
- No Power: Check if the power cord is securely plugged into both the station and the wall outlet. Ensure the main power switch is in the 'ON' position.
- Temperature Not Reaching Set Value: Verify that the heating elements are properly connected. Ensure the hot air gun is removed from its holder for operation, and the soldering iron is not in sleep mode.
- Unstable Temperature: The PID control system should maintain stable temperatures. If fluctuations occur, ensure the sensors are clean and properly seated. Digital calibration may be required.
- Hot Air Gun Not Blowing Air: Check for any obstructions in the nozzle or air intake. Ensure the airflow setting is not at minimum.
- Soldering Iron Not Heating: Inspect the soldering iron tip and heating element for damage. Ensure the iron is fully inserted into its connector.
If problems persist, refer to the warranty and support section for assistance.
9. Specifications
| Manufacturer | Guangzhou Yihua Electronic Equipment Co.,Ltd. |
| Item Model Number | 938BD-I |
| Product Dimensions (L x W x H) | 15 x 13.6 x 10 cm; 2.1 kilograms |
| Power Type | AC Current |
| Voltage | 230 Volts |
| Power | 110 Watts |
| Display Type | LCD |
| Hot Air Temperature Range | 100 °C to 480 °C |
| Soldering Iron Temperature Range | 200 °C to 480 °C |
| Temperature Stability | 100% |
| Country of Origin | China |
10. Warranty and Support
The YIHUA 938BD-I is designed for 230V AC with a Type F EU power plug and comes with an exclusive 12-month EU technical coverage. Our dedicated team provides professional technical support on Amazon 24/7 to assist with any questions or suggestions you may have regarding your product.
For technical assistance or warranty claims, please contact YIHUA customer support through the Amazon platform.
Ask a question about this manual
Ask about setup, troubleshooting, compatibility, parts, safety, or missing instructions. Manuals+ will review the question and use this page’s manual context to help answer it.