1. Introduction
Thank you for purchasing the Vecupou HI-08 Native 1080P 5G WiFi Projector. This projector is designed to provide a high-quality visual experience for home entertainment, outdoor viewing, and presentations. Featuring native 1080P resolution, 5G WiFi connectivity, and support for 4K content, it offers versatile connectivity options and a large display capability up to 300 inches.

Image: The Vecupou HI-08 projector, showcasing its compact design and the large screen projection capabilities, highlighting its 9500 brightness, Full HD 1080P resolution, and Wi-Fi support.

Image: Multiple usage scenarios for the projector, including a home theater setup, an outdoor movie night, and a casual viewing experience, demonstrating its versatility.
2. Safety Information
- Do not look directly into the projector lens when the lamp is on. The intense light can cause eye damage.
- Ensure proper ventilation around the projector. Do not block ventilation openings.
- Use only the power adapter supplied with the projector.
- Do not expose the projector to rain or moisture to prevent fire or electric shock.
- Avoid placing the projector on unstable surfaces.
- Unplug the projector from the power outlet during lightning storms or when unused for long periods.
- Do not attempt to repair this product yourself. Refer all servicing to qualified service personnel.
3. Package Contents
Please check the package contents upon unboxing:
- Vecupou HI-08 Projector
- Power Cable
- HDMI Cable
- AV Cable
- Remote Control
- User Manual
- Projector Screen (stretchable cloth)
4. Product Overview
Familiarize yourself with the various parts and interfaces of your projector.
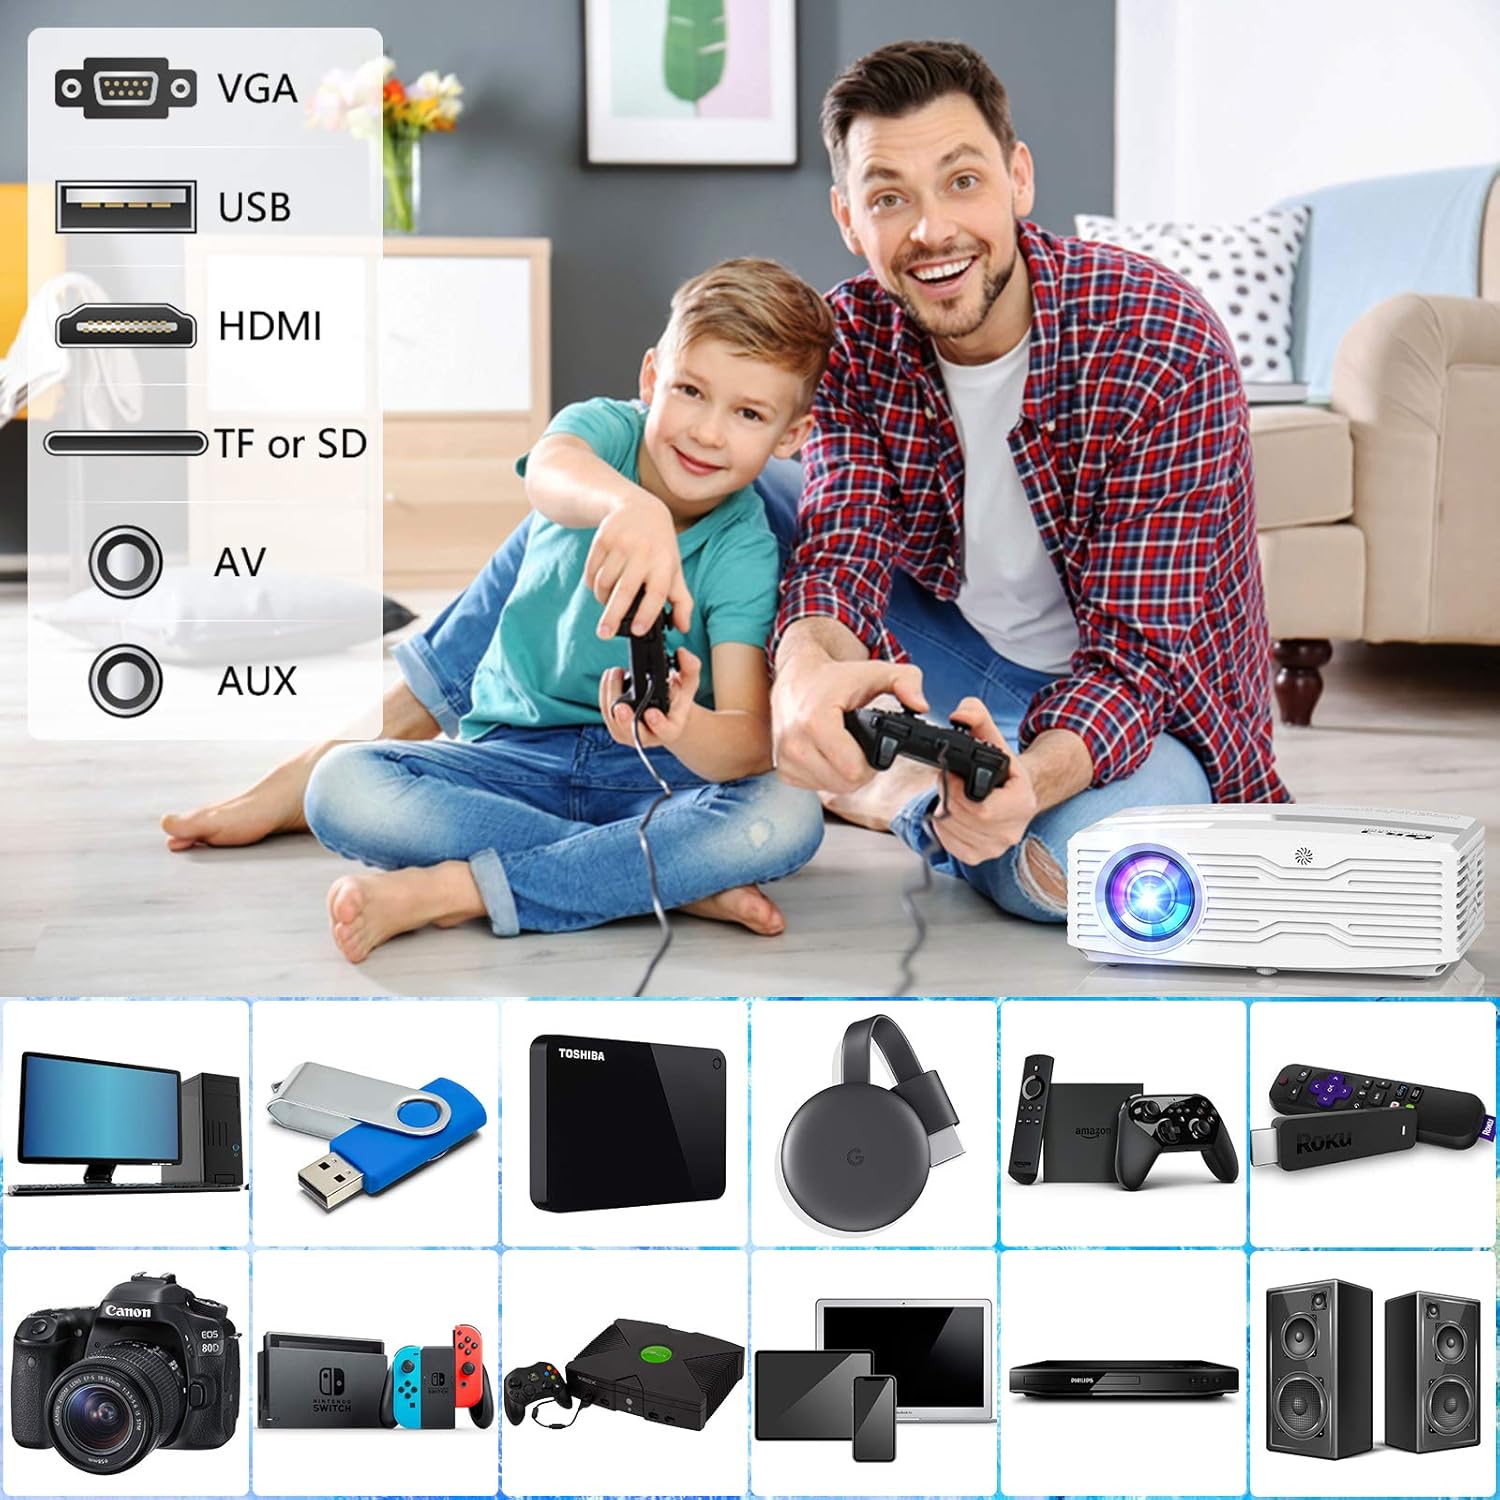
Image: Overview of the projector's connectivity options, including VGA, USB, HDMI, TF/SD card slot, AV, and AUX ports, illustrating the wide range of devices that can be connected.
The projector features a lens, focus ring, keystone correction, various input ports (HDMI, USB, AV, TF/SD, VGA, AUX), power input, and built-in speakers.
5. Setup
5.1 Placement
Place the projector on a stable, flat surface. Ensure there is enough space around the projector for proper ventilation. The ideal projection distance varies based on the desired screen size.
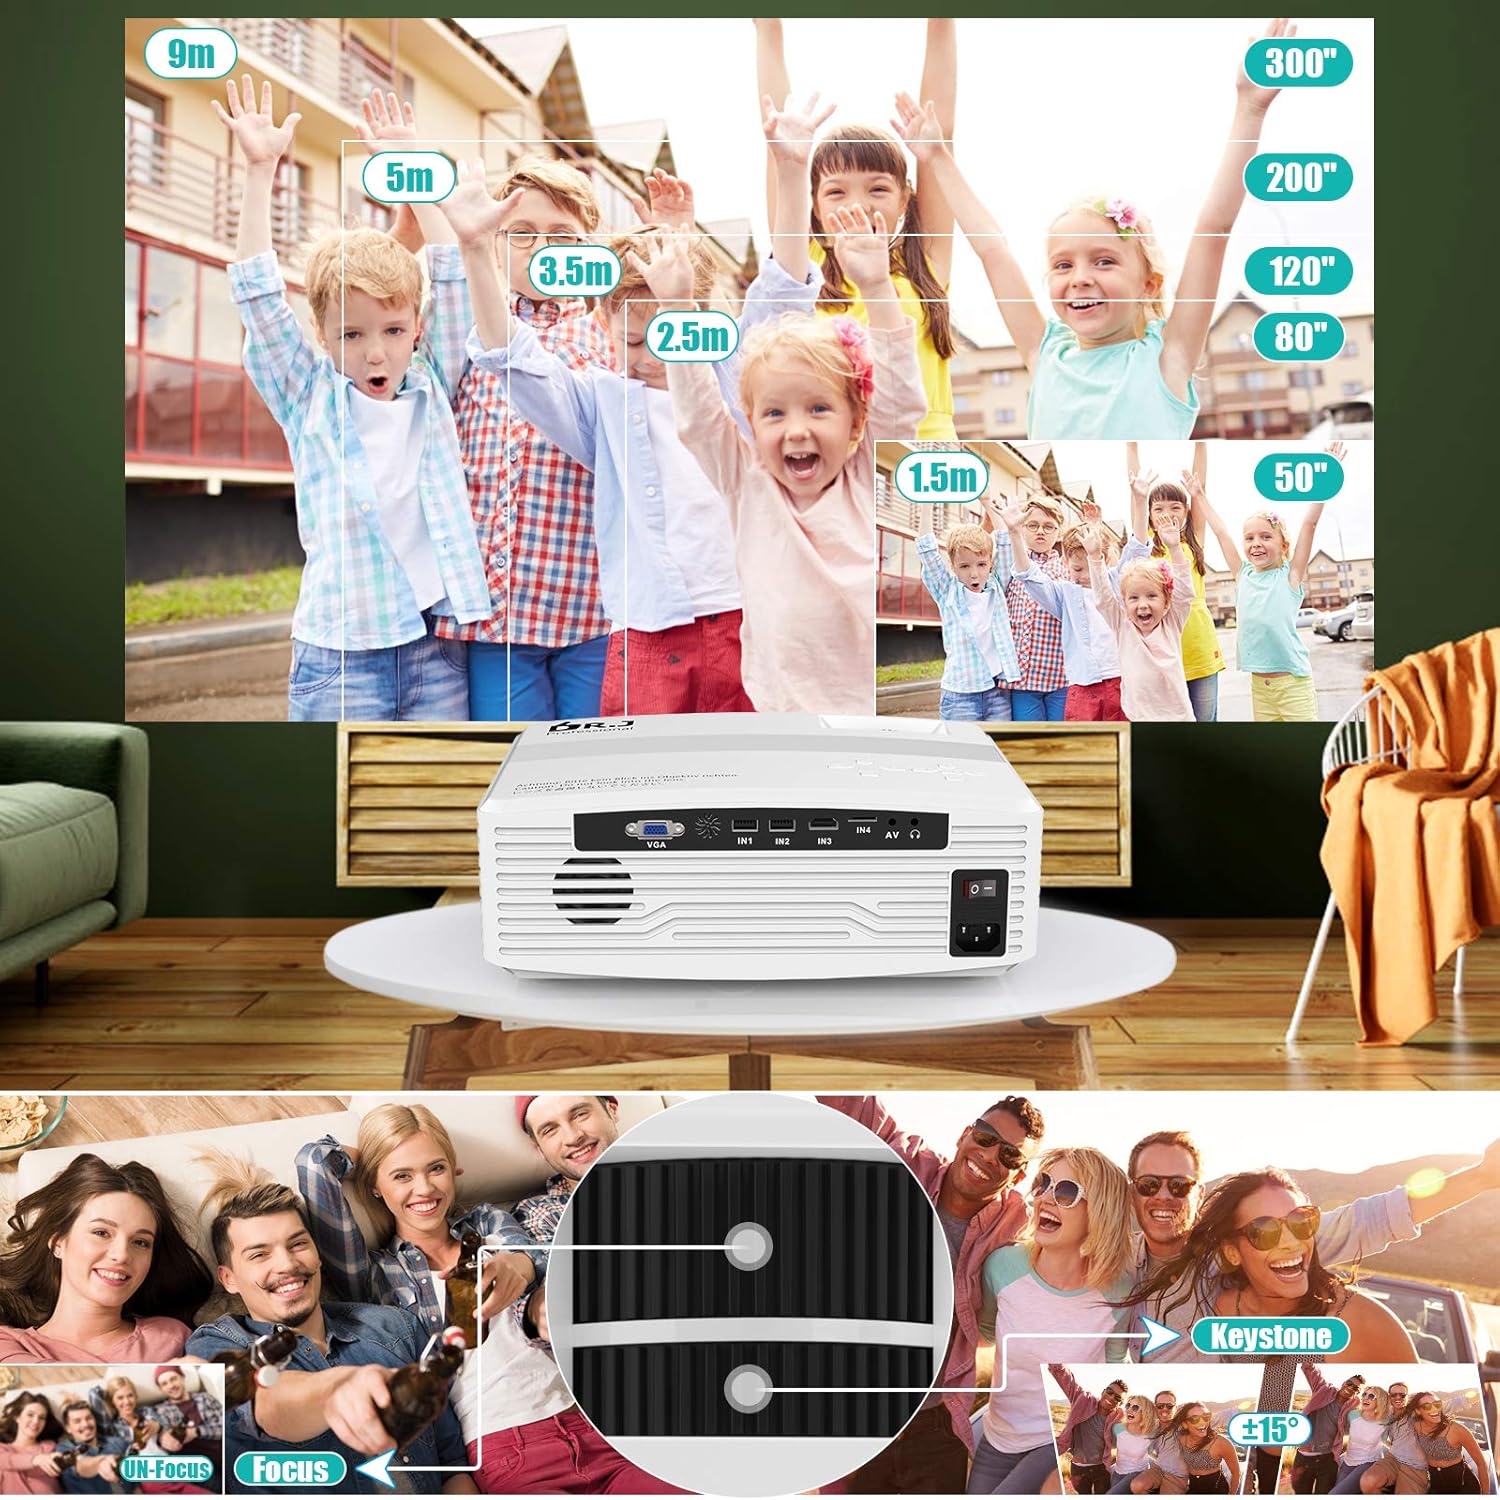
Image: Guide for optimal projection distances for screen sizes ranging from 50 to 300 inches, along with visual instructions for adjusting focus and keystone correction.
5.2 Power Connection
- Connect the power cable to the projector's power input port.
- Plug the other end of the power cable into a power outlet.
- Press the power button on the projector or remote control to turn it on.
5.3 Focus and Keystone Adjustment
- Focus: Rotate the focus ring on the projector lens until the projected image is clear and sharp.
- Keystone: Use the keystone correction dial (or digital keystone in settings) to adjust the image shape if it appears trapezoidal. This corrects distortion when the projector is not perfectly perpendicular to the screen.
5.4 Connecting Devices
The projector supports various input methods:
- HDMI: Connect your laptop, game console, Blu-ray player, or streaming stick (e.g., Amazon Fire TV Stick, Roku, Chromecast) via an HDMI cable.
- USB: Insert a USB drive to play media files directly.
- TF/SD Card: Insert a TF or SD card to play media files.
- AV: Use the AV cable to connect older devices like DVD players.
- VGA: Connect a computer via a VGA cable for video output.
- AUX: Connect external audio devices or headphones.

Image: Demonstrates both wireless screen mirroring via Wi-Fi and wired USB connection options for connecting smartphones to the projector.
5.5 Wi-Fi Connectivity and Screen Mirroring
The projector supports 5G WiFi for stable and fast screen mirroring from your mobile devices.
- Go to the projector's main menu and select the 'Setup' or 'Network' option.
- Select 'WiFi' and then 'Scan' to find available networks.
- Choose your desired WiFi network from the list and enter the password if prompted. Confirm the connection.
- For iOS devices, select 'iOS Cast' or 'AirPlay' from the projector's menu. On your iOS device, open Control Center and tap 'Screen Mirroring', then select the projector.
- For Android devices, select 'Miracast' or 'Android Cast' from the projector's menu. On your Android device, enable 'Wireless Display' or 'Screen Mirroring' (names may vary by device) and select the projector.

Image: A step-by-step visual guide demonstrating how to connect the projector to a Wi-Fi network and initiate screen mirroring from a smartphone.
5.6 Bluetooth Connectivity
Connect external Bluetooth speakers or headphones for enhanced audio.
- Go to the projector's main menu and select 'Bluetooth' settings.
- Enable Bluetooth on the projector and put your Bluetooth audio device into pairing mode.
- Select your device from the list of available devices on the projector's screen to pair.
6. Operating
6.1 Basic Operation
- Power On/Off: Press the power button on the projector or remote control.
- Menu Navigation: Use the arrow keys on the remote or projector panel to navigate through menus. Press 'OK' or 'Enter' to confirm selections.
- Back/Exit: Use the 'Return' or 'Exit' button to go back to the previous menu or exit the current menu.
6.2 Input Source Selection
From the main menu, select 'Source' or 'Input' and choose the desired input (e.g., HDMI1, USB, AV, WiFi Display) corresponding to your connected device.
6.3 Audio Settings
The projector features built-in stereo speakers. You can adjust the volume using the remote control. For external audio, connect via the AUX port or Bluetooth.

Image: Emphasizes the projector's built-in double stereo speakers, providing a high-fidelity audio experience for users.
6.4 Picture Settings
Access the 'Picture' or 'Display' settings in the menu to adjust:
- Brightness: Adjust the overall luminance of the image.
- Contrast: Control the difference between light and dark areas.
- Color Temperature: Change the warmth or coolness of the colors.
- Aspect Ratio: Select between 16:9, 4:3, or auto.
- Zoom: Digitally reduce the image size if needed.
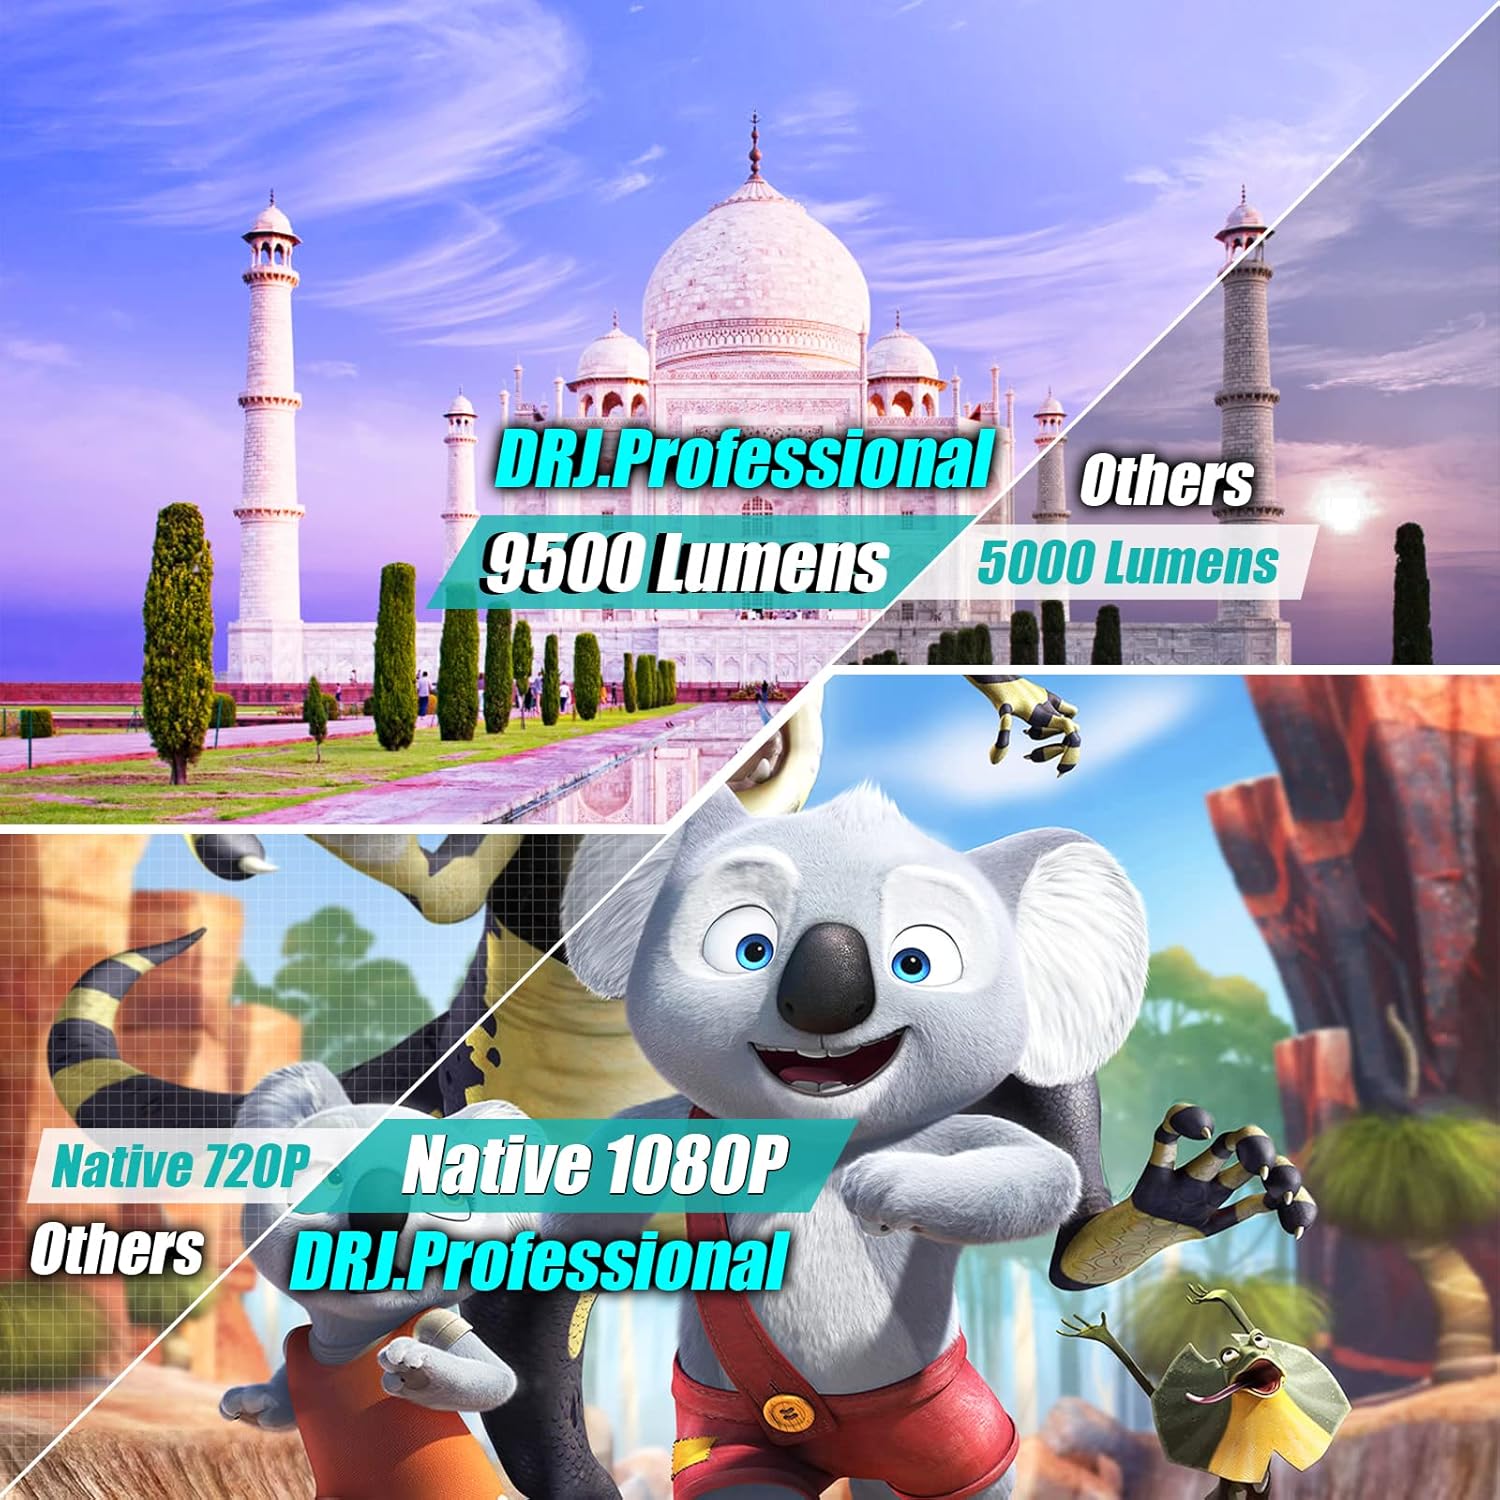
Image: A visual comparison highlighting the superior brightness (9500 Lumens) and native 1080P resolution of the DR.J Professional projector against other models.
7. Maintenance
- Lens Cleaning: Use a soft, lint-free cloth specifically designed for optical lenses to gently wipe the projector lens. Do not use abrasive cleaners.
- Air Filter Cleaning: Regularly check and clean the air filter to prevent dust buildup, which can affect performance and lifespan. Refer to the product diagram for filter location.
- General Cleaning: Wipe the projector's exterior with a soft, dry cloth. Do not use liquid or aerosol cleaners.
- Storage: When not in use for extended periods, store the projector in a cool, dry place, away from direct sunlight and extreme temperatures. Use the original packaging or a protective case.
8. Troubleshooting
| Problem | Possible Cause | Solution |
|---|---|---|
| No image projected | Power not connected; Incorrect input source; Lens cap on. | Check power connection; Select correct input source; Remove lens cap. |
| Image is blurry | Focus not adjusted; Projector too far/close. | Adjust focus ring; Adjust projection distance. |
| Image is trapezoidal | Keystone not adjusted. | Adjust keystone correction. |
| No sound | Volume too low; Muted; Incorrect audio output; External speaker not connected. | Increase volume; Unmute; Check audio settings; Ensure external speaker is connected and powered. |
| WiFi connection unstable | Weak signal; Interference. | Move projector closer to router; Reduce interference from other devices. |
9. Specifications
| Feature | Detail |
|---|---|
| Brand | Vecupou |
| Model Number | HI-08 |
| Display Resolution | Native 1920 x 1080 (Full HD) |
| Display Resolution Maximum | 1920 x 1080 |
| Connectivity Technology | Wi-Fi (5G supported), HDMI, 3.5mm Jack (AUX) |
| Special Features | Wireless, Portable, Built-In Wi-Fi |
| Speaker Type | Stereo, Built-In |
| Item Weight | 7.11 pounds |
| Package Dimensions | 13.78 x 13.39 x 5.91 inches |
| Visible Screen Diagonal | Up to 300 inches / 762 cm |
10. Warranty and Support
Your Vecupou HI-08 Projector comes with a standard manufacturer's warranty. Please refer to the warranty card included in your package for specific terms and conditions. For technical support, troubleshooting assistance, or warranty claims, please contact Vecupou customer service through the retailer's platform or the official brand website.
Please retain your proof of purchase for warranty purposes.


