1. Introduction
This manual provides detailed instructions for the assembly, operation, and maintenance of your GOPLUS 2.7㎡ Extendable Metal Garden Shed, Model A. Please read all instructions carefully before beginning assembly and retain this manual for future reference. Proper assembly and care will ensure the longevity and optimal performance of your shed.
2. Safety Information
- Always wear appropriate personal protective equipment (PPE) such as gloves and safety glasses during assembly.
- Ensure the assembly area is clear of obstructions and children or pets.
- It is recommended that at least two adults perform the assembly.
- Handle all metal panels and components with care to avoid cuts or scratches. Edges may be sharp.
- Do not assemble the shed in strong winds or adverse weather conditions.
- Secure the shed to a level, solid foundation (e.g., concrete slab) to prevent tipping or movement.
- Do not store flammable liquids or hazardous materials inside the shed.
- Regularly check all fasteners and connections to ensure they remain tight and secure.
3. Package Contents
Your GOPLUS 2.7㎡ Extendable Metal Garden Shed (Model A) is delivered in multiple packages, which may arrive on different days. Please verify all components against the detailed parts list provided with your product before beginning assembly.
Included Components:
- Metal panels for walls, roof, and doors
- Frame components (galvanized tubes)
- Fasteners (screws, nuts, washers)
- Door handles and sliding mechanisms
- Instruction Manual (this document)
If any parts are missing or damaged, please contact customer support immediately.
4. Setup and Assembly Instructions
Assembly requires careful attention to detail and is best performed by two adults. Refer to the numbered parts and detailed diagrams in the separate assembly guide included with your product for specific step-by-step instructions.
4.1 Site Preparation
- Choose a level, solid surface for installation, such as a concrete slab or paved area.
- Ensure adequate drainage around the shed to prevent water accumulation.
- Clear the area of any debris, rocks, or vegetation.
4.2 General Assembly Steps
- Unpack and Organize: Carefully unpack all boxes and lay out components. Group similar parts and verify against the parts list.
- Base Assembly: Assemble the base frame according to the instructions, ensuring it is square and level.
- Wall Panel Installation: Attach the wall panels to the base frame, securing them with the provided fasteners. Pay attention to the orientation of panels with ventilation openings.
- Roof Frame Assembly: Construct the roof frame and attach it to the top of the wall panels.
- Roof Panel Installation: Install the roof panels, ensuring they overlap correctly to provide weather protection. The inclined roof design facilitates rain runoff.
- Door Assembly and Installation: Assemble the sliding doors and install them onto the designated tracks. Ensure smooth operation.
- Final Checks: Tighten all screws and bolts. Ensure the shed is stable and secure. Anchor the shed to the ground if necessary (anchoring hardware may be sold separately).

Figure 1: Key features of the GOPLUS metal garden shed, highlighting ventilation, robust steel structure, portable handle, and practical sliding door for easy access.
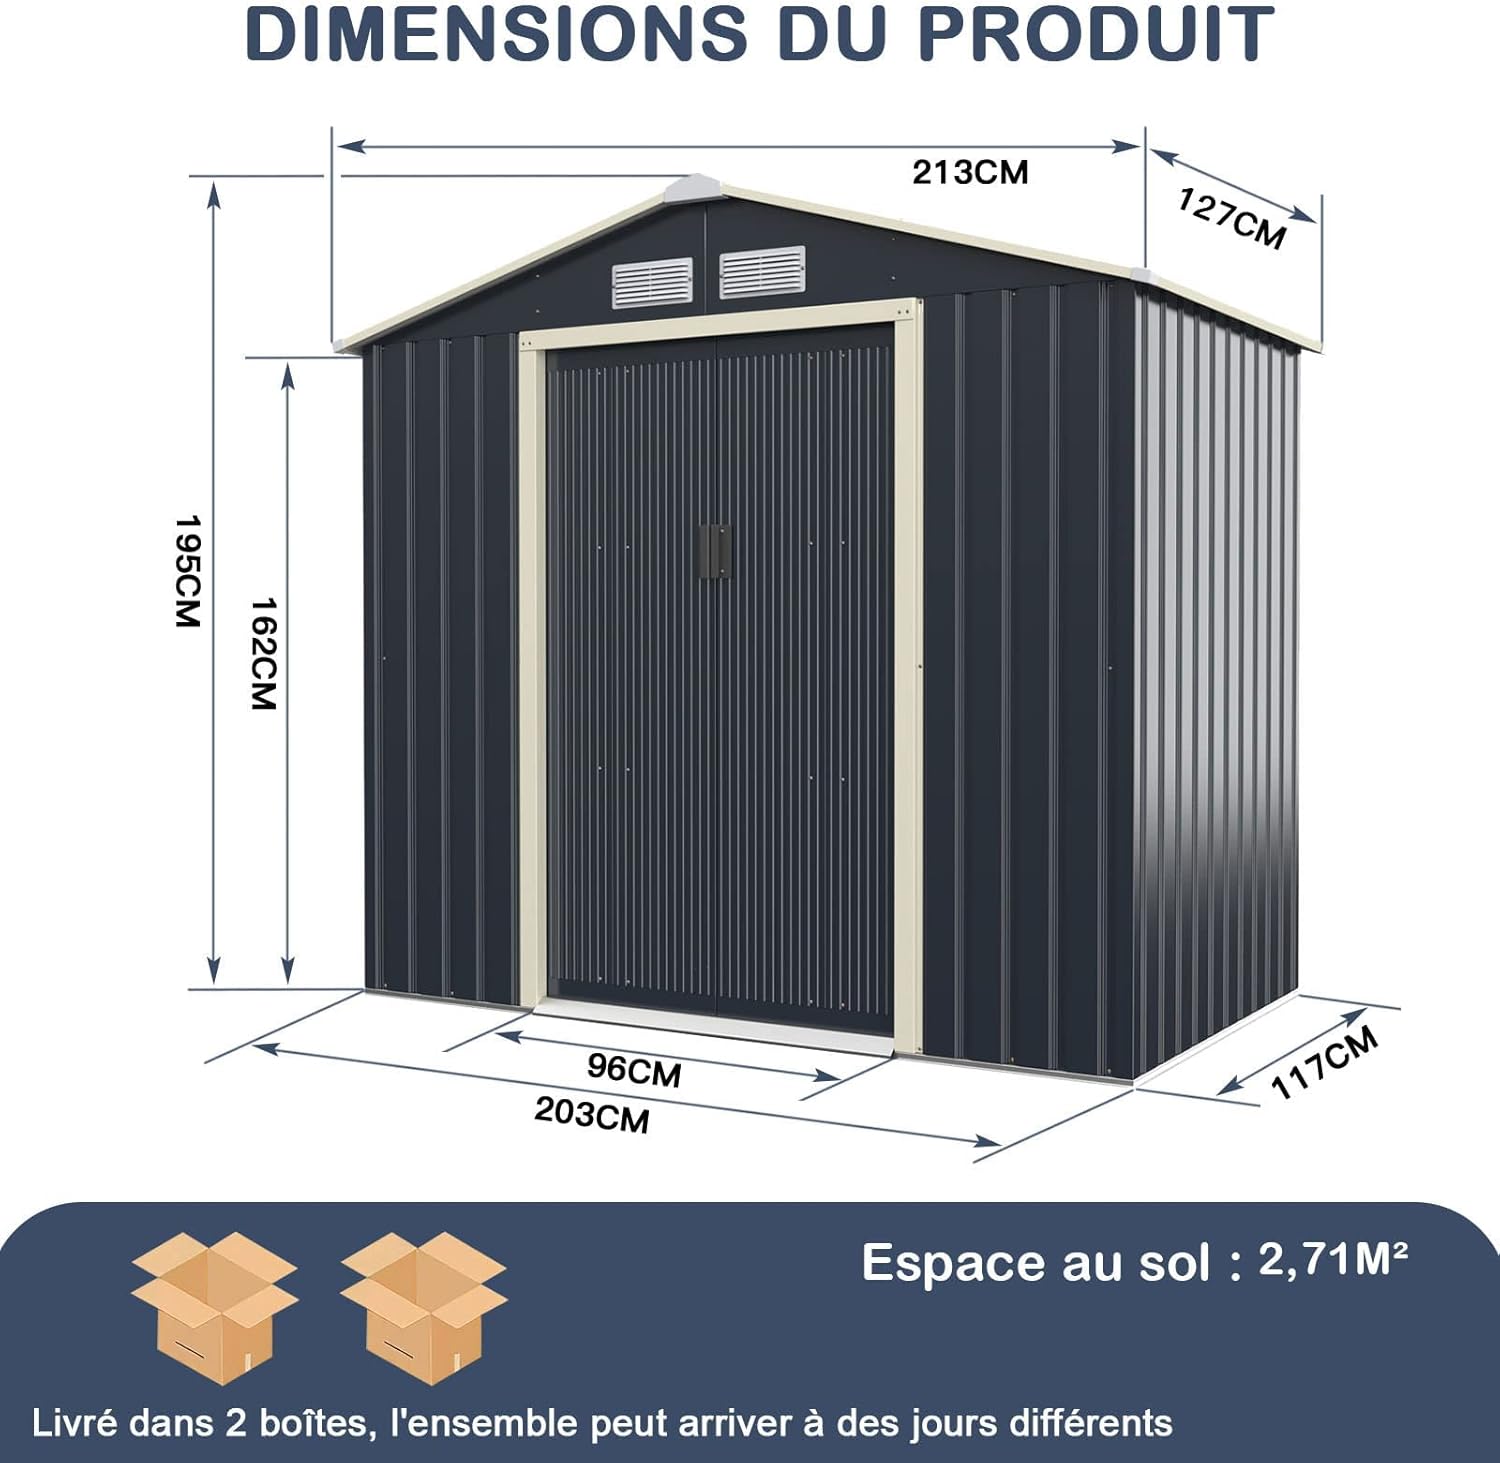
Figure 2: Product dimensions for the 2.7㎡ garden shed, providing measurements for height, width, and depth to assist with planning and assembly.

Figure 3: Close-up of the sliding door, illustrating its functionality for easy entry and exit.
5. Operating Instructions
5.1 Door Operation
- The shed features two sliding doors. To open, gently slide the door along its track.
- Ensure the track is free of debris for smooth operation.
- Close the doors completely to protect contents from weather and unauthorized access.
5.2 Ventilation
- The shed is equipped with front and rear ventilation windows to promote air circulation.
- These vents help reduce condensation and eliminate odors inside the shed.
- Do not block the ventilation openings.
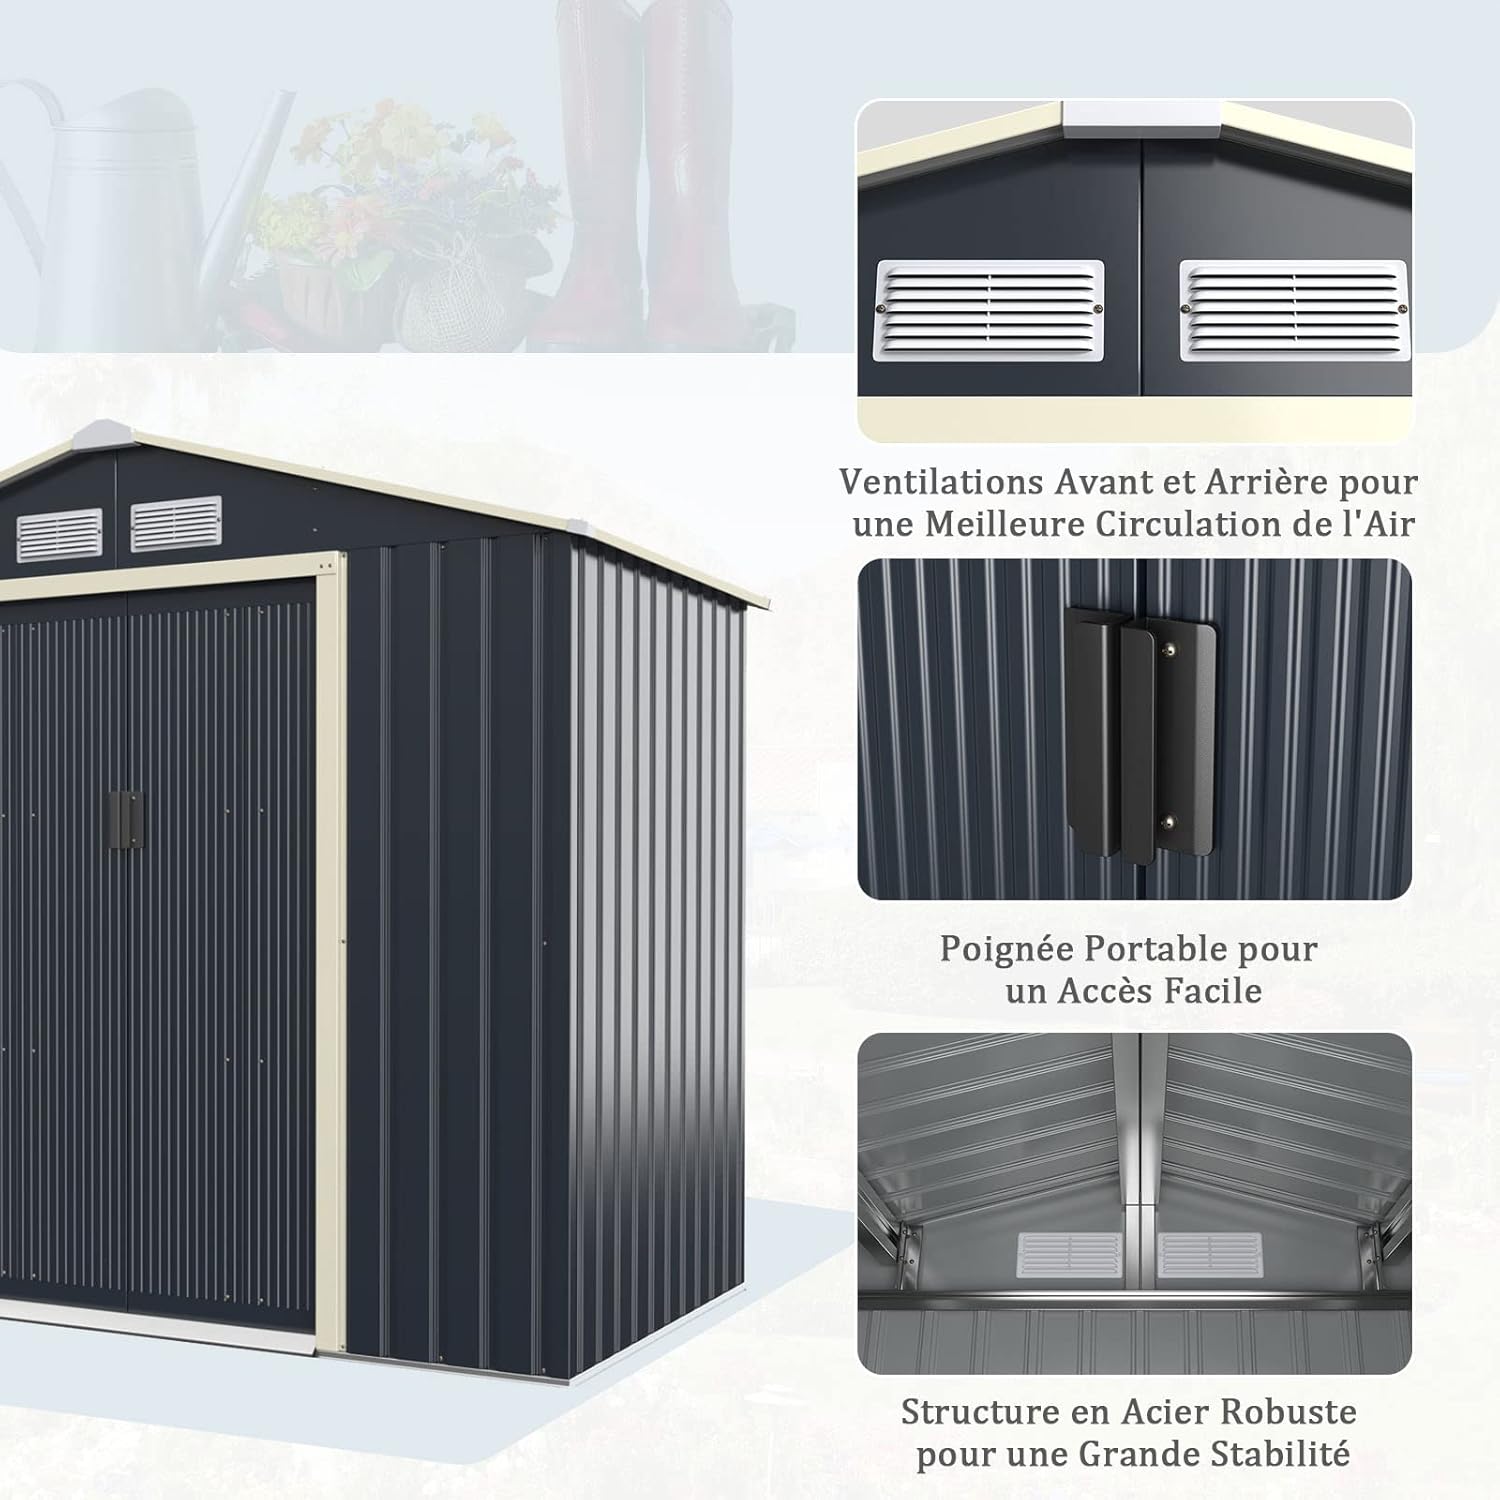
Figure 4: Exterior view of the shed, highlighting the ventilation grilles and the door handle for operational use.
6. Maintenance
Regular maintenance will extend the life of your garden shed.
- Cleaning: The waterproof surface allows for easy cleaning. Wipe down the exterior and interior surfaces with a damp cloth and mild detergent as needed. Avoid abrasive cleaners.
- Rust Prevention: Although made of durable steel, inspect the shed periodically for any signs of rust, especially in areas where the paint might be scratched. Touch up any affected areas with rust-inhibiting paint.
- Fastener Check: Annually, check all screws, bolts, and connections to ensure they are tight. Re-tighten if necessary.
- Door Tracks: Keep the sliding door tracks clean and free of dirt, leaves, or other debris to ensure smooth operation. Lubricate tracks with a silicone-based spray if doors become stiff.
- Snow Removal: While the inclined roof is designed to prevent accumulation, heavy snowfall should be cleared promptly to avoid excessive load on the roof structure.

Figure 5: The inclined roof design ensures quick water runoff and offers solar protection, contributing to the shed's durability.
7. Troubleshooting
- Difficulty during Assembly: If you encounter difficulties with aligning holes or fitting parts, double-check the assembly guide for correct orientation and ensure all previous steps were completed accurately. Sometimes, slight adjustments or loosening adjacent fasteners can help. Having a second person is crucial for complex steps.
- Shed Not Stable: Ensure the shed is assembled on a perfectly level surface. All fasteners must be tightened securely. Consider anchoring the shed to its foundation for added stability, especially in windy areas.
- Doors Sticking/Not Sliding Smoothly: Check the door tracks for any debris or obstructions. Clean the tracks thoroughly. Apply a silicone lubricant to the tracks if needed. Ensure the shed structure is square, as misalignment can affect door operation.
- Water Leaks: Verify that all roof panels are correctly overlapped and all fasteners are tight. Check for any gaps or damaged seals. Ensure the shed is on a level surface to prevent water pooling around the base.
8. Specifications
| Feature | Specification |
|---|---|
| Brand | GOPLUS |
| Model | Model A |
| Product Dimensions (L x W x H) | 213 x 127 x 195 cm (83.9 x 50 x 76.8 inches) |
| Floor Area | 2.7 square meters |
| Item Weight | 43.3 Kilograms (95.5 lbs) |
| Color | Grey |
| Material | Colored Steel + Galvanized Tube + PP |
| Water Resistance Level | Waterproof |
| Door Style | Sliding Door |
| Door Width | 96 Centimeters (37.8 inches) |
| Door Height | 162 Centimeters (63.8 inches) |
| Assembly Required | Yes |
| Manufacturer | GOPLUS |
9. Warranty and Support
For warranty information, please refer to the documentation provided at the time of purchase or contact your retailer. If you require technical assistance, have questions about assembly, or need replacement parts, please contact GOPLUS customer support through the vendor from whom you purchased the product.