HITBOX CT520-US
HITBOX CT520 Multi-Process Welder Instruction Manual
Model: CT520-US (FHB-CT520CA)
1. Introduction
Thank you for choosing the HITBOX CT520 Multi-Process Welder. This machine is a versatile 3-in-1 unit, combining Plasma Cutting (CUT), Pulse Tungsten Inert Gas (TIG) welding, and Electrode Stick Arc (MMA) welding functionalities. Designed for both professional and hobbyist use, it offers high-frequency non-touch pilot arc plasma cutting, precise pulse TIG welding, and robust ARC welding capabilities. This manual provides essential information for the safe and effective operation, maintenance, and troubleshooting of your CT520 unit.
2. Safety Precautions
Operating welding and cutting equipment can be hazardous if proper safety measures are not followed. Always prioritize your safety and the safety of others. Read and understand all safety warnings before operating the machine.
- Electric Shock: Welding and cutting circuits are electrically live. Do not touch live electrical parts. Wear dry, insulating gloves and clothing. Ensure your work area is dry and free of standing water.
- Fumes and Gases: Welding and cutting produce fumes and gases that can be hazardous to your health. Work in a well-ventilated area. Use local exhaust ventilation or a respirator if ventilation is poor.
- Arc Rays and Sparks: Arc rays can burn eyes and skin. Wear a welding helmet with appropriate shade filter, safety glasses, and protective clothing. Sparks and hot metal can cause fires. Keep flammable materials away from the work area.
- Fire and Explosion: Hot metal and sparks can cause fires. Have a fire extinguisher readily available. Do not weld or cut near flammable materials, containers, or pipes that have held flammable substances.
- Compressed Gas Cylinders: Handle gas cylinders with care. Secure them properly to prevent falling. Use only the correct gas for the application.
- Moving Parts: Keep hands, hair, and loose clothing away from moving parts such as cooling fans.
3. Product Overview
3.1. Main Unit and Components
The HITBOX CT520 is a compact and portable unit designed for various welding and cutting tasks.

Figure 3.1: Front view of the HITBOX CT520 Multi-Process Welder with included foot pedal.
3.2. Control Panel
The front panel features a digital display and various controls for selecting modes and adjusting parameters.
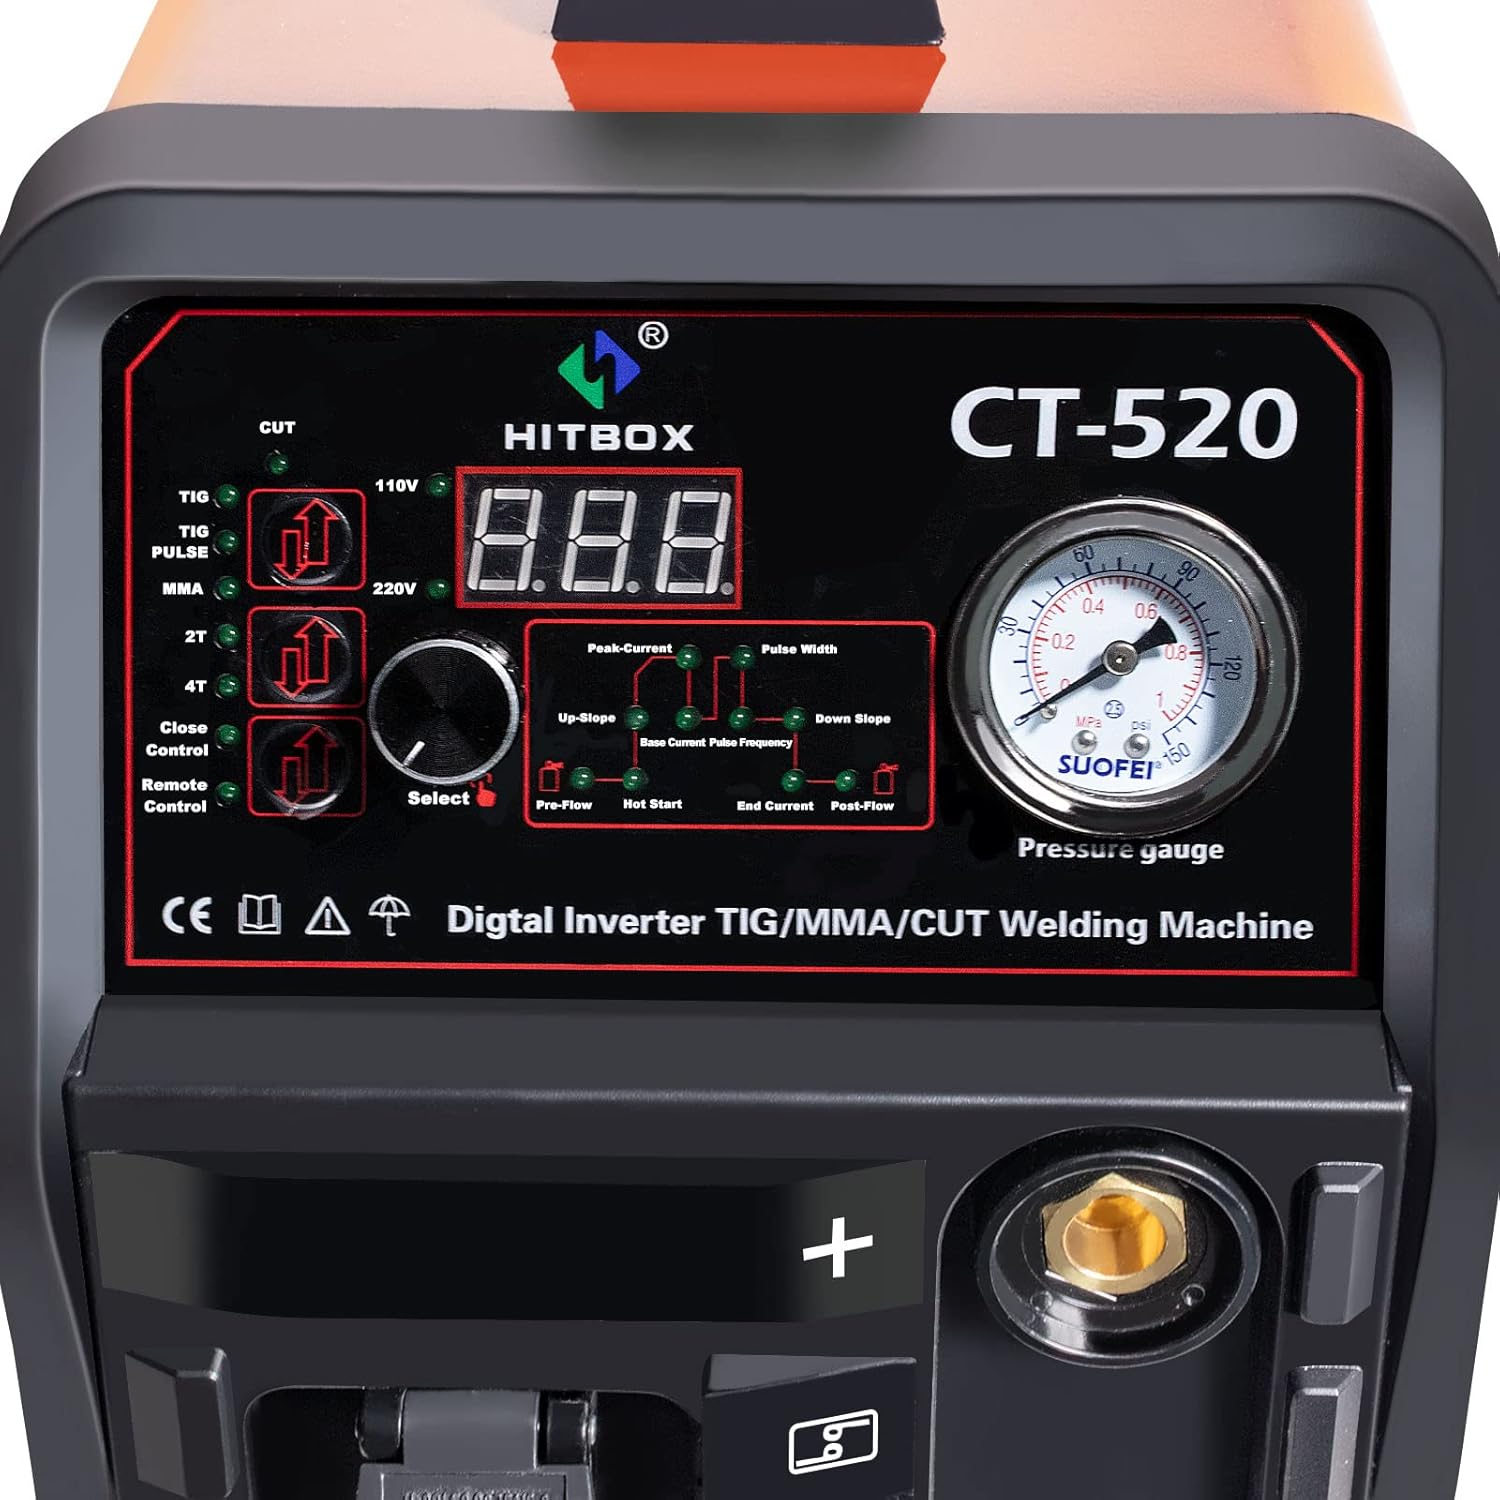
Figure 3.2: Detailed view of the CT520 control panel, showing the digital display, mode selection buttons, and adjustment knobs.
- Digital Display: Shows current settings and error codes.
- Mode Selection Buttons: For switching between CUT, TIG, Pulse TIG, and MMA (ARC) modes.
- Voltage Selector (110V/220V): For input power selection.
- Parameter Adjustment Knob: Used to set current, pre-flow, post-flow, pulse frequency, etc.
- Pressure Gauge: Indicates gas pressure for TIG and Plasma cutting.
4. Setup
4.1. Unpacking and Initial Inspection
Carefully unpack the CT520 unit and all accessories. Inspect for any shipping damage. If damage is found, contact your supplier immediately.

Figure 4.1: Standard accessories included with the HITBOX CT520, such as torches, ground clamp, welding holder, and power cable.
4.2. Power Connection
The CT520 supports both 110V and 220V input power. Ensure the voltage selector on the front panel matches your power supply. Use the appropriate power plug and ensure the power source is capable of supplying the required amperage.
4.3. Gas Connection
For TIG welding and Plasma cutting, an external gas supply is required. Connect the gas hose from your argon (for TIG) or compressed air (for Plasma) cylinder to the gas inlet on the rear of the machine. Ensure all connections are secure and leak-free.

Figure 4.2: Rear view of the CT520, highlighting the gas inlet connection and main power switch.
4.4. Accessory Connections
Connect the appropriate torch, ground clamp, and welding holder based on the desired operation mode.

Figure 4.3: Connection methods for TIG, ARC, and CUT modes, illustrating how to connect the respective torches, ground clamp, and welding holder.
- Ground Clamp: Always connect the ground clamp securely to the workpiece or work table.
- TIG Torch: Connect the TIG torch to the designated port. Ensure the gas line is also connected.
- Plasma Torch: Connect the plasma torch to its designated port. Ensure the air line is connected.
- ARC Welding Holder: Connect the electrode holder to the positive (+) terminal for most electrodes.
- Foot Pedal: Connect the foot pedal to its dedicated port for remote current control in TIG mode.
5. Operating Modes
The CT520 offers three primary operating modes: Plasma Cutting (CUT), Pulse TIG Welding, and Electrode Stick ARC Welding (MMA).
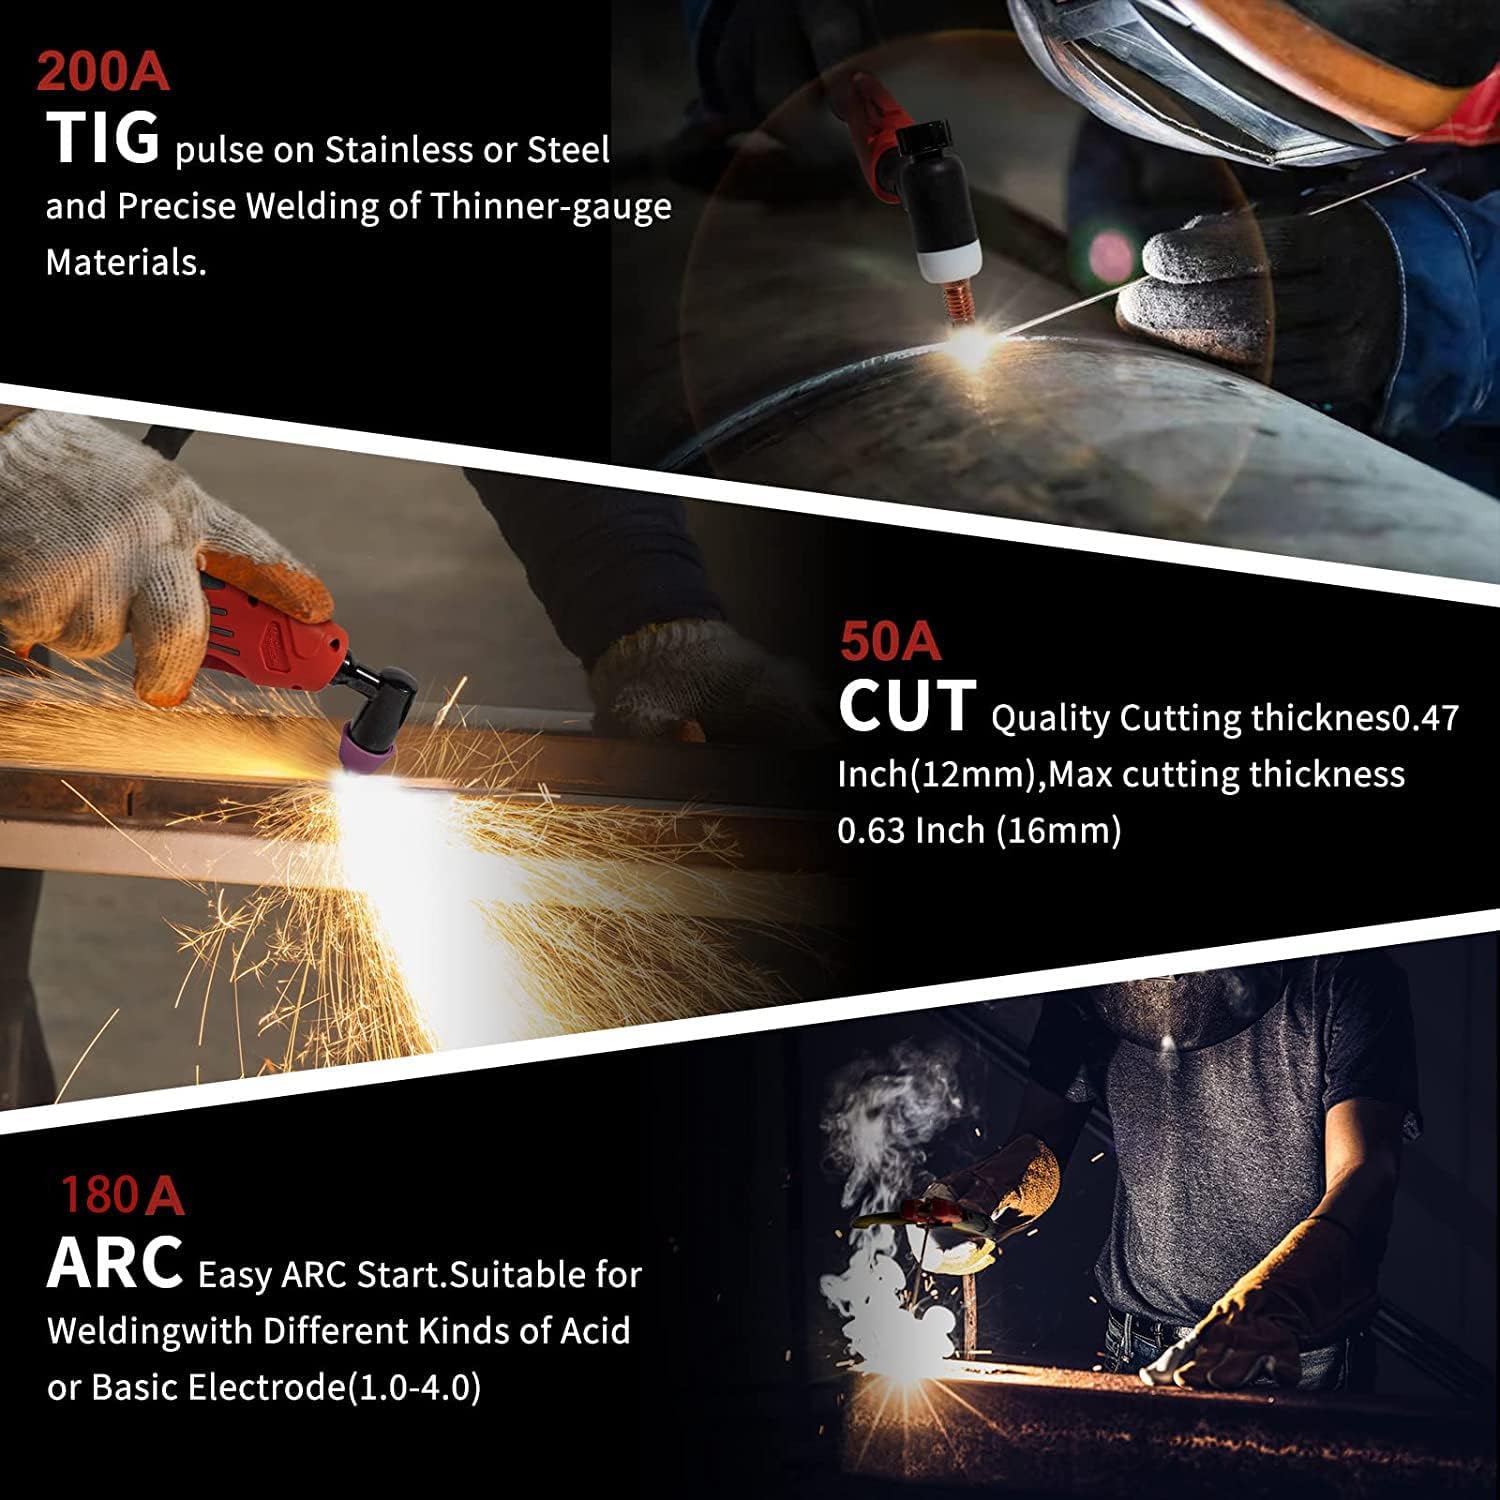
Figure 5.1: Overview of the CT520's capabilities, including 200A TIG, 50A CUT, and 180A ARC.
5.1. Plasma Cutting (CUT) Mode
This mode is used for cutting various conductive metals using a high-temperature plasma arc. The CT520 features a 50A plasma cutter with high-frequency non-touch pilot arc for easy starting.

Figure 5.2: Examples of cutting capabilities, showing clean cuts on various thicknesses up to 16mm.
- Connect the plasma torch and ground clamp.
- Connect the air compressor to the machine's gas inlet.
- Select 'CUT' mode on the control panel.
- Adjust the cutting current (amperage) based on material thickness.
- Ensure proper air pressure is set.
- Position the torch nozzle close to the workpiece and initiate the arc.
5.2. Pulse TIG Welding Mode
TIG welding provides precise, high-quality welds, especially on thinner gauge materials and stainless steel. The pulse function offers enhanced control over heat input.
- Connect the TIG torch, ground clamp, and argon gas cylinder.
- Select 'TIG' or 'PULSE TIG' mode.
- Adjust welding current, pre-flow, post-flow, and pulse parameters (if in Pulse TIG mode).
- Ensure the tungsten electrode is properly ground and extended.
- Initiate the arc using the torch trigger or foot pedal.
5.3. Electrode Stick ARC Welding (MMA) Mode
MMA welding is suitable for a wide range of materials and thicknesses, offering ease of use and portability.
- Connect the electrode holder and ground clamp.
- Select 'MMA' mode.
- Insert the appropriate electrode into the holder.
- Adjust the welding current based on the electrode type and material thickness.
- Strike the arc by lightly tapping or scratching the electrode on the workpiece.
6. Maintenance
Regular maintenance ensures the longevity and optimal performance of your CT520 unit. Always disconnect power before performing any maintenance.
- Cleaning: Periodically clean the internal components using dry, compressed air to remove dust and metal particles. Clean the exterior with a soft, dry cloth.
- Torch Maintenance: Inspect TIG and Plasma torches regularly for wear on consumables (nozzles, electrodes, collets, diffusers). Replace worn parts as needed.
- Cable Inspection: Check all cables (power, ground, torch) for cuts, cracks, or loose connections. Repair or replace damaged cables immediately.
- Air Filter: If applicable, clean or replace the air filter on the plasma cutter's air regulator to ensure clean air supply.
- Fan Vents: Ensure cooling fan vents are clear of obstructions to allow proper airflow.
7. Troubleshooting
This section provides solutions to common issues you might encounter. For problems not listed here, contact technical support.
| Problem | Possible Cause | Solution |
|---|---|---|
| Machine does not power on | No power supply; Power switch off; Circuit breaker tripped | Check power outlet; Turn on power switch; Reset circuit breaker |
| No arc in TIG/MMA mode | Loose ground clamp; Incorrect current setting; Worn electrode; Incorrect polarity | Secure ground clamp; Adjust current; Replace electrode; Check polarity |
| Poor cut quality (Plasma) | Low air pressure; Worn plasma consumables; Incorrect cutting speed/current | Adjust air pressure; Replace nozzle/electrode; Adjust cutting parameters |
| Gas flow issues (TIG/Plasma) | Gas cylinder empty; Regulator closed; Gas hose kinked/leaking | Check cylinder level; Open regulator; Inspect hose for damage |
| Overheat protection activated | Exceeded duty cycle; Blocked cooling vents | Allow machine to cool down; Clear vents; Reduce duty cycle |
8. Specifications
Technical specifications for the HITBOX CT520 Multi-Process Welder.
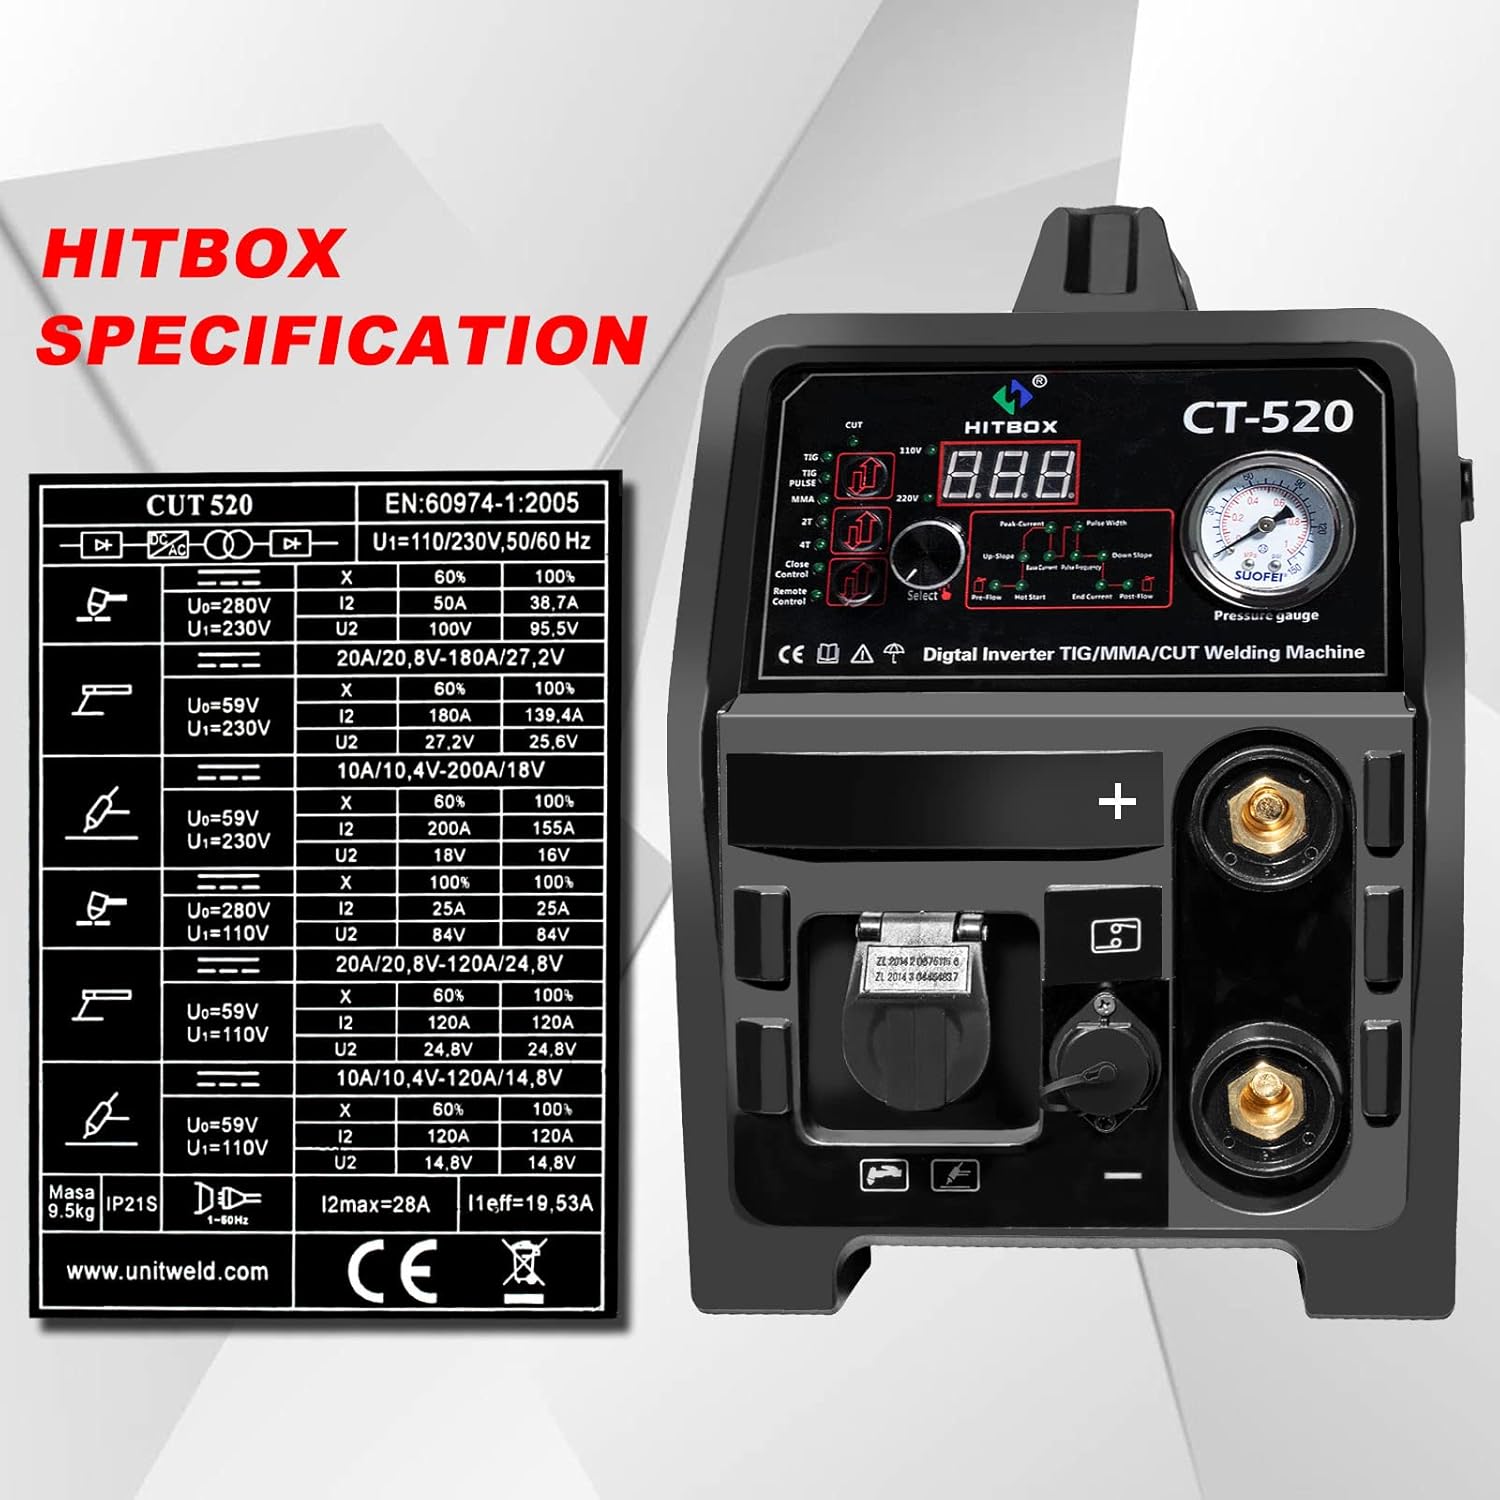
Figure 8.1: Manufacturer's detailed technical specification table for the CT520.
| Specification | Value |
|---|---|
| Manufacturer | HITBOX |
| Part Number | FHB-CT520CA |
| Parcel Dimensions | 50.16 x 39.37 x 37.59 cm |
| Pattern | CT520-US |
| Power Source | DC |
| Item Weight | 18.1 kg |
| First Available Date | May 17 2022 |
9. Warranty and Support
For information regarding warranty coverage, technical support, or spare parts, please refer to the warranty card included with your product or contact HITBOX customer service directly. Keep your purchase receipt as proof of purchase.
You can typically find contact information on the manufacturer's official website or through the retailer where the product was purchased.