TOTMOX d6430fe1-1368-4d62-803c-b9a2dbfcc6cd
TOTMOX Wireless Bike Computer
User Manual - Model d6430fe1-1368-4d62-803c-b9a2dbfcc6cd
Introduction
This manual provides detailed instructions for the installation, operation, and maintenance of your TOTMOX Wireless Bike Computer. Please read this manual thoroughly before use to ensure proper functionality and to maximize your cycling experience. This device is designed to track various cycling metrics with ease and accuracy.
Key Features:
- 3-inch large LCD screen with green backlight for clear visibility day or night.
- Completely waterproof design for reliable performance in all weather conditions.
- 20 multi-functions including distance, speed, riding time, calorie consumption, and temperature.
- Wireless setup for a clean handlebar appearance.
Package Contents
Verify that all the following components are included in your package:
- Bike Speedometer (Main Unit)
- Wireless Transmitter
- Wheel Magnet
- Handlebar Bracket
- Cable Ties (for mounting)

Image: All included components of the TOTMOX Wireless Bike Computer system.
Setup and Installation
Follow these steps to correctly install your bike computer:
- Battery Installation: The bike computer and transmitter require batteries (not included). Open the battery compartments on both units and insert the appropriate batteries, observing polarity.
- Mounting the Handlebar Bracket: Attach the handlebar bracket to your bicycle's handlebar using the provided cable ties. Ensure it is securely fastened and positioned for easy viewing.
- Installing the Transmitter: Secure the wireless transmitter to the front fork of your bicycle using cable ties. Position it so that it aligns with the wheel magnet.
- Attaching the Wheel Magnet: Fasten the magnet to a spoke on your front wheel. Ensure the magnet passes within 5mm of the transmitter when the wheel rotates. Adjust the magnet's position as needed for optimal signal detection.
- Mounting the Bike Computer: Slide the main bike computer unit onto the handlebar bracket until it clicks securely into place.

Image: Visual guide for installing the bike computer components.

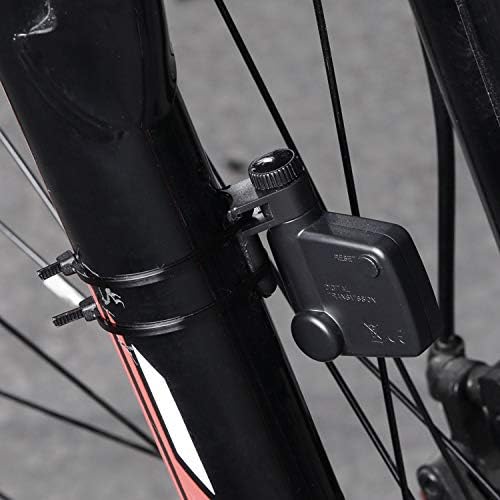
Image: The bike computer mounted on handlebars and the sensor/magnet on the fork.
Initial Settings
After installation, you will need to configure basic settings for accurate readings:
- Wheel Circumference: Refer to your bicycle tire's sidewall for its diameter (e.g., 700c, 26 inches). Use a conversion chart or measure the circumference manually. This value is crucial for accurate speed and distance calculations.
- Unit Selection: Choose between kilometers per hour (KM/hr) or miles per hour (MPH) as your preferred unit of speed and distance.
- Time Setting: Set the current time.
Use the 'SET' and 'MODE' buttons on the computer to navigate through the settings menu and adjust values. Consult the on-screen prompts for specific instructions.
Operating Instructions
Your TOTMOX Wireless Bike Computer offers multiple functions accessible via the 'MODE' button.
Button Functions:
- MODE Button: Press to cycle through different display modes (e.g., current speed, total distance, riding time, average speed, maximum speed, temperature, calories).
- SET Button: Used for entering and confirming settings, and for resetting certain values (e.g., trip distance).
- Backlight: The device features an automatic backlight for improved visibility in low-light conditions.
Display Modes:
The computer can display up to 20 different functions. A 'SCAN' mode is available to automatically cycle through important data points. Common displays include:
- Current Speed (KM/hr or MPH)
- Total Distance (ODO)
- Trip Distance (DST)
- Maximum Speed (MXS)
- Average Speed (AVS)
- Riding Time (TM)
- Clock (12H/24H)
- Temperature
- Calories Burned
- Stopwatch
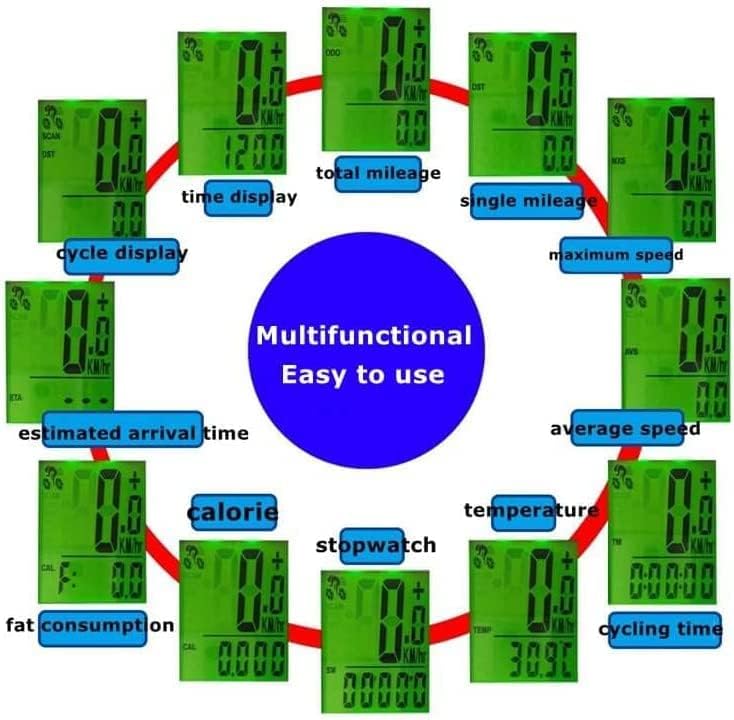
Image: Overview of the multi-functional display options.

Image: Display visibility in day and night conditions with automatic backlight.
Maintenance
To ensure the longevity and optimal performance of your bike computer, follow these maintenance guidelines:
- Cleaning: Wipe the unit with a soft, damp cloth. Avoid using abrasive cleaners or solvents, as these can damage the display or casing.
- Water Resistance: The computer is designed to be waterproof. However, avoid prolonged submersion or high-pressure water jets, which could compromise the seals over time.
- Battery Replacement: When the display becomes dim or erratic, replace the batteries in both the main unit and the transmitter. Ensure correct battery type and polarity.
- Storage: If not in use for an extended period, remove the batteries to prevent leakage and store the unit in a cool, dry place.

Image: The bike computer demonstrating its waterproof feature.
Troubleshooting
If you encounter issues with your bike computer, refer to the following common problems and solutions:
| Problem | Possible Cause | Solution |
|---|---|---|
| No display or dim display | Low or dead batteries. | Replace batteries in both the computer and transmitter. Ensure correct polarity. |
| No speed/distance reading | Transmitter/magnet misalignment or distance too great. Transmitter battery low. Interference. | Ensure magnet passes within 5mm of the transmitter. Adjust positions. Replace transmitter battery. Move away from strong electromagnetic sources. |
| Inaccurate speed/distance | Incorrect wheel circumference setting. | Verify and re-enter the correct wheel circumference in the settings. |
| Buttons unresponsive | Unit frozen or battery issue. | Remove and reinsert batteries to reset the unit. |
Specifications
| Feature | Detail |
|---|---|
| Model Number | d6430fe1-1368-4d62-803c-b9a2dbfcc6cd |
| Brand | TOTMOX |
| Display Size | 3 Inches |
| Display Type | LCD |
| Connectivity Technology | Wireless |
| Sensor Type | Speed Sensor |
| Material | Plastic |
| International Protection Rating | IP54 (Waterproof) |
| Mounting Type | Handlebar Mount |
| Item Weight | 150 g |
| Batteries Included | No |
Warranty and Support
Your TOTMOX Wireless Bike Computer comes with a free one-year warranty from the date of purchase. This warranty covers manufacturing defects under normal use.
For any questions, issues, or warranty claims, please contact our customer support. We aim to respond to all inquiries within 24 hours.
Please retain your proof of purchase for warranty service.
Ask a question about this manual
Ask about setup, troubleshooting, compatibility, parts, safety, or missing instructions. Manuals+ will review the question and use this page’s manual context to help answer it.