1. Introduction
This manual provides detailed instructions for the installation, operation, and maintenance of your SATISURE Wireless Doorbell Alarm Kit 1T1. This system is designed to enhance home security by detecting the opening of doors and windows, providing alerts through a receiver with multiple chime options and an alarm function.
2. Product Components
The SATISURE Wireless Doorbell Alarm Kit 1T1 typically includes the following components:
- 1 x Doorbell Alarm Receiver
- 1 x Door/Window Sensor (Magnetic Contact)
- Adhesive pads for mounting
- User Guide
Please verify all components are present before proceeding with installation.
Video 1: Unboxing of the Wireless Door and Window Alarm Sensor. This video demonstrates the contents of the product package, including the doorbell alarm receiver, door/window sensors, and accessories.
3. Setup and Installation
3.1 Battery Installation
The door/window sensor requires battery installation. Follow these steps:
- Open the sensor casing.
- Insert the battery into the designated slot, ensuring correct polarity.
- Close the sensor casing securely.
3.2 Mounting the Sensor and Receiver
Ensure the mounting surface is clean and dry for optimal adhesive performance.
- Plug the receiver into a standard electrical outlet.
- Attach the adhesive tape to the back of both the main sensor unit and the magnetic strip.
- Mount the main sensor unit on the door or window frame.
- Mount the magnetic strip on the door or window itself, aligning it with the main sensor unit. The distance between the two parts should be less than 1 cm (0.4 inches) when the door/window is closed.
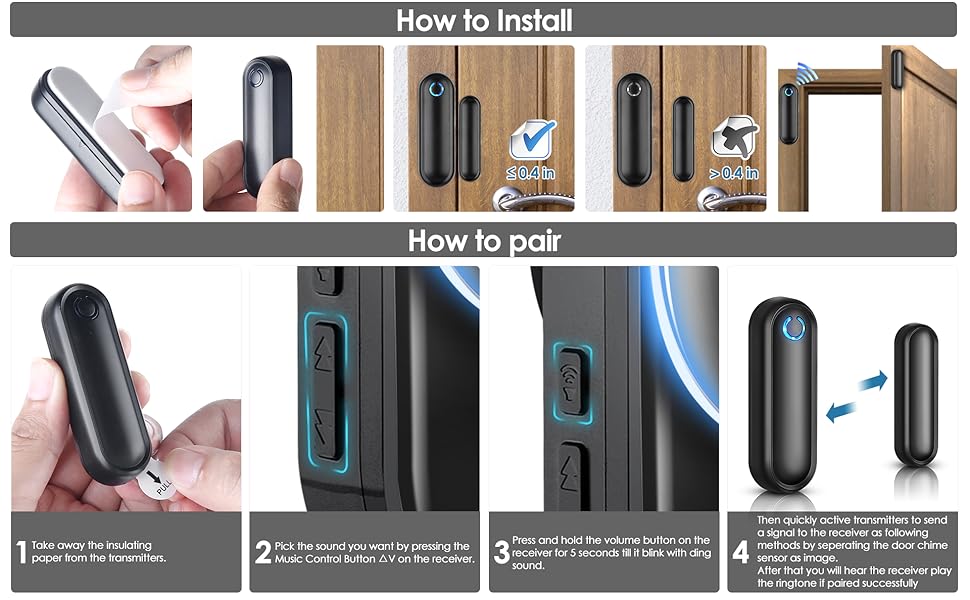
Image 1: Detailed steps for installing the sensor battery, applying adhesive, and mounting the sensor and magnetic strip on a door or window. It also illustrates the pairing process.
Video 2: Installation and mode demonstration for a door and window alarm sensor. This video shows how to install the sensor and switch between different operating modes.
3.3 Pairing the Sensor with the Receiver
The sensor and receiver are typically pre-paired. If re-pairing is needed or you are adding new sensors, follow these steps:
- Select your desired ringtone on the receiver by pressing the music control button.
- Press and hold the volume button on the receiver for 5-7 seconds until it emits a 'ding' sound and the blue LED light flashes, indicating it is in pairing mode.
- Within 5 seconds, separate the door chime sensor (main unit and magnetic strip) to activate it.
- If pairing is successful, the receiver will play the selected ringtone.
Video 3: Demonstration of pairing a door sensor with a receiver. This video illustrates the steps to link a sensor to the main receiver unit.
4. Operating Instructions
4.1 Modes and Settings
The receiver offers 58 unique ringtones and 5 adjustable volume levels (30-110dB). You can select different modes for various scenarios:
- Chime Mode: Ideal for welcoming guests or monitoring children/pets. The receiver plays a selected melody when the sensor is triggered.
- Alarm Mode: Activates a loud 110dB siren when the sensor is triggered, suitable for security against intruders.
- Mute Mode with LED Indicator: The receiver's LED light flashes without sound, useful for hearing-impaired users or quiet environments.
The system has a wireless operating range of up to 250 meters (900ft) in open spaces.

Image 2: Illustration of the door/window sensor in action, showing the maximum allowed gap of 0.4 inches (10mm) between the two parts for detection.
4.2 Expanding Your System
The system supports expansion with up to 20 additional sensors. You can add more door/window sensors, motion sensors, or wireless doorbells to create a comprehensive security system tailored to your needs.

Image 3: A visual representation of the system's 900ft operating range and its expandability, showing multiple sensors placed around a house for different monitoring purposes (kids, pets, visitors, theft).
5. Maintenance
To ensure optimal performance and longevity of your SATISURE Wireless Doorbell Alarm Kit, consider the following maintenance tips:
- Regularly check the sensor batteries. The LED indicator on the sensor will flash to alert you when the battery is low.
- Clean the sensor and receiver units periodically with a soft, dry cloth to prevent dust accumulation.
- Ensure the magnetic strip and main sensor unit remain within the 1 cm (0.4 inch) gap for proper function.
- Avoid exposing the units to extreme temperatures or direct moisture, although they are designed for various conditions.
6. Troubleshooting
If you encounter issues with your device, refer to the following common solutions:
- No sound from receiver: Check if the receiver is plugged in and powered on. Ensure the volume is not set to mute. Re-pair the sensor with the receiver if necessary.
- Sensor not triggering: Verify that the sensor and magnetic strip are aligned correctly and the gap is less than 1 cm. Check the sensor battery and replace if low.
- Reduced range: Ensure there are no significant obstructions (thick walls, large metal objects) between the sensor and the receiver. Relocate the receiver to a more central position if possible.
- False alarms: Check for proper installation and alignment. Ensure the sensor is not exposed to vibrations or strong magnetic fields from other devices.
7. Specifications
| Feature | Detail |
|---|---|
| Brand | Satisure |
| Model | 1T1 |
| Power Source | Battery powered (Receiver plugs into outlet) |
| Battery Type (Sensor) | 1 Lithium Ion battery (included) |
| Voltage | 12 Volts (DC) |
| Noise Level (Siren) | 110 Decibels |
| Mounting Type | On door / On window |
| Maximum Range | 250 Meters (900ft) |
| Sensor Technology | Contact Sensor |
| Dimensions (Product) | 7L x 5W x 5H cm |
| Weight (Item) | 160 g |
| Compatible Devices | Smartphone, Tablet (for general information, not direct control) |

Image 4: Detailed dimensions of the receiver and door sensor units, showing their height, width, and depth in inches.
8. Warranty and Support
For any questions or advice regarding the use of your SATISURE Wireless Doorbell Alarm Kit, please do not hesitate to contact Satisure Direct customer service. We offer 24/7 customer support to assist you.
Please refer to your purchase documentation for specific warranty details.


