Introduction
This manual provides detailed instructions for the installation, operation, and maintenance of your YUNTX Android 10 Car Radio with Navigation, designed specifically for the Nissan Qashqai J10 models from 2008 to 2014. Please read this manual thoroughly before using the product to ensure proper functionality and safety.
Package Contents
Verify that all items listed below are included in your package:
- 1 x YUNTX Android Car Radio Unit
- 1 x Power Cord
- 1 x RCA Output Cable A
- 1 x RCA Output Cable B
- 1 x GPS Antenna
- 1 x USB Cable
- 1 x Wireless Antenna
- 1 x Rear Camera
- 1 x User Manual (this document)
Specifications
| Operating System | Android 10 |
| Processor | Quad-Core, Cortex 1.1 GHz |
| RAM | 2 GB |
| ROM | 32 GB |
| Screen Size | 9 Inches |
| Screen Resolution | 1024 x 600 |
| Audio Output | 4 x 50 W, Stereo |
| Bluetooth Version | 5.0 |
| Connectivity | Bluetooth, USB, Wi-Fi |
| USB/SD Card Support | Up to 500 GB |
| Dimensions (L x W x H) | 1 x 1 x 1 cm |
| Weight | 2.25 kg |
Setup and Installation
This section provides an overview of the installation process. Professional installation is recommended.
1. Compatibility Check
Ensure your vehicle is a Nissan Qashqai J10 manufactured between 2008 and 2014. The unit is designed for a direct fit in this model range.
2. Visual Installation Guide

This image illustrates the seamless integration of the YUNTX Android 10 car radio into the dashboard of a Nissan Qashqai J10 (2008-2014). It displays the original car radio setup and the new 9-inch touchscreen unit after installation, highlighting the improved aesthetic and functionality.
The image above demonstrates the appearance of the dashboard before and after the installation of the YUNTX car radio. The unit is designed to replace the factory radio, providing a modern 9-inch touchscreen interface.
3. Wiring Connections

This image displays the customizable RGB button illumination feature, supporting up to 196 languages. It also provides a comprehensive wiring diagram with labeled connectors and a visual guide to included accessories like power sockets, RCA outputs, GPS antenna, USB cables, and the rear camera.
Refer to the detailed wiring diagram provided in the image above for connecting the power harness, RCA cables, GPS antenna, USB cables, and other accessories. Ensure all connections are secure and correctly matched to prevent damage to the unit or vehicle.
- Power Socket: Connect the main power harness to the vehicle's wiring.
- GPS Antenna: Connect the GPS antenna and place it in a location with a clear view of the sky for optimal signal reception.
- USB Cables: Connect the provided USB cables for external storage or smartphone connectivity.
- RCA Output Sockets: Use RCA cables for connecting external amplifiers, subwoofers, or additional displays.
- Rear Camera: Connect the included rear camera for parking assistance.
- Wireless Antenna: Connect for improved Wi-Fi and Bluetooth signal.
Operating Instructions
1. Power On/Off and Basic Navigation
Press the power button to turn the unit on or off. Navigate the interface using the 9-inch touchscreen. The main menu provides access to all primary functions.
2. CarPlay and Android Auto

This image showcases the integrated Apple CarPlay and Android Auto features, allowing users to connect their smartphones for navigation, music, calls, and messages. The screen displays a typical CarPlay interface with app icons and a voice command prompt.
Connect your smartphone via USB to activate CarPlay (for Apple devices) or Android Auto (for Android devices). This allows you to access navigation, make calls, send messages, and play music directly from your phone's interface on the car radio screen. Use voice commands for hands-free operation.
3. Bluetooth 5.0

This image demonstrates several advanced features: Mirrorlink for mirroring smartphone content, Split Screen mode for running two apps simultaneously, Bluetooth 5.0 for hands-free calling and audio streaming, and the Headrest Function for connecting external displays for rear-seat entertainment.
Pair your phone via Bluetooth for hands-free calling and audio streaming. Access your phonebook, call history, and music library directly from the car radio. Bluetooth 5.0 ensures a stable and high-quality connection.
4. Wi-Fi and Internet Connectivity
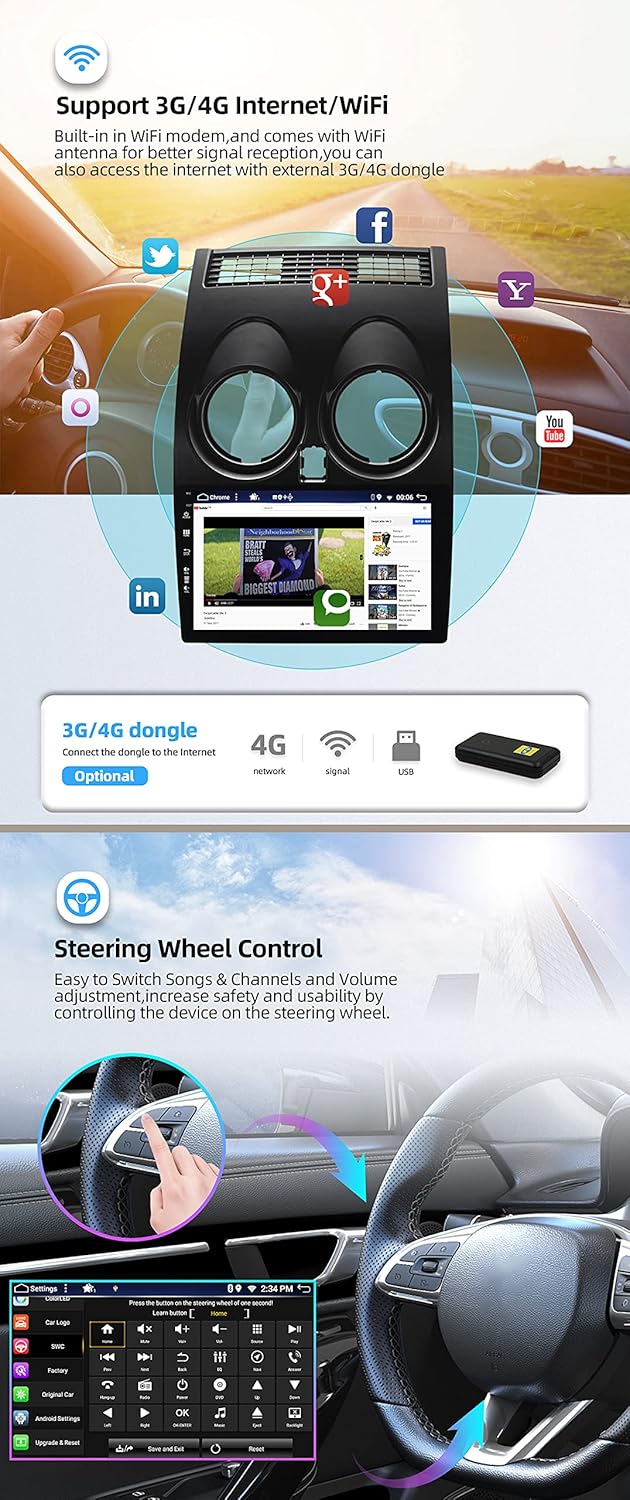
This image highlights the car radio's internet capabilities, including built-in WiFi and support for external 3G/4G dongles. It also illustrates the steering wheel control function, enabling safe and convenient operation of media and volume without taking hands off the wheel.
The unit features built-in Wi-Fi. Connect to a mobile hotspot or home Wi-Fi network to access online features, download apps, and browse the internet. External 3G/4G dongles (sold separately, e.g., B089KGJT61) are supported for mobile data access.
5. Steering Wheel Control
The unit supports your vehicle's original steering wheel controls. After installation, you may need to configure the buttons in the system settings to match your preferences for volume, track skipping, and other functions.
6. MirrorLink
MirrorLink allows you to mirror your smartphone's screen onto the car radio display via USB or Wi-Fi. This feature supports both Android and iOS devices, enabling you to view and control your phone's content directly from the unit.
7. Split Screen Mode
Utilize the split-screen function to run two applications simultaneously. For example, you can have navigation open on one side and music playback on the other, enhancing multitasking capabilities.
8. Headrest Function
The unit supports video output to external headrest monitors. Connect compatible displays to the RCA video output to provide entertainment for rear-seat passengers.
9. GPS Navigation
The integrated GPS supports both online and offline navigation applications. Install your preferred navigation app and download offline maps for use without an internet connection. The system supports 3D maps and voice guidance.
10. Radio (AM/FM/DAB)
The unit includes an integrated AM/FM tuner with RDS (Radio Data System) for enhanced radio information. For digital radio (DAB+), an optional DAB box (e.g., B07NRD4T9D) is required, offering CD-like sound quality.
11. Multicolor Button Illumination
Customize the color of the physical buttons on the unit to match your vehicle's interior lighting or personal preference. The system supports a wide range of RGB colors and up to 196 languages for the interface.
Maintenance
1. Cleaning the Screen
Use a soft, lint-free cloth to gently wipe the touchscreen. For stubborn smudges, slightly dampen the cloth with water or a screen-cleaning solution designed for electronics. Avoid harsh chemicals or abrasive materials.
2. Software Updates
Periodically check for software updates to ensure optimal performance and access to new features. Updates can typically be performed via Wi-Fi or USB. Refer to the system settings for update options.
3. General Care
Avoid exposing the unit to extreme temperatures, direct sunlight for prolonged periods, or excessive moisture. Ensure proper ventilation around the unit to prevent overheating.
Troubleshooting
- No Power: Check all power connections and fuses. Ensure the vehicle's ignition is on.
- No Sound: Verify speaker connections, volume levels, and audio source selection. Check amplifier connections if applicable.
- GPS Signal Loss: Ensure the GPS antenna is properly connected and has an unobstructed view of the sky. Try restarting the unit.
- Bluetooth Connection Issues: Ensure Bluetooth is enabled on both the car radio and your smartphone. Delete previous pairings and try reconnecting.
- Touchscreen Unresponsive: Try restarting the unit. If the issue persists, a factory reset might be necessary (note: this will erase all user data).
- CarPlay/Android Auto Not Connecting: Ensure your phone's operating system is up to date. Try a different USB cable. Check the settings on both the car radio and your phone for CarPlay/Android Auto permissions.
For issues not covered here, please refer to the support section or contact customer service.
Support and Warranty
For technical assistance, troubleshooting, or to request a PDF version of this manual in German, Italian, French, Spanish, or English, please contact YUNTX technical support:
Email: yuntx_techsupport@163.com
Information regarding specific warranty terms and conditions is available upon request from YUNTX customer service.