M MUSIC PUBLIC KINGDOM TT16011-3
User Manual
M MUSIC PUBLIC KINGDOM Multi-Functional Record Player
Model: TT16011-3
1. Introduction
This manual provides essential information for the safe and efficient operation of your M MUSIC PUBLIC KINGDOM Multi-Functional Record Player. This versatile audio system combines a 3-speed turntable, CD player, FM radio, Bluetooth connectivity, and USB recording capabilities, offering a comprehensive music experience.
Please read this manual thoroughly before using the product and retain it for future reference.
2. Safety Information
To ensure safe operation and prevent damage, please observe the following precautions:
- Do not expose the unit to rain or moisture.
- Do not block ventilation openings.
- Place the unit on a stable, flat surface.
- Use only the power adapter supplied with the unit.
- Avoid placing the unit near heat sources or direct sunlight.
- Do not attempt to disassemble or repair the unit yourself. Refer all servicing to qualified personnel.
- Keep the unit away from strong magnetic fields.
3. Package Contents
Verify that all items listed below are included in your package:
- Multi-Functional Record Player Unit
- Power Adapter
- User Manual (this document)
- Built-in Stereo Speakers
- CD Player
- FM Radio
- USB Recording Function
4. Product Overview and Components
Familiarize yourself with the various parts and controls of your record player.
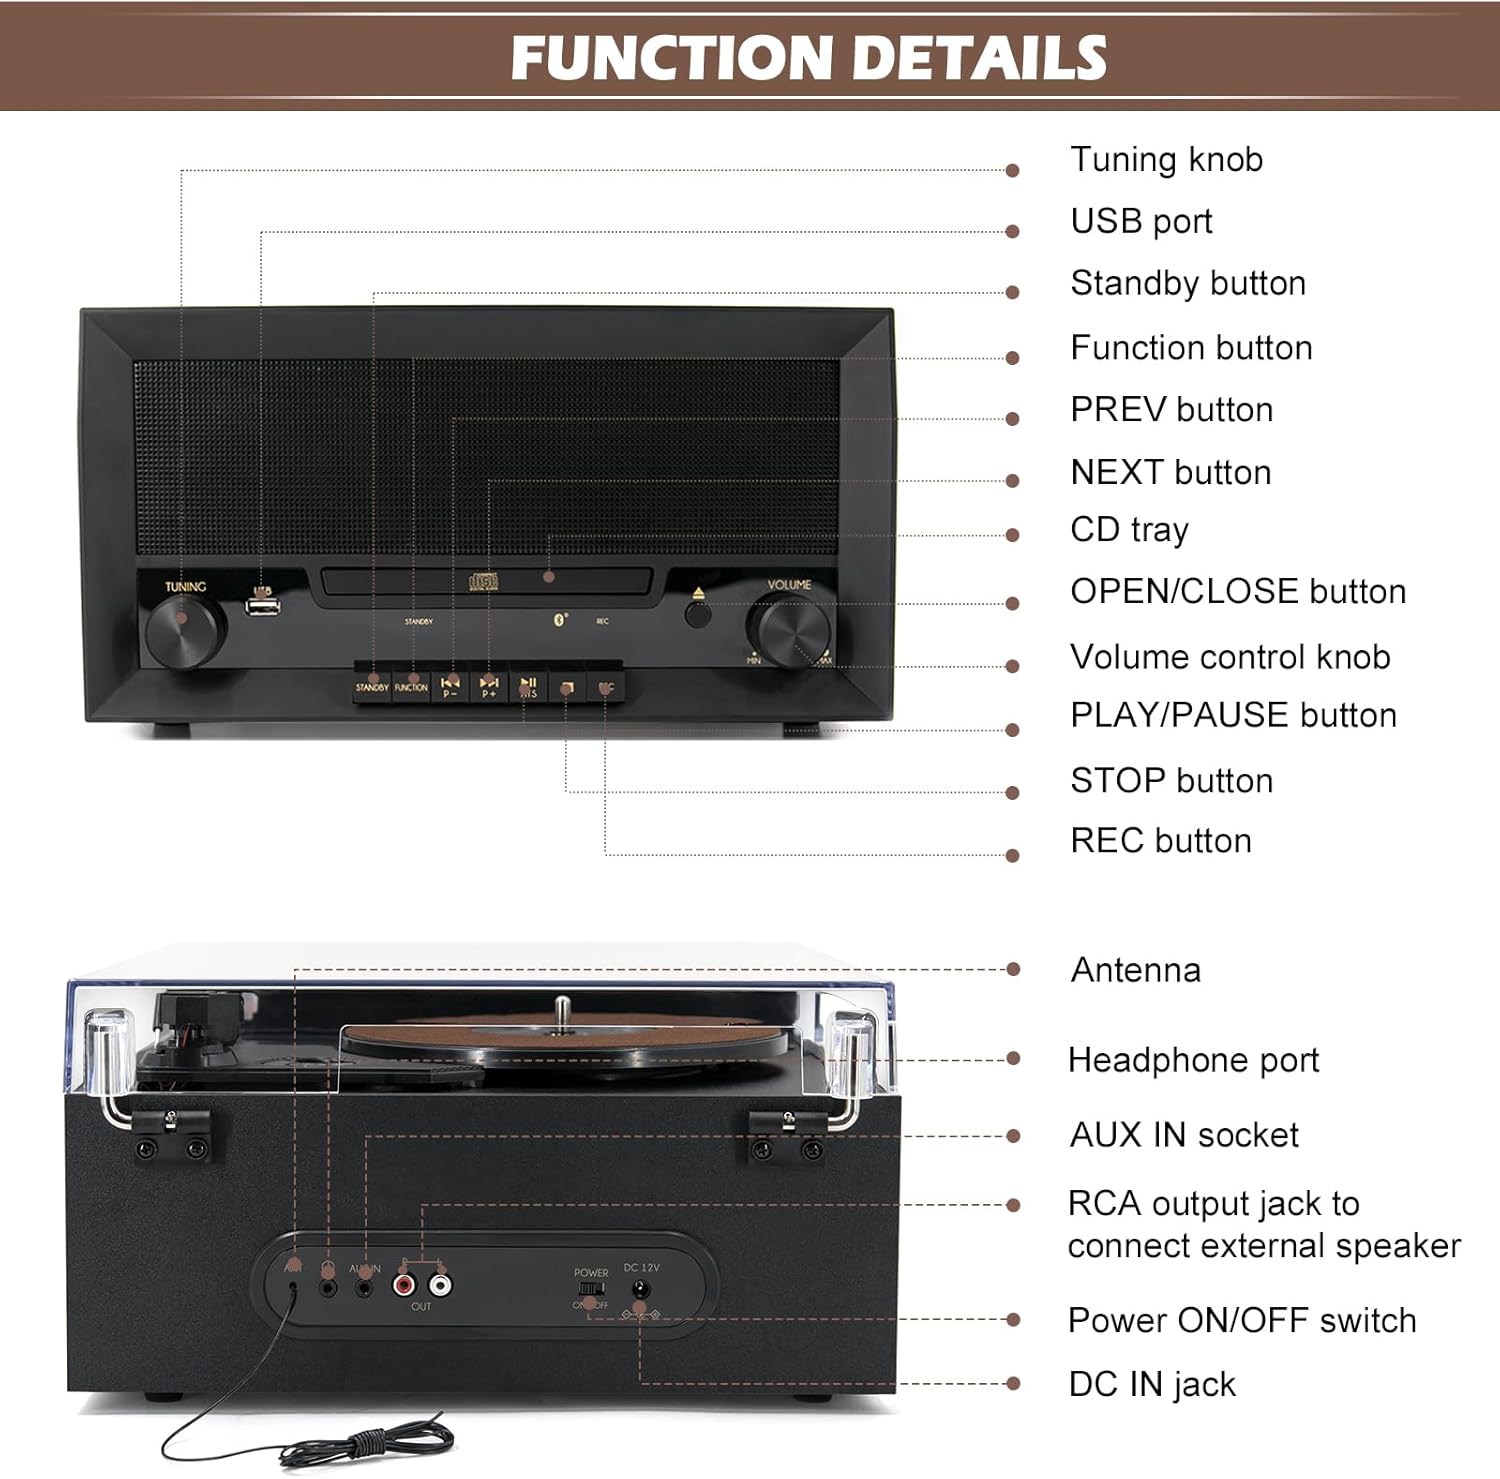
Figure 4.1: Front and Rear Panel Components
This diagram illustrates the location of key controls and ports. On the front, you'll find the Tuning knob, USB port, Standby button, Function button, PREV/NEXT buttons, CD tray, OPEN/CLOSE button, Volume control knob, PLAY/PAUSE button, STOP button, and REC button. The rear panel includes the Antenna, Headphone port, AUX IN socket, RCA output jacks for external speakers, Power ON/OFF switch, and DC IN jack.

Figure 4.2: Key Internal and Control Features
Detailed views show the ceramic cartridge for accurate sound reproduction, the belt-drive turntable mechanism for smooth rotation, the Smart Auto Stop setting switch (ON/OFF) to prevent stylus wear, and the easy-to-use control knobs for tuning and volume.
5. Setup
- Unpacking: Carefully remove the unit from its packaging. Retain the packaging for future transport or storage.
- Placement: Place the record player on a flat, stable surface away from direct sunlight, heat sources, and excessive dust or vibrations. Ensure adequate ventilation around the unit.
- Power Connection: Connect the supplied power adapter to the DC IN jack on the rear of the unit, then plug the adapter into a wall outlet.
- Antenna Connection (for FM Radio): Extend the FM antenna located at the rear of the unit for optimal radio reception.
- External Speaker Connection (Optional): If connecting to external speakers, use RCA cables (not included) to connect the RCA OUT jacks on the rear of the record player to the audio input of your powered external speakers or amplifier.
6. Operating Instructions
6.1. Turntable Operation

Figure 6.1: 3-Speed Vinyl Turntable Compatibility
The turntable supports 33 1/3, 45, and 78 RPM speeds, compatible with all standard vinyl record sizes.
- Lift the dust cover.
- Place a vinyl record on the turntable platter.
- Select the appropriate speed (33, 45, or 78 RPM) using the speed selector switch located on the turntable deck. For 45 RPM records, place the included 45 RPM adapter on the center spindle.
- Move the auto-stop switch to ON if you want the turntable to stop automatically when the record finishes playing. Set to OFF for continuous play or for some records that may trigger auto-stop prematurely.
- Gently lift the tone arm using the cue lever and position the stylus over the desired track of the record.
- Lower the tone arm slowly onto the record using the cue lever. Playback will begin.
- Adjust the volume using the VOLUME knob.
- When the record finishes, lift the tone arm and return it to the tone arm rest.
6.2. CD Player Operation
- Press the FUNCTION button to select CD mode.
- Press the OPEN/CLOSE button to open the CD tray.
- Place a CD with the label side facing up into the tray.
- Press the OPEN/CLOSE button again to close the tray. The unit will read the CD.
- Press the PLAY/PAUSE button to start playback.
- Use the PREV and NEXT buttons to skip tracks.
- Press the STOP button to stop playback.
6.3. FM Radio Operation
- Press the FUNCTION button to select FM mode.
- Extend the FM antenna fully for best reception.
- Turn the TUNING knob to manually tune to your desired FM station.
- Alternatively, press and hold the PLAY/PAUSE button for automatic station scanning. The unit will scan and save available stations.
- Use the PREV and NEXT buttons to navigate through saved stations.
6.4. Bluetooth (Wireless Input) Operation
- Press the FUNCTION button to select Bluetooth mode. The unit will enter pairing mode, indicated by a flashing Bluetooth indicator.
- Enable Bluetooth on your mobile device (smartphone, tablet, etc.).
- Search for "M MUSIC PUBLIC KINGDOM" or similar device name in your device's Bluetooth settings and select it to pair.
- Once paired, the Bluetooth indicator will stop flashing. You can now stream music from your device to the record player's speakers.
- Control playback (play/pause, skip) from your connected device or using the unit's PLAY/PAUSE, PREV, and NEXT buttons.
6.5. USB Playback & Recording
- USB Playback:
- Insert a USB flash drive into the USB port.
- Press the FUNCTION button to select USB mode.
- The unit will automatically begin playing compatible audio files (MP3).
- Use the PREV, NEXT, PLAY/PAUSE, and STOP buttons to control playback.
- USB Recording (Encoding):
- Insert a USB flash drive into the USB port.
- Select the desired source for recording (Turntable, CD, or FM Radio).
- Start playback of the source material (e.g., play a record, start a CD, tune to an FM station).
- Press the REC button. The unit will begin recording the audio directly to the USB flash drive in MP3 format.
- Press the REC button again to stop recording. The recorded file will be saved on the USB drive.
6.6. Auxiliary Input (AUX IN)
Connect external audio devices (e.g., MP3 players, older smartphones) to the AUX IN socket on the rear of the unit using a 3.5mm audio cable (not included). Press the FUNCTION button to select AUX mode. Audio from the connected device will play through the record player's speakers.
6.7. Headphone Output
For private listening, plug standard 3.5mm headphones into the HEADPHONE port on the rear of the unit. The built-in speakers will automatically mute.
6.8. Product Demonstration Video
Video 6.8.1: Multi-Functional Record Player Overview
This video provides a brief visual overview of the Multi-Functional Record Player, highlighting its key features and design. It demonstrates the product in various settings, showcasing its versatility and aesthetic appeal.
7. Maintenance
- Cleaning the Unit: Wipe the exterior of the unit with a soft, dry cloth. Do not use abrasive cleaners, waxes, or solvents.
- Cleaning the Stylus: Gently brush the stylus from back to front with a soft brush designed for stylus cleaning. Do not use your fingers.
- Cleaning Records: Use a dedicated record cleaning brush or cloth to remove dust and debris from your vinyl records before playing.
- Dust Cover: Keep the dust cover closed when not in use to protect the turntable from dust.
8. Troubleshooting
| Problem | Possible Cause | Solution |
|---|---|---|
| No power | Power adapter not connected; Power switch off | Ensure power adapter is securely plugged in; Turn the Power ON/OFF switch to ON. |
| No sound from speakers | Volume too low; Wrong function mode selected; Headphones connected | Increase volume; Press FUNCTION button to select correct mode; Disconnect headphones. |
| Turntable not spinning or playing | Auto-stop switch set incorrectly; Tone arm not lowered; Speed setting incorrect | Try setting auto-stop to OFF; Gently lower tone arm; Ensure correct RPM speed is selected. |
| Poor radio reception | Antenna not extended; Weak signal | Fully extend and adjust the FM antenna; Try repositioning the unit. |
| Bluetooth not connecting | Unit not in Bluetooth mode; Device not in pairing mode; Already connected to another device | Ensure unit is in Bluetooth mode; Put your device in pairing mode; Disconnect from other Bluetooth devices. |
| USB recording not working | USB drive full or incompatible; Source not playing | Use a different USB drive (FAT32 format recommended); Ensure source (record, CD, FM) is actively playing. |
9. Specifications
| Brand | M MUSIC PUBLIC KINGDOM |
| Model Name | Multi Funcitonal Turntable (TT16011-3) |
| Dimensions (L x W x H) | 12.5 x 12.8 x 6.4 inches (32 x 32.7 x 16.4 cm) |
| Item Weight | 10.12 pounds (4.6 Kilograms) |
| Rotational Speeds | 33 1/3, 45, 78 RPM |
| Included Components | Built-in Stereo Speakers, CD Player, FM Radio, USB Recording Function |
| Special Features | Adjustable Speed, Built-in Speaker, AUX Input, RCA Output, CD Recorder |
| Material | Wood, Plastic, Metal |
| Color | Dark Black |
| Compatible Devices | Headphone, Speaker |

Figure 9.1: Product Dimensions
This image provides a visual representation of the record player's physical dimensions, indicating its compact size suitable for various home environments.
10. Warranty and Support
M MUSIC PUBLIC KINGDOM products are manufactured to the highest quality standards. For information regarding warranty coverage, technical support, or service inquiries, please refer to the warranty card included with your product or visit the official M MUSIC PUBLIC KINGDOM website. Please have your model number (TT16011-3) and purchase date available when contacting support.
For further assistance, you may also refer to the seller's information on the platform where you purchased the product.
Ask a question about this manual
Ask about setup, troubleshooting, compatibility, parts, safety, or missing instructions. Manuals+ will review the question and use this page’s manual context to help answer it.