MOESAPU 032108
Indoor Air Quality Monitor User Manual
Brand: MOESAPU | Model: 032108
1. Product Overview
The MOESAPU Indoor Air Quality Monitor (Model 032108) is a multifunctional device designed to accurately test and record various air quality parameters in real-time. This monitor helps you understand the air quality in your home or office environment, ensuring a healthier living space.
It provides data for Formaldehyde (HCHO), Volatile Organic Compounds (TVOC), Particulate Matter (PM2.5), Carbon Monoxide (CO), Carbon Dioxide (CO2), Temperature (in ℃), and Humidity (in %). The device features an LCD Digital Color Screen for easy readability and includes a color and voice alarm system to indicate different pollution levels.
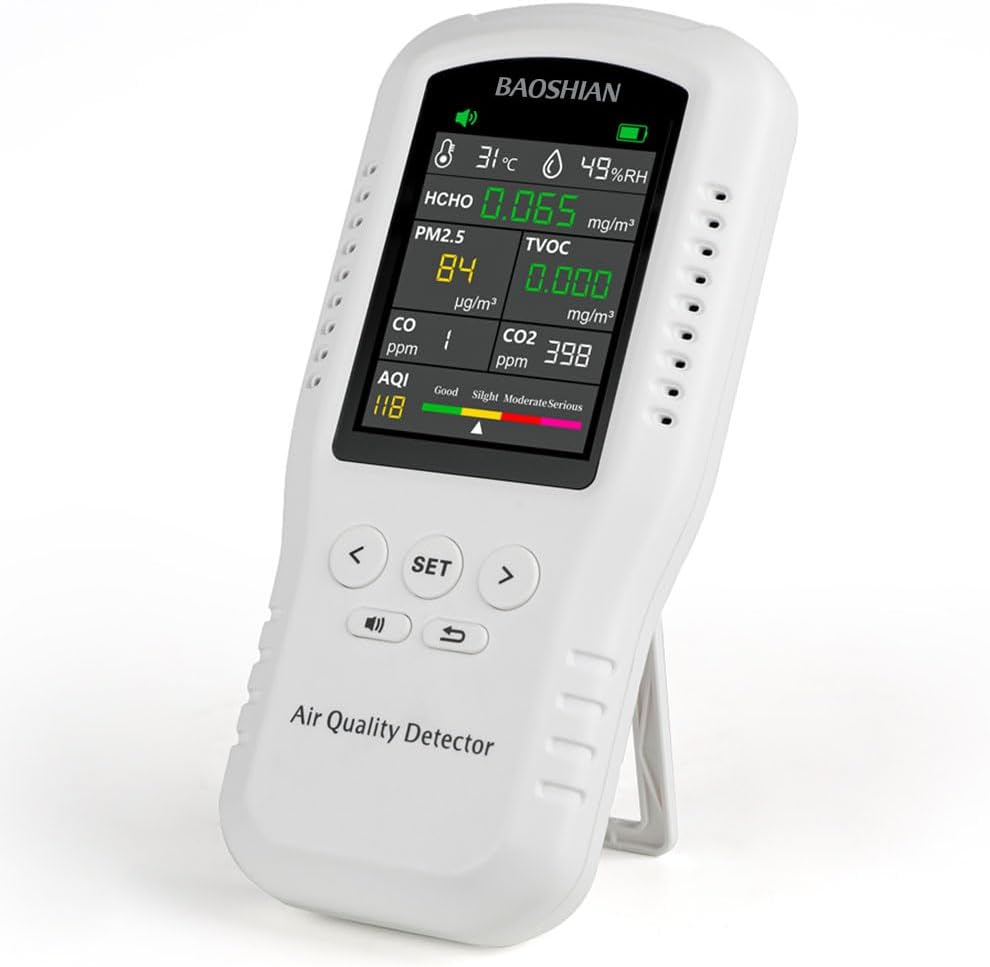
Figure 1: MOESAPU Indoor Air Quality Monitor displaying real-time air quality data.

Figure 2: The monitor detects multiple gases including HCHO, PM2.5, TVOC, CO, CO2, and provides an AQI index.
2. Setup and Initial Use
2.1 Charging the Device
The air quality detector is equipped with a 1500mAh rechargeable lithium battery. Before first use, or after prolonged storage, ensure the device is fully charged. Use the provided Type-C cable to connect the monitor to a USB power source (USB wall charger not included). A full charge can provide up to 8 hours of operation.

Figure 3: The device supports both battery power and Type-C charging for continuous use.
2.2 Initial Calibration
For accurate readings, it is crucial to perform an initial calibration. Place the monitor in a well-ventilated indoor environment for at least 1 hour before its first use or after long-term storage. This allows the sensors to stabilize and ensures data accuracy.
2.3 Powering On/Off
To power on the device, press and hold the power button located on the side. The LCD screen will illuminate. To power off, press and hold the power button again.
3. Operation
3.1 Understanding the Display
The large LCD color screen displays real-time readings for various air quality parameters. The display is designed for easy interpretation with color-coded indicators for overall air quality:
- Good (Green): Indicates healthy air quality.
- Slight Pollution (Yellow): Suggests minor air quality issues.
- Moderately Pollution (Red): Indicates significant air quality concerns.
- Severe Pollution (Purple): Signifies hazardous air quality levels.
Individual gas concentrations (HCHO, TVOC, PM2.5, CO, CO2), temperature, and humidity are displayed numerically. The AQI (Air Quality Index) provides an overall assessment.

Figure 4: Detailed view of the monitor's display and button functions, including vents, display screen, power switch, Type-C interface, mute on/off, support frame, setting buttons, and return key.

Figure 5: The screen color changes to indicate different AQI alarm levels, providing a quick visual alert.
3.2 Controls and Settings
The device is operated primarily with a few buttons. The "SET" button allows access to settings, while the left and right arrow buttons navigate options. The return key (curved arrow icon) allows you to go back.
Settings may include:
- Temperature Unit: Switch between Celsius (℃) and Fahrenheit (℉).
- Alarm Point: Adjust the threshold for specific gas alarms.
- Display Style: Customize the display layout.
- Key Sound: Turn button press sounds on or off.
- Voice Alarm: Enable or disable the voice alarm function.
- Sleep Time: Set the duration before the display goes to sleep.
- Brightness: Adjust screen brightness.
- Language: Select the display language (e.g., English).

Figure 6: The system setup interface allows customization of various settings, while the history record interface displays past data trends.
3.3 Data Recording and History
The monitor logs and graphs historical data for most parameters (excluding CO and CO2) for up to 8 hours. This feature allows you to track air quality trends over time and identify potential issues.

Figure 7: The curve display value feature allows users to visualize historical air quality data trends.
4. Maintenance
4.1 Cleaning
To clean the device, gently wipe the exterior with a soft, dry cloth. Do not use abrasive cleaners, solvents, or immerse the device in water. Ensure the vents are clear of dust and debris for optimal performance.
4.2 Storage
When not in use for extended periods, store the monitor in a cool, dry place away from direct sunlight and extreme temperatures. If storing for a long time, ensure the battery is partially charged to prolong its lifespan.
4.3 Important Sensor Information
The sensors within this product are sensitive and can be influenced by various environmental factors. When using the device, ensure that there are no volatile substances with irritating odors present in the room. These include, but are not limited to, alcohol, perfume, benzene, toluene, acetic acid, hydrogen sulfide, and carbon monoxide. Such pungent odors can affect or even damage the sensors, leading to inaccurate detection readings.
5. Troubleshooting
| Problem | Possible Cause | Solution |
|---|---|---|
| Inaccurate Readings |
|
|
| Device Not Turning On |
|
|
| Loud Beeping During Warm-up |
|
|
If you encounter issues not listed here or if the suggested solutions do not resolve the problem, please refer to the Warranty and Support section for assistance.
6. Specifications
| Parameter | Value |
|---|---|
| Brand | MOESAPU |
| Model Number | 032108 |
| Power Source | Battery Powered (1 Lithium Ion battery included) |
| Item Weight | 0.9 Pounds (approx. 14.4 ounces) |
| Product Dimensions | 6.7 x 3.2 x 1.2 inches |
| Sensor Types | HCHO, TVOC, PM2.5, CO, CO2, Temperature, Humidity |
| Alarm Type | Audible, Visual (Color Change) |
| Operating Humidity | Up to 90 percent |
| Upper Temperature Rating | 50 Degrees Celsius |
| UPC | 762774149940 |
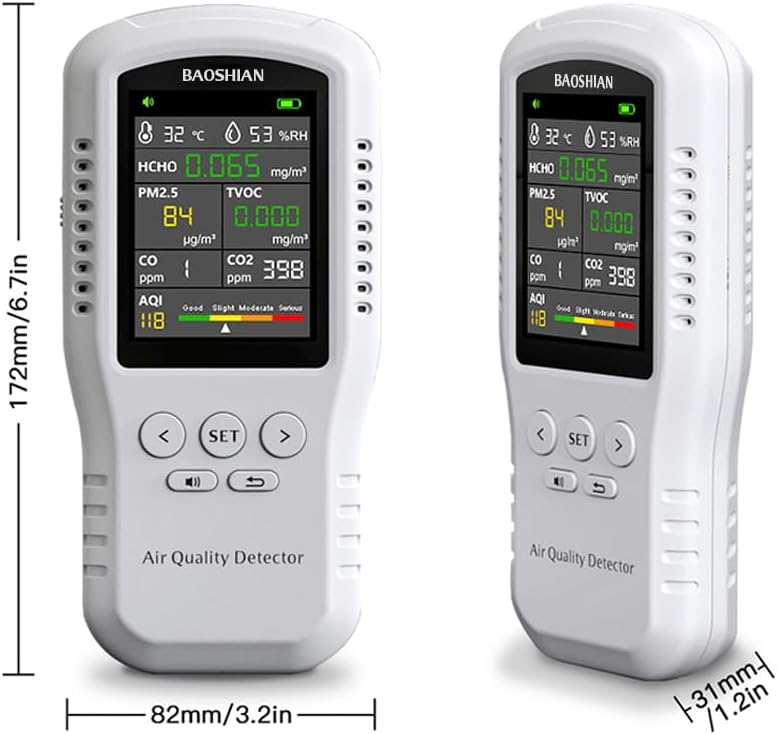
Figure 8: Physical dimensions of the MOESAPU Air Quality Monitor.
7. Warranty and Support
MOESAPU is committed to providing high-quality products and customer satisfaction. If you experience any quality problems with your Indoor Air Quality Monitor, please do not hesitate to contact our customer service team.
We will work to provide you with a satisfactory resolution. Please have your model number (032108) and purchase details ready when contacting support.
For the most up-to-date support information and contact methods, please refer to the official MOESAPU website or the retailer's support channels where you purchased the product.
Ask a question about this manual
Ask about setup, troubleshooting, compatibility, parts, safety, or missing instructions. Manuals+ will review the question and use this page’s manual context to help answer it.