1. Introduction
The TSUSF OP-COM Diagnostic Interface V1.78 is a diagnostic tool designed for Opel vehicles. It allows users to read and clear fault codes, view live data, perform output tests, and access various control units within the vehicle. This manual provides detailed instructions for the proper installation, operation, and maintenance of the device.
This interface supports a wide range of Opel vehicles, including newer models that utilize CAN-BUS based diagnostics, such as Vectra-C, Astra-H, and Zafira-B.

Figure 1: Front view of the TSUSF OP-COM Diagnostic Interface V1.78. It features indicator lights for Power, Rx (Receive), and Tx (Transmit), and the "Op-com Diagnostic Interface" logo.
2. Safety Information
Please read all safety instructions carefully before using this device. Failure to follow these instructions may result in damage to the device, vehicle, or personal injury.
- Always connect and disconnect the device with the vehicle's ignition turned off.
- Ensure the vehicle's battery is adequately charged before performing diagnostic procedures to avoid data loss or module damage.
- Do not operate the device in wet conditions or expose it to extreme temperatures.
- Keep the device away from strong magnetic fields.
- Only use the provided USB cable and software. Using unauthorized accessories or software may damage the device or vehicle.
- Consult a qualified automotive technician if you are unsure about any diagnostic procedure.
3. Package Contents
Verify that all items listed below are included in your package:
- OP-COM Interface (Diagnostic Tool)
- USB Cable
- Software CD

Figure 2: The OP-COM diagnostic interface, USB cable, and software CD as typically included in the package.
4. Setup
4.1 Software Installation
- System Requirements: The software is compatible with Windows XP operating system. Ensure your computer meets this requirement.
- Insert CD: Insert the provided software CD into your computer's CD-ROM drive.
- Run Installer: Navigate to the CD drive and locate the installer file (e.g., "setup.exe"). Double-click to run the installer.
- Follow On-Screen Prompts: Follow the instructions provided by the installation wizard. It is recommended to install the software to the default directory.
- Driver Installation: During the installation, you may be prompted to install USB drivers for the OP-COM interface. Allow these drivers to be installed.
- Restart Computer: After the installation is complete, restart your computer to ensure all changes take effect.

Figure 3: The OP-COM diagnostic interface shown alongside its accompanying software CD, essential for installation.
4.2 Hardware Connection
- Connect USB Cable: Connect one end of the provided USB cable to the OP-COM interface and the other end to an available USB port on your computer.
- Connect to Vehicle: With the vehicle's ignition OFF, locate the OBD-II diagnostic port in your Opel vehicle. This port is typically located under the dashboard on the driver's side. Connect the OP-COM interface to the vehicle's OBD-II port.
- Power On: Once connected, the "Power" indicator light on the OP-COM interface should illuminate, indicating it is receiving power from the vehicle.

Figure 4: Detailed view of the OP-COM interface's OBD-II connector, highlighting the pin configuration for vehicle connection.
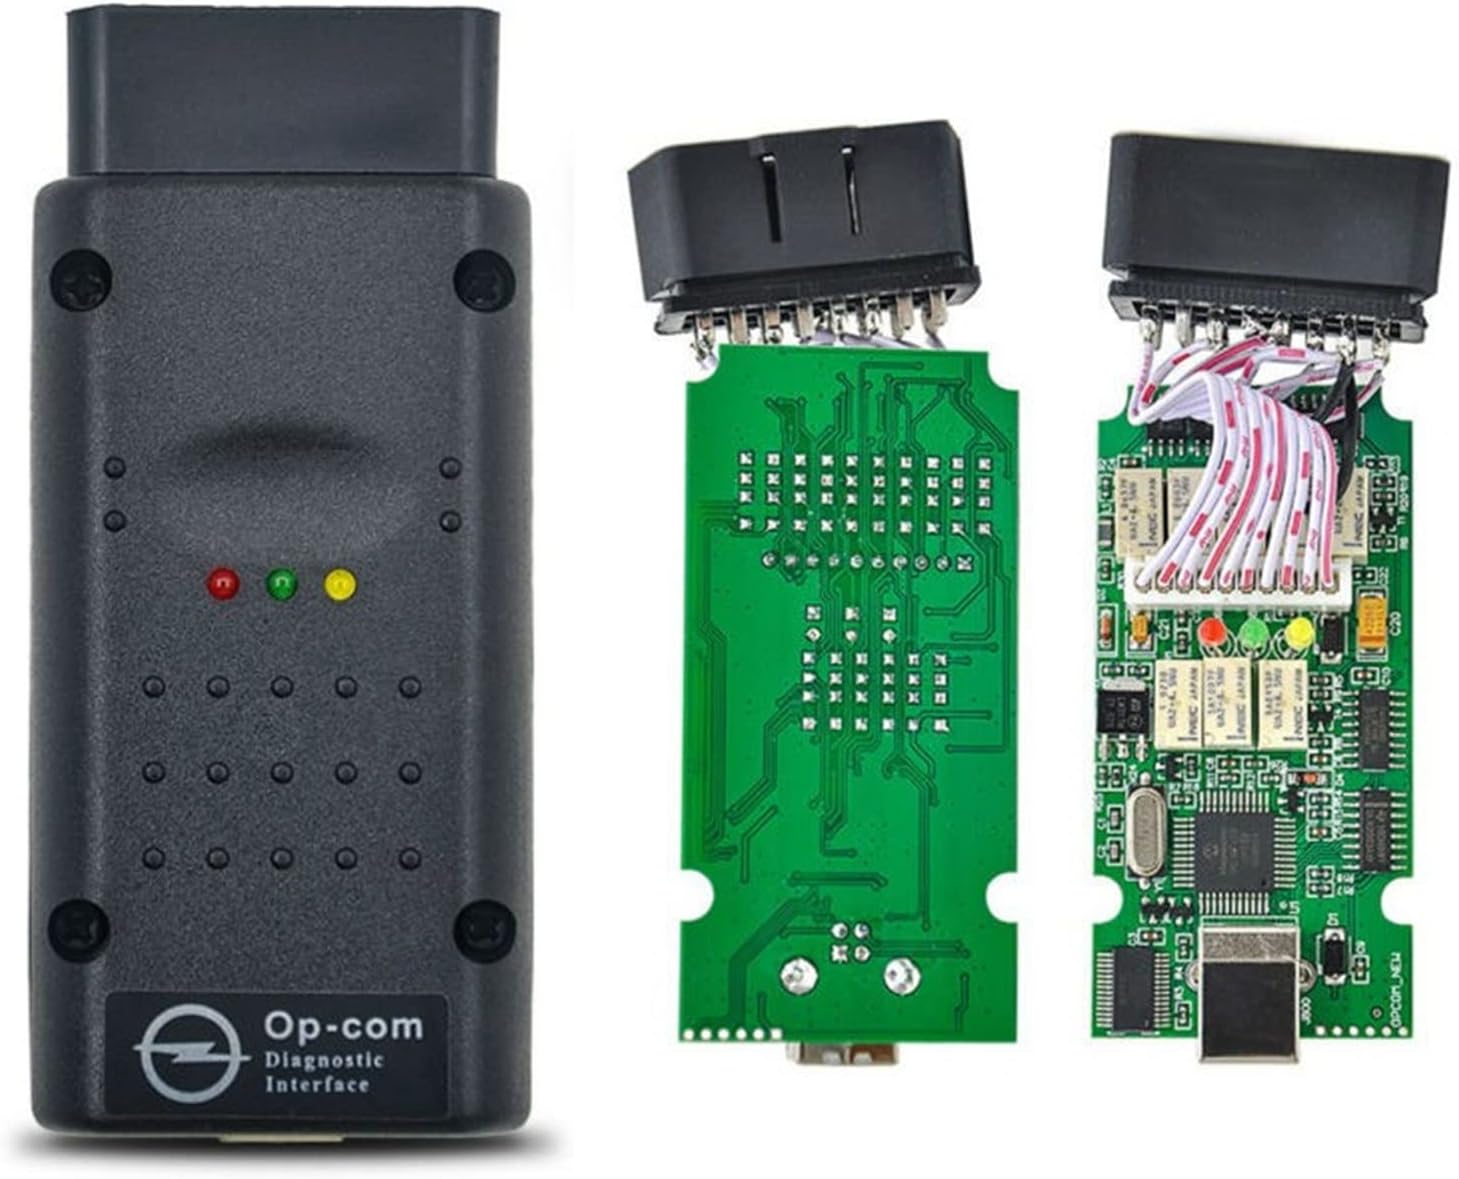
Figure 5: An internal view of the OP-COM diagnostic interface, showcasing its circuit board and components, including the PIC18F458 microcontroller.
5. Operating Instructions
This section outlines the primary functions and operational procedures for the TSUSF OP-COM Diagnostic Interface.
5.1 Launching the Software
- Ensure the OP-COM interface is connected to both your computer and the vehicle.
- Turn the vehicle's ignition to the "ON" position (do not start the engine unless instructed by a specific test).
- Launch the OP-COM software from your computer's Start Menu or desktop shortcut.
- In the software, select the appropriate vehicle model and year.

Figure 6: A screenshot of the OP-COM software interface, showing options for testing the interface, advanced protocol settings, and internet update.
5.2 Reading and Clearing Fault Codes
- From the main menu, select the desired control unit (e.g., Engine, ABS, Airbag).
- Choose the "Fault Codes" option. The program will display all detected fault codes with full text descriptions and status information (Present, Not present, Intermittent).
- To clear fault codes, select the "Clear Fault Codes" option. Confirm the action when prompted.
- Fault codes can be printed, saved, or copied to other applications.
5.3 Live Data and Measuring Blocks
- Select a control module and then choose "Measuring Blocks" or "Live Data."
- You can select up to 8 measuring block parameters to view simultaneously.
- The sample rate for live data depends on the vehicle's communication protocol.
5.4 Output Tests
- The software allows you to perform output tests on various components.
- During an output test, you will receive feedback on the state of the activated output, which assists in identifying failed components.
5.5 Key and Immobilizer Programming
The OP-COM interface can be used to program keys to the immobilizer and remote keys for central door locking. It can also reset and program immobilizer-related items such as ECM, BCM, and IPC.
- Important: You will need the vehicle's security code, typically found on the CAR-PASS document, to perform these functions.
- Navigate to the "Immobilizer" or "Key Programming" section within the software and follow the on-screen prompts.
5.6 Service Interval Reset and Airbag Coding
- Service Interval Reset: The software supports resetting and programming the service interval reminder on specific models like Astra-G, Zafira, Corsa-C, and Meriva.
- Airbag Coding: You can code SAB6 and SAB8 airbags using the software.
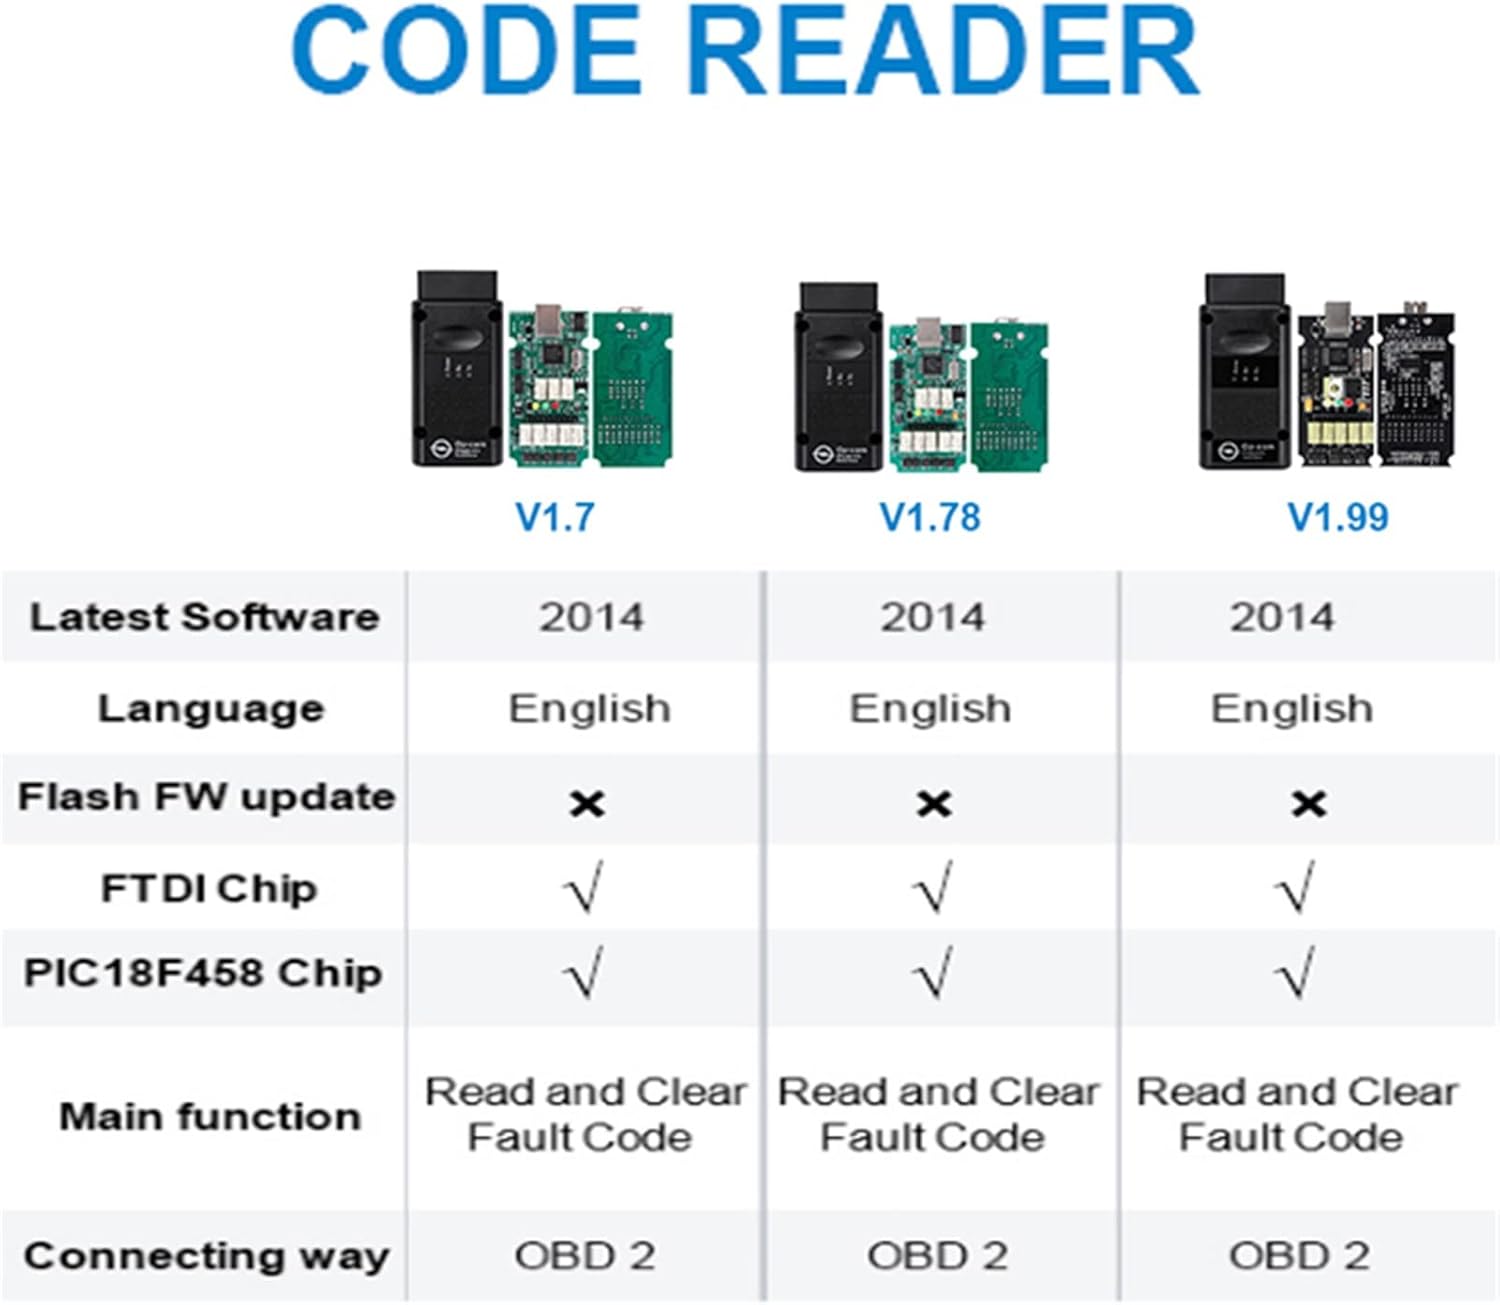
Figure 7: A comparison table detailing features such as software version, language, firmware update capability, FTDI chip, PIC18F458 chip, main functions, and connecting way (OBD2) across different OP-COM versions (V1.7, V1.78, V1.99).
6. Maintenance
- Cleaning: Use a soft, dry cloth to clean the exterior of the device. Do not use liquid cleaners or solvents.
- Storage: Store the device in a cool, dry place, away from direct sunlight and extreme temperatures.
- Cable Care: Avoid bending or kinking the USB and OBD-II cables excessively to prevent internal wire damage.
- Software Updates: Periodically check for software updates from the manufacturer's official channels to ensure compatibility with newer vehicle models and improved functionality.
7. Troubleshooting
| Problem | Possible Cause | Solution |
|---|---|---|
| Device not powering on. | Not properly connected to vehicle's OBD-II port; vehicle ignition off; blown fuse in vehicle's OBD-II circuit. | Ensure secure connection. Turn vehicle ignition to "ON". Check vehicle's fuse box for OBD-II port fuse. |
| Software not detecting the interface. | USB cable not connected; USB drivers not installed correctly; incompatible operating system. | Verify USB connection. Reinstall USB drivers from the provided CD. Ensure operating system is Windows XP. |
| Cannot communicate with vehicle control unit. | Incorrect vehicle model/year selected; vehicle ignition off; faulty OBD-II port; communication protocol issue. | Confirm vehicle selection. Turn ignition to "ON". Test with another vehicle if possible. Ensure the interface supports the vehicle's communication protocol. |
| Error messages during key programming. | Incorrect security code entered; vehicle battery low; interruption during programming. | Verify the CAR-PASS security code. Ensure vehicle battery is fully charged. Do not interrupt the process once started. |
8. Specifications
- Model: OP-COM V1.78
- Brand: TSUSF
- Manufacturer: TSUSF
- Power Source: Corded Electric (via OBD-II port and USB)
- Operating System Compatibility: Windows XP
- Communication Protocols: PIN3, PIN7, PIN8, PIN12 = Serial Link (ISO9141, KW81, KW82, KWP2000)
- Language: English only
- Item Weight: Approximately 500 g
- Country of Origin: China
9. Warranty and Support
Specific warranty details for the TSUSF OP-COM Diagnostic Interface V1.78 are not provided in this manual. Please refer to your purchase documentation or contact the retailer/manufacturer directly for warranty information.
For technical support or further assistance, please contact the vendor from whom you purchased the device.