1. Introduction
This manual provides detailed instructions for the setup, operation, and maintenance of your Timelux Flexible LED Matrix Panel. This device features Bluetooth app control, allowing you to display custom text, patterns, and animations. Its flexible design and USB power make it suitable for various applications, including car windows, shop displays, and event signage.

Image 1.1: Timelux Flexible LED Matrix Panel with smartphone control and USB power.
2. Safety Information
Please read and adhere to the following safety guidelines to ensure proper operation and prevent damage to the device or personal injury:
- Do not use power adapters with an output voltage exceeding 5V or a rated current lower than 2A to power the equipment.
- For optimal programming, ensure the control device (e.g., smartphone) is within 3 meters of the LED panel.
- While the panel is flexible and bendable, avoid strong folding or impact from sharp objects.
- The LED sign controller and switch are not waterproof. Do not expose them to direct sunlight or rain.

Image 2.1: Product dimensions and important safety notes regarding power and programming distance.
3. Package Contents
Verify that all items listed below are included in your package:
- 1 x Timelux LED Matrix Panel (14.64" x 3.62")
- 1 x USB Line with Control Box & Switch (approximately 14.4 ft)
- 1 x USB Car Charger Adapter
- 1 x 3M Adhesive Tape

Image 3.1: Overview of included components.
4. Specifications
| Feature | Specification |
|---|---|
| Model Number | JTPD-03-001 |
| Dimensions | 14.64 x 3.62 x 0.39 inches |
| Item Weight | 11.3 ounces (0.32 Kilograms) |
| Material | Silicone Rubber |
| Color | Black |
| Power Input | USB 5V/2A |
| Control Method | Bluetooth APP Control |
| Mounting Type | Wall Mount (with adhesive) |
| Recommended Uses | Advertising, displaying messages, decorative signage |
5. Setup
5.1 App Download and Installation
- Search for the companion app (e.g., 'LED Space' or similar, refer to product packaging for exact name) on your smartphone's app store (iOS App Store or Google Play Store).
- Download and install the app on your mobile device.
5.2 Power Connection
The LED Matrix Panel is powered via a USB connection.
- Connect the USB plug of the LED panel's cable to a 5V/2A USB power source. This can be a standard AC/DC adapter, a power bank, or the included USB car charger adapter.
- Ensure the power source meets the 5V/2A requirement to prevent damage and ensure proper functionality.

Image 5.1: USB power connection for the LED panel.
5.3 Bluetooth Pairing
Once powered on, the LED panel is ready for Bluetooth connection.
- Enable Bluetooth on your smartphone.
- Open the installed companion app. The app should automatically detect and connect to the LED panel. If not, follow the app's instructions to manually search and pair.
- Maintain a distance of less than 3 meters between your smartphone and the LED panel during programming for a stable connection.

Image 5.2: Bluetooth app control in action, showing connection to the LED panel.
5.4 Installation
The flexible design allows for versatile placement.
- Clean the surface where you intend to install the LED panel. Ensure it is dry and free of dust or grease.
- Peel off the protective backing from the 3M adhesive tape.
- Carefully press the LED panel onto the desired surface. The strong adhesive is designed for secure attachment.

Image 5.3: Demonstration of 3M adhesive application for installation.
6. Operating Instructions
The Timelux LED Matrix Panel is controlled entirely through its dedicated smartphone application.
6.1 App Features
The app provides various options for customizing your display:
- Text Editing: Input custom text messages. Adjust font, size, color, and scrolling direction/speed.
- Pattern Display: Select from pre-loaded patterns or create your own.
- Animation: Choose from various animations or design custom animated sequences.
- Music Mode: Some apps may offer a music synchronization feature, allowing the display to react to sound.
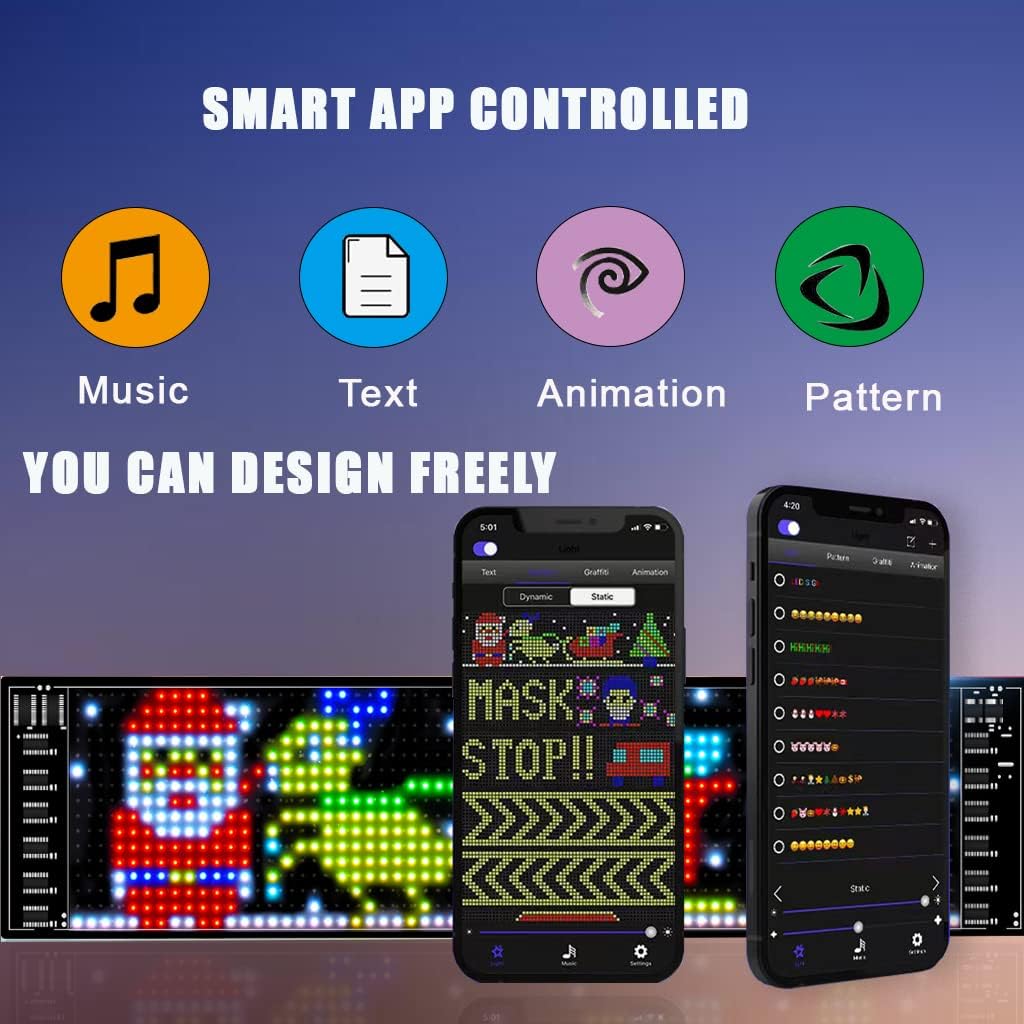
Image 6.1: Smart App Controlled features for content creation.
6.2 Creating and Uploading Content
- Within the app, navigate to the desired content creation section (Text, Pattern, or Animation).
- Use the app's interface to design your message or graphic.
- Once your content is ready, select the 'Send' or 'Apply' option within the app to upload it to the LED panel. The panel will immediately display the new content.
6.3 Scrolling Control
The control box on the USB cable includes a switch to manage scrolling behavior.
- Press the switch on the control box to toggle between scrolling and non-scrolling display modes.

Image 6.2: Examples of various display modes and content.
7. Maintenance
To ensure the longevity and optimal performance of your LED Matrix Panel, follow these maintenance guidelines:
- Cleaning: Gently wipe the surface of the LED panel with a soft, dry cloth. Avoid using abrasive cleaners or excessive moisture.
- Storage: When not in use, store the panel in a cool, dry place away from direct sunlight and extreme temperatures.
- Handling: Due to its flexible nature, avoid sharp bends or creases that could damage the internal circuitry.
8. Troubleshooting
If you encounter issues with your Timelux LED Matrix Panel, refer to the following common problems and solutions:
- Panel does not power on:
- Ensure the USB power source is providing 5V/2A.
- Check if the USB cable is securely connected to both the panel and the power source.
- Verify that the power source itself is functional.
- App cannot connect to the panel:
- Make sure Bluetooth is enabled on your smartphone.
- Ensure the LED panel is powered on.
- Bring your smartphone closer to the LED panel (within 3 meters).
- Restart the app and try connecting again.
- If issues persist, try restarting both your smartphone and the LED panel.
- Content does not display correctly:
- Ensure the content was successfully uploaded from the app.
- Check for any error messages within the app.
- Verify that the content created is compatible with the panel's resolution and capabilities.
- Adhesive tape is not sticking:
- Ensure the surface is clean, dry, and smooth before application.
- Apply firm pressure for several seconds after placement.
- Avoid repositioning the panel multiple times, as this can reduce adhesive effectiveness.
9. Warranty and Support
For warranty information or technical support, please refer to the product packaging or contact Timelux customer service through the retailer where the product was purchased. Keep your purchase receipt as proof of purchase.


