Product Overview
The EDS-G4008-LV is a managed full Gigabit Ethernet switch designed for industrial applications. It features 8 10/100/1000BaseT(X) ports, providing high-speed network connectivity. This device supports dual power inputs (12/24/48 VDC) and operates reliably in a wide temperature range of -10 to 60°C, making it suitable for demanding environments.
This manual provides essential information for the proper installation, operation, and maintenance of your EDS-G4008-LV switch.
Package Contents
- EDS-G4008-LV Ethernet Switch
- Quick Installation Guide
- Warranty Card
- Terminal Block for Power Input
Setup
Proper installation ensures optimal performance and longevity of the device.
1. Physical Installation
The EDS-G4008-LV is designed for DIN-rail mounting. Ensure the mounting surface is stable and provides adequate ventilation.
- Attach the DIN-rail kit to the rear of the switch (if not pre-attached).
- Hook the top of the DIN-rail clip over the DIN rail.
- Push the bottom of the switch towards the DIN rail until it snaps into place.
Note: Maintain sufficient clearance around the switch for heat dissipation and cable routing.
2. Power Connection
The switch supports dual redundant power inputs (PWR1 and PWR2) for enhanced reliability. Connect a 12/24/48 VDC power source to the terminal block.
- Ensure the power source is off before connecting.
- Connect the positive (+) and negative (-) wires from your DC power supply to the corresponding terminals on the terminal block.
- Insert the terminal block into the power input connector on the switch.
- Optionally, connect a second power source to the PWR2 input for redundancy.
Caution: Verify correct polarity to prevent damage to the device.
3. Network Connections
Connect Ethernet cables to the 10/100/1000BaseT(X) ports. The switch automatically detects link speed and duplex mode.
- Use standard RJ45 Ethernet cables (Cat5e or better) for Gigabit connections.
- Connect your network devices (e.g., PCs, servers, other switches) to the available Ethernet ports.
4. Initial Configuration
The switch can be configured via a web-based interface or console port.
- Web Interface: Connect a PC to any Ethernet port. The default IP address is typically provided in the Quick Installation Guide or can be discovered using a utility. Open a web browser and enter the switch's IP address.
- Console Port: Connect a serial cable from your PC to the console port on the switch. Use a terminal emulation program (e.g., PuTTY) with appropriate serial settings (e.g., 115200 bps, 8 data bits, no parity, 1 stop bit, no flow control).
Security Note: Change default login credentials immediately after initial access.
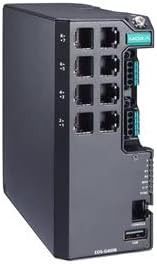
Figure 1: Front view of the EDS-G4008-LV Managed Gigabit Ethernet Switch, showing 8 Ethernet ports, power input, and status LEDs.
Operating Instructions
Powering On/Off
Once power is connected, the switch will automatically power on. To power off, disconnect the power source(s).
LED Indicators
The front panel LEDs provide visual status of the switch's operation:
- PWR1/PWR2: Indicates status of power input 1 and 2. Lit green when power is supplied.
- FAULT: Lit red if a system fault occurs.
- LINK/ACT (per port): Lit green when a link is established, blinks when data is being transmitted/received.
- SPEED (per port): Indicates port speed (e.g., green for 1000 Mbps, amber for 100 Mbps).
Management Interface
Access the web-based management interface or console CLI to configure advanced features such as VLANs, QoS, port mirroring, and security settings. Refer to the comprehensive user manual (available on the manufacturer's website) for detailed configuration instructions.
Maintenance
Regular maintenance helps ensure reliable operation of your EDS-G4008-LV switch.
- Cleaning: Periodically clean the exterior of the switch with a soft, dry cloth. Do not use liquid or aerosol cleaners. Ensure ventilation openings are free from dust and debris.
- Firmware Updates: Check the manufacturer's website for available firmware updates. Apply updates as recommended to benefit from new features, performance improvements, and security patches.
- Environmental Checks: Ensure the operating environment remains within specified temperature and humidity ranges.
- Cable Integrity: Periodically inspect network and power cables for damage or loose connections.
Troubleshooting
This section addresses common issues you might encounter.
- No Power:
- Verify power source is active and connected correctly to the terminal block.
- Check PWR1/PWR2 LEDs. If off, recheck power connections and source.
- No Network Connectivity:
- Check LINK/ACT LEDs for the connected port. If off, ensure the Ethernet cable is securely connected at both ends and the connected device is powered on.
- Verify cable integrity. Try a different cable.
- Check IP configuration of connected devices.
- Slow Network Performance:
- Check SPEED LEDs. Ensure ports are operating at expected speeds (e.g., 1000 Mbps for Gigabit connections).
- Inspect cables for damage or excessive length.
- Check for network congestion or issues with connected devices.
- FAULT LED is Lit:
- A red FAULT LED indicates a system error. Consult the full user manual for specific fault codes or contact technical support.
- Try power cycling the device.
If issues persist, refer to the comprehensive user manual or contact technical support.
Specifications
| Model | EDS-G4008-LV |
| Ports | 8 x 10/100/1000BaseT(X) Ethernet Ports |
| Power Input | Dual 12/24/48 VDC |
| Operating Temperature | -10 to 60°C (14 to 140°F) |
| Dimensions | Approximately 8 x 8 x 3 inches (Package Dimensions) |
| Weight | 2.2 pounds |
| Manufacturer | MOXA |
| UPC | 691027038949 |
Warranty Information
This product is covered by a manufacturer's warranty. For detailed information regarding warranty terms, conditions, and duration, please refer to the warranty card included with your product or visit the official MOXA website. Keep your proof of purchase for warranty claims.
Technical Support
For technical assistance, troubleshooting beyond this manual, or further product information, please contact MOXA technical support. Support resources, including FAQs, drivers, and full documentation, are available on the official MOXA website:


