COSTWAY FP10111US-WH
COSTWAY Portable Air Conditioner User Manual
Model: FP10111US-WH
Brand: COSTWAY
1. Introduction
Thank you for choosing the COSTWAY Portable Air Conditioner. This 4-in-1 unit provides versatile climate control with cooling, ventilating, dehumidifying, and sleep modes. Designed for spaces up to 350 sq. ft., it offers powerful and efficient performance to keep your environment comfortable. Its compact size and rolling casters ensure easy portability between rooms. Please read this manual thoroughly before operation to ensure proper use, maintenance, and safety.

Figure 1: COSTWAY Portable Air Conditioner with remote control.

Figure 2: Wide cooling area coverage up to 350 sq. ft.
2. Important Safety Information
WARNING: To reduce the risk of fire, electrical shock, or injury, read and follow all instructions and warnings before using this appliance.
- Always plug the unit into a grounded 3-prong outlet. Do not remove the grounding prong.
- Do not operate the unit with a damaged cord or plug.
- Keep the unit away from water or excessive moisture.
- Ensure proper ventilation and do not block air inlets or outlets.
- The unit uses R410A refrigerant, which is environmentally friendly. Do not attempt to service the refrigerant system yourself.
- The unit features a child lock function to prevent accidental changes by children or pets.
- Overload protection is built-in to prevent damage from power surges.
- The unit will stop operation when the water tank is full to prevent overflow.

Figure 3: Protective features of the portable air conditioner.
3. Parts List
The following items are included in your package:
- 1 x Portable Air Conditioner Unit
- 1 x Remote Control
- 1 x Exhaust Hose (5 ft length, 6" diameter)
- 1 x Window Venting Kit (adjustable panels)
- 1 x Drainage Hose (25.5" length, 16mm diameter)
- 1 x User Guide
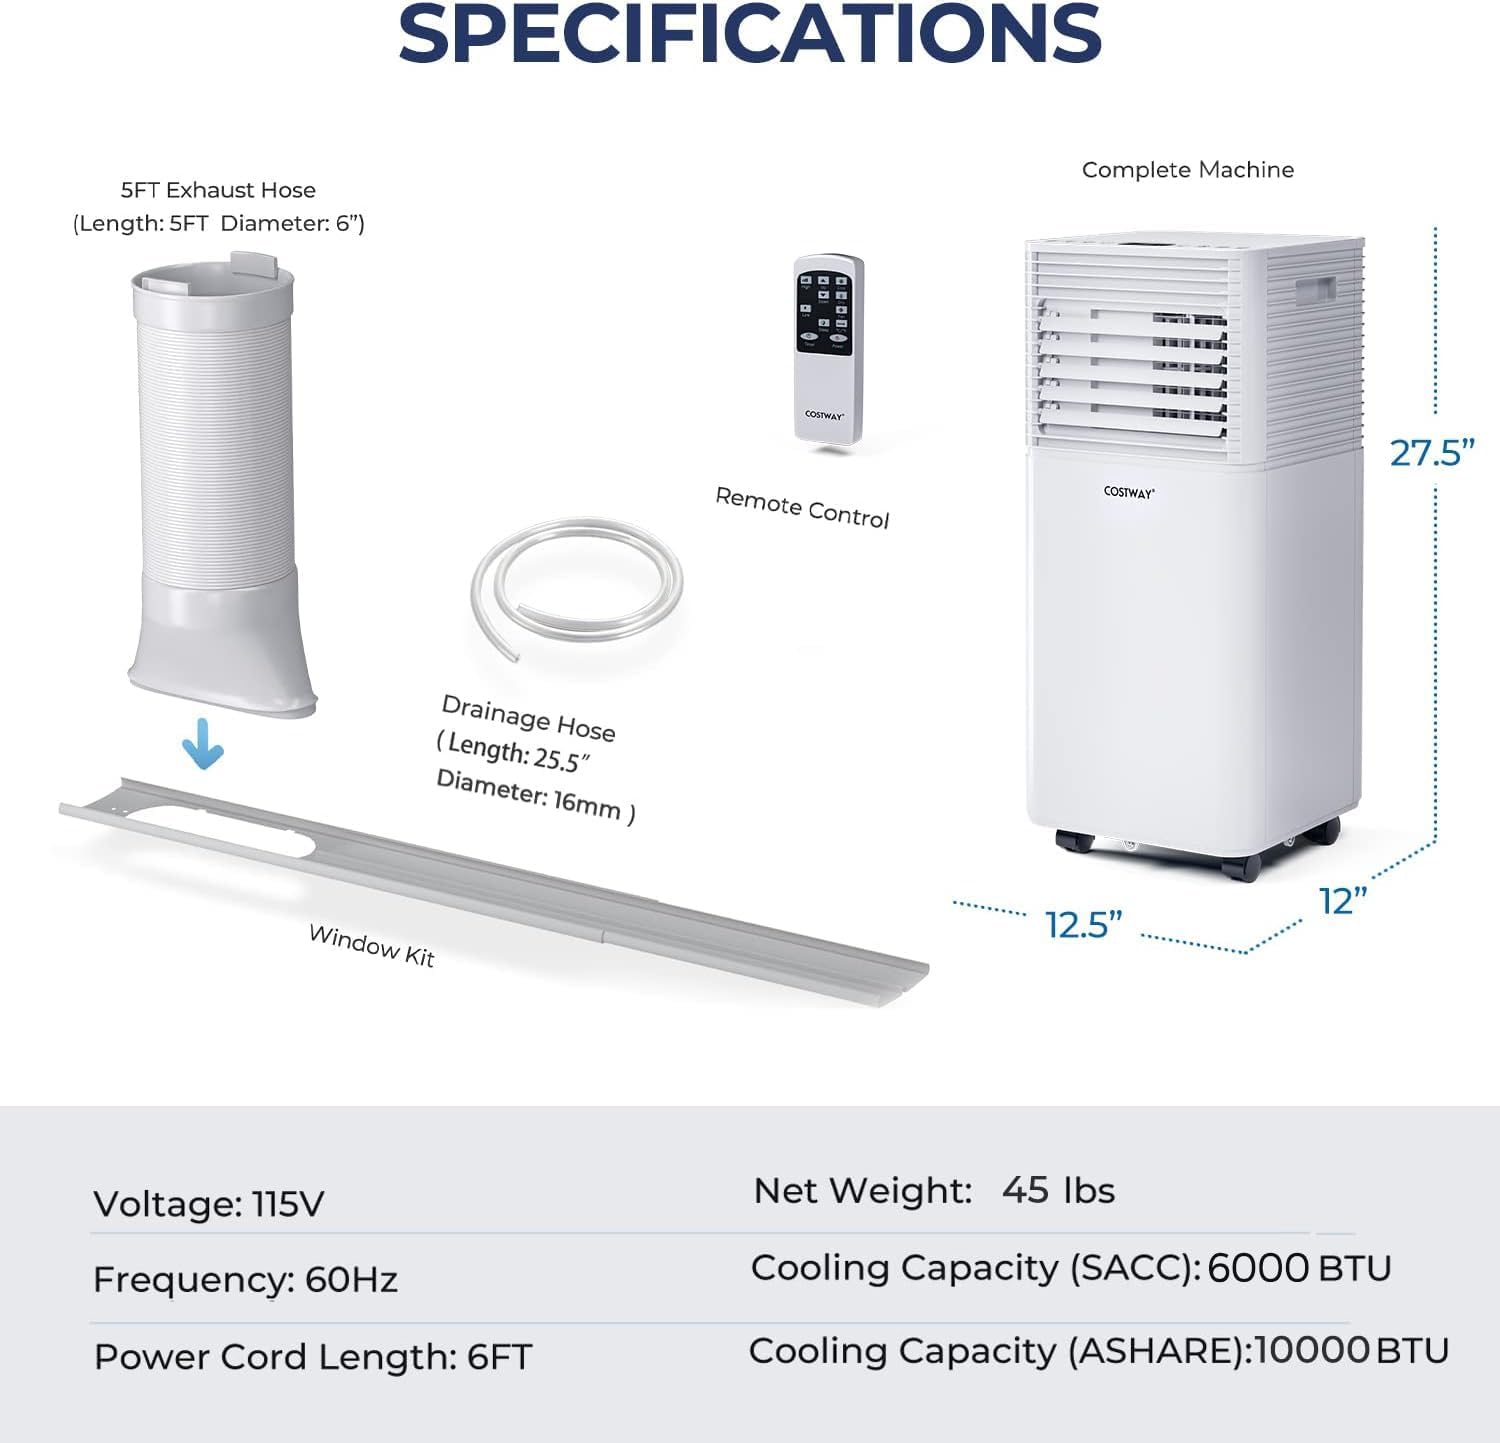
Figure 4: All components included with the portable air conditioner.
4. Setup and Installation
Follow these steps to set up your portable air conditioner:
- Connect the Exhaust Hose: Connect the hose connector to one end of the exhaust hose.
- Attach Window Kit Adapter: Connect the window kit adapter to the other end of the exhaust hose.
- Install Window Kit: Extend the adjustable window kit to match the length of your window opening. Connect the exhaust hose to the window kit.
- Secure in Window: Close the window to firmly secure the kit in place, ensuring a tight seal to prevent air leakage.
Important Note:
- The portable air conditioner will not work effectively without the exhaust hose installed. It releases heat during cooling operation, which must be vented outside.
- The unit is equipped with four rolling casters for easy movement. Use the built-in handle for convenient transportation.

Figure 5: Step-by-step guide for window kit installation.
Video 1: Official product video demonstrating the setup and features of the COSTWAY Portable Air Conditioner.
5. Operating Modes
Your COSTWAY Portable Air Conditioner offers four versatile operating modes:
- Air Cooling Mode: Provides powerful cooling for room spaces up to 350 sq. ft. The temperature can be adjusted from 60.8℉ to 89.6℉.
- Ventilating Mode: Circulates air with two fan speeds (high and low). Features 140° vertical and 50° horizontal oscillation for wide air distribution.
- Drying Mode (Dehumidifier): Effectively removes moisture from the air, with a dehumidifying rate of up to 50 Pints/24H. A drainage hole is available for continuous drainage.
- Sleep Mode: Designed for quiet and comfortable overnight operation. The temperature will automatically increase by 1.8℉/1℃ per hour to prevent overcooling. Operates with low noise levels (≤ 60 dB).

Figure 6: Multiple operating modes for various needs.
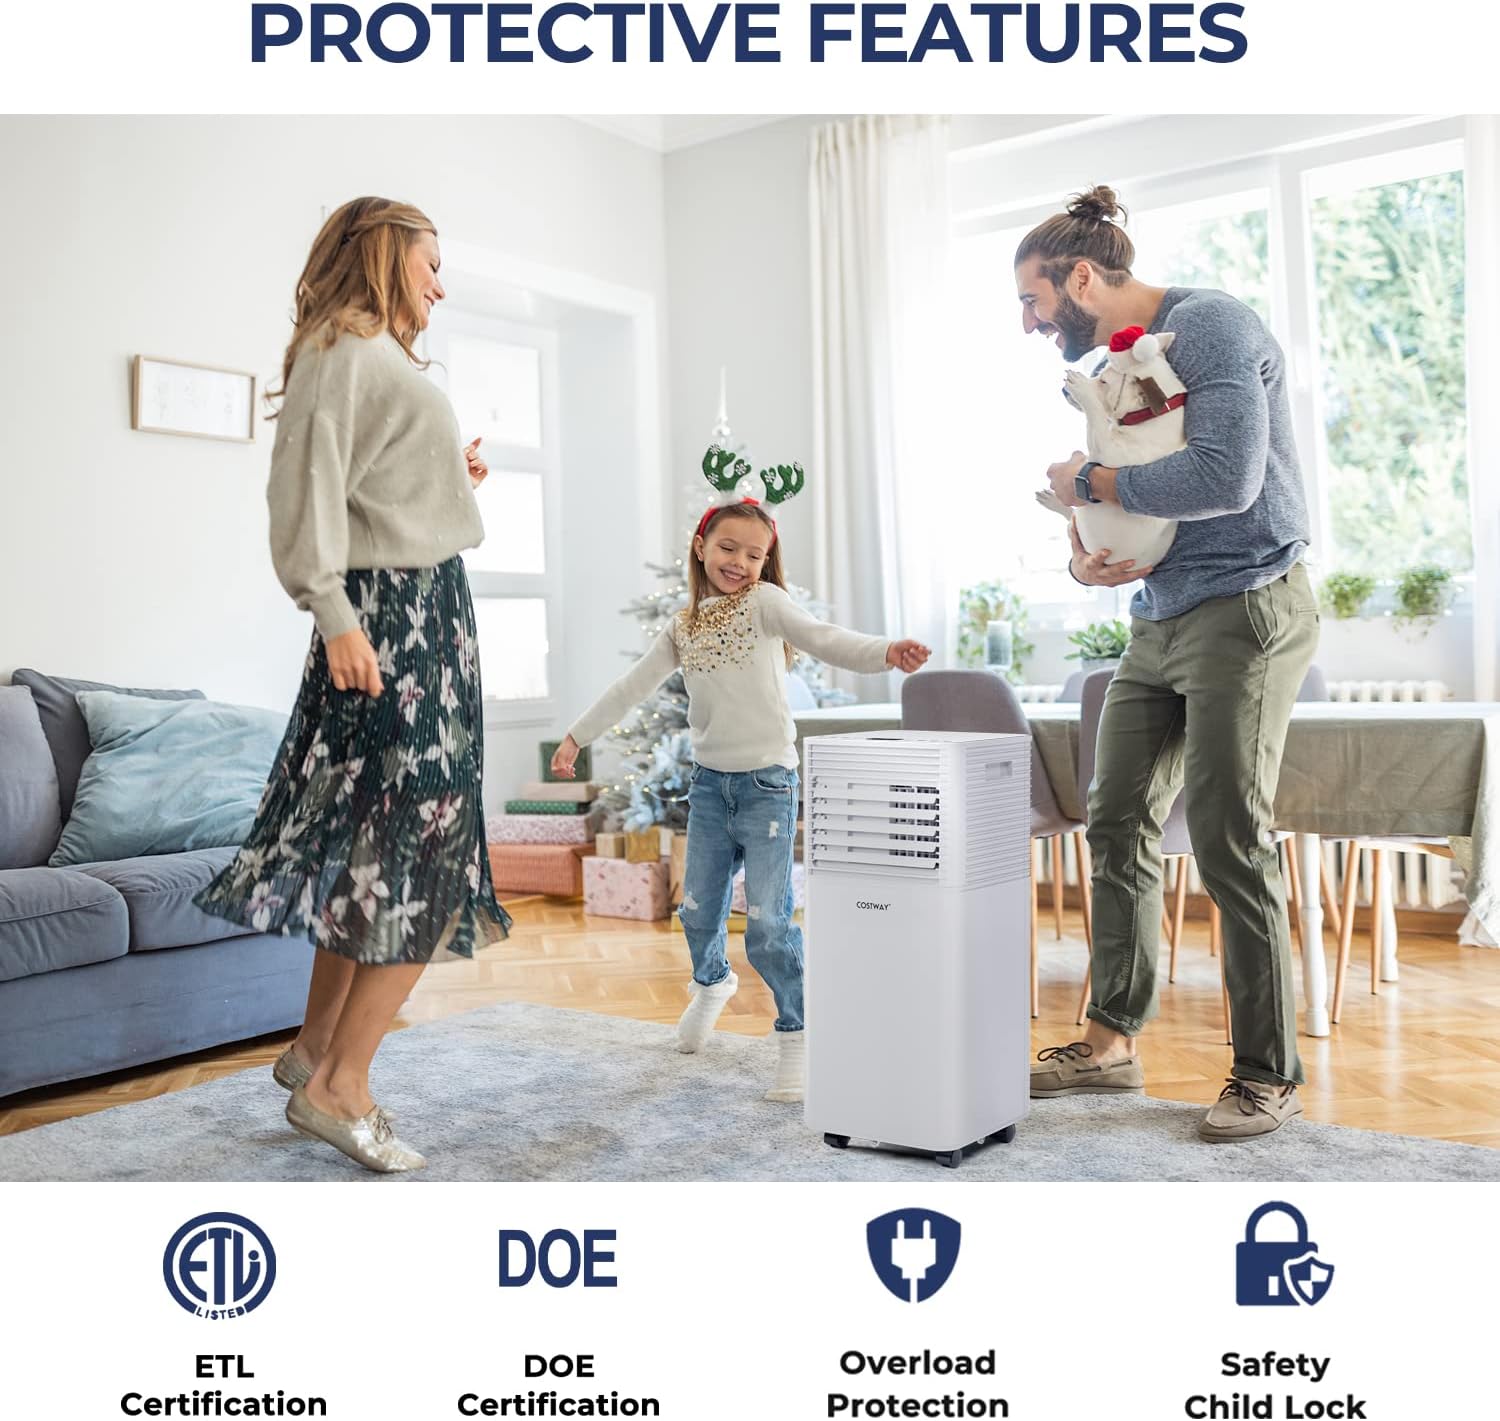
Figure 7: Features of the Humanized Sleep Mode for comfortable rest.
6. Controls and Display
The unit can be operated using the intuitive control panel on top or the included remote control.
Control Panel Buttons:
- Power: Turns the unit On/Off.
- Mode: Cycles through Cooling, Ventilating, Drying, and Sleep modes.
- Speed: Adjusts fan speed between High and Low.
- Up/Down Arrows: Adjusts desired temperature or timer settings.
- Timer: Sets the auto On/Off timer (1-24 hours).
- Sleep: Activates Sleep Mode for quiet, energy-saving operation.
- Lock: Engages child lock to prevent accidental changes to settings.
Remote Control:
The remote control provides convenient operation from up to 16.5 feet away, allowing you to adjust settings without needing to approach the unit.

Figure 8: Control panel and remote for convenient operation.
7. Maintenance
Regular maintenance ensures optimal performance and longevity of your air conditioner.
Filter Cleaning:
The unit features a high-density filtration system to eliminate dust. The filter should be cleaned regularly, especially with daily use, to maintain air quality and efficiency. Simply remove the filter, rinse it under running water, allow it to dry completely, and then reinsert it.
Water Drainage:
During dehumidifying operation, water collects in the internal tank. The unit will stop when the tank is full. You can manually drain the water using the drainage hole at the bottom, or attach the provided drainage hose for continuous drainage into a suitable container.

Figure 9: Internal components showing filtration and drainage.

Figure 10: Efficient filtration system and water tank.
8. Troubleshooting
| Problem | Possible Cause | Solution |
|---|---|---|
| Unit does not turn on. | No power, power cord unplugged, water tank full. | Check power outlet, ensure cord is plugged in, drain water tank. |
| Not blowing cold air. | Temperature setting too high, exhaust hose not properly installed, dirty filter. | Ensure temperature is lower than room temperature. Verify exhaust pipe is installed and sealed. Clean the air filter. |
| Unit is noisy. | Unit not on a flat surface, fan speed too high. | Place unit on a stable, flat surface. Reduce fan speed. |
| Water leaking. | Drainage plug not secured, drainage hose improperly connected. | Ensure drainage plug is tightly closed. Reconnect drainage hose securely. |
For further assistance, please refer to the contact information in the Warranty & Support section.
9. Specifications
| Feature | Specification |
|---|---|
| Model Number | FP10111US-WH |
| Cooling Power | 10000 BTU |
| Coverage Area | Up to 350 sq. ft. |
| Dimensions (D x W x H) | 12"D x 12.5"W x 27.5"H |
| Item Weight | 45 pounds |
| Voltage | 110 Volts (AC) |
| Wattage | 960 watts |
| Noise Level | 60 dB |
| Refrigerant | R-410A |
| Timer | 1-24 hours |
| Temperature Range | 60.8℉ - 89.6℉ |
| Certifications | ETL, DOE |
Figure 11: Detailed product specifications.
10. Warranty and Support
COSTWAY products are designed and manufactured to the highest quality standards. This portable air conditioner has passed ETL and DOE tests, ensuring its quality and safety.
For any product inquiries, technical support, or warranty claims, please contact COSTWAY customer support directly. Refer to the contact information provided on the product packaging or the official COSTWAY website.
Please retain your purchase receipt as proof of purchase for warranty purposes.
Ask a question about this manual
Ask about setup, troubleshooting, compatibility, parts, safety, or missing instructions. Manuals+ will review the question and use this page’s manual context to help answer it.