1. Introduction
This manual provides detailed instructions for the installation, operation, and maintenance of your MAXSUN Z690 iCraft WiFi Gaming PC Motherboard. Please read this manual thoroughly before proceeding with installation to ensure proper setup and optimal performance.
The MAXSUN Z690 iCraft WiFi motherboard supports 12th and 13th Gen Intel Core, Pentium, and Celeron processors with an LGA 1700 socket. It features 19+1 power stages, DDR5 memory support, PCIe 5.0 x16, dual 2.5G LAN, quad M.2 slots, and integrated ARGB lighting.

Figure 1: Top view of the MAXSUN Z690 iCraft WiFi Motherboard.
2. Setup and Installation
2.1. CPU Installation
Ensure the motherboard is placed on a non-conductive surface. Open the LGA 1700 CPU socket lever, align the CPU with the socket's notches, and gently place it into the socket. Close the lever to secure the CPU.
2.2. RAM (DDR5) Installation
This motherboard supports DDR5 memory across four DIMM slots, with a maximum capacity of 128 GB and speeds up to 6000+ MHz. Open the clips on both ends of the DIMM slot, align the memory module with the slot key, and press down firmly until the clips snap into place.
2.3. Storage Device Installation
The motherboard features four M.2 SSD PCIe 4.0x4 connectors. Install M.2 SSDs by inserting them into the appropriate slot and securing them with the provided screw or latch mechanism. For SATA drives, connect them to the four available SATA ports.
2.4. PCIe Expansion Cards
Install graphics cards or other expansion cards into the PCIe 5.0 x16 slot or other PCIe 3.0 x1/x4 slots. Ensure the card is seated correctly and secured with a screw to the chassis.
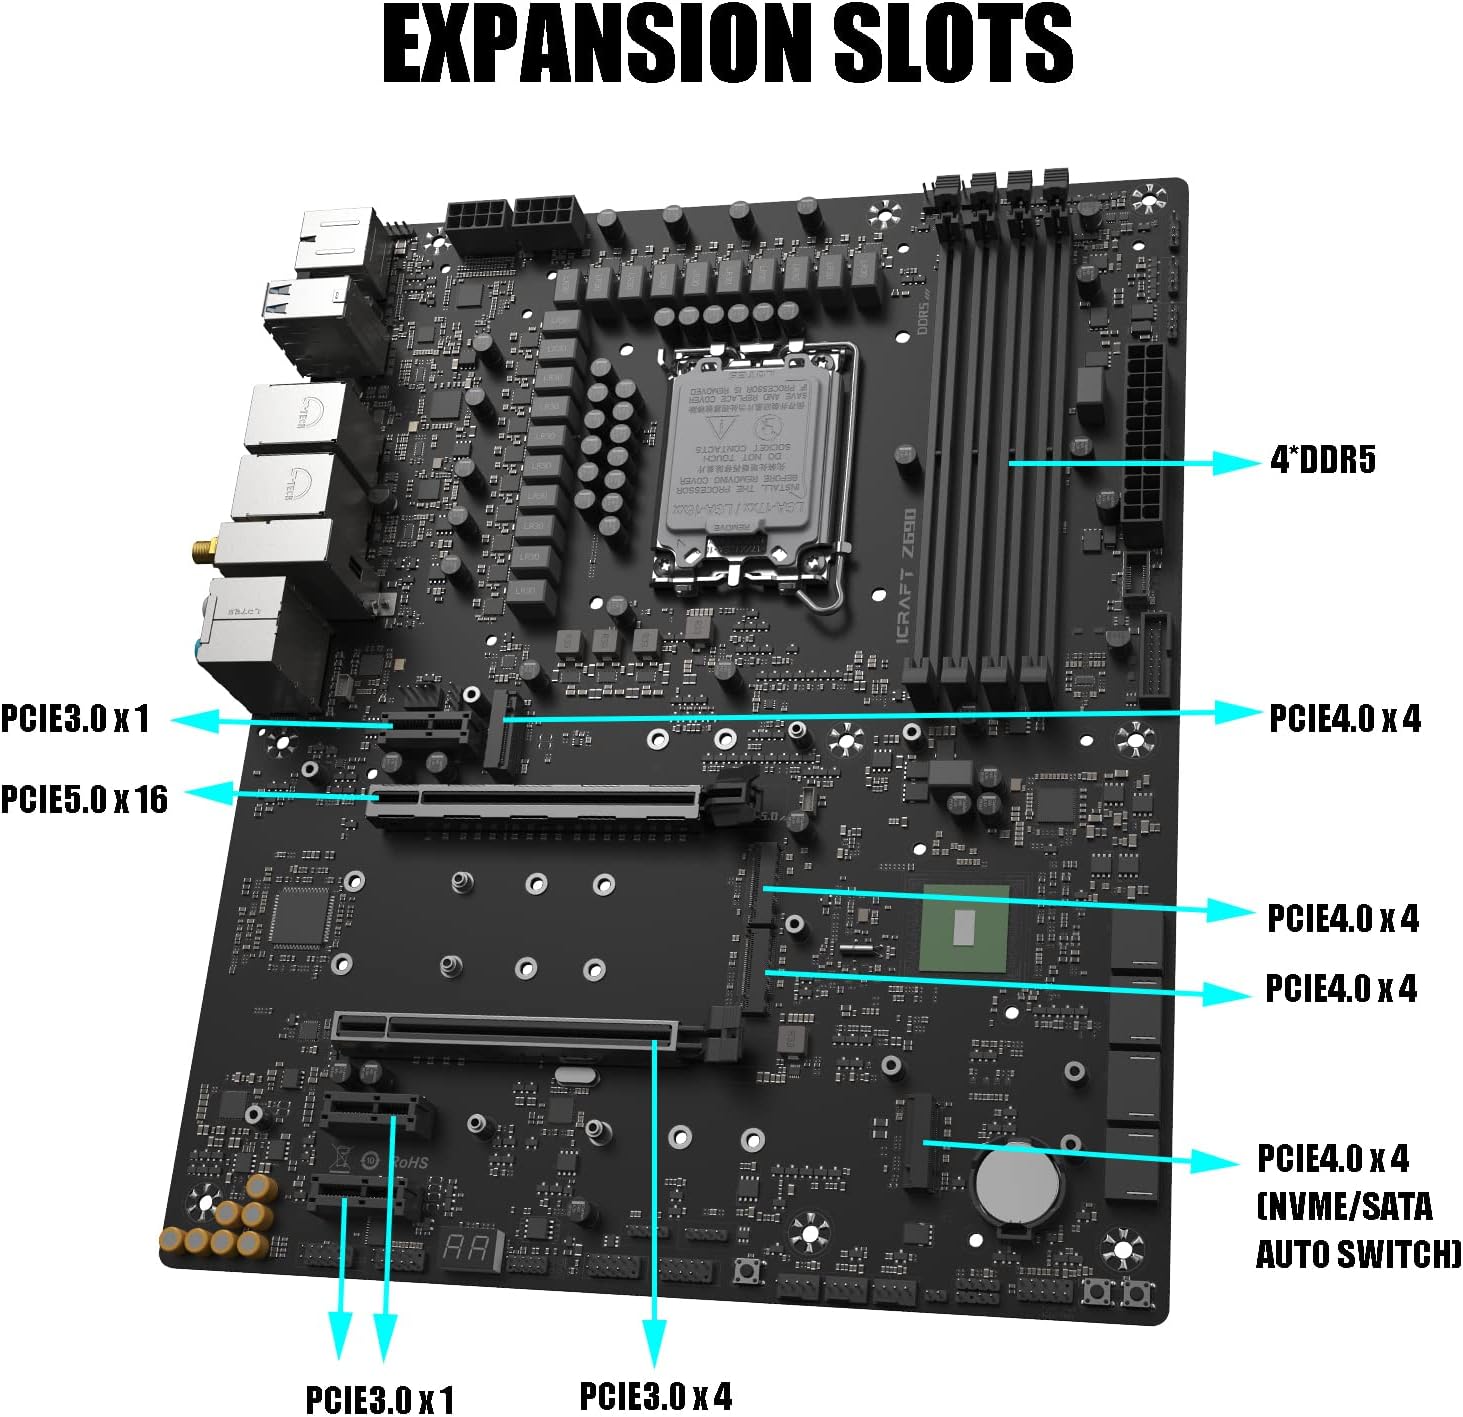
Figure 2: Overview of expansion slots including 4 DDR5, PCIe 5.0 x16, and multiple PCIe 4.0 x4 and PCIe 3.0 x1 slots.
2.5. Power Connections
Connect the 24-pin ATX main power connector and the 8-pin CPU power connector(s) from your power supply to the corresponding ports on the motherboard. This motherboard features 19+1 power stages for stable power delivery.

Figure 3: Motherboard highlighting the large heatsink, 19+1 power stage, and Skylight RGB areas.
2.6. I/O Panel Connections
Connect peripherals to the rear I/O panel. Available ports include USB 3.2, HDMI 2.0, DisplayPort 1.4, dual 2.5G Ethernet, and 7.1 Channel HD Audio jacks. Ensure all cables are securely connected.

Figure 4: Rear I/O panel with various USB, display, network, and audio ports.
2.7. ARGB Lighting
The motherboard includes iCraft Sky Light RGB with 2x ARGB (3-pin, 5V) and 1x NRGB (4-pin, 12V) headers. Connect compatible RGB devices to these headers. Lighting effects can be controlled via onboard buttons or dedicated software.
3. Operating Instructions
After completing all hardware installations, connect your display, keyboard, and mouse. Power on your system. The motherboard will initiate the boot process. To access the BIOS/UEFI setup, repeatedly press the Delete key during startup.
4. BIOS Update Procedure
Updating the BIOS can improve system stability, compatibility, and performance. Follow these steps carefully. It is recommended to watch the accompanying video for a visual guide.
- Prepare a USB storage device: Format a USB drive to FAT32. Other boot disk types like PE or DOC are not supported for this process.
- Download BIOS file: Visit the MAXSUN support site (www.maxsun.com.cn/en/) to download and unzip the latest BIOS file for your Z690 iCraft WiFi motherboard.
- Copy EFI folder: Copy the entire extracted EFI folder to the root directory of your prepared USB storage device.
- Remove hard drives: Before updating the BIOS, remove all hard drives, including M.2 and SATA SSDs, from the motherboard.
- Insert USB and enter BIOS: Insert your USB storage device into a USB port on the motherboard. Power on the system and repeatedly press the Delete key to enter the BIOS interface.
- Load optimized defaults and disable Flash Write Protect: In the BIOS, press F9 and then Enter to load optimized defaults. Navigate to the "Startup" section and disable "Flash Write Protect". Then, press F10 and Enter to save and reset.
- Select USB boot option: After the system restarts, repeatedly press the F11 key to enter the boot device selection menu. Select the USB storage device boot option starting with "UEFI:".
- Automatic BIOS update: The system will automatically execute the program to update the BIOS.
- Unplug USB: When the screen displays "FS0:\EFI\BOOT>" or "FPT Operation Successful", unplug your USB storage device. The system will repeat the update if the USB remains connected.
- Restart and enter new BIOS: Press Ctrl+Alt+Delete at the same time. The system will automatically restart and enter the new BIOS.
- Load optimized defaults in new BIOS: In the new BIOS, press F9 and Enter to load optimized defaults. Then press F10 and Enter to save and reset.
Important: Do not interrupt the power supply during the BIOS update process. This can cause irreversible damage to the motherboard.
Video 1: How to update BIOS for MAXSUN Motherboard. This video provides a step-by-step visual guide for updating the BIOS using a USB drive.
5. Maintenance
Regular maintenance helps prolong the life and performance of your motherboard. Keep the system clean by regularly removing dust from components and cooling fans using compressed air. Ensure proper airflow within your PC case. Periodically check for and install the latest BIOS and driver updates from the MAXSUN support website to maintain optimal system compatibility and performance.
6. Troubleshooting
If you encounter issues with your MAXSUN Z690 iCraft WiFi motherboard, consider the following troubleshooting steps:
- No Power/No Boot: Verify all power connections (24-pin ATX, 8-pin CPU) are securely seated. Check if the power supply is functioning correctly. Ensure the CPU, RAM, and graphics card are properly installed.
- System Instability/Crashes: This can often be related to RAM. Try reseating memory modules or testing them individually. Ensure your CPU cooler is properly installed and making good contact. Check for overheating.
- Failure to Detect SSD/HDD: Ensure SATA data and power cables are securely connected. For M.2 drives, confirm they are fully seated and secured. Check BIOS settings to ensure storage controllers are enabled and drives are recognized.
- Accidental CMOS Reset: Some users have reported accidental CMOS resets when plugging/unplugging USB devices from the top row of the back panel. If this occurs, reconfigure your BIOS settings as needed.
- BIOS Update Issues: If a BIOS update fails or causes issues, ensure you followed all steps precisely, especially regarding USB formatting and disabling "Flash Write Protect". Refer to the BIOS update video for guidance.
- Peripheral Recognition: If a USB device or other peripheral is not recognized, try different ports or ensure necessary drivers are installed.
For complex issues, consult the MAXSUN support website or contact technical support.
7. Specifications
| Feature | Detail |
|---|---|
| Brand | MAXSUN |
| Model Name | MS-iCraft Z690 WIFI |
| CPU Socket | LGA 1700 |
| Compatible Processors | 12th & 13th Gen Intel Pentium / Celeron / Core Processors |
| Chipset Type | Z690 |
| RAM Memory Technology | DDR5 |
| Memory Clock Speed | 6000 MHz (Max) |
| Memory Slots Available | 4 DIMM |
| Ram Memory Maximum Size | 128 GB |
| Graphics Card Interface | Integrated, PCI Express (PCIe 5.0 x16 slot) |
| Total PCIe Ports | 8 (including PCIe 5.0 x16, PCIe 4.0 x4, PCIe 3.0 x1) |
| Total M.2 Slots | 4 (PCIe 4.0x4) |
| Total SATA Ports | 4 |
| Main Power Connector Type | 24-Pin |
| Number of Ethernet Ports | 2 (Dual 2.5G LAN) |
| Total USB Ports | 13 (including USB 3.2) |
| Total Number of HDMI Ports | 1 (HDMI 2.0) |
| DisplayPort | 1 (DP 1.4) |
| S/PDIF Connector Type | Optical |
| Platform | Windows |
| Special Features | WIFI 6E, iCraft Sky Light RGB, Active VRM Heatsink, Large M.2 Heatsink |
8. Warranty
The MAXSUN Z690 iCraft WiFi Motherboard comes with a 3-year manufacturer warranty. Please retain your proof of purchase for warranty claims. The warranty covers defects in materials and workmanship under normal use. It does not cover damage caused by improper installation, accident, abuse, misuse, natural disaster, or unauthorized modification.
9. Support
For further assistance, technical support, or driver downloads, please visit the official MAXSUN support website: www.maxsun.com.cn/en/. You can find updated drivers, BIOS versions, and additional product information there.