1. Introduction
This manual provides detailed instructions for the installation, operation, and maintenance of your TOTMOX Car Alarm System M810. This universal 12V anti-theft device is designed to enhance vehicle security with a loud horn and adjustable sensitivity. Please read this manual thoroughly before installation and use to ensure proper function and safety.
2. Product Overview
The TOTMOX Car Alarm System M810 integrates the alarm unit and horn into a single device for simplified installation. It features a 120dB 6-tone siren and 7-level adjustable sensitivity to detect disturbances.
2.1. Package Contents
- 1 x Car Alarm Horn Unit (Integrated Host Speaker)
- 2 x Remote Controls
- 1 x Wiring Harness with Inline Fuse
- 1 x User Manual

Image: The complete TOTMOX Car Alarm System package, showing the main alarm horn unit, two remote key fobs, and the instruction manual.

Image: A detailed view of the integrated alarm module circuit board located inside the horn unit, highlighting its compact design.
2.2. Key Features
- Universal Compatibility: Designed for most DC 12V vehicles.
- Integrated Design: Alarm device and units are integrated into the horn for simplified installation.
- Loud Siren: 120dB (or 125dB as per some images) 6-tone alarm speaker for effective deterrence.
- Adjustable Sensitivity: 7-level sensitivity adjustment to prevent false alarms and ensure optimal detection.
- Remote Control Operation: Two remote controls for arming, disarming, and sensitivity adjustment.
- Low Power Consumption: Efficient operation with overcurrent and low voltage protection.

Image: Illustration demonstrating the universal compatibility of the alarm system with various 12V vehicles, including sports cars, SUVs, sedans, motorcycles, trucks, and electric bikes.
3. Specifications
| Feature | Specification |
|---|---|
| Model Number | M810 / CW-8110 |
| Working Voltage | DC 12V ±3V |
| Working Current | 10A |
| Quiescent Current | 10mA |
| Power | 20W |
| Alarm Loudness | 120dB - 125dB |
| Sensitivity Levels | 7 levels |
| Remote Control Frequency | 433.92MHz |
| Maximum Range (Remote) | 328 Feet (100m) |
| Product Dimensions | 7.87 x 5.91 x 1.77 inches |
| Item Weight | 11.3 ounces |

Image: Visual representation of the alarm's sound intensity and effective range.

Image: Measurements of the remote control, showing its length (9cm / 3.54 inches), width (3cm / 1.18 inches), and thickness (1.5cm / 0.59 inches).
4. Installation Guide
The TOTMOX Car Alarm System is designed for straightforward installation. The alarm unit and control module are integrated into the horn, simplifying the wiring process.
4.1. General Installation Steps
- Choose a Location: Select a suitable location under the hood of your vehicle for the alarm horn. Ensure the bell mouth of the horn is facing downward to prevent water accumulation.
- Connect Power: Connect the red wire from the alarm system to the positive (+) terminal of your 12V car battery.
- Connect Ground: Connect the black wire from the alarm system to the negative (-) terminal of your 12V car battery or a suitable chassis ground point.
- Secure the Unit: Mount the alarm horn securely using appropriate fasteners.
- Test Functionality: After installation, test the alarm system using the remote controls to ensure it functions correctly.
Note: This alarm system primarily functions as a shock/vibration sensor and does not control door locking/unlocking mechanisms or include a panic button feature.

Image: A professional installing the car alarm system in the engine bay, demonstrating the ease of setup.

Image: Wiring diagram illustrating how to connect the red wire to the positive battery terminal and the black wire to the negative terminal. It also shows the recommended placement of the horn in the engine compartment with the bell mouth facing down.

Image: A close-up view of the alarm system's wiring connected to a 12V car battery, showing the positive and negative terminals.
5. Operating Instructions
The alarm system is operated using the provided remote controls.
5.1. Remote Control Functions

Image: Two remote controls, each featuring a lock button and an unlock button, used to operate the car alarm system.
- Arming (Lock): Press the "lock" button once. The siren will sound once, and the system will enter the anti-theft state after approximately 5 seconds.
- Disarming (Unlock): Press the "unlock" button once. The siren will sound twice, and the system will exit the anti-theft state.
- Car Search: In armed mode, pressing the "lock" button briefly may activate a car search function (siren sounds to locate the vehicle).
6. Sensitivity Adjustment
The alarm system features 7 levels of sensitivity, with the 7th level being the highest and the 1st level the lowest. The factory default setting is typically level 4.
6.1. Increasing Sensitivity
- Press and hold both the "lock" and "unlock" buttons simultaneously for 3 seconds. The horn will ring 4 times, indicating it is in the fourth sensitivity gear (level 4).
- To increase sensitivity, press the "lock" button. Each press will increase the sensitivity by one level. For example, if the horn sounds 5 times, it is at level 5. If it sounds 7 times, it is at level 7 (highest sensitivity).
- After confirming the desired sensitivity level, do not operate any button for 5 seconds, or press and hold both the "lock" and "unlock" buttons simultaneously for 3 seconds. The horn will ring 3 times, indicating that the sensitivity adjustment mode has been exited.
6.2. Reducing Sensitivity
- Press and hold both the "lock" and "unlock" buttons simultaneously for 3 seconds. The horn will ring 4 times, indicating it is in the fourth sensitivity gear (level 4).
- To reduce sensitivity, press the "unlock" button. Each press will decrease the sensitivity by one level. The lowest level is the first gear.
- After confirming the desired sensitivity level, do not operate any button for 5 seconds, or press and hold both the "lock" and "unlock" buttons simultaneously for 3 seconds. The horn will ring 3 times, indicating that the sensitivity adjustment mode has been exited.
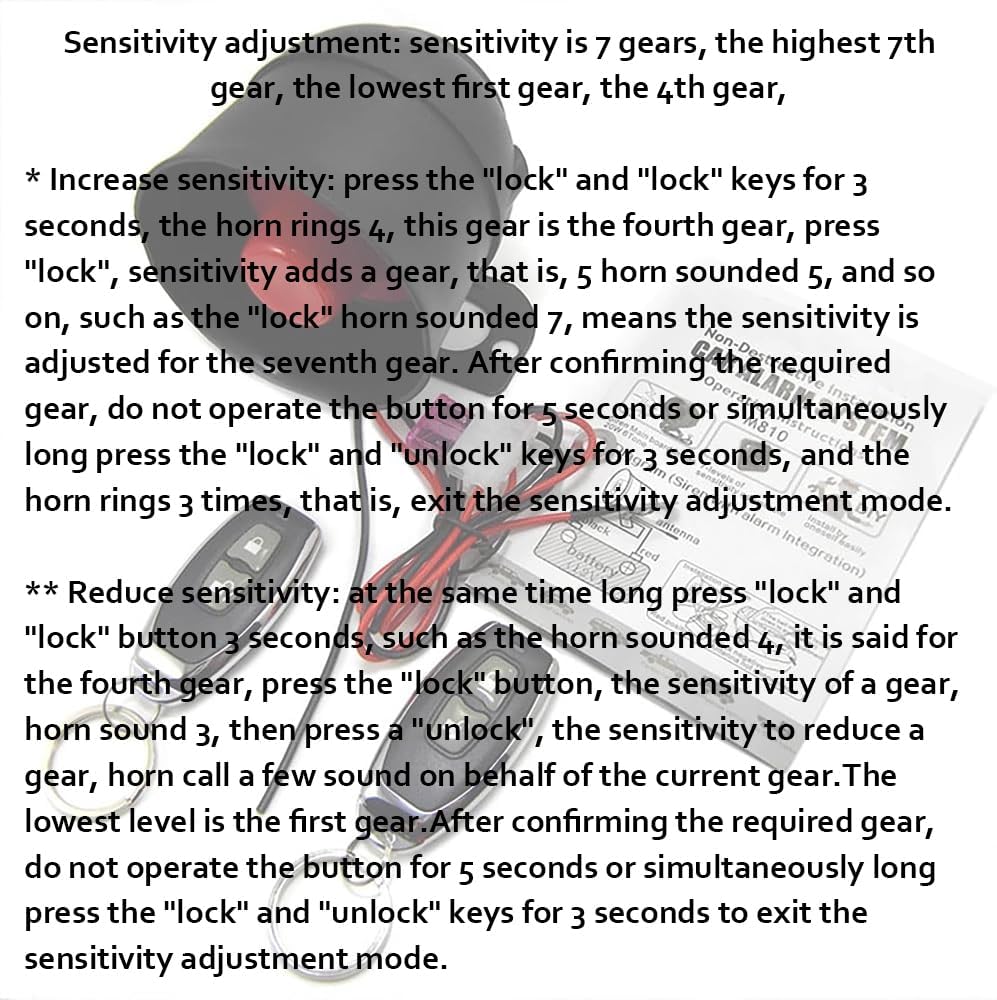
Image: A visual guide explaining how to increase and decrease the alarm's sensitivity using the remote control buttons, with specific button press sequences and horn feedback.
7. Maintenance
To ensure the longevity and optimal performance of your TOTMOX Car Alarm System, consider the following maintenance tips:
- Regular Checks: Periodically check the wiring connections to the battery to ensure they are secure and free from corrosion.
- Cleanliness: Keep the alarm horn unit clean and free from excessive dirt or debris. Avoid spraying water directly onto the unit.
- Remote Battery: If the remote control range decreases or becomes unresponsive, replace the battery in the remote control.
- Avoid Extreme Conditions: While designed for automotive use, prolonged exposure to extreme temperatures or harsh chemicals should be avoided.
8. Troubleshooting
If you encounter issues with your car alarm system, refer to the following common problems and solutions:
| Problem | Possible Cause | Solution |
|---|---|---|
| Alarm does not arm/disarm. | Remote control battery low or dead; remote out of range; wiring issue. | Replace remote battery; move closer to the vehicle; check power and ground connections. |
| Alarm triggers too frequently (false alarms). | Sensitivity setting is too high. | Reduce the sensitivity level (refer to Section 6.2). |
| Alarm does not trigger when disturbed. | Sensitivity setting is too low; unit malfunction. | Increase the sensitivity level (refer to Section 6.1); check wiring; contact support if issue persists. |
| Siren is not loud enough or does not sound. | Wiring issue; horn obstruction; unit malfunction. | Check power and ground connections; ensure horn is unobstructed; contact support. |
| Remote control buttons are unresponsive. | Remote battery low; remote damaged. | Replace remote battery; if damaged, consider replacing the remote. |
9. Warranty and Support
TOTMOX provides a 12-month warranty for this car alarm system. If you have any questions, experience issues, or require assistance, please contact TOTMOX customer support. We are committed to providing the best service, including replacement or refund for eligible issues.
For support, please refer to the contact information provided with your purchase or visit the official TOTMOX store on Amazon.