
1. Introduction
This manual provides essential instructions for the safe and effective installation, operation, and maintenance of your Alltemp Electric Water Heater Tune-Up Kit, Model EWH-03. This kit is designed to replace critical components in most electric water heaters, helping to restore efficient operation.
2. Safety Information
WARNING: Electric water heater maintenance involves working with electricity and hot water. Failure to follow these safety instructions can result in electric shock, burns, property damage, or death.
- Disconnect Power: Always turn off the electrical power to the water heater at the circuit breaker or fuse box before performing any service or maintenance. Verify power is off using a voltage tester.
- Drain Water Heater: Before removing heating elements, completely drain the water heater tank to prevent scalding and water damage.
- Scald Hazard: Water temperatures above 120°F (49°C) can cause severe burns instantly or death from scalding. Exercise extreme caution when handling hot water or components.
- Electric Shock Hazard: Ensure all electrical connections are secure and properly insulated. Do not operate the water heater with exposed wiring.
- Professional Assistance: If you are unfamiliar with electrical wiring or plumbing, it is recommended to consult a qualified electrician or plumber for installation.
- Personal Protective Equipment: Wear appropriate safety gear, including safety glasses and gloves, during installation and maintenance.
3. Kit Components
The Alltemp Electric Water Heater Tune-Up Kit EWH-03 includes the following components:
- Two (2) 4500W 240V Water Heater Elements: High-power density copper elements with a chromed coating for durability and efficient heating.
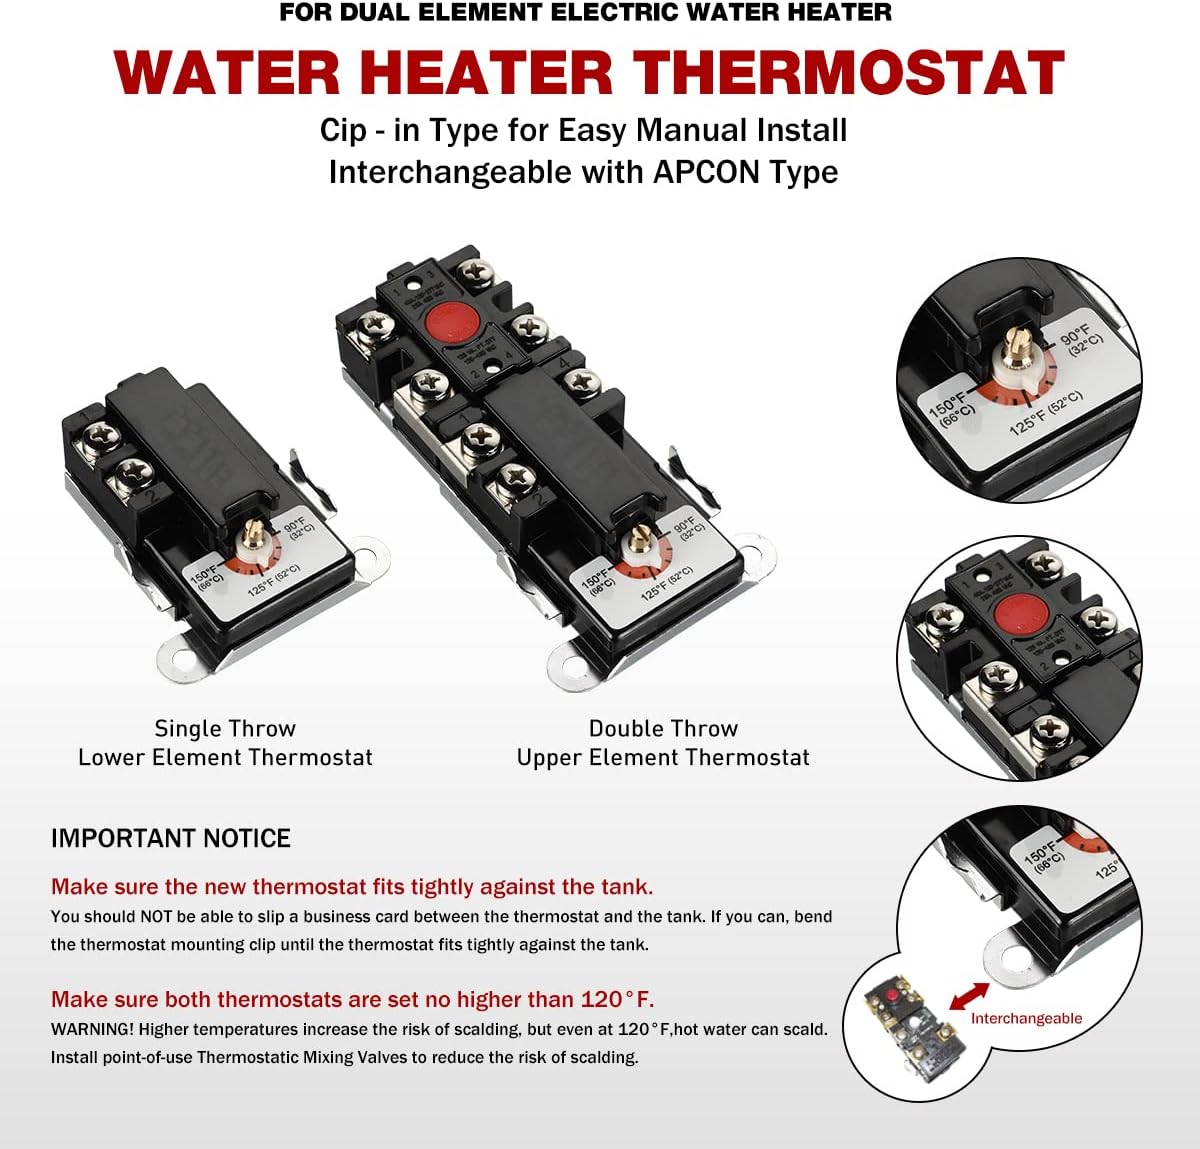
- One (1) Upper Thermostat: A Thermo-O-Disc (TOD) style thermostat, compatible with 120V to 480V systems, with a temperature adjustment range of 90°F to 150°F.
- One (1) Lower Thermostat: A Thermo-O-Disc (TOD) style thermostat, compatible with 120V to 480V systems, with a temperature adjustment range of 90°F to 150°F.
- Two (2) Protective Covers: Designed to shield electrical terminals on the thermostats.
- Two (2) Element Gaskets: For sealing the heating elements to the water heater tank.
- One (1) Element Wrench: A 10-inch zinc-plated dual hex socket wrench for installing and removing heating elements.




4. Installation Instructions
Follow these steps carefully to install the tune-up kit components:
- Power Disconnection: Locate the circuit breaker for your water heater and switch it to the OFF position. Confirm there is no power to the unit using a voltage tester.
- Water Supply Shut-off: Turn off the cold water supply valve to the water heater.
- Drain Water Heater: Connect a garden hose to the drain valve at the bottom of the water heater and direct it to a suitable drain. Open the drain valve and open a hot water faucet in your home to allow air into the tank, facilitating drainage. Allow the tank to drain completely.
- Access Components: Remove the access panels covering the heating elements and thermostats. Carefully remove the terminal covers from the thermostats. Note the wiring configuration before disconnecting any wires.
- Remove Old Elements: Use the provided element wrench to loosen and remove the old heating elements. Be prepared for residual water. Remove and discard the old elements and gaskets.
- Install New Elements: Place a new gasket onto each new heating element. Insert the new elements into the tank openings and hand-tighten. Use the element wrench to securely tighten the elements. Do not overtighten.
- Remove Old Thermostats: Disconnect the wiring from the old thermostats and carefully remove them.
- Install New Thermostats: Install the new upper and lower thermostats. Ensure each thermostat fits tightly against the tank. If necessary, gently bend the mounting clips to achieve a snug fit.
- Wiring Connections: Reconnect the electrical wiring to the new thermostats, ensuring all connections are secure and match the original configuration. Refer to your water heater's wiring diagram if unsure.
- Install Protective Covers: Place the new protective covers over the thermostat terminals. Ensure they are securely latched.
- Refill Water Heater: Close the drain valve and remove the garden hose. Close the hot water faucet you opened earlier. Open the cold water supply valve to the water heater. Allow the tank to fill completely. Once water flows steadily from a hot water faucet in your home, the tank is full and air has been purged. Close the hot water faucet.
- Restore Power: Replace the access panels. Return to the circuit breaker and switch the power to the water heater to the ON position.
The water heater will now begin heating water. Allow sufficient time for the water to reach the desired temperature.
5. Operating Instructions
The thermostats in this kit allow for temperature adjustment. The recommended temperature setting for most households is 120°F (49°C) to balance comfort and energy efficiency while minimizing the risk of scalding. Temperatures above 120°F significantly increase the risk of severe burns.
- Temperature Adjustment: To adjust the temperature, carefully remove the protective cover from the thermostat (after disconnecting power). Use a flat-head screwdriver to turn the adjustment dial to your desired setting within the 90°F to 150°F range.
- Safety Precaution: If setting the temperature above 120°F, consider installing point-of-use thermostatic mixing valves to reduce the risk of scalding at faucets.
6. Maintenance
Regular maintenance helps prolong the life and efficiency of your water heater. While this kit replaces key components, general water heater maintenance is still important.
- Annual Flushing: Drain and flush your water heater annually to remove sediment buildup, which can reduce efficiency and shorten the life of elements.
- Anode Rod Inspection: Inspect the anode rod every 3-5 years (or more frequently in areas with hard water) and replace it if significantly corroded.
- Element and Thermostat Check: Periodically inspect elements and thermostats for signs of wear or damage. If issues arise, refer to the troubleshooting section.
7. Troubleshooting
If your water heater is not functioning correctly after installing the tune-up kit, consider the following common issues:
- No Hot Water or Insufficient Hot Water:
- Verify power is supplied to the water heater at the circuit breaker.
- Check thermostat settings; ensure they are set to a desired temperature (e.g., 120°F).
- Inspect wiring connections for looseness or damage.
- Test heating elements for continuity. A lack of continuity indicates a faulty element.
- Check thermostats for proper function. If a thermostat is not cycling correctly, it may need replacement.
- Circuit Breaker Trips:
- This often indicates a short circuit. Disconnect power and inspect elements for signs of burning or damage.
- Check for any exposed wiring or improper connections that could be causing a short.
- A faulty element or thermostat can cause a breaker to trip.
- Water Leakage:
- Ensure heating element gaskets are properly seated and elements are tightened securely.
- Inspect the tank for any new leaks, which may indicate a tank issue rather than a component issue.
For persistent issues, consult a qualified professional.
8. Specifications
| Feature | Specification |
|---|---|
| Brand | Alltemp |
| Model Number | EWH-03 |
| Heating Element Wattage | 4500 watts |
| Voltage Compatibility | 240 Volts, 480 Volts |
| Maximum Temperature (Thermostat) | 150°F (65.5°C) |
| Thermostat Adjustment Range | 90°F - 150°F |
| Element Material | Copper with Chromed Coating |
| Thermostat Style | TOD Style (interchangeable with Apcom Style) |
| Element Wrench Size | 1-1/2" (elements), 1-1/16" (anode rods) |
| Item Weight | 1.83 pounds |
| Kit Dimensions (Approximate) | 17.24"W x 17.24"H |
9. Warranty and Support
Alltemp is committed to providing high-quality appliance parts. If you encounter any quality issues with your Electric Water Heater Tune-Up Kit EWH-03, please contact customer support through the Amazon platform where the purchase was made. Our support team will assist you in resolving the issue.