Introduction
This manual provides detailed instructions for the safe and effective operation, maintenance, and troubleshooting of your Huepar Tools Heat Gun, Model HG01. This hot air gun is designed for various applications including defrosting water pipes, softening plastic pipes, drying paint, shrinking PVC, and loosening rusted bolts. It features an LCD digital display for precise temperature and airflow control, fast heating, and overload protection for enhanced durability and safety.
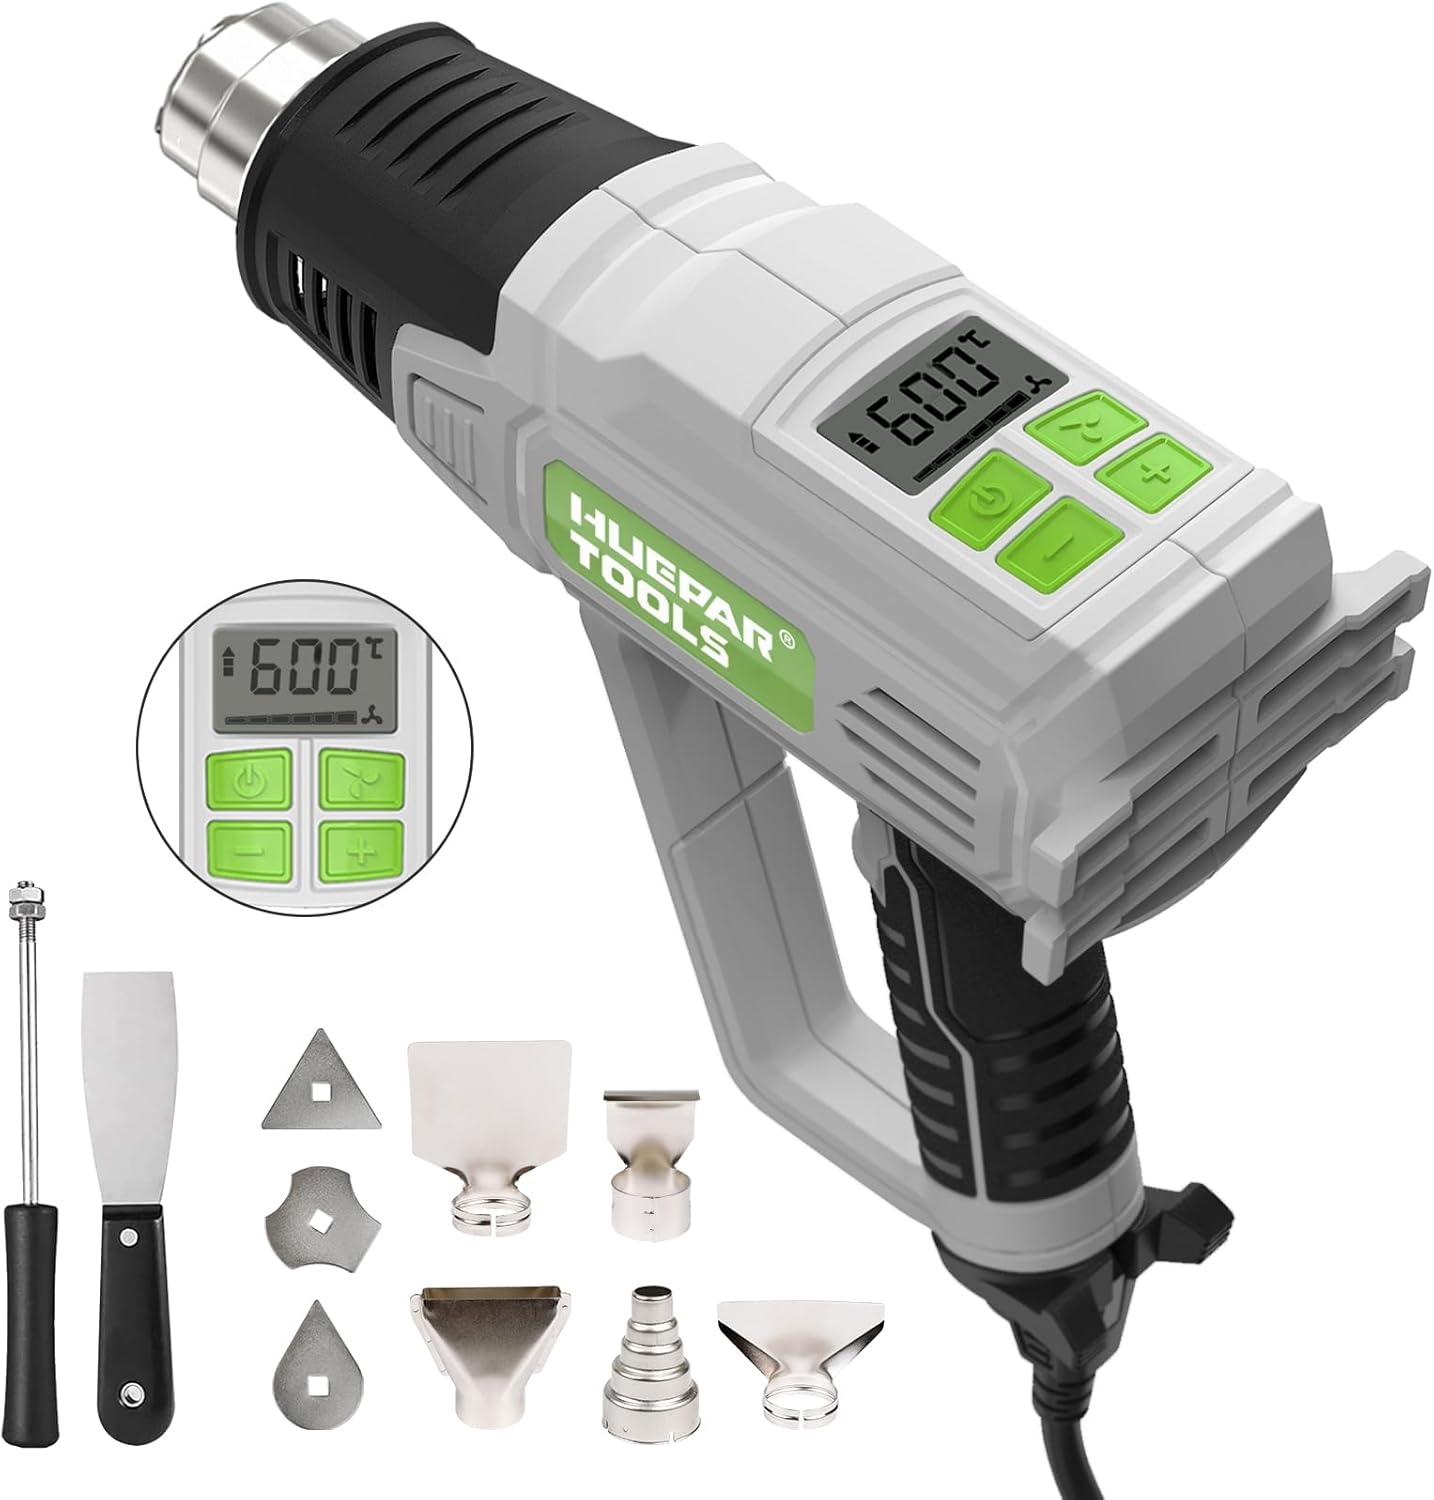
Figure 1: Huepar Tools Heat Gun HG01 and included accessories. The image displays the heat gun along with various nozzles and scrapers, highlighting its comprehensive kit.
Safety Information
Always prioritize safety when operating any power tool. Failure to follow these instructions may result in electric shock, fire, and/or serious injury. This section provides general safety guidelines. For comprehensive safety information, always refer to the full safety manual included with your product.
- Read All Instructions: Before using the heat gun, read and understand all safety warnings, instructions, illustrations, and specifications provided with the product.
- Personal Safety: Always wear appropriate personal protective equipment (PPE), including safety glasses, gloves, and respiratory protection, especially when working with materials that may release fumes.
- Work Area: Ensure the work area is well-ventilated and free from flammable materials. The heat gun produces high temperatures.
- Electrical Safety: Do not expose the heat gun to rain or wet conditions. Do not abuse the cord. Keep the cord away from heat, oil, sharp edges, or moving parts.
- Cool Down: Allow the heat gun to cool down completely before storing. The unit features an automatic cool-down function after use.
- Overload Protection: The heat gun is equipped with an overload protector to prevent damage. If the tool stops working, allow it to cool before attempting to restart.
Product Overview
The Huepar Tools Heat Gun HG01 is designed for precision and versatility. Familiarize yourself with its components and controls.
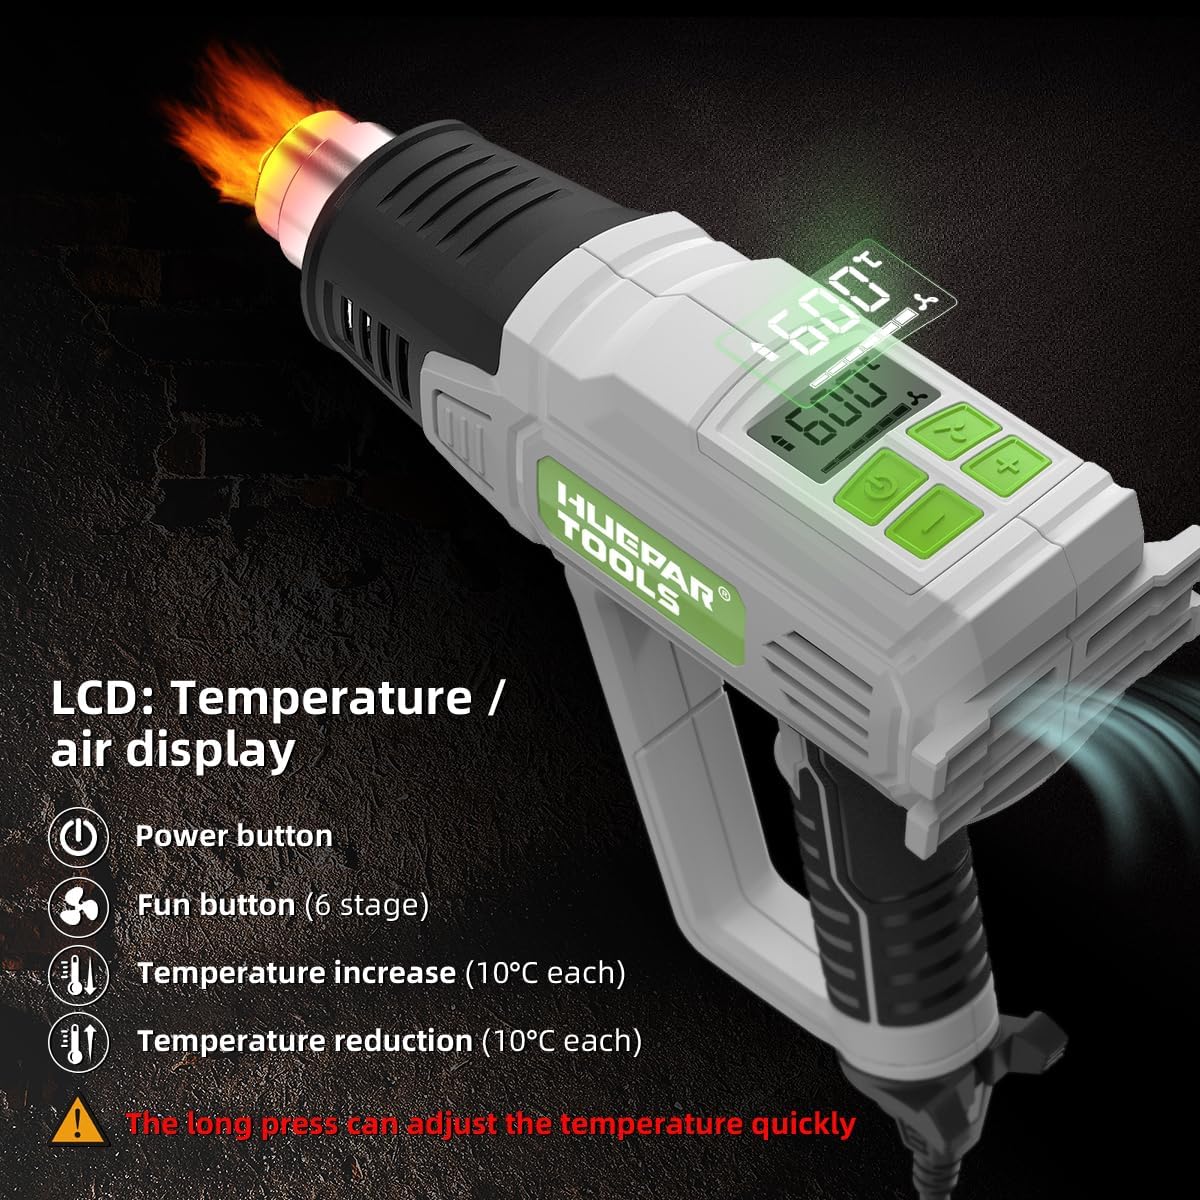
Figure 2: LCD Digital Display and Control Buttons. This image illustrates the power button, fan speed adjustment, and temperature increase/decrease buttons, along with the LCD screen showing temperature and airflow settings.
Key Components:
- LCD Digital Display: Shows real-time temperature and air volume.
- Control Buttons:
- Power Button: Turns the unit on/off.
- Fan Button: Adjusts air flow through six stages.
- Temperature Increase/Decrease Buttons: Adjusts temperature in 10-degree increments. Long press for quick adjustment.
- Nozzle: The heat output end where various accessories can be attached.
- Ergonomic Handle: Features a silicone non-slip grip for comfortable and secure handling.
- Detachable Power Cord: 1.8 meters in length for flexible use.
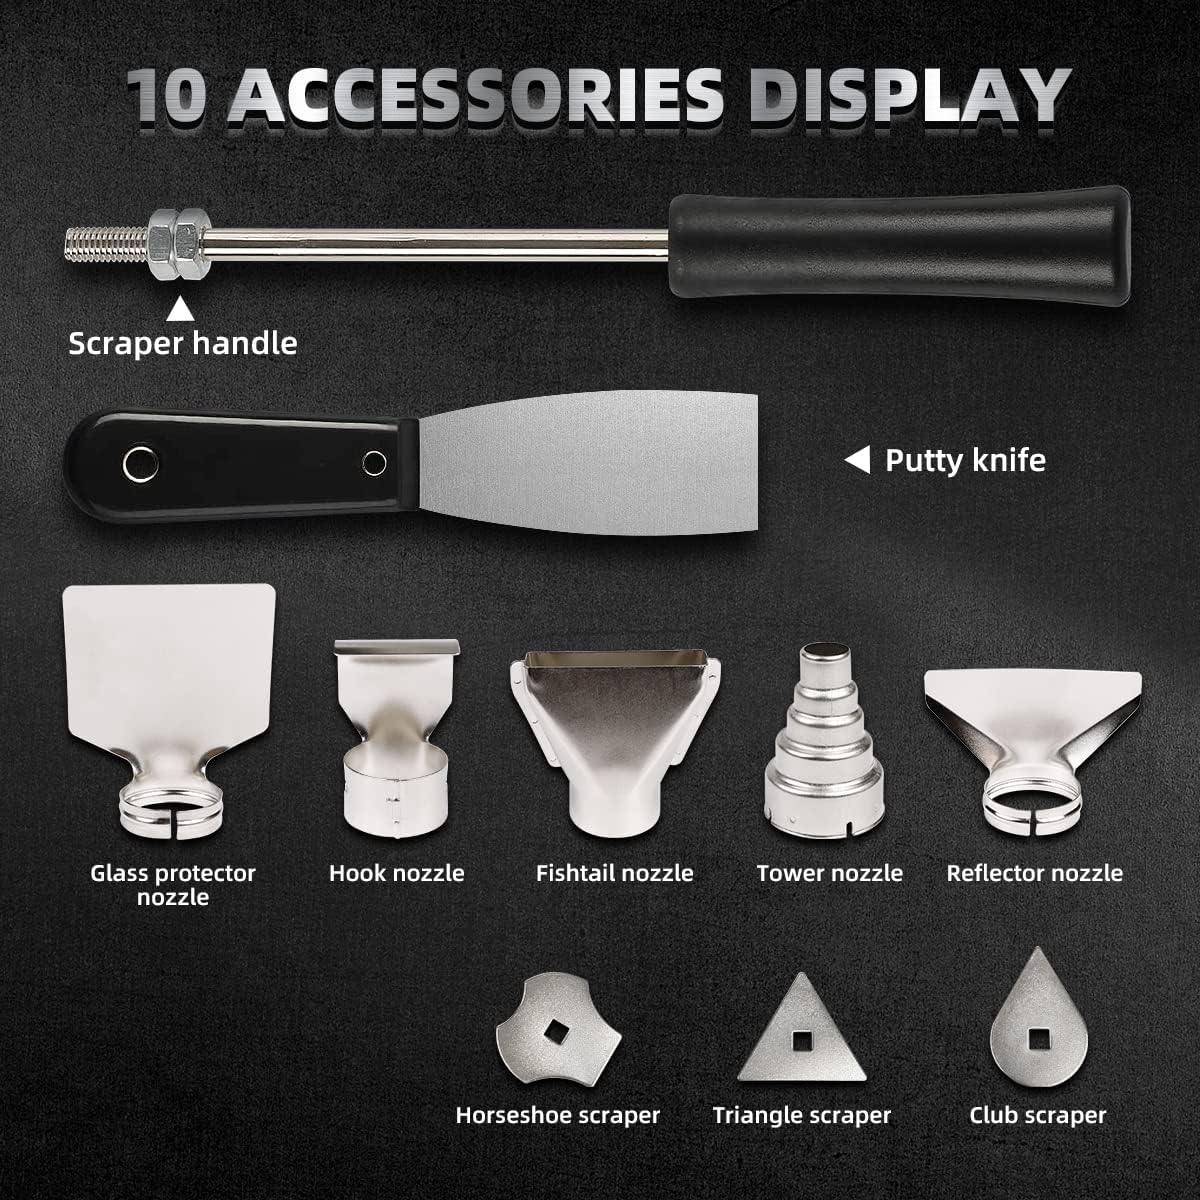
Figure 3: Included Accessories. This image showcases the variety of nozzles (tower, reflector, glass protector, fishtail, hook) and scrapers (triangle, club, horseshoe, putty knife with handle) that come with the heat gun, designed for diverse applications.
Included Accessories:
- Nozzles: Tower nozzle, Reflector nozzle, Glass protector nozzle, Fishtail nozzle, Hook nozzle.
- Scrapers: Triangle scraper, Club scraper, Horseshoe scraper, Putty knife with scraper handle.
Setup
- Unpacking: Carefully remove the heat gun and all accessories from the packaging. Inspect for any damage.
- Power Connection: Ensure the power cord is securely connected to the heat gun. Plug the heat gun into a standard 120V AC power outlet.
- Nozzle Attachment: Select the appropriate nozzle for your task and securely attach it to the heat gun's output end. Ensure it is firmly seated before operation.
- Work Area Preparation: Prepare your work area by ensuring it is clean, well-ventilated, and free from flammable materials. Place the heat gun on a stable, heat-resistant surface when not in hand. The unit features a back-to-stand design for safe cooling.

Figure 4: Back-to-Stand Design and Detachable Power Cord. This image highlights the heat gun's stable design for safe cooling and the 1.8m detachable power cord, emphasizing convenience and safety.
Operating Instructions
- Power On: Press the power button to turn on the heat gun. The LCD display will illuminate, showing the current temperature and airflow settings.
- Adjusting Temperature:
- Use the + and - buttons to adjust the temperature. Each press changes the temperature by 10°F or 10°C.
- The temperature range is 122°F-1112°F (50°C-600°C).
- To switch between Fahrenheit (°F) and Celsius (°C), press and hold the + button.
- For rapid temperature adjustment, press and hold either the + or - button.
- Adjusting Airflow:
- Press the fan button to cycle through the six available airflow settings. The current airflow stage will be indicated on the LCD display.
- Application Specifics: Refer to the temperature guide below for common applications.

Figure 5: Temperature Application Guide. This chart provides recommended temperature ranges for various tasks, from defrosting water pipes to paint removal and carbonation.
Recommended Temperature Ranges for Applications Temperature Range (°C) Application 50-150°C (122-302°F) Defrost frozen water pipes, dry paint, soften plastic tubes. 230-290°C (446-554°F) Soften adhesives. 425-455°C (797-851°F) Soften solder. 480-510°C (896-950°F) Loosen rusty nuts. 500-550°C (932-1022°F) Remove paint. 550-600°C (1022-1112°F) Start qualitative change/carbonation. - Cool Down Function: After use, when the heat gun is powered off, it will automatically enter a 30-second cooling cycle. The word "COOL" and an airflow block will appear on the LCD display. Do not unplug the unit during this cycle.

Figure 6: Internal Mechanism and Safety Features. This image illustrates the fast heating element, the 30-second cool-down feature, and the overload protection mechanism, ensuring safe and efficient operation.
Applications
The Huepar Tools Heat Gun HG01 is a versatile tool suitable for a wide range of tasks. Always select the appropriate nozzle and temperature setting for your specific application.
- Defrosting: Quickly defrost frozen water pipes.
- Softening: Soften plastic pipes for bending or shaping, and soften adhesives for removal.
- Drying: Accelerate the drying process for paint, varnish, or other coatings.
- Shrinking: Ideal for shrinking PVC film, heat shrink tubing, and other shrinkable materials.
- Removal: Effectively strip old paint, loosen rusted bolts, or remove old flooring.
- Crafts: Suitable for various craft projects requiring controlled heat, such as embossing or resin curing.

Figure 7: Diverse Applications of the Heat Gun. This collage demonstrates the heat gun being used for various tasks, including paint stripping, pipe bending, and heat shrinking, showcasing its versatility.
Maintenance
Regular maintenance ensures the longevity and optimal performance of your heat gun.
- Cleaning: After each use, ensure the heat gun has cooled down completely. Wipe the exterior with a soft, damp cloth. Do not use harsh chemicals or abrasive cleaners.
- Nozzle Care: Clean any residue from the nozzles after use. Ensure they are free from blockages.
- Storage: Store the heat gun in a dry, secure location, out of reach of children. Ensure the power cord is neatly coiled and not kinked.
- Inspection: Periodically inspect the power cord for any signs of damage (cuts, fraying). If damage is found, discontinue use and have it repaired by a qualified professional.
Troubleshooting
This section addresses common issues you might encounter with your heat gun.
| Problem | Possible Cause | Solution |
|---|---|---|
| Heat gun does not turn on. | No power supply; Power button not pressed; Overload protection activated. | Check power outlet and cord connection. Ensure power button is pressed firmly. If overload protection activated, allow unit to cool down for several minutes before restarting. |
| Insufficient heat output. | Incorrect temperature setting; Airflow obstruction. | Increase temperature setting using the + button. Check nozzles and air vents for any obstructions. |
| Heat gun shuts off unexpectedly. | Overheating due to prolonged use or blocked vents; Overload protection activated. | Allow the unit to cool down. Ensure air vents are clear. Reduce usage time or adjust settings. |
| LCD display not working. | Power issue; Internal fault. | Check power connection. If the unit still functions but the display is off, contact customer support. |
Specifications
| Feature | Detail |
|---|---|
| Model Number | HG01 |
| Manufacturer | Huepar Tools |
| Power Source | AC |
| Voltage | 120 Volts |
| Wattage | 1500 Watts |
| Amperage Capacity | 12.5 Amps |
| Temperature Range | 122-1112°F (50-600°C) |
| Airflow Settings | 6 Stages |
| Display Style | LCD Digital Display |
| Cord Length | 1.8 Meters |
| Item Weight | 2.9 pounds |
| Product Dimensions | 8.2 x 3.9 x 10 inches |
| Material | Metal, Plastic |
| Special Features | Temperature & Air Flow Adjustable, Fast Heating/Cooling, Overload Protection |
Warranty and Support
Huepar Tools is committed to providing high-quality products. For any questions, concerns, or support needs, please contact Huepar Tools customer service.
- Return Policy: This product is eligible for a refund or replacement within 30 days of purchase, subject to the retailer's return policy.
- Manufacturer Support: For technical assistance or warranty claims, please visit the official Huepar Tools website or contact their customer support directly.
- Protection Plans: Extended protection plans may be available for purchase separately to cover your investment beyond the standard return period.