LOUVIXA 202
LOUVIXA Model 202 Electric Power Lift Recliner Chair User Manual
Model: 202
Introduction
Thank you for choosing the LOUVIXA Model 202 Electric Power Lift Recliner Chair. This manual provides essential information for the safe assembly, operation, and maintenance of your new recliner. Please read these instructions thoroughly before use and retain them for future reference.
Important Safety Instructions
- Weight Limit: Do not exceed the maximum weight capacity of 330 pounds (150 kg).
- Electrical Safety: Ensure all electrical connections are secure and the power cord is not pinched or damaged. Use only the provided power adapter. Unplug the chair from the power outlet before cleaning or maintenance.
- Children and Pets: Keep children and pets away from the chair's moving parts, especially during operation.
- Clearance: Ensure adequate clearance around the chair when reclining or lifting to prevent obstruction or injury.
- Stable Surface: Place the chair on a flat, stable surface.
- Medical Conditions: Consult a physician before using the massage and heat functions if you have any medical conditions, especially those related to circulation, heart, or skin sensitivity.
- Liquid Spills: Avoid spilling liquids on the chair, especially near electrical components.
Package Contents
Please verify that all components are present before beginning assembly:
- Recliner Base
- Backrest
- Left Armrest
- Right Armrest
- Power Adapter
- Power Lift Remote Control
- Massage & Heat Remote Control
- Instruction Manual
Assembly Instructions
The LOUVIXA Model 202 recliner is designed for easy assembly with no tools required. Follow these steps:
- Attach the Backrest: Slide the backrest onto the metal slots on the recliner base until it clicks securely into place.
- Attach Armrests: Slide the left and right armrests onto the corresponding metal slots on the sides of the recliner base. Ensure they are firmly seated.
- Connect Wiring: Locate the electrical wires extending from the backrest and base. Connect the corresponding wires. Ensure all connections are snug.
- Connect Power: Plug the power adapter into the chair's power input, then plug the adapter into a wall outlet.
- Secure Base (Optional): If desired, attach the stabilizing feet to the base using the provided bolts and wing nuts. This step is shown in the assembly video.
Video: LOUVIXA Recliners Lift Chairs. This video demonstrates the assembly process, including attaching the backrest and armrests, connecting wiring, and securing the base. It also shows the chair's operational features.

Image: Reinforced Steel Structure. This image highlights the robust steel frame that supports the recliner, ensuring stability and durability.
Operating Instructions
Your LOUVIXA recliner features power lift, recline, massage, and heating functions, controlled by two separate remotes.
Power Lift and Recline
Use the Power Lift Remote Control (white remote with two large buttons) to adjust the chair's position:
- Press the UP button to raise the chair to a standing assist position.
- Press the DOWN button to recline the chair or return it to the upright position.

Image: Power Lift and Recline Positions. This image illustrates the chair's range of motion, from a 45-degree lift-up position to a 150-degree recline for napping, along with positions for watching TV and reading.

Image: Elderly Assistance and USB Port. This image demonstrates how the power lift function helps elderly users stand up easily. It also shows the integrated USB charging port.
Massage and Heating Functions
Use the Massage & Heat Remote Control (black remote with body diagram) to activate these features:
- Power: Press the 'POWER' button to turn the massage and heat functions on/off.
- Massage Points: Select from 8 massage points targeting 4 available stress parts (back, lumbar, thighs, legs).
- Massage Modes: Choose from 5 massage modes (e.g., pulse, press, wave, auto, normal).
- Vibration Strength: Adjust between 2 vibration strengths (high/low).
- Heat: Activate the waist heating function by pressing the 'HEAT' button.
- Timer: Set a timer for the massage duration (e.g., 15, 30, 60 minutes).

Image: Massage & Heating Function. This image details the massage and heating features, including the remote control interface, 8 massage points, 5 modes, 2 vibration strengths, and 3 timer settings.
Video: Power Lift Chair. This video demonstrates the power lift and recline functions, as well as the massage and heat features of the chair.
USB Charging Port
A USB charging port is integrated into the power lift remote control. Connect your mobile devices to charge them while relaxing in the chair.
Side Pockets and Cup Holders
Utilize the two side pockets for storing remote controls, magazines, or other small items. The built-in cup holders on each armrest provide convenient placement for beverages.
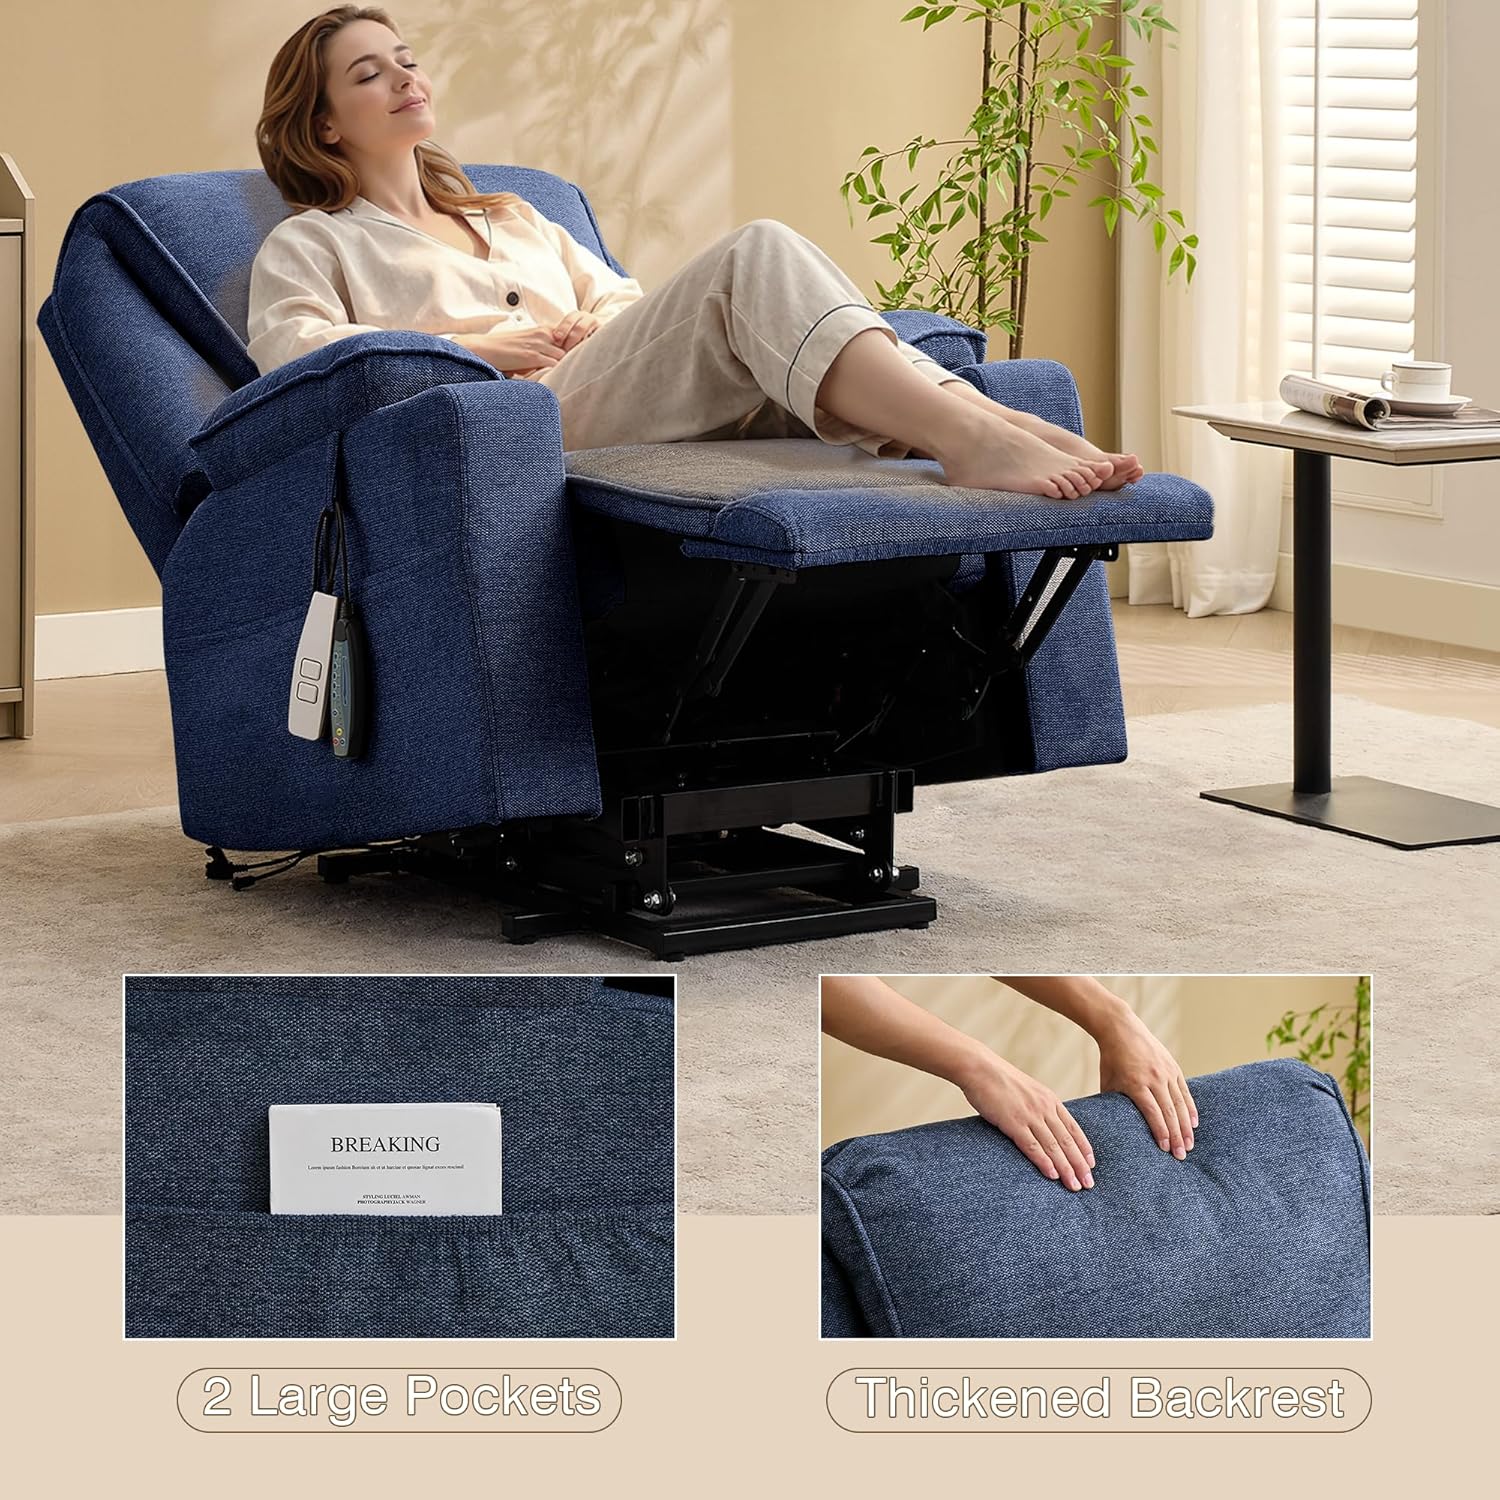
Image: Side Pockets and Thickened Backrest. This image highlights the practical side pockets for storage and the comfortable, thickened backrest design.
Image: Armrests and Cup Holders. This image showcases the soft padded wide armrests and the convenient built-in cup holder.
Maintenance
- Cleaning: Spot clean the microfiber fabric with a damp cloth and mild detergent. Avoid harsh chemicals or abrasive cleaners.
- Electrical Components: Keep all electrical components dry. Do not immerse any part of the chair in water.
- Moving Parts: Periodically check all bolts and connections to ensure they are tight. Do not lubricate moving parts unless specifically instructed.
- Storage: If storing the chair for an extended period, unplug it and cover it to protect from dust and moisture.
Troubleshooting
| Problem | Possible Cause | Solution |
|---|---|---|
| Chair does not operate (no power) | Power cord unplugged; loose connection; power outlet malfunction. | Ensure power cord is securely plugged into the chair and a working wall outlet. Check all internal wiring connections. |
| Massage/Heat function not working | Massage remote not connected; power issue; remote malfunction. | Check the connection of the massage remote. Ensure the chair has power. If issues persist, contact customer support. |
| Chair makes unusual noises | Loose bolts; obstruction in mechanism. | Check and tighten all visible bolts. Ensure no objects are obstructing the chair's moving parts. |
| USB port not charging | Chair not powered on; device cable issue. | Ensure the chair is powered on. Try a different USB cable or device to rule out cable/device issues. |
Specifications
| Feature | Detail |
|---|---|
| Brand | LOUVIXA |
| Model Name | 202 |
| Color | Navy Blue |
| Material | Microfiber (Upholstery), Sponge (Fill), Aluminum (Frame) |
| Product Dimensions (D x W x H) | 28.7"D x 32.5"W x 32.5"H |
| Item Weight | 115 Pounds |
| Maximum Weight Recommendation | 330 Pounds |
| Features | Adjustable Backrest, Arm Rest, Cup Holders, Foot Rest, Reclining, Power Lift, Massage, Heat, USB Port, Side Pockets |
| Assembly Required | Yes (Easy, no tools required) |
| Indoor/Outdoor Usage | Indoor |
| Number of Cup Holders | 1 (per armrest, total 2) |
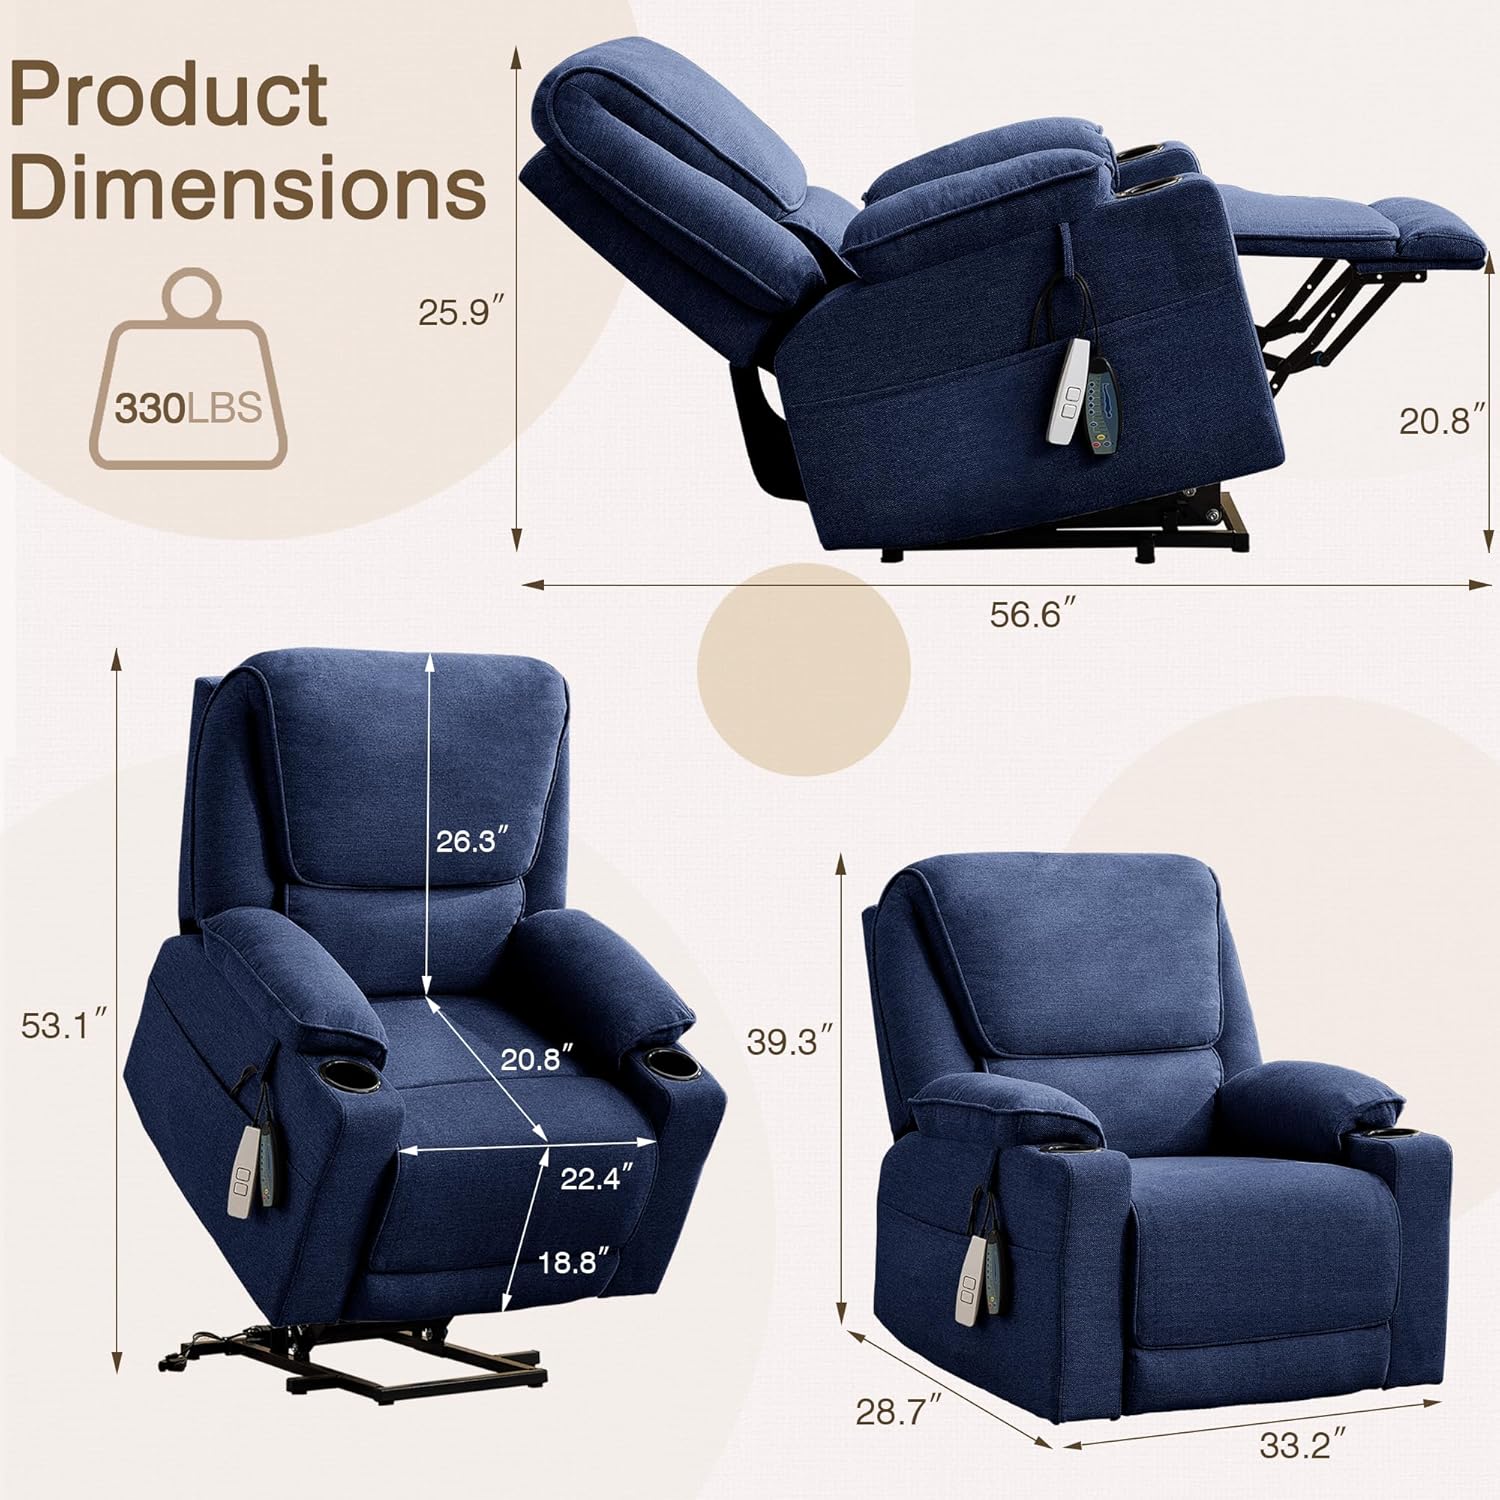
Image: Product Dimensions. This image provides a visual representation of the recliner's dimensions and its maximum weight capacity of 330 lbs.

Image: Fabric Detail. A close-up view of the breathable and skin-friendly microfiber fabric used for the recliner's upholstery.
Warranty and Support
For warranty information, technical support, or assistance with parts, please contact LOUVIXA customer service. Refer to your purchase documentation for specific warranty terms and contact details.
Manufacturer: LOUVIXA
Related Documents - 202
 |
Louvixa Manufactured Wood Open Pull Out Trash Can Assembly Instructions Step-by-step assembly guide for the Louvixa manufactured wood open pull-out trash can (20 Gallons, model auvi1007 / Trashcan02-). Includes parts list, hardware list, and detailed assembly instructions. |
 |
LOUVIXA 10 Gallon Tilt Out Trash Bin Cabinet Assembly Instructions Detailed assembly instructions for the LOUVIXA 10 Gallon Tilt Out Trash Bin Cabinet (Model 4TC6011). Includes a comprehensive parts list, hardware guide, and step-by-step visual assembly instructions for easy setup. |
 |
Legrand DPX³ 250 Thermal Magnetic Circuit Breakers - Technical Data Sheet Comprehensive technical specifications for Legrand DPX³ 250 thermal magnetic circuit breakers and DPX³-I 250 trip-free switches, detailing electrical performance, installation, dimensions, and compliance with IEC/EN standards. |
 |
Beurer MG 202 Shiatsu Massage Seat Cover User Manual Comprehensive user manual for the Beurer MG 202 Shiatsu massage seat cover. Includes safety instructions, setup, usage, and troubleshooting guidelines. |
 |
How to Change Fuel Filter on Mercedes-Benz C-Class Saloon (W202) - AUTODOC Guide Step-by-step guide from AUTODOC on how to replace the fuel filter for a Mercedes-Benz C-Class Saloon (W202). Includes tools needed, safety precautions, and detailed instructions. |
 |
Danfoss VLT MCD 202 Compact Starter: Operating Manual and Specifications Comprehensive operating instructions, specifications, wiring diagrams, and troubleshooting guide for the Danfoss VLT MCD 202 Compact Starter. Learn about installation, adjustments, and features of this motor control device. |
Ask a question about this manual
Ask about setup, troubleshooting, compatibility, parts, safety, or missing instructions. Manuals+ will review the question and use this page’s manual context to help answer it.