Sunrosa 6060C
Sunrosa Tub Shower Door Installation and User Manual
Model: 6060C | Dimensions: 58-7/8"W x 60"H
1. Important Safety Information
Please read all instructions carefully before beginning installation. Failure to follow these instructions could result in personal injury or product damage.
- Two-Person Installation: It is highly recommended that at least two people install this product due to the weight and size of the glass panels.
- Personal Protective Equipment: Always wear safety glasses and gloves during installation to protect against potential glass shards or sharp edges.
- Tempered Glass: This product features ANSI-Certified 5/16-inch (8mm) thick clear tempered glass. Tempered glass is designed to shatter into small, relatively harmless pieces upon impact, but it is still fragile at the edges. Handle with extreme care.
- Surface Preparation: Ensure all surfaces are clean, dry, and structurally sound before installation.
- Sealant Curing: Allow sufficient time for sealant to cure (typically 24 hours) before using the shower door to ensure a watertight seal.
2. Package Contents
Verify that all parts are present and undamaged before beginning assembly. If any parts are missing or damaged, please contact Sunrosa customer support.
- Tempered Glass Panels (x2)
- Top Rail
- Wall Posts (x2)
- Bottom Guide
- Door Handles/Towel Bars (x2)
- Rollers and Brackets
- Waterproof Strips/Seals
- Mounting Hardware (screws, wall anchors, washers)
- Installation Template Sticker
3. Required Tools
Gather the following tools before starting the installation process:
- Tape Measure
- Pencil
- Level
- Electric Drill
- Drill Bits (Ø6mm, Ø3.2mm)
- Rubber Mallet
- Screwdriver (Phillips head recommended)
- Utility Knife
- Caulk Gun
- Silicone Sealant (waterproof)
4. Installation Guide
This section provides detailed steps for installing your Sunrosa Tub Shower Door. For a visual guide, please refer to the official installation video below.
Official Sunrosa Installation Video: Double Sliding Shower Door. This video demonstrates the complete installation process, from measuring to final sealing, providing a helpful visual aid for each step.
4.1. Pre-Installation Measurements and Preparation
Measure Wall Width: Measure the width of your walls (L) where the shower door will be installed. Cut the top rail to the length of L-30mm. This ensures proper fit and allows for wall post installation.
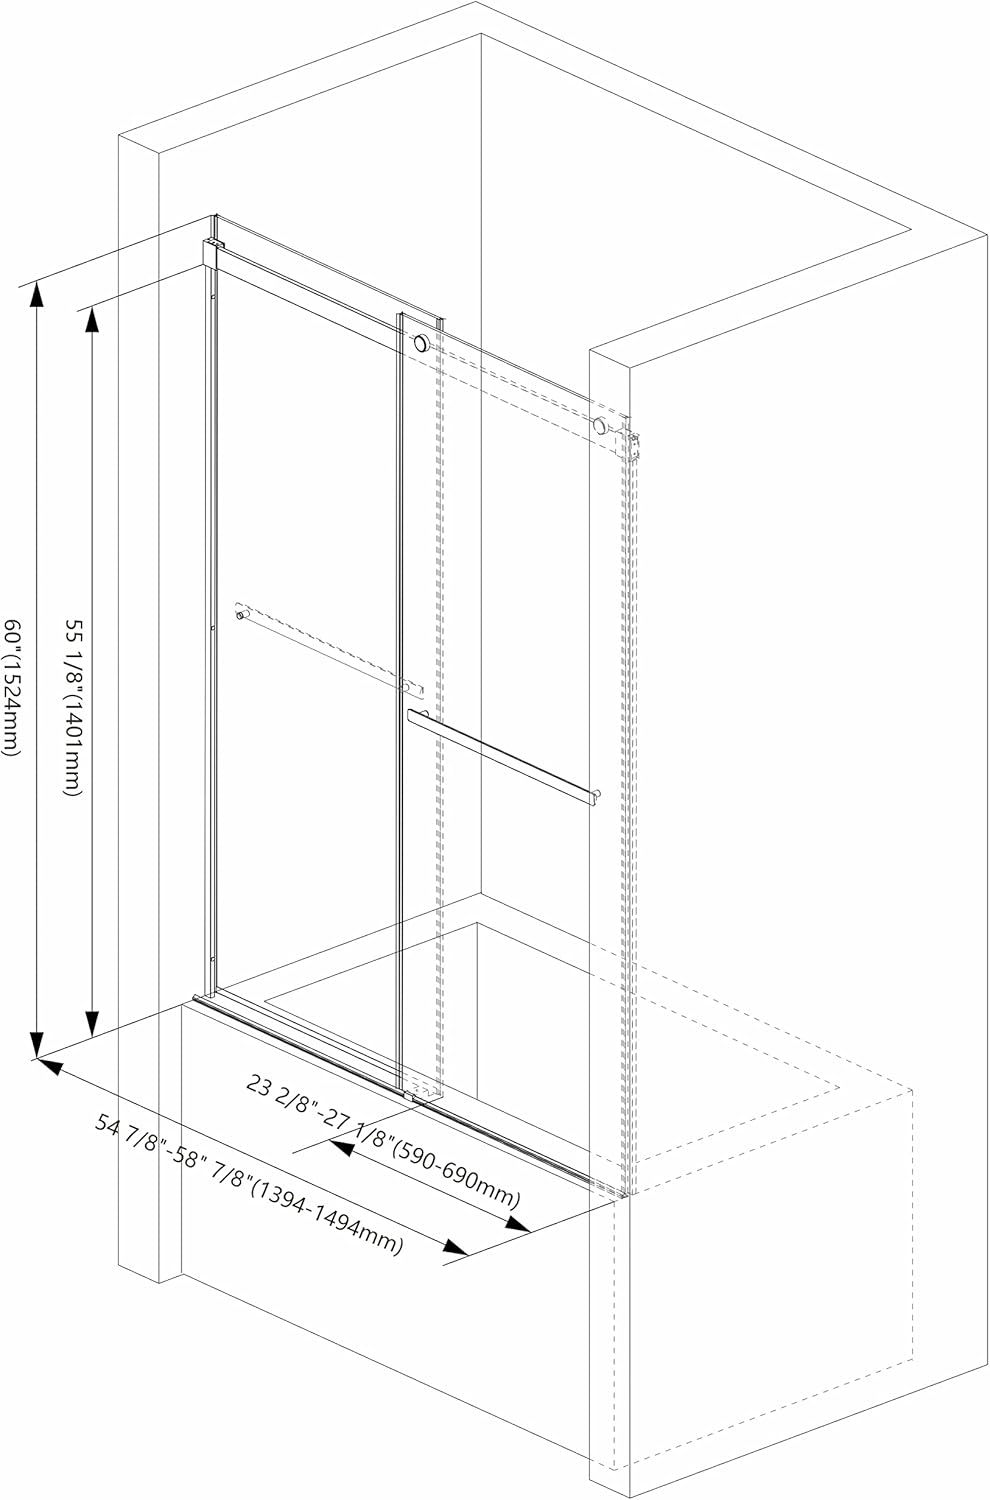
This diagram illustrates the adjustable width of the shower door, showing the overall dimensions and how to measure your space for a proper fit.
Apply Installation Template: Cut the hole location template sticker and apply it to the wall at the desired height for the top rail. This template will guide your drilling for precise alignment.
4.2. Wall Post Installation
Mark and Drill Holes for Wall Posts: Place the wall post against the wall, aligning it with the template. Use a pencil to mark the drill holes. Drill holes using a Ø6mm drill bit. Insert wall plugs into the drilled holes using a rubber mallet. Then, insert the seal strip into the wall post and secure it to the wall using ST4x35 screws.
Repeat for Other Wall: Follow the same steps for installing the wall post on the opposite wall, ensuring both are perfectly level and aligned.
4.3. Bottom Guide and Threshold Installation
Install Threshold: Drill holes at the marked locations on the bathtub rim using the template sticker. Insert wall plugs. Place the threshold in position over the plugs.
Install Bottom Guide: Place the bottom guide onto the threshold and secure it with ST3.5x25 screws. Ensure it is firmly attached and level.

This image shows a detailed view of the bottom guide and track system, which ensures smooth sliding of the shower door panels.
4.4. Top Rail Assembly
Assemble Top Rail: Attach the top rail to the wall connectors. Ensure it is securely fitted and level. Use a level to verify horizontal alignment before tightening all screws.

A close-up of the top rail and the smooth-gliding rollers, highlighting the precision engineering for effortless door movement.
4.5. Glass Panel Installation
Hang Glass Panels: Carefully hang each glass panel onto the rollers on the top rail. Ensure the bottom of the glass panel fits correctly into the bottom guide. Adjust the rollers if the glass appears tilted to ensure smooth operation and proper alignment.
This image displays the Sunrosa double sliding tub shower door fully installed, showcasing its frameless design and how it complements a modern bathroom aesthetic.
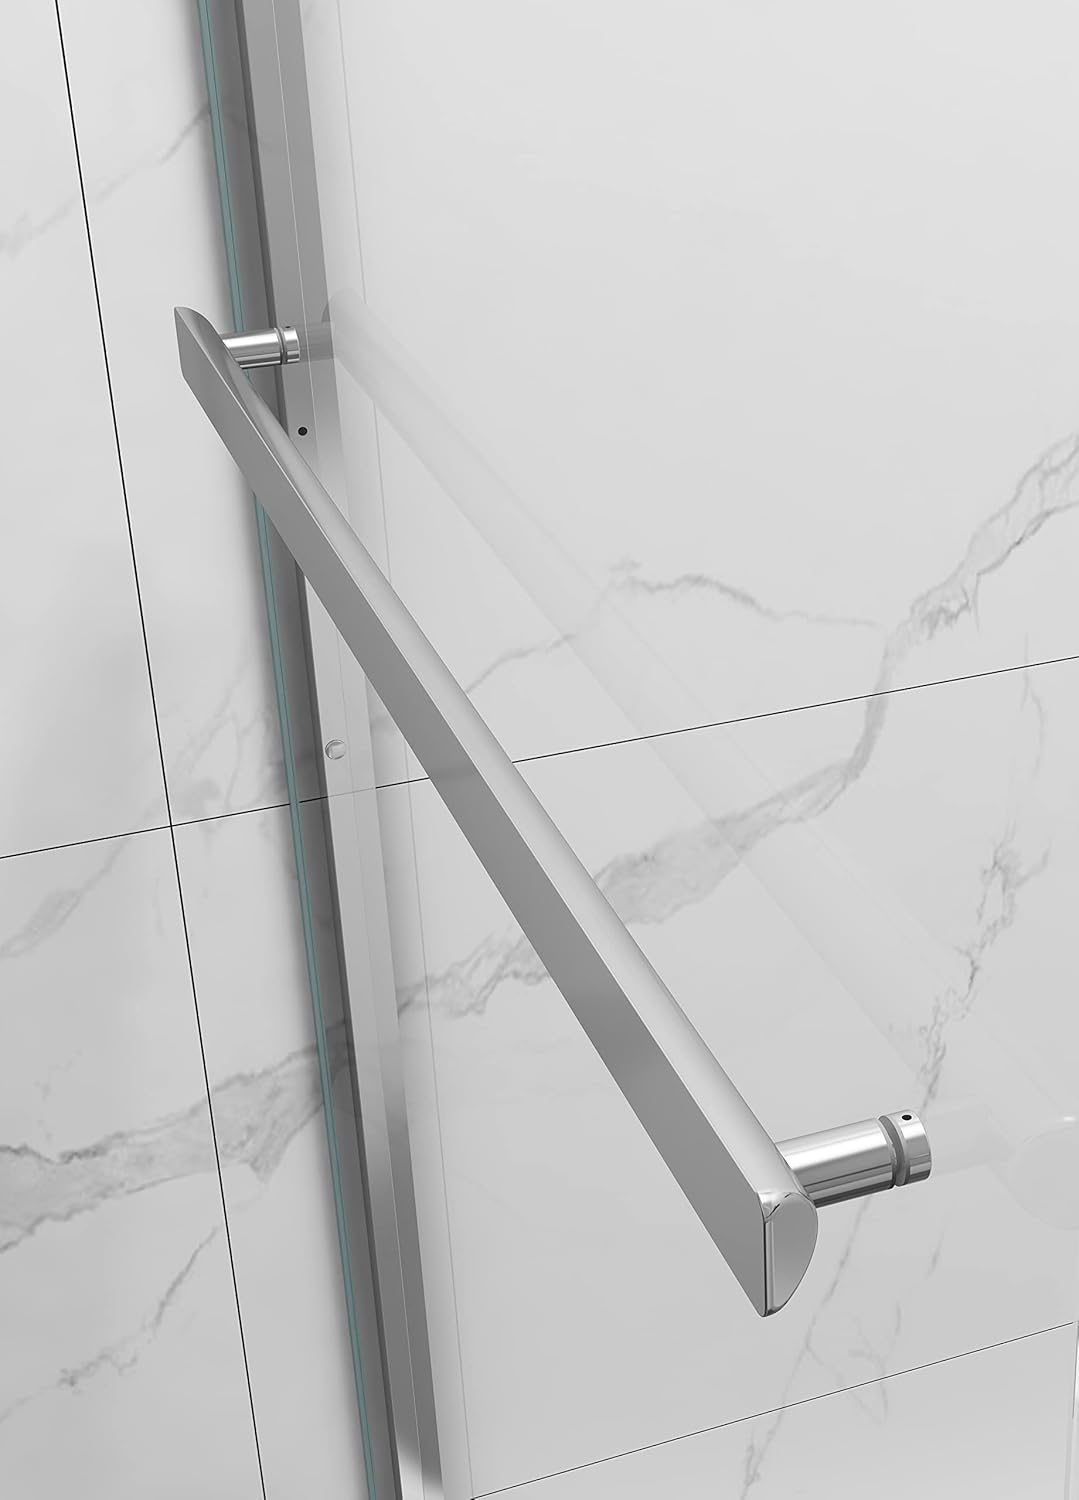
Install Handles: Attach the door handles to the designated holes on the glass panels. Tighten securely.

A detailed view of the chrome handle, emphasizing its ergonomic design and polished finish, which also serves as a towel bar.
Insert Side Door Strips: Insert the side door strips onto the edges of the glass panels to create a seal when the doors are closed. You may need to cut a small area of the strip to fit around the bottom guide.
4.6. Sealing
Apply Sealant: Apply enough silicone sealant along all seams where the shower door frame meets the wall and the bathtub. This includes the bottom threshold and the vertical wall posts. Ensure a continuous, watertight bead of caulk.
Curing Time: Do not use or get the shower door wet for at least 24 hours to allow the sealant to fully cure. Refer to the sealant manufacturer's instructions for specific curing times.
5. Operating Instructions
Your Sunrosa Tub Shower Door is designed for smooth and effortless operation.
- Sliding Doors: Gently push or pull the door handles to slide the glass panels open or closed. The double sliding design allows for entry from either side.
- Reversible Installation: The door can be installed to open from either the left or right side, depending on your bathroom layout and preference.
- Towel Bar: The handles also function as convenient towel bars.

This diagram illustrates the reversible installation feature, allowing you to customize the opening direction of your shower door to best suit your bathroom layout.
6. Maintenance and Care
Proper care will ensure the longevity and pristine appearance of your Sunrosa shower door.
- Glass Cleaning: Clean glass panels regularly with a soft cloth and a non-abrasive glass cleaner. Avoid harsh chemicals or abrasive pads that can scratch the glass or damage the finish.
- Frame Cleaning: Wipe down aluminum frames with a soft, damp cloth. For stubborn spots, use a mild soap solution and rinse thoroughly.
- Seal Maintenance: Periodically inspect the waterproof strips and silicone sealant for any signs of wear, cracking, or mold. Reapply sealant as needed to maintain a watertight enclosure.
- Roller Lubrication: If the doors become stiff or noisy, apply a small amount of silicone-based lubricant to the rollers and tracks.
7. Troubleshooting
Here are some common issues and their potential solutions:
| Problem | Possible Cause | Solution |
|---|---|---|
| Water leakage from bottom or sides. | Damaged or improperly installed waterproof strips/sealant. | Inspect and replace damaged strips. Reapply silicone sealant to all seams, ensuring a complete seal. Allow 24 hours to cure. |
| Doors are difficult to slide or make noise. | Dirty tracks, worn rollers, or lack of lubrication. | Clean tracks thoroughly. Check rollers for damage and replace if necessary. Apply silicone-based lubricant to rollers and tracks. |
| Glass panels appear wobbly or loose. | Loose roller connections or improper installation. | Ensure all roller screws are tightened. Verify that the glass panels are properly seated in the bottom guide and top rail. |
8. Specifications
| Feature | Detail |
|---|---|
| Brand | Sunrosa |
| Model Number | 6060C |
| Dimensions (W x H) | Adjustable width: 54 7/8" - 58 7/8" x 60" |
| Glass Thickness | 5/16-inch (8mm) |
| Glass Type | ANSI-Certified Clear Tempered Glass |
| Material | Aluminum, Glass |
| Style | Bypass Sliding, Frameless |
| Finish | Chrome |
| Item Weight | 107.8 Pounds |
| Assembly Required | Yes |
 The shower door features premium clear tempered glass, 5/16-inch (8mm) thick, ensuring durability and safety. It is also designed for easy cleaning.
This model is available in Chrome finish, providing a sleek and modern look for your bathroom.
9. Warranty and Support
Sunrosa stands behind the quality of its products. If you encounter any issues or have questions regarding your shower door, please contact our customer support team for prompt assistance.
For warranty details and to register your product, please visit the official Sunrosa website or refer to the warranty card included in your package.
Customer Support: For assistance, please refer to the contact information provided with your purchase or visit the Sunrosa store on Amazon: Sunrosa Store