TP-Link EAP650
TP-Link OMADA EAP650 AX3000 Dual Band WiFi 6 Access Point User Manual
Model: EAP650 | Brand: TP-Link
1. Introduction
The TP-Link EAP650 AX3000 is a high-performance ceiling-mount WiFi 6 Access Point designed for business environments. It provides ultra-fast dual-band WiFi speeds, enhanced efficiency for multiple connected devices, and seamless integration with the Omada Software Defined Networking (SDN) platform for centralized cloud management.
This manual provides detailed instructions for the installation, operation, maintenance, and troubleshooting of your EAP650 access point.

Figure 1: Top view of the TP-Link EAP650 AX3000 Access Point, showing its circular, white design with the TP-Link logo in the center and a small blue LED indicator.
2. Package Contents
Verify that all items are present in your package. If any item is missing or damaged, contact your vendor.
- EAP650 Access Point
- Power Adapter (12 V / 1.0 A DC for EU, 12 V / 1.5 A DC for US)
- Ceiling/Wall Mounting Kits
- Installation Guide

Figure 2: The retail packaging box for the TP-Link AX3000 Ceiling Mount Wi-Fi 6 Access Point EAP650, highlighting its key features and design.
3. Hardware Overview
3.1 Physical Dimensions and Design
The EAP650 features an ultra-slim, elegant design with dimensions of approximately 6.3 × 6.3 × 1.3 inches (160 × 160 × 33.6 mm), making it suitable for discreet ceiling or wall mounting.

Figure 3: Side view of the TP-Link EAP650 Access Point, showcasing its thin profile and white finish.
3.2 Ports and Buttons
The access point includes essential ports and a reset button for connectivity and management.
- 1x Gigabit Ethernet (RJ-45) Port: Supports IEEE 802.3at PoE for power and data transmission.
- Reset Button: Used to restore the device to factory default settings.
- DC Power Jack: For optional power supply via the included power adapter.

Figure 4: Underside view of the TP-Link EAP650 Access Point, revealing the Gigabit Ethernet port, reset button, and DC power input, with the mounting plate detached.
4. Setup and Installation
4.1 Mounting Options
The EAP650 can be mounted on ceilings or walls using the provided mounting kits. Ensure the chosen location provides optimal Wi-Fi coverage and is within reach of a power source (PoE+ switch or DC adapter).

Figure 5: The TP-Link EAP650 Access Point shown mounted on a ceiling, illustrating its discreet integration into an indoor environment.
4.2 Powering the Device
The EAP650 supports two power supply methods:
- PoE+ (Power over Ethernet Plus): Connect the Gigabit Ethernet port to an 802.3at compliant PoE+ switch. This method provides both power and data through a single Ethernet cable.
- DC Adapter: Use the included 12V DC power adapter by plugging it into the DC power jack.
4.3 Initial Configuration
For initial setup and configuration, it is recommended to use the Omada SDN Controller. This can be accessed via a web UI or the Omada app. Refer to the Omada SDN documentation for detailed setup procedures.
5. Operating the Access Point
5.1 Omada SDN Integration
The EAP650 is designed to integrate seamlessly with the Omada Software Defined Networking (SDN) platform. This allows for centralized management of your entire network, including access points, switches, and routers, from a single interface, either locally or via the cloud.
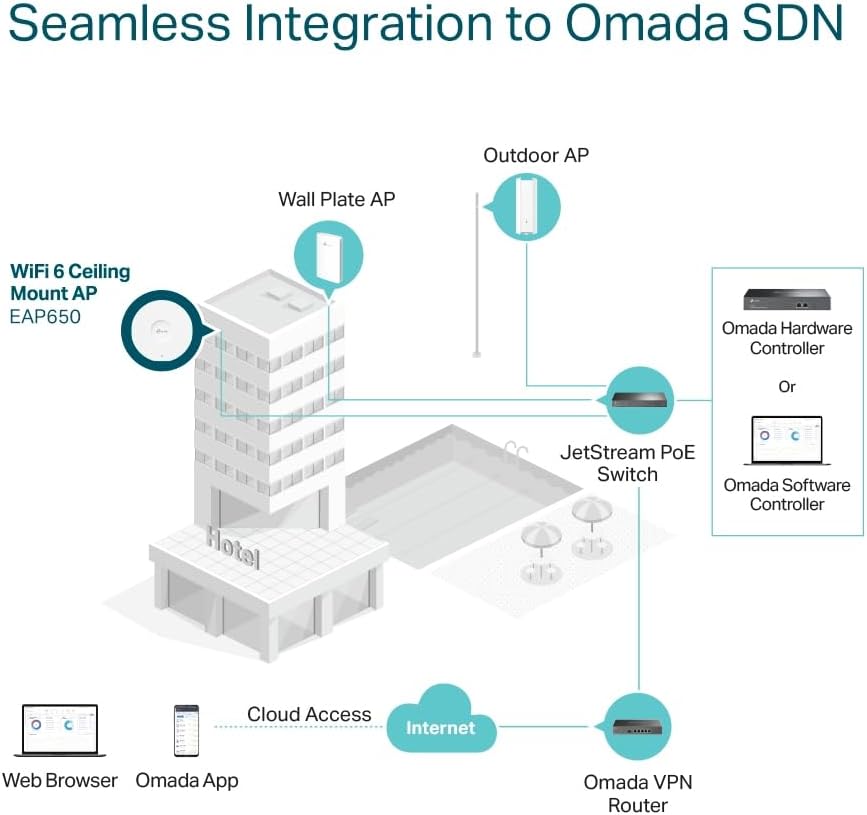
Figure 6: A diagram illustrating the seamless integration of the EAP650 Wi-Fi 6 Ceiling Mount AP into an Omada SDN network, showing connections to a hotel network, JetStream PoE Switch, Omada Hardware Controller or Software Controller, and cloud access via web browser or Omada app.
5.2 Wi-Fi 6 Features
The EAP650 leverages Wi-Fi 6 technology to deliver superior performance:
- Ultra-Fast Speeds: Simultaneous 574 Mbps on 2.4 GHz and 2402 Mbps on 5 GHz, totaling 2976 Mbps.
- High-Efficiency: Supports more connected devices with faster speeds.
- 160 MHz Channel: Doubles data at peak transmission times on a single stream.
- Seamless Roaming: Ensures uninterrupted video streams and voice calls as users move between access points.
- Omada Mesh: Enables wireless connectivity between access points for extended range and flexible deployment.

Figure 7: A graphic detailing the lightning-fast AX3000 Dual-Band Wi-Fi 6 speeds, showing 2x 1201 Mbps for 5GHz and 2x 287 Mbps for 2.4GHz, along with images of typical business environments like hospitality, education, shopping malls, and offices where the EAP650 can be deployed.
6. Maintenance
6.1 Firmware Updates
Regularly check for and install firmware updates through the Omada SDN Controller. Firmware updates often include performance improvements, security patches, and new features.
6.2 Cleaning
To clean the device, use a soft, dry cloth. Do not use liquid or aerosol cleaners, as they may damage the unit.
6.3 Resetting the Device
If the device is not functioning correctly, you can perform a factory reset. With the device powered on, press and hold the Reset button for approximately 5-10 seconds until the LED indicator changes, then release. This will revert all settings to their factory defaults.
7. Troubleshooting
7.1 No Power/LED Indicator Off
- Ensure the power adapter is securely connected to the device and a power outlet, or that the Ethernet cable is connected to a PoE+ compliant switch.
- Verify the power outlet is functional.
7.2 No Internet Connection
- Check the Ethernet cable connection between the EAP650 and your network.
- Ensure your router or gateway is functioning correctly and has an active internet connection.
- Verify network settings in the Omada SDN Controller.
7.3 Poor Wi-Fi Signal or Speed
- Relocate the access point to a more central position or away from obstructions and interference sources (e.g., thick walls, large metal objects, microwaves).
- Check for channel interference and adjust Wi-Fi channels in the Omada SDN Controller.
- Ensure client devices support Wi-Fi 6 for optimal performance.
7.4 Cannot Access Omada SDN Controller
- Ensure your computer is on the same network segment as the Omada Controller.
- Check firewall settings on your computer.
- Restart the Omada Controller software or hardware.
8. Specifications
| Feature | Detail |
|---|---|
| Model Name | EAP650 |
| Interface | 1x Gigabit Ethernet (RJ-45) Port (supports IEEE802.3at PoE) |
| Button | Reset |
| Power Supply | 802.3at PoE or 12 V / 1.0 A DC (EU), 12 V / 1.5 A DC (US) |
| Power Consumption | EU: 13.5 W, US: 14.7 W |
| Dimensions (W x D x H) | 6.3 × 6.3 × 1.3 in (160 × 160 × 33.6 mm) |
| Antenna Type | Internal Omni |
| Antenna Gain | 2.4 GHz: 2× 4 dBi, 5 GHz: 2× 5 dBi |
| Mounting | Ceiling / Wall Mounting (Kits included), Junction Box Mounting |
| Wireless Standards | 802.11ac, 802.11ax, 802.11b, 802.11g, 802.11n |
| Frequency Band Class | Dual-Band (2.4 GHz and 5 GHz) |
| System Requirements | Microsoft Windows XP, Vista, Windows 7, Windows 8, Windows 10, Linux |
9. Warranty and Support
For warranty information and technical support, please refer to the official TP-Link website or contact TP-Link customer service directly. The official TP-Link store can be visited at TP-Link Store on Amazon.
Additional resources, including updated drivers, firmware, and FAQs, are typically available on the product support page of the manufacturer's website.
Related Documents - EAP650
 |
TP-Link Omada Wireless Access Point Quick Installation Guide This guide provides instructions for installing and configuring TP-Link Omada Wireless Access Points, covering hardware overview, installation methods (ceiling, wall, junction box), power supply options, and software setup via standalone mode or Omada Controller. |
 |
TP-Link Omada Wireless Access Point Quick Installation Guide A quick installation guide for the TP-Link Omada Wireless Access Point, covering hardware overview, installation options (ceiling, wall, junction box), power supply, and software configuration methods (standalone and controller modes). |
 |
TP-Link EAP650-Desktop Quick Installation Guide Quick installation guide for the TP-Link EAP650-Desktop Omada AX3000 Wi-Fi 6 Access Point, covering hardware overview, connection instructions, mounting guides, and setup procedures for Standalone and Controller modes. |
 |
TP-Link Archer AX3000: High-Performance Wi-Fi 6 Router Explore the TP-Link Archer AX3000, a powerful Wi-Fi 6 router offering enhanced speed, extended coverage, and advanced security features like HomeShield and WPA3 for a superior home network experience. |
 |
TP-Link Archer Air R5 AX3000: მთავარი მახასიათებლები და ინსტალაცია დეტალური მიმოხილვა TP-Link Archer Air R5 AX3000 Wi-Fi 6 როუტერის შესახებ, რომელიც მოიცავს მის ძირითად მახასიათებლებს, როგორიცაა AX3000 სიჩქარე, ორმაგი ზოლის მხარდაჭერა, OFDMA, MU-MIMO, WPA3 უსაფრთხოება და TP-Link Tether აპლიკაციის დაყენება. |
 |
TP-Link Archer AX3000 Dual-Band Wi-Fi 6 Router Quick Installation Guide Step-by-step guide to install and set up your TP-Link Archer AX3000 Dual-Band Wi-Fi 6 Router using the Tether app or a web browser, including hardware connection and troubleshooting. |
Ask a question about this manual
Ask about setup, troubleshooting, compatibility, parts, safety, or missing instructions. Manuals+ will review the question and use this page’s manual context to help answer it.