Introduction
Thank you for choosing the Parkside Automatic Irrigation Programmer. This device is designed to simplify your garden watering tasks by providing automated and programmable control over your irrigation system. Its intuitive menu and robust design ensure reliable performance.
Please read this manual carefully before operating the device to ensure proper setup, safe use, and optimal performance. Keep this manual for future reference.
Safety Instructions
- Ensure the device is securely attached to the water tap to prevent leaks.
- Do not expose the device to extreme temperatures or direct sunlight for prolonged periods.
- The device is protected against water jets (IPX4), but do not submerge it in water.
- Use only the specified battery type (included) and dispose of used batteries responsibly.
- Keep out of reach of children.
- Do not attempt to disassemble or repair the device yourself. Contact qualified personnel for service.
Product Overview
Familiarize yourself with the components of your Parkside Automatic Irrigation Programmer.

Figure 1: Front view of the irrigation programmer, showing the large LCD display, rotary dial, and control buttons (Power, Clock, Set, Manual Watering).

Figure 2: Side view of the irrigation programmer, highlighting its compact design and the robust casing.

Figure 3: Included tap adapters: one for 33.3 mm (G1") threads and another for 26.5 mm (G3/4") threads, ensuring compatibility with common outdoor taps.
Setup
1. Battery Installation
- Locate the battery compartment on the back of the device.
- Open the compartment cover.
- Insert the required batteries (included), ensuring correct polarity (+/-).
- Close the battery compartment cover securely. The display should illuminate.
2. Attaching to the Tap
- Select the appropriate adapter for your tap thread (33.3 mm G1" or 26.5 mm G3/4").
- Screw the selected adapter onto your outdoor tap.
- Attach the irrigation programmer to the adapter by screwing it on firmly. Ensure a watertight seal.

Figure 4: The irrigation programmer properly installed on an outdoor tap, ready for hose connection.
Operating Instructions
Setting Current Time and Day
- Press the Clock button. The time display will flash.
- Use the rotary dial to adjust the hour, then press SET to confirm. Repeat for minutes.
- The day of the week will flash. Use the rotary dial to select the current day (Mo, Tu, We, Th, Fr, Sa, Su), then press SET to confirm.
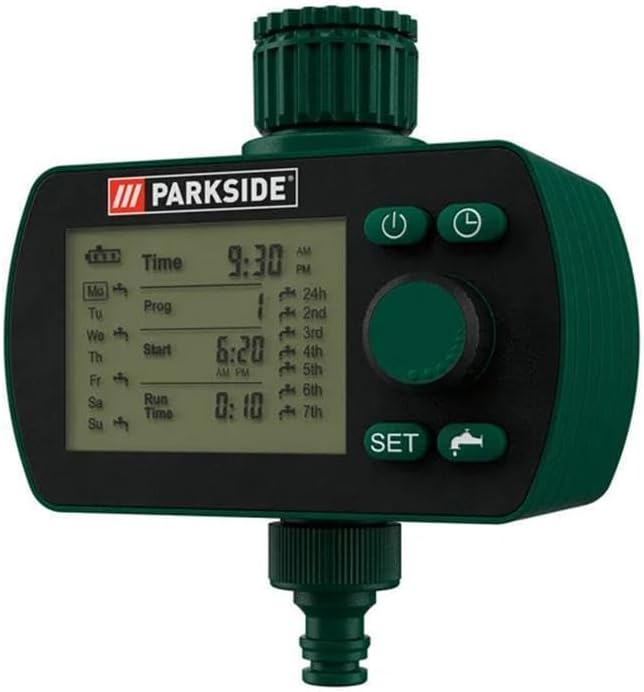
Figure 5: The programmer's display showing the current time (9:30 AM) and day (Monday) set, along with program slots.
Programming Irrigation Schedules
The device allows for multiple irrigation programs. Each program consists of a start time, run time, and frequency.
- Press the Prog (Program) button. The program number (e.g., 1st) will flash.
- Use the rotary dial to select the program slot you wish to set (1st to 7th), then press SET.
- The "Start" time will flash. Use the rotary dial to set the desired start time for this program, then press SET.
- The "Run Time" will flash. Use the rotary dial to set the duration of watering (e.g., 0:10 for 10 minutes), then press SET.
- The frequency setting will flash (e.g., 24h for every 24 hours, or specific days). Use the rotary dial to select the desired frequency or specific days of the week for this program to run. Press SET to confirm.
- Repeat for additional programs as needed.
Manual Watering
To manually water outside of programmed schedules:
- Press the Manual Watering button (faucet icon).
- The display will show a default manual watering duration. Use the rotary dial to adjust the desired manual watering time.
- Press SET to start manual watering. The water will flow for the set duration.
- To stop manual watering prematurely, press the Manual Watering button again.
Power On/Off
Press the Power button (circle with line) to turn the device on or off. When off, programmed schedules will not run.
Maintenance
Cleaning
Clean the exterior of the device with a soft, damp cloth. Do not use abrasive cleaners or solvents. Ensure no water enters the battery compartment or display area.
Battery Replacement
When the battery indicator on the display shows low power, replace the batteries promptly to ensure continuous operation. Follow the battery installation steps in the Setup section.
Winter Storage
Before the first frost, disconnect the irrigation programmer from the tap. Remove the batteries and store the device in a dry, frost-free location. This will prevent damage from freezing water.
Troubleshooting
| Problem | Possible Cause | Solution |
|---|---|---|
| Device not turning on / Display blank | Batteries are dead or incorrectly inserted. | Check battery polarity or replace batteries. |
| Water not flowing at programmed time | Device is off; tap is closed; low battery; incorrect program settings. | Ensure device is on; open the tap fully; replace batteries; verify program settings (start time, run time, frequency). |
| Water leaking from connection | Loose connection; damaged O-ring/washer; incorrect adapter. | Tighten connection; check and replace O-rings/washers if damaged; ensure correct adapter is used. |
| Manual watering not working | Tap is closed; low battery. | Open the tap fully; replace batteries. |
Specifications
| Model: | 125 |
| Dimensions (L x W x H): | 135 x 88 x 130 mm (approx. 5.3 x 3.5 x 5.1 inches) |
| LC Display Size: | 69 x 51 mm (approx. 2.7 x 2.0 inches) |
| Weight: | 382 g (approx. 0.84 lbs) |
| Material: | PA6 + GF30 (Housing), Silicone gel (Buttons), ABS / TPR (Rotary button), ABS (Connections) |
| Water Protection Rating: | IPX4 (Splash-proof) |
| Compatible Tap Threads: | 33.3 mm (G1") and 26.5 mm (G3/4") with included adapter |
| Power Source: | Batteries (included), 3 Volts (DC) |
Warranty and Support
Warranty Information
Specific warranty terms and conditions are typically provided with your purchase documentation or on the product packaging. Please refer to these documents for details regarding your product's warranty period and coverage.
Customer Support
For technical assistance, troubleshooting beyond this manual, or inquiries regarding parts and service, please contact the retailer or the manufacturer's customer support line. Contact information can usually be found on the product packaging or the brand's official website.