1. Important Safety Instructions
Please read all instructions carefully before using this appliance and retain them for future reference. Failure to follow these instructions may result in electric shock, fire, or serious injury.
- Always ensure the power supply matches the voltage specified on the rating label.
- Do not immerse the appliance, cord, or plug in water or other liquids.
- Unplug the appliance from the power outlet when not in use, before filling or emptying the water tank, and before cleaning.
- Keep the appliance out of reach of children and pets.
- Do not operate the appliance with a damaged cord or plug, or after the appliance malfunctions or has been damaged in any manner.
- Place the appliance on a stable, level surface to prevent tipping.
- Do not block the air inlet or outlet. Maintain at least 20 cm clearance from walls and other objects.
- Only use clean tap water in the water tank. Do not add any chemicals or additives other than recommended by the manufacturer.
- Do not use the appliance outdoors or in wet environments like bathrooms.
- Ensure the water tank is properly seated before operating.
2. Product Overview
The RELAX4LIFE Portable 3-in-1 Air Cooler is designed to cool, humidify, and circulate air, providing a comfortable environment for your home or office. It features a 7-liter water tank, three wind modes, three fan speeds, a timer function, and remote control operation.

Figure 2.1: Front view of the RELAX4LIFE Portable 3-in-1 Air Cooler, showing the air outlet and control panel.
3. Setup
3.1 Unpacking
- Carefully remove the air cooler from its packaging.
- Remove all packing materials, including any protective films or tapes.
- Check for any damage during transit. If the appliance is damaged, do not use it and contact customer support.
3.2 Attaching Universal Wheels
The air cooler comes with universal wheels for easy mobility. If not pre-attached, follow these steps:
- Carefully turn the unit upside down.
- Insert the stem of each wheel into the designated holes at the bottom of the unit until securely in place.
- Return the unit to an upright position.

Figure 3.1: Illustration of the removable water tank, universal wheels, and visible water level indicator.
3.3 Filling the Water Tank
For cooling and humidification functions, the water tank must be filled with water. You can also add ice boxes for enhanced cooling.
- Ensure the appliance is unplugged from the power outlet.
- Pull out the water tank from the bottom rear of the unit.
- Fill the tank with clean tap water, ensuring the water level is between the 'MIN' and 'MAX' indicators. Do not overfill.
- For stronger cooling, place the provided ice boxes (after freezing) into the water tank.
- Carefully slide the water tank back into the unit until it clicks into place.

Figure 3.2: Demonstrating how to fill the 7L water tank.
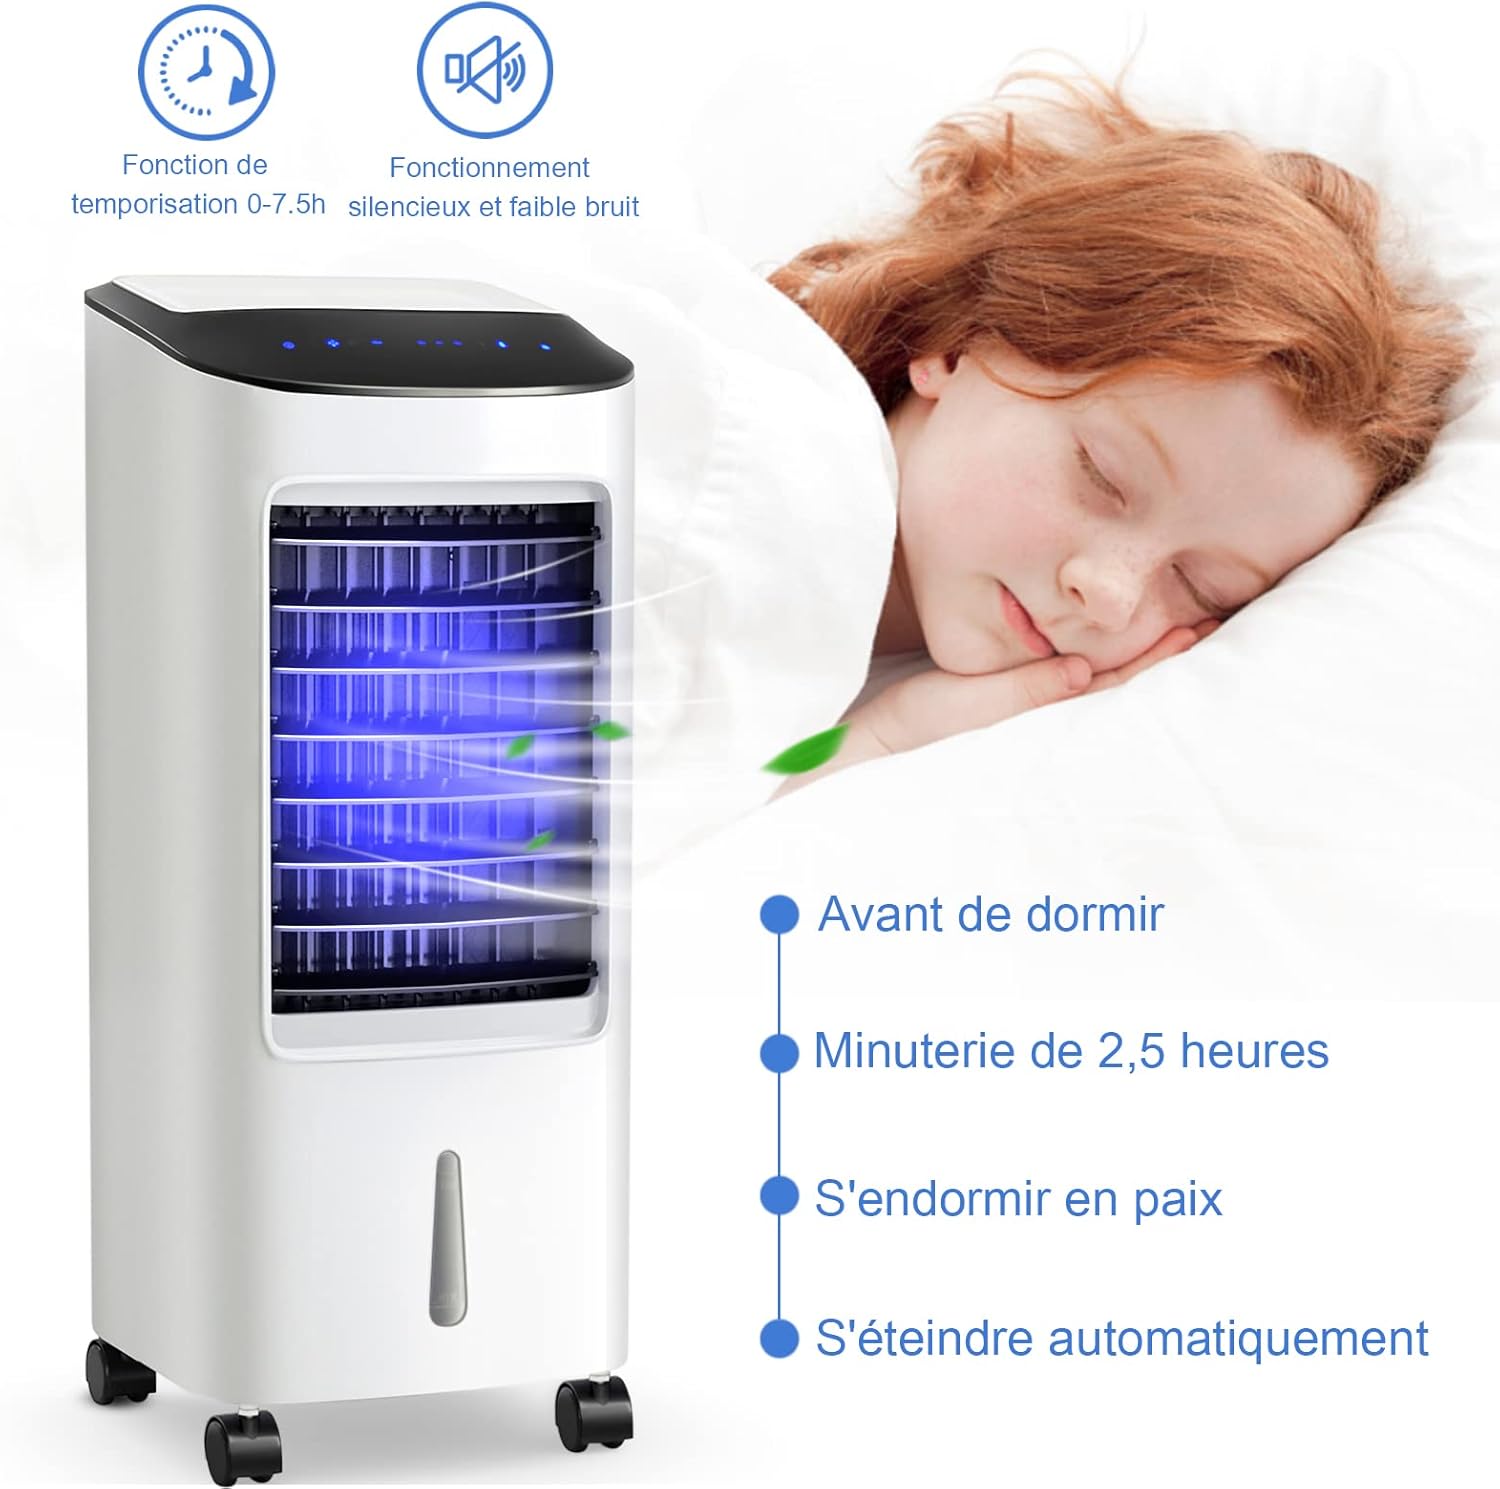
Figure 3.3: Ice boxes can be added to the water tank for improved cooling performance.
4. Operating Instructions
The air cooler can be operated using the touch control panel on top of the unit or the included remote control.

Figure 4.1: The intelligent touch control panel and effective remote control.
4.1 Power On/Off
- Plug the power cord into a suitable electrical outlet.
- Press the ON/OFF button on the control panel or remote control to turn the unit on or off.
4.2 Selecting Wind Mode
Press the MODE button to cycle through the available wind modes:
- Normal Mode: Provides a constant, steady airflow.
- Natural Mode: Simulates a natural breeze with varying fan speeds.
- Sleep Mode: Operates at a lower, quieter speed, gradually decreasing fan speed over time for undisturbed sleep.

Figure 4.2: Visual representation of the three wind modes and three fan speeds.
4.3 Adjusting Fan Speed
Press the SPEED button to select from three fan speeds:
- Low Speed
- Medium Speed
- High Speed
4.4 Oscillation Function
The air cooler features automatic horizontal oscillation and manual vertical adjustment.
- Press the SWING button to activate or deactivate the automatic left-to-right oscillation of the internal louvers.
- Manually adjust the external louvers up or down to direct the airflow vertically.
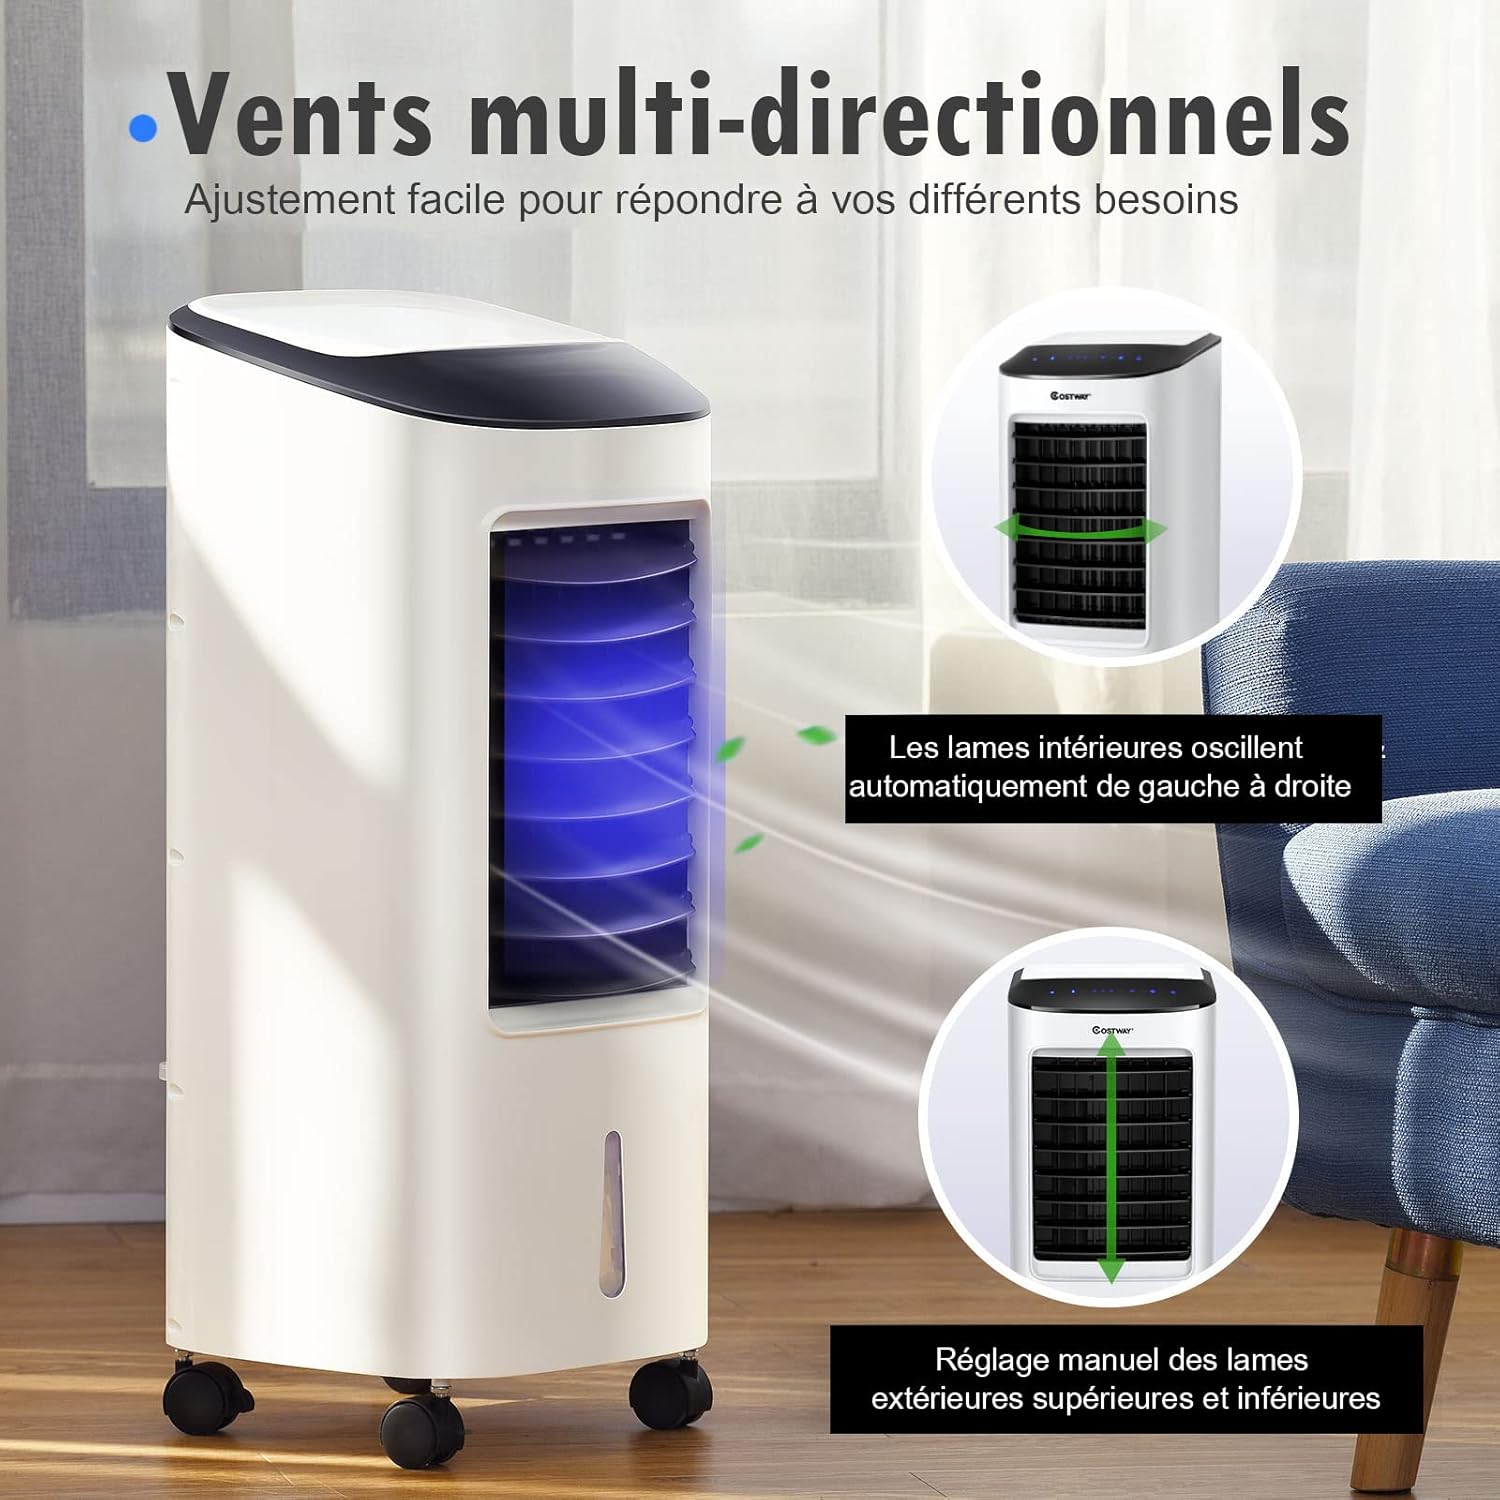
Figure 4.3: Multi-directional airflow with automatic horizontal swing and manual vertical adjustment.
4.5 Timer Function
The timer allows you to set the appliance to turn off automatically after a specified period (0 to 7.5 hours).
- Press the TIMER button repeatedly to select the desired operating time in 0.5-hour increments.
- The indicator lights on the control panel will show the set time.
- The unit will automatically turn off once the set time has elapsed.
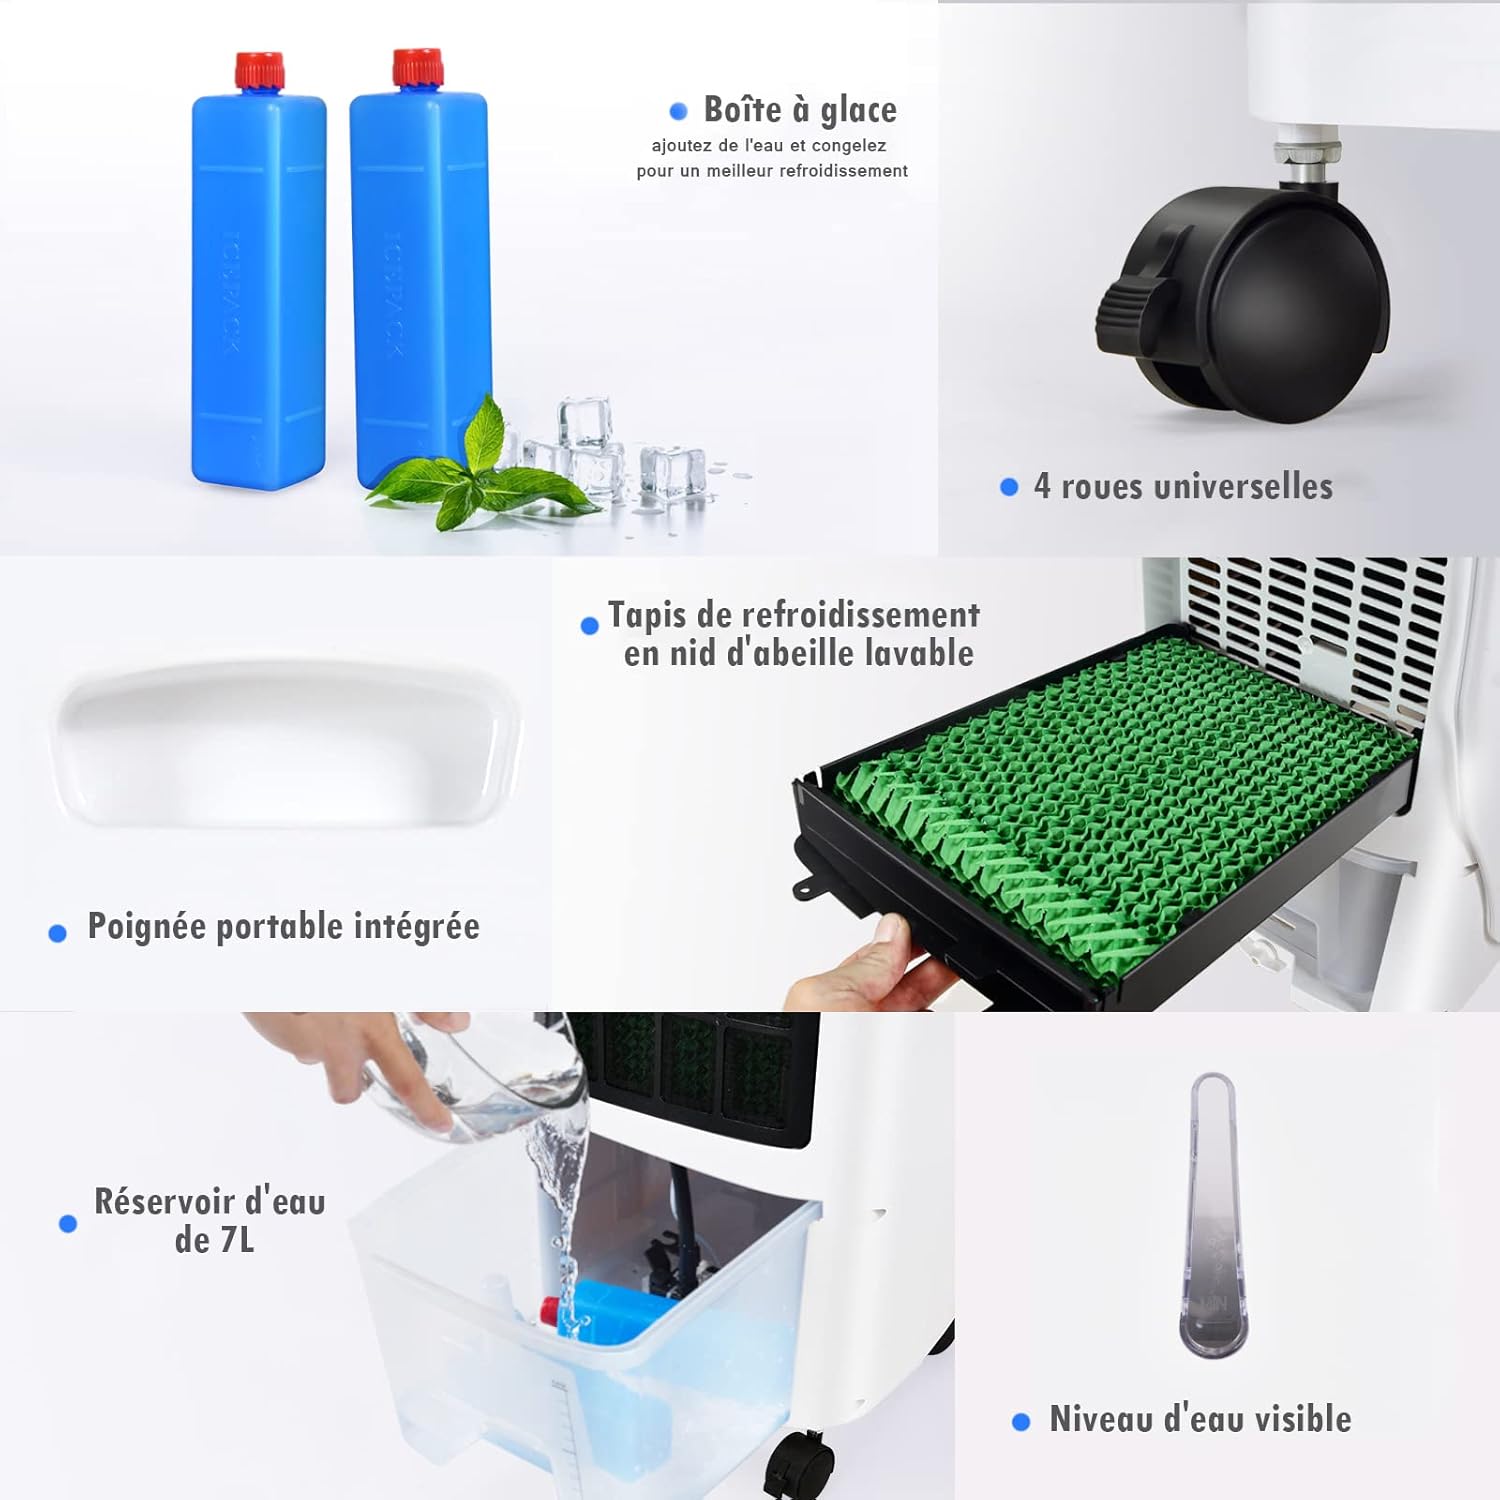
Figure 4.4: The timer function allows for automatic shut-off, ideal for sleep.
4.6 Cooling/Humidification Function
To activate the cooling and humidification function, ensure the water tank is filled.
- Press the COOL button on the control panel or remote control.
- The unit will begin to draw water from the tank to humidify and cool the air.
- Press the COOL button again to deactivate this function.
5. Maintenance
Regular cleaning and maintenance will ensure optimal performance and extend the lifespan of your air cooler.
5.1 Cleaning the Water Tank
It is recommended to clean the water tank weekly, especially if used frequently.
- Unplug the appliance from the power outlet.
- Pull out the water tank from the unit.
- Empty any remaining water.
- Clean the tank with a soft cloth and mild detergent. Rinse thoroughly with clean water.
- Dry the tank completely before reinserting it into the unit.
5.2 Cleaning the Cooling Pad/Filter
The cooling pad should be cleaned regularly to prevent mold and maintain airflow.
- Unplug the appliance.
- Remove the rear filter cover (refer to diagram if available).
- Carefully slide out the cooling pad.
- Rinse the cooling pad under running water to remove dust and mineral deposits. For stubborn dirt, use a soft brush.
- Allow the cooling pad to air dry completely before reinserting.
- Reattach the rear filter cover.

Figure 5.1: The washable honeycomb cooling pad for easy maintenance.
5.3 Exterior Cleaning
- Wipe the exterior of the unit with a soft, damp cloth.
- Do not use abrasive cleaners or solvents.
- Ensure no water enters the control panel or other electrical components.
5.4 Storage
If the appliance will not be used for an extended period:
- Empty and clean the water tank and cooling pad thoroughly.
- Ensure all parts are completely dry.
- Store the appliance in a cool, dry place, preferably in its original packaging.
6. Troubleshooting
Before contacting customer support, please refer to the following troubleshooting guide for common issues:
| Problem | Possible Cause | Solution |
|---|---|---|
| Unit does not turn on. | No power supply. | Check if the power cord is securely plugged in. Check the power outlet. |
| Weak or no airflow. | Air inlet/outlet blocked. Fan speed too low. | Ensure nothing is obstructing the air vents. Increase the fan speed. |
| No cooling/humidification. | Water tank empty. Cooling function not activated. | Fill the water tank. Press the 'COOL' button. |
| Unpleasant odor. | Stagnant water or dirty cooling pad. | Empty and clean the water tank. Clean the cooling pad. |
| Remote control not working. | Batteries depleted. Obstruction between remote and unit. | Replace batteries. Ensure a clear line of sight to the unit's receiver. |
7. Specifications
Technical details for the RELAX4LIFE Portable 3-in-1 Air Cooler (7L Model):
| Feature | Specification |
|---|---|
| Model Name | Portable 3-in-1 Air Cooler |
| Dimensions (L x W x H) | 30 x 27 x 152.4 cm (11.8 x 10.6 x 60 inches) |
| Item Weight | 7.69 Kilograms (16.95 lbs) |
| Power Consumption | 65 Watts |
| Water Tank Capacity | 7 Liters |
| Material | Copper (motor), ABS (body) |
| Color | White |
| Control Type | Remote Control, Touch Panel |
| Number of Speeds | 3 |
| Special Features | Cooling Fan, Humidifier, Timer (0-7.5h), Universal Wheels |
| Mounting Type | Freestanding |
| Country of Origin | China |

Figure 7.1: Key features and dimensions of the air cooler.
8. Warranty and Support
RELAX4LIFE products are manufactured to high-quality standards. In the unlikely event of a problem, please refer to your purchase documentation for warranty details. For technical assistance, troubleshooting beyond this manual, or to inquire about replacement parts, please contact RELAX4LIFE customer support through your retailer or the official brand website.
Please have your model number (7L Portable 3-in-1 Air Cooler) and purchase date available when contacting support.