Mesenic MS-005-CA-10
Mesenic Mini Sewing Machine MS-005-CA-10 User Manual
Model: MS-005-CA-10 | Brand: Mesenic
Introduction
This manual provides detailed instructions for the safe and efficient operation, setup, and maintenance of your Mesenic Mini Sewing Machine MS-005-CA-10. Please read this manual thoroughly before using the machine to ensure proper function and to prevent damage.

Image: Mesenic Mini Sewing Machine with its extension table and a comprehensive sewing supplies kit.
Product Features
- 12 Built-in Stitch Patterns: Offers a variety of stitch options for different sewing needs.
- Replaceable Presser Foot: Allows for changing to different presser feet (not included) for specialized tasks like zipper sewing.
- Reverse Sewing Function: Useful for reinforcing seams and securing stitches.
- Buttonhole & Overlock Function: Provides versatility for various garment constructions.
- Adjustable Needle Spacing: Enables customization of stitch length.
- Double Thread & Double Speed: Ensures neat, straight, and firm stitches with adjustable speed settings.
- LED Sewing Light: Illuminates the sewing area for improved visibility.
- Winding Function: Simplifies the process of winding bobbin thread.
- Built-in Thread Cutter: Conveniently cuts thread without the need for scissors.
- Mini Hidden Drawer: Provides storage for small accessories like threads, bobbins, and needles.

Image: Detailed view highlighting the replaceable presser foot, built-in thread cutter, and LED sewing light.
What's in the Box
Upon unpacking, please verify that all items listed below are present:
- 1 x Mesenic Mini Sewing Machine
- 1 x Thread Snip
- 1 x Extension Table
- 1 x Sewing Supplies Set
- 1 x Power Adapter
- 1 x Foot Pedal
- 1 x Spare Needle
- 1 x Needle Threader
- 4 x Thread Spool
- 1 x User Manual (this document)

Image: All components included in the Mesenic Mini Sewing Machine package.
Product Overview
Familiarize yourself with the main components of your sewing machine:

Image: Labeled diagram of the Mesenic Mini Sewing Machine, indicating key parts such as the hand wheel, reverse button, power/speed switch, and LED light.
Setup
1. Power Supply
The machine can be powered by either the included AC/DC power adapter or 4 x 1.5V AA batteries (not included).
- AC/DC Adapter: Insert the adapter plug into the DC 6V input jack on the machine and connect the adapter to a standard electrical outlet (100V-240V).
- Batteries: Open the battery compartment cover on the bottom of the machine. Insert 4 AA batteries, ensuring correct polarity (+/-). Close the cover.
Note: Do not use both power sources simultaneously. Remove batteries when using the AC adapter or when the machine will not be used for an extended period.
2. Attaching the Extension Table
To provide a larger working surface, slide the extension table onto the free arm of the sewing machine until it clicks securely into place.
3. Threading the Machine
Correct threading is essential for proper operation. Follow these steps carefully:

Image: Visual guide demonstrating the seven steps for threading the Mesenic Mini Sewing Machine.
- Bobbin Winding:
- Place an empty bobbin onto the bobbin winder spindle.
- Place a spool of thread onto the thread spindle.
- Guide the thread from the spool through the bobbin winder tension disk.
- Wind the thread around the empty bobbin a few times manually.
- Push the bobbin winder spindle to the right.
- Turn on the machine (low speed recommended) to wind the bobbin. Stop when the bobbin is full.
- Cut the thread and push the bobbin winder spindle back to the left.
- Upper Threading:
- Step 1: Turn the hand wheel (on the right side of the machine) towards you to raise the needle to its highest position. Place a spool on the thread spindle, then pull out the thread.
- Step 2: Guide the thread through the first thread guide (usually a metal hook).
- Step 3: Guide the thread through the tension disc gap.
- Step 4: Feed the thread from right to left through the hole in the chromed take-up lever.
- Step 5: Pull the thread straight down towards the needle.
- Step 6: Guide the thread through the needle holder's hole.
- Step 7: Thread the needle from the front side to the back side. Pull about 10 cm (4 inches) of thread through the eye of the needle.
- Lower Threading (Bobbin Insertion):
- Open the bobbin cover plate.
- Insert the wound bobbin into the bobbin case, ensuring the thread unwinds counter-clockwise.
- Pull the bobbin thread through the small slot in the bobbin case.
- Hold the upper thread with one hand, and turn the hand wheel towards you to lower and then raise the needle. This will catch the bobbin thread and bring it up through the needle plate.
- Pull both upper and lower threads under the presser foot and towards the back of the machine, leaving about 15 cm (6 inches) of thread.
Operating Instructions
1. Stitch Selection
Rotate the stitch pattern dial (located on the front of the machine) to select one of the 12 available stitch patterns. Ensure the needle is in its highest position before changing stitch patterns.
2. Speed Control
The machine offers two speed settings: Low (L) and High (H). Use the "OFF L H" switch to select your desired sewing speed. For beginners or intricate work, start with the low speed.
3. Reverse Sewing
To reinforce the beginning and end of a seam, press and hold the reverse button (usually located near the stitch pattern dial) while sewing. The machine will sew backward. Release the button to resume forward sewing.
4. LED Sewing Light
Press the light switch (usually located near the needle area) to turn the LED sewing light on or off. This provides illumination for your work area.
5. Thread Cutter
After completing a seam, lift the presser foot and pull the fabric slightly. Use the built-in thread cutter (a small blade located on the side of the machine) to cut both the upper and bobbin threads.
6. Replacing the Presser Foot
To change the presser foot, ensure the needle is in its highest position. Lift the presser foot lever. Press the release button (if present) or unclip the current presser foot. Align the new presser foot with the holder and lower the presser foot lever to snap it into place.

Image: A user actively sewing fabric with the Mesenic Mini Sewing Machine.
Maintenance
- Cleaning: Regularly clean lint and dust from the bobbin area and feed dogs using a small brush. Unplug the machine before cleaning.
- Needle Replacement: Replace the needle frequently, especially if it becomes bent, dull, or if you experience skipped stitches. Use appropriate needle types and sizes for your fabric. To replace, loosen the needle clamp screw, remove the old needle, insert the new needle with the flat side facing the back, and tighten the screw.
- Storage: When not in use, store the machine in a dry, dust-free environment.
Troubleshooting
| Problem | Possible Cause | Solution |
|---|---|---|
| Machine not starting | No power, foot pedal not connected, power switch off. | Check power adapter/batteries, ensure foot pedal is securely plugged in, turn power switch to 'L' or 'H'. |
| Skipped stitches | Incorrect needle, bent needle, improper threading, wrong tension. | Replace needle, re-thread machine, adjust tension dial. |
| Thread breaking | Incorrect threading, tension too tight, damaged needle, poor quality thread. | Re-thread machine, loosen tension, replace needle, use good quality thread. |
| Fabric not moving | Presser foot not lowered, feed dogs clogged. | Lower the presser foot, clean feed dogs. |
| Loose stitches | Tension too loose, bobbin incorrectly inserted. | Tighten tension, re-insert bobbin correctly. |
Specifications
| Model Number | MS-005-CA-10 |
| Input Voltage | 100V-240V; 50/60Hz |
| Output | 6V 1200mA |
| Power Supply Options | AC/DC power adapter or 4 x 1.5V AA batteries (not included) |
| Color | White (with purple accents) |
| Dimensions (L x W x H) | 27 x 12 x 26 cm (10.6 x 4.7 x 10.2 inches) |
| Weight | 1.9 kg (4.2 lb) / Shipping Weight: 2.77 kg |
| Stitch Patterns | 12 Built-in |
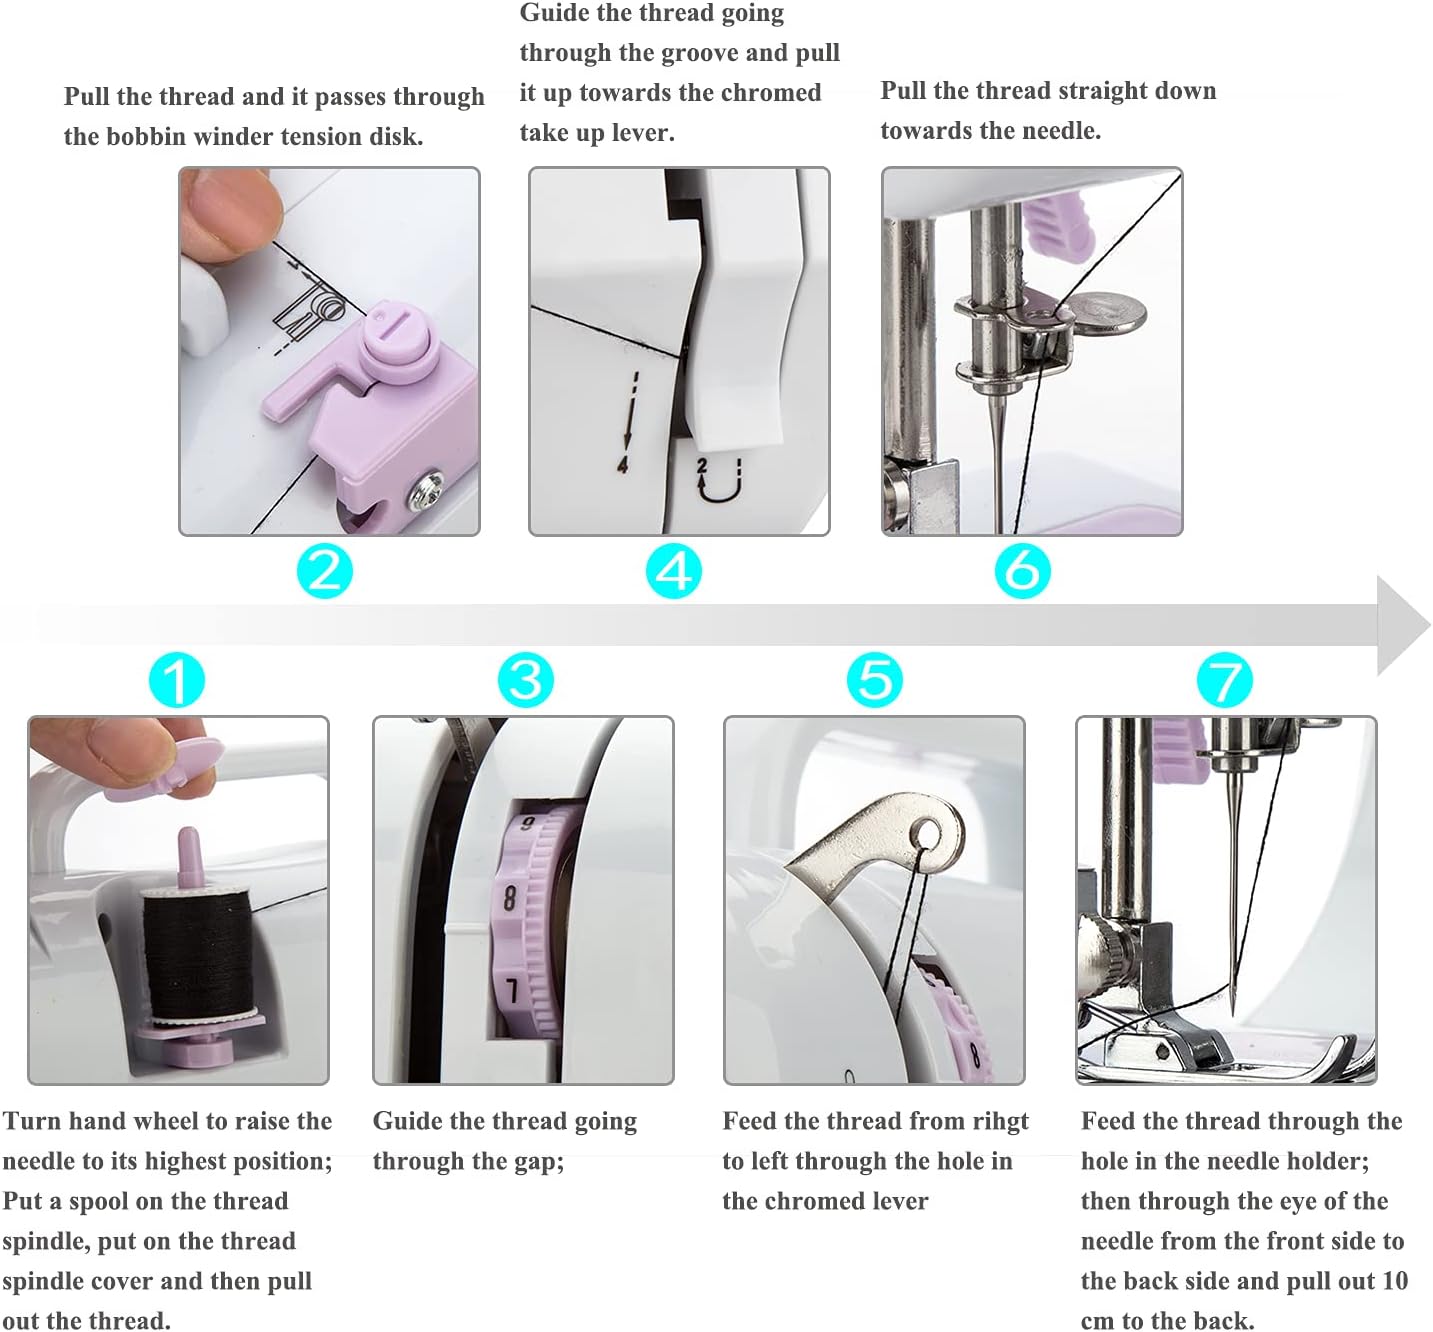
Image: Visual representation of the Mesenic Mini Sewing Machine's dimensions.
Warranty and Support
For warranty information, technical support, or any inquiries regarding your Mesenic Mini Sewing Machine MS-005-CA-10, please refer to the contact information provided on the product packaging or the official Mesenic website. Keep your purchase receipt as proof of purchase.
Ask a question about this manual
Ask about setup, troubleshooting, compatibility, parts, safety, or missing instructions. Manuals+ will review the question and use this page’s manual context to help answer it.