PULMIC TAKE CONTROL 13223
PULMIC Raptor 16 Advance Professional Backpack Sprayer User Manual
Brand: PULMIC TAKE CONTROL | Model: 13223
Introduction
This manual provides detailed instructions for the safe and effective use of your PULMIC Raptor 16 Advance Professional Backpack Sprayer. Designed for application of agrochemicals, pest control, watering, and weed control, this sprayer features a manual pump, padded shoulder straps, and an adjustable nozzle for versatile use. Please read this manual thoroughly before operation to ensure proper assembly, usage, and maintenance.
Important Safety Information
WARNING:
- Harmful if swallowed or inhaled.
- Avoid contact with skin and eyes.
- Do not ingest.
- Prolonged or repeated exposure through skin or inhalation may cause allergic reactions in some individuals.
- Always wear appropriate personal protective equipment (PPE) when handling chemicals and operating the sprayer.
- Keep out of reach of children and pets.
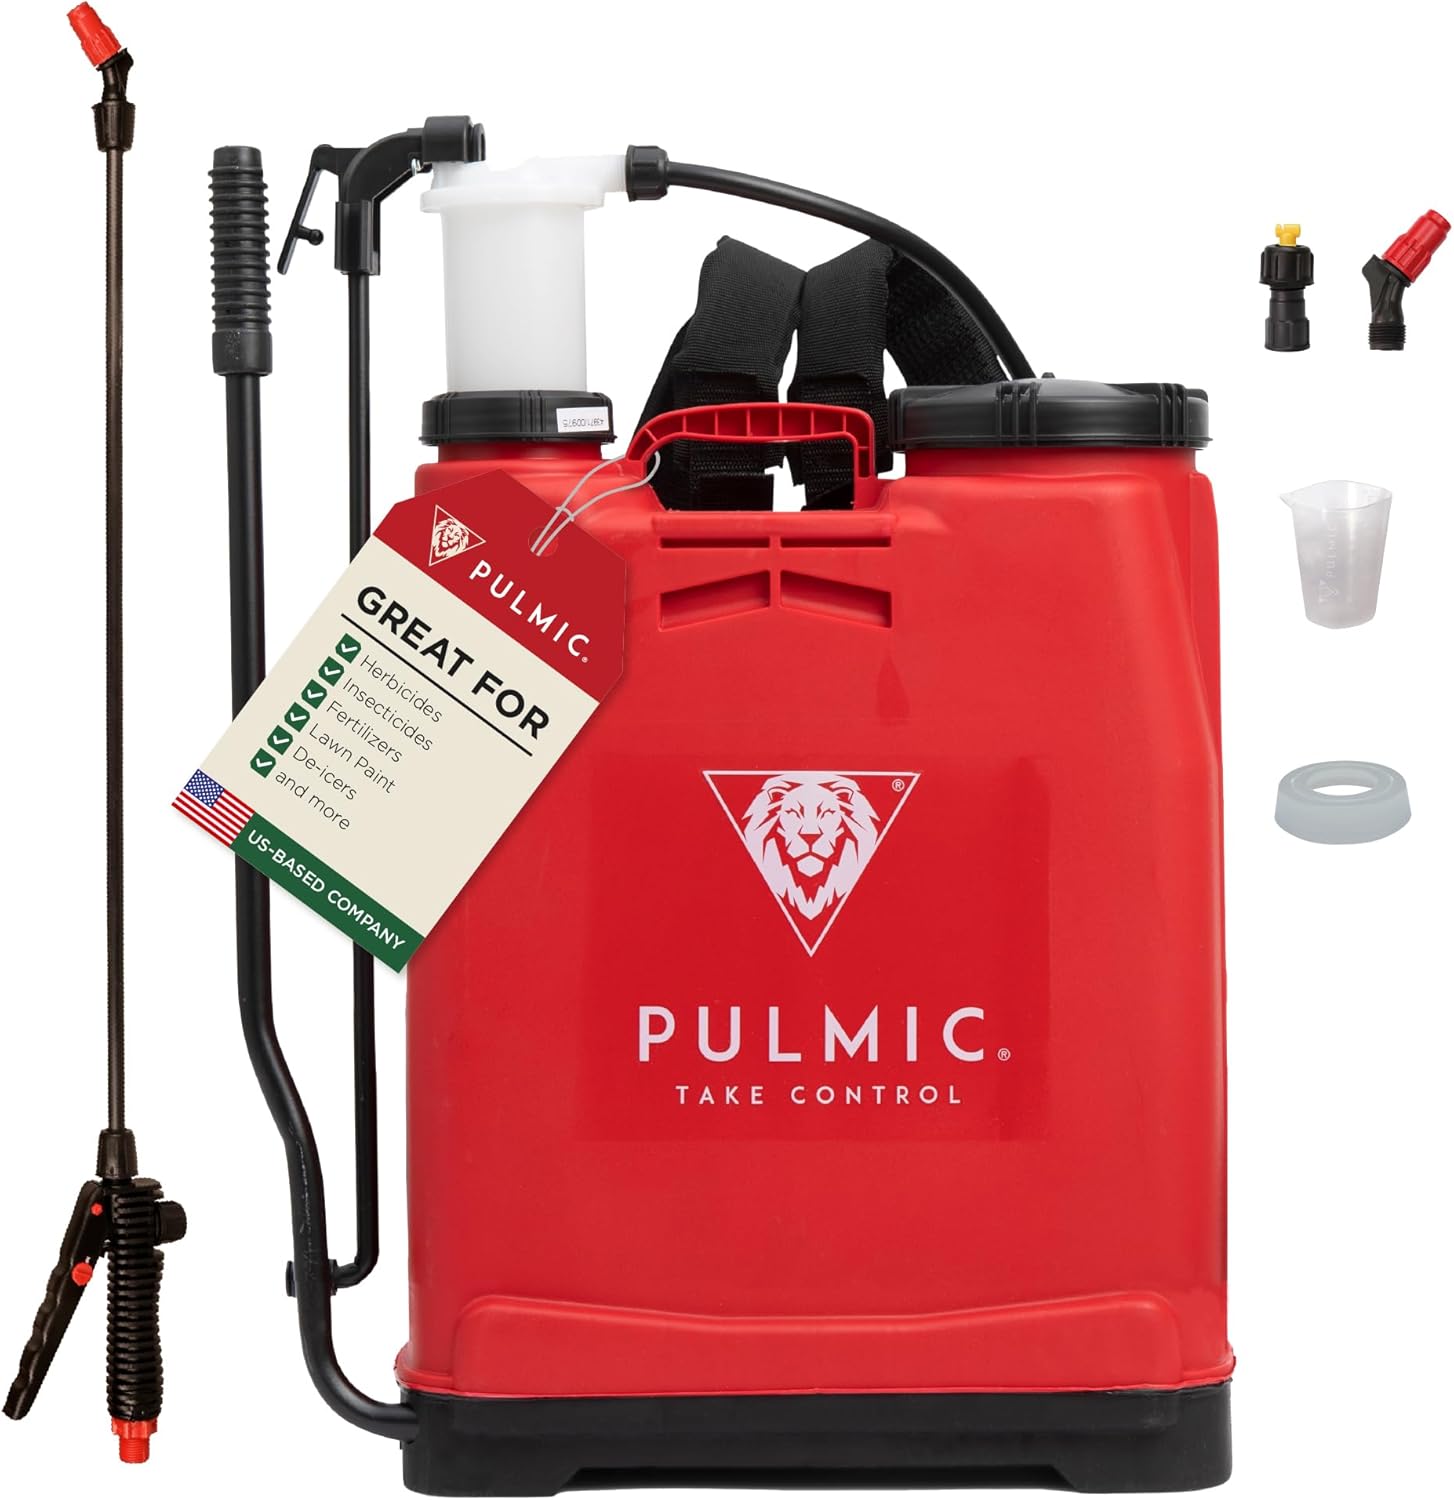
What's Included
Your PULMIC Raptor 16 Advance Backpack Sprayer package includes the following components:
- Sprayer Tank (4 Gallons / 16 Liters capacity)
- Fiberglass Lance with Adjustable Nozzle
- Padded Shoulder Straps
- Measuring Cup
- Extra PRODUR Piston
- Various Nozzle Types (e.g., cone, fan, dual)
- Filters and Gaskets

Assembly
- Attach Shoulder Straps: Connect the padded shoulder straps to the designated attachment points on the sprayer tank. Ensure they are securely fastened. The straps feature a mesh-style material for comfort and breathability.
- Connect Hose to Tank: Securely attach the hose to the outlet port at the bottom of the sprayer tank. A wing nut connection ensures a tight fit.
- Assemble Lance: Connect the fiberglass lance to the trigger handle. Choose your desired nozzle type and screw it onto the end of the lance. The sprayer comes with various nozzles for different spray patterns.
- Connect Hose to Trigger Handle: Attach the other end of the hose to the trigger handle. Ensure all connections are tight to prevent leaks.

Operation
- Filling the Tank:
- Unscrew the main cap on the tank.
- Use the included mesh strainer to prevent debris from entering the tank.
- Carefully pour your desired liquid (water, agrochemicals, etc.) into the tank. The tank has a wide opening for easier refilling.
- If adding concentrates, use the measuring cup provided in the smaller port.
- Securely screw the cap back on.
- Wearing the Sprayer:
- For easier lifting, place the filled sprayer on a raised surface (e.g., a table or bench) that is about hip-high.
- Slide your arms through the padded shoulder straps.
- Adjust the straps for a comfortable and secure fit. The padded back support with air channels helps reduce discomfort during extended use.
- Fasten the waist belt for additional support and stability.
- Spraying:
- Turn on the sprayer using the power switch located at the bottom.
- Adjust the pressure using the dedicated knob.
- Hold the trigger handle and press to begin spraying. The ergonomic design ensures comfortable use.
- Twist the adjustable nozzle on the fiberglass lance to change the spray pattern (mist, cone, stream, fan, dual-head, shower).
- Release the trigger to stop spraying.


Official Product Video: Using the Raptor 16
Video: A demonstration of the PULMIC Raptor 16 Advance Backpack Sprayer in use, showcasing its features and ease of operation for various spraying tasks.
Maintenance
- Cleaning: After each use, rinse the tank and all components thoroughly with clean water to prevent chemical residue buildup and clogging.
- Filter Maintenance: Regularly check and clean the mesh strainer and any other filters to ensure optimal performance and prevent blockages.
- Gasket Replacement: The sprayer includes spare gaskets. Replace worn or damaged gaskets to prevent leaks. Teflon tape can be used for secure connections.
- Storage: Store the sprayer in a cool, dry place away from direct sunlight and extreme temperatures. Ensure the tank is empty and clean before storage.
Specifications
| Brand | PULMIC TAKE CONTROL |
| Model Name | 13223 |
| Tank Volume | 4 Gallons |
| Power Source | Manual Pump (Hydraulic) |
| Maximum Pressure | 87 Pound per Square Inch |
| Product Dimensions | 17.1 x 7.2 x 24.4 inches |
| Item Weight | 8.71 pounds |
| Material | High-quality plastic (Cl) and fiberglass lance |
| Recommended Uses | Pest Control, Watering, Weed Control |
Warranty & Support
PULMIC TAKE CONTROL is committed to providing high-quality products and excellent customer service.
- Warranty: All PULMIC products include three years of coverage.
- Spare Parts: Up to ten years of support for spare parts is available, ensuring long-term reliability.
- Customer Service: For any questions or concerns, please contact our dedicated customer agents.
- Contact Information:
- Phone: 847-550-8150 (Mon - Fri | 9am - 4pm CST)
- Email: customerservice@ezkutproducts.com

Ask a question about this manual
Ask about setup, troubleshooting, compatibility, parts, safety, or missing instructions. Manuals+ will review the question and use this page’s manual context to help answer it.