1. Introduction
Welcome to the user manual for your new XIAOKOA Wireless Microphone Headset. This guide provides comprehensive instructions to help you set up, operate, and maintain your UHF head mic speaker system. Please read this manual carefully before using the product to ensure proper function and longevity.
Package Contents:
- 1 x Wireless Microphone Headset (Transmitter)
- 1 x Wireless Receiver
- 1 x Dual USB Charging Cable
- 1 x 3.5mm to 6.35mm Converter
- 1 x User Manual
2. Product Features
LED Digital Display
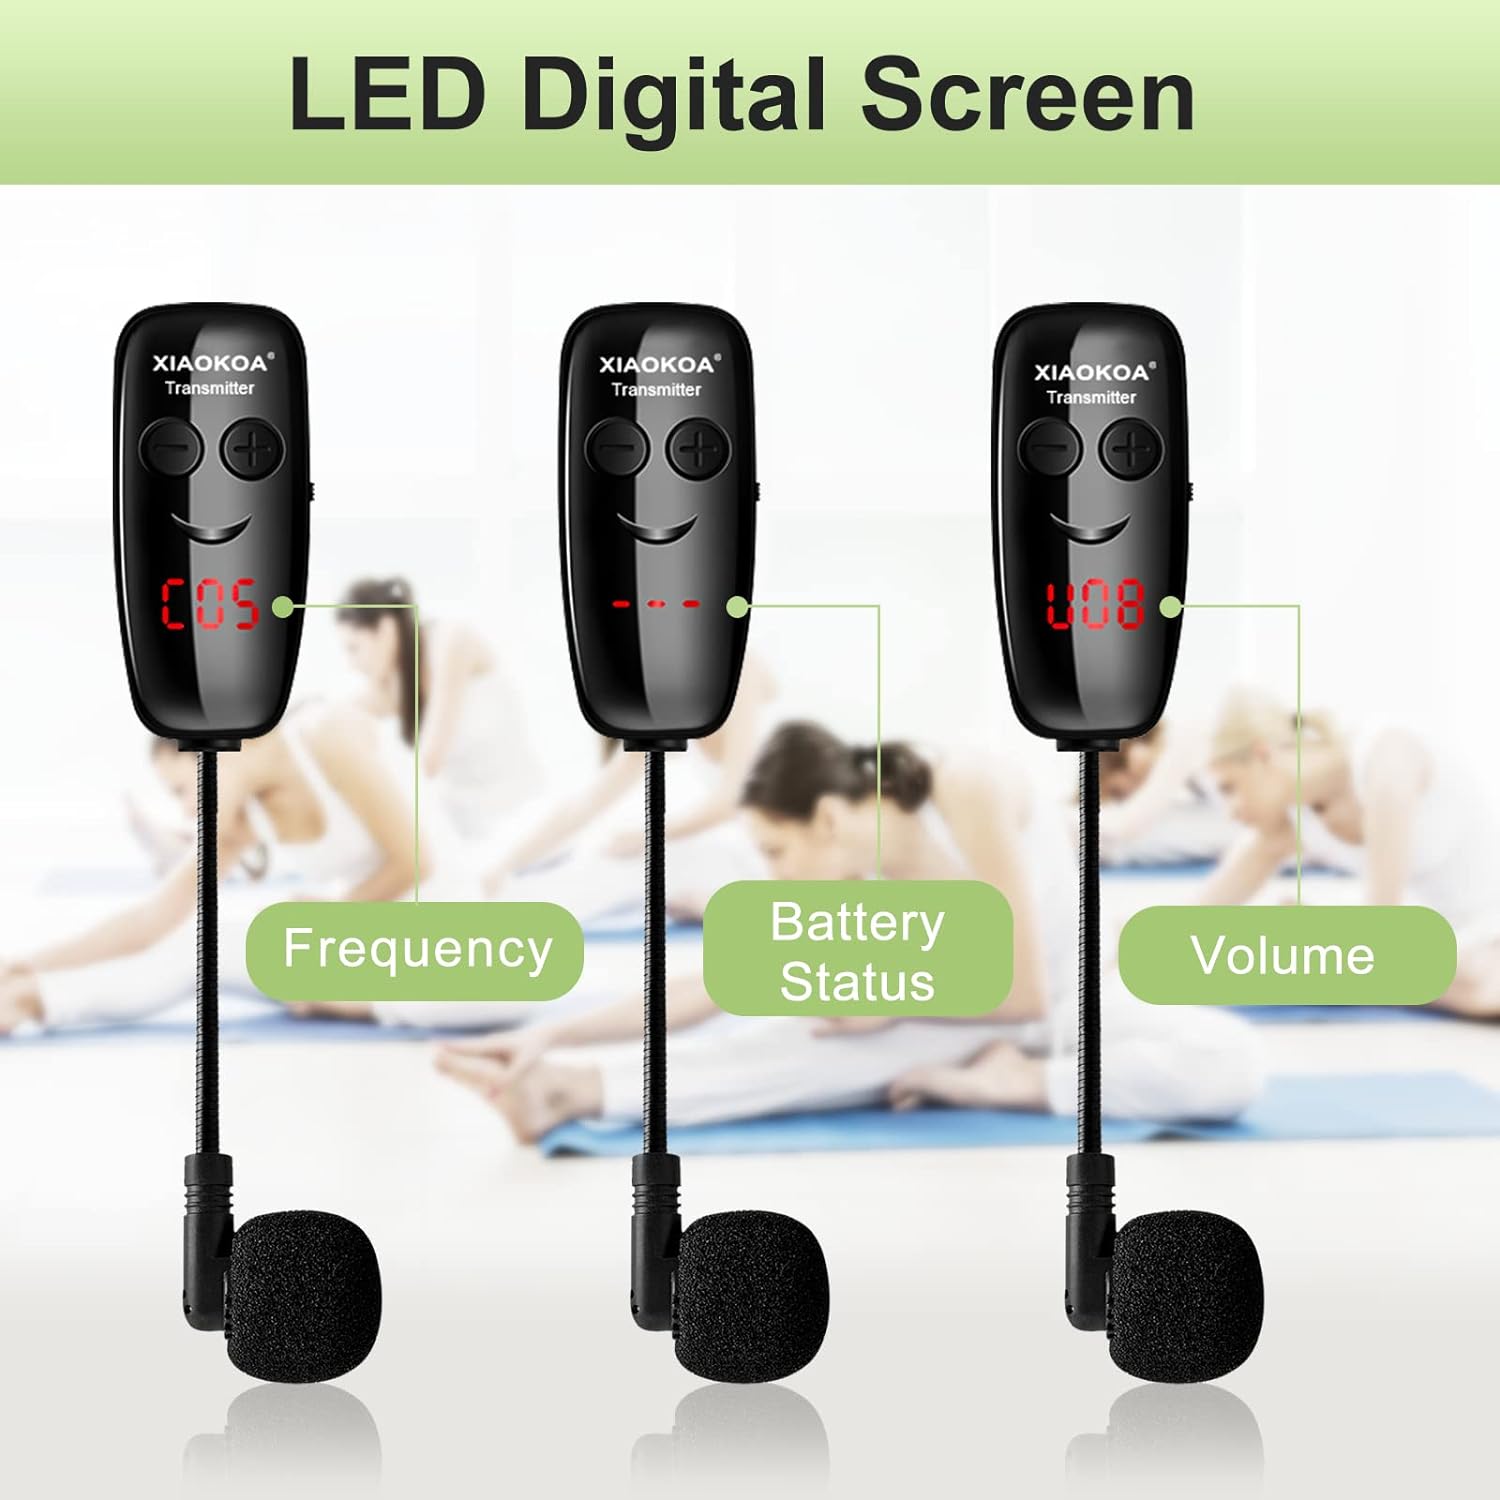
The microphone features a clear LED digital screen that displays essential information such as current frequency, battery status, and volume level, allowing for easy monitoring during use.
Ultra-Long Transmission Distance

Utilizes advanced UHF wireless technology, providing a stable and reliable connection up to 50 meters (165 feet) in open environments, minimizing signal loss and interference.
Omni-directional Microphone

Equipped with an omni-directional microphone that captures sound from all directions, ensuring high-definition sound quality and clear voice transmission.
Headset and Handheld 2-in-1 Design

The versatile design allows for easy switching between head-mounted and handheld modes, adapting to various usage scenarios. Simple installation steps are provided for conversion.
Dual USB Charging

Features a built-in Li-ion rechargeable battery for both the headset and receiver. A single full charge provides over 5 hours of working time, with a charging time of approximately 2 hours using the included dual charging cable.
Wide Compatibility
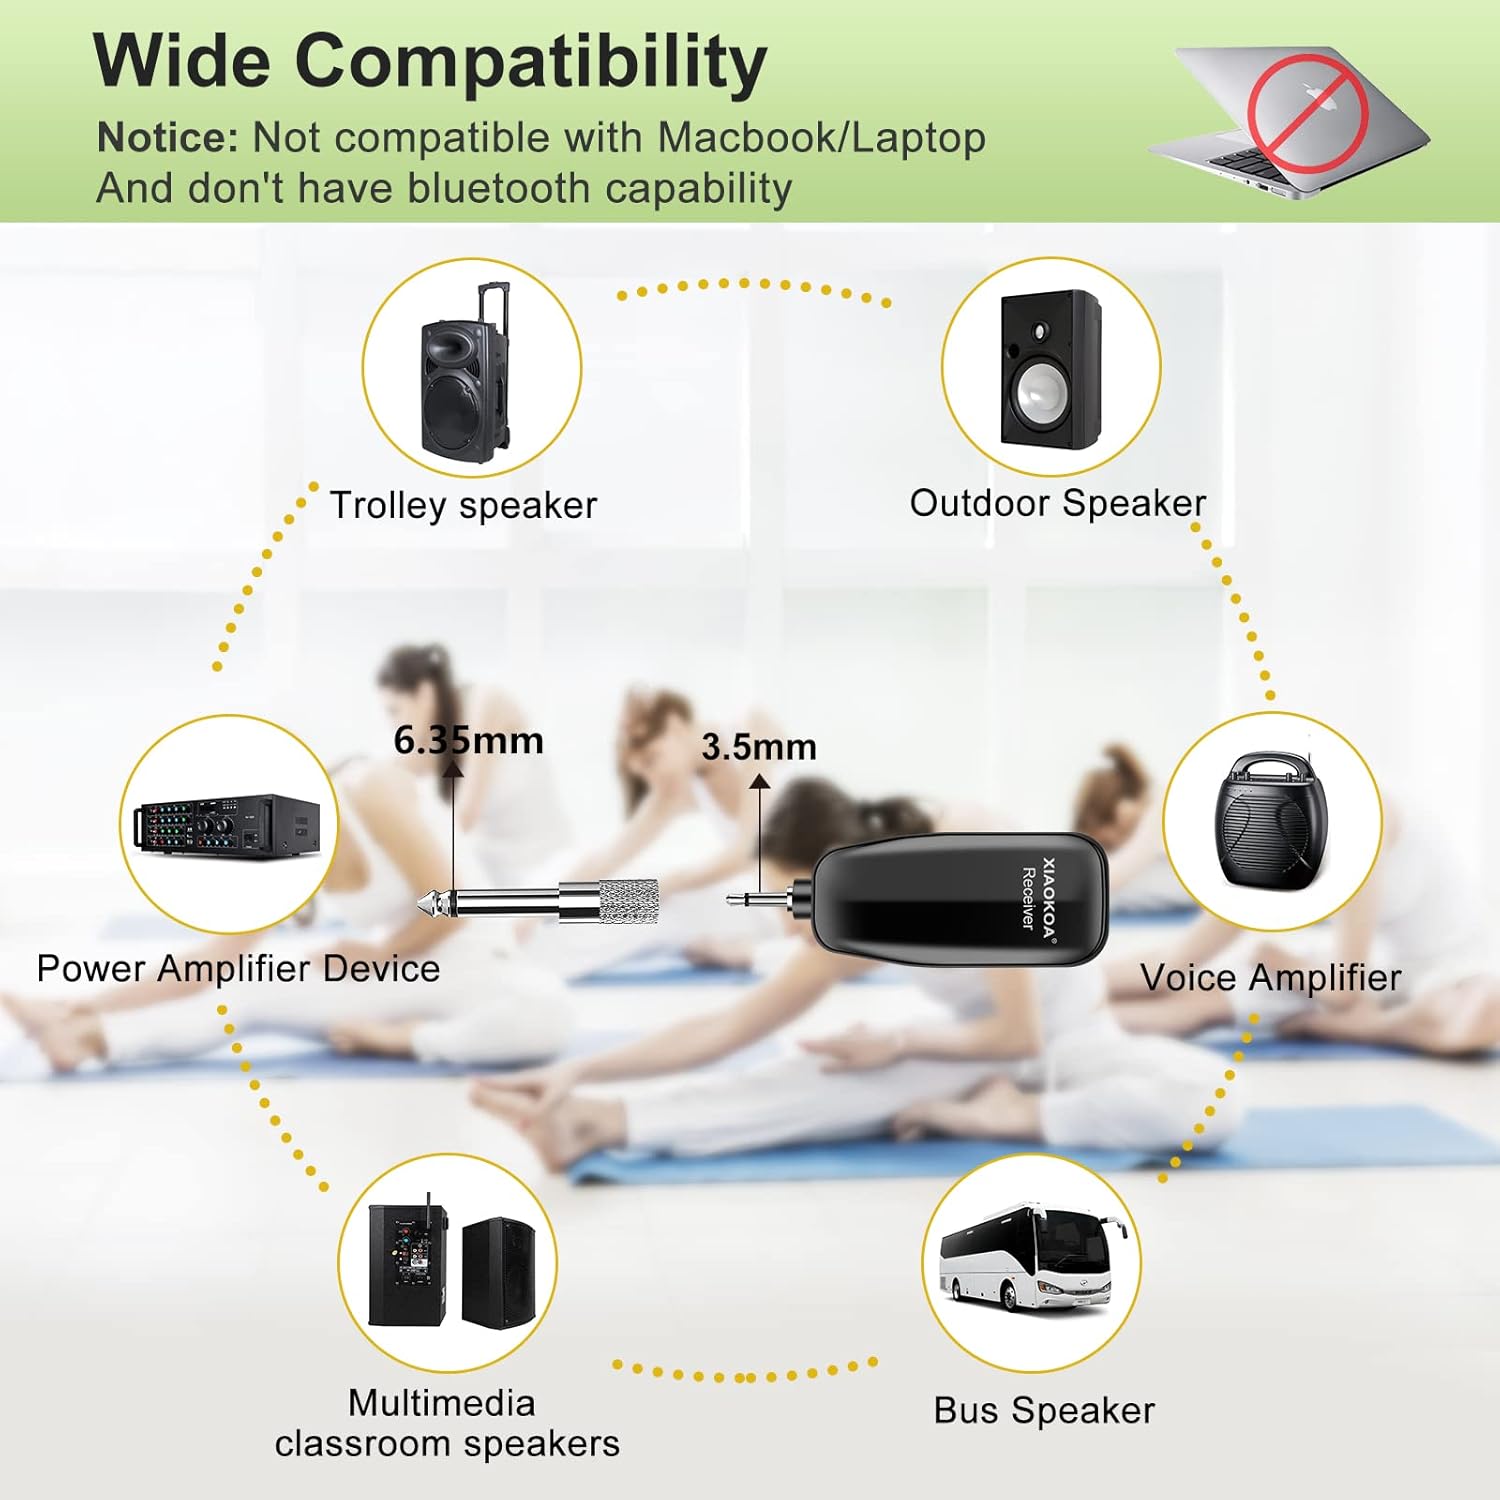
The wireless microphone is compatible with a wide range of audio devices that have a microphone input jack (6.35mm or 3.5mm), including voice amplifiers, PA systems, and various speakers. Note: Not compatible with mobile phones, Macbooks, or laptops.
3. Setup Guide
3.1 Charging the Devices
Before first use, ensure both the wireless microphone headset (transmitter) and the receiver are fully charged. Use the provided dual USB charging cable to connect both units to a USB power source (e.g., wall adapter, computer USB port). The charging indicator light on each unit will illuminate during charging and turn off when fully charged.
3.2 Connecting the Receiver
- Identify the microphone input jack on your compatible audio device (e.g., PA system, amplifier, speaker). This is typically a 6.35mm (1/4 inch) or 3.5mm (1/8 inch) jack.
- If your device has a 6.35mm input, directly plug the receiver into the jack.
- If your device has a 3.5mm input, attach the included 3.5mm to 6.35mm converter to the receiver, then plug the converter into the 3.5mm jack.
- Ensure your audio device is powered on and its volume is set to a low level before proceeding.
3.3 Powering On and Pairing
- Press and hold the power button on the wireless microphone headset (transmitter) until its LED digital display illuminates.
- Press and hold the power button on the receiver until its indicator light turns on.
- The headset and receiver are designed to automatically pair. Once successfully paired, the receiver's indicator light will turn solid blue. If the light is blinking, it indicates that pairing is in progress or has failed. Ensure both devices are close to each other during initial pairing.
4. Operating Instructions
4.1 Wearing the Headset
Gently place the headset over your head, ensuring a comfortable and secure fit. Position the microphone boom so that the microphone capsule is approximately 1-2 inches (2.5-5 cm) from the corner of your mouth for optimal sound pickup and clarity.
4.2 Adjusting Volume
Use the '+' and '-' buttons located on the side of the headset transmitter to increase or decrease the microphone's volume. The LED digital display will show the current volume level (e.g., 'U08' for volume).
4.3 Frequency Management
The headset utilizes UHF technology with multiple available channels (40 channels). This allows for multiple microphone systems to operate simultaneously in the same area without interfering with each other. The LED display on the headset will show the current operating frequency (e.g., 'C05' for channel).
4.4 Switching to Handheld Mode
To convert the headset to handheld mode, carefully detach the microphone unit from the headband. The main body of the microphone unit then functions as a compact handheld microphone.
5. Maintenance
5.1 Cleaning
Regularly wipe the microphone headset and receiver with a soft, dry, lint-free cloth. Do not use liquid cleaners, aerosols, or harsh chemicals, as these can damage the device's components and finish.
5.2 Storage
When not in use, store the device in a cool, dry place away from direct sunlight, excessive heat, and moisture. Avoid storing in environments with extreme temperatures.
5.3 Battery Care
To maximize the lifespan of the built-in Li-ion battery, avoid completely discharging it frequently. It is recommended to charge the device regularly, even if it has not been used for an extended period (e.g., once every 3 months).
6. Troubleshooting
6.1 No Sound Output
- Ensure both the microphone headset and the receiver are powered on and fully charged.
- Verify that the receiver is securely plugged into the correct microphone input of your audio device.
- Check if the audio device's volume is turned up and not muted.
- Confirm that the headset and receiver are successfully paired (receiver's indicator light should be solid blue). If not, power cycle both units and try pairing again.
6.2 Poor Sound Quality or Interference
- Ensure the microphone is positioned correctly, approximately 1-2 inches from your mouth.
- Check for any physical obstructions between the headset and the receiver that might block the signal.
- Move away from other electronic devices (e.g., Wi-Fi routers, other wireless systems) that might cause electromagnetic interference.
- If multiple units are in use, ensure they are operating on different frequencies to avoid interference.
6.3 Device Not Compatible
- Please note that this microphone system is not compatible with mobile phones, Macbooks, or laptops.
- Ensure your audio device has a dedicated 6.35mm or 3.5mm microphone input.
7. Specifications
| Model Number | U12AS |
| Item Weight | 140 Grams (4.9 ounces) |
| Microphone Form Factor | Headset |
| Power Source | Battery Powered (1 Lithium Polymer battery included) |
| Material | Plastic |
| Signal-to-Noise Ratio | 70 dB |
| Number of Channels | 40 |
| Connectivity Technology | UHF |
| Connector Type | 6.35 mm Jack, 3.5 mm Jack |
| Special Feature | Adjustable Headband |
| Compatible Devices | PA System, Amplifier, Speaker |
| Polar Pattern | Omnidirectional |
| Audio Sensitivity | 58 dB |
8. Warranty and Support
For detailed warranty information, technical support, or any inquiries regarding your XIAOKOA Wireless Microphone Headset, please refer to the contact details provided in your product packaging or visit the official XIAOKOA website. Keep your purchase receipt for warranty claims.