1. Introduction
This manual provides essential information for the safe and efficient operation, installation, and maintenance of your YATOINTO 3 in 1 Electric Hoist Winch. Please read this manual thoroughly before using the product to ensure proper function and safety.
The YATOINTO Electric Hoist Winch is a versatile lifting and towing tool designed for various applications in gardens, forests, factories, warehouses, and construction sites. It features a robust design with multiple control options and enhanced safety mechanisms.
2. Safety Information
WARNING: Failure to follow these safety instructions may result in serious injury or death.
- Always inspect the hoist, cable, and hooks for damage before each use. Do not operate if any components are damaged.
- Ensure the load does not exceed the maximum rated capacity of 1100 lbs.
- Never stand directly under a suspended load.
- Keep hands and clothing clear of moving parts, especially the wire rope and drum.
- The hoist is equipped with a safety limit switch that automatically cuts power to prevent accidents when the hook reaches its upper limit.
- Overload protection is included to prevent damage to the motor and hoist.
- The forged alloy hook features a safety latch to prevent accidental disengagement of the load.
- Avoid running the hoist without a load during its first use to ensure optimal safety and proper cable seating.
- Ensure the power supply matches the hoist's requirements (120V).
3. Product Overview and Components
The YATOINTO Electric Hoist Winch is designed for ease of use and durability. Familiarize yourself with its main components:
- Hoist Unit: Main body containing the motor, gearbox, and wire rope drum.
- Wire Rope: Galvanized anti-rotation steel cable for lifting.
- Hook: 360-degree rotating forged alloy hook with safety latch.
- Manual Control: Buttons directly on the unit for close-range operation.
- Wired Remote Control: For precise control from a short distance.
- Wireless Remote Control: For operation from a greater distance.
- Safety Limit Switch: Automatically stops lifting at maximum height.
- LED Indicator: Provides quick status checks.
- Dust Cap: Protects handle connections.

Figure 1: The YATOINTO Electric Hoist offers three control methods: manual, wired, and wireless remote control for versatile operation.

Figure 2: Enhanced safety features include a 360-degree rotating hook, durable steel rope, and an automatic limit stop with a bright red indicator.

Figure 3: The hoist is constructed with industrial-grade materials such as multiple copper wires for stronger power, anti-twist steel cable, and an efficient cooling system.
4. Setup
Proper setup is crucial for safe and effective operation.
4.1 Mounting the Hoist
The electric hoist can be mounted horizontally or vertically depending on your space requirements and application. Ensure the mounting surface is stable and capable of supporting the hoist's weight plus the maximum load.
- Horizontal Mounting: Secure the hoist firmly to a horizontal beam or structure using appropriate fasteners.
- Vertical Mounting: Attach the hoist to a vertical surface, such as a wall or ceiling, ensuring all mounting points are robust.
Always verify that the hoist is securely fastened before connecting power or attempting to lift any load.
4.2 Connecting Controls
- Wired Remote Control: Connect the wired remote control cable to the designated port on the hoist unit. Ensure the connection is secure and the dust cap is properly seated when not in use.
- Wireless Remote Control: The wireless remote control is pre-paired. Ensure AAA batteries are installed (included with some models).
- Power Connection: Plug the hoist into a standard 120V power outlet.
5. Operating Instructions
The YATOINTO Electric Hoist offers three modes of operation: manual, wired remote, and wireless remote.
5.1 Pre-Operation Check
- Verify all connections are secure.
- Check the wire rope for any fraying, kinks, or damage.
- Ensure the hook's safety latch operates freely.
- Confirm the lifting path is clear of obstructions.
5.2 Lifting and Lowering
- Attach the load securely to the forged alloy hook, ensuring the safety latch is closed.
- Select your preferred control method (manual, wired, or wireless).
- To lift, press and hold the "Up" button. To lower, press and hold the "Down" button.
- Release the button to stop the operation.
- The hoist will automatically stop when the hook reaches its upper limit due to the safety limit switch.
5.3 Preventing Cable Tangling
To ensure smooth cable operation and prevent tangling, always maintain proper load tension. Avoid operating the hoist with an empty hook or a very light load, as this can cause the cable to unwind unevenly and tangle.
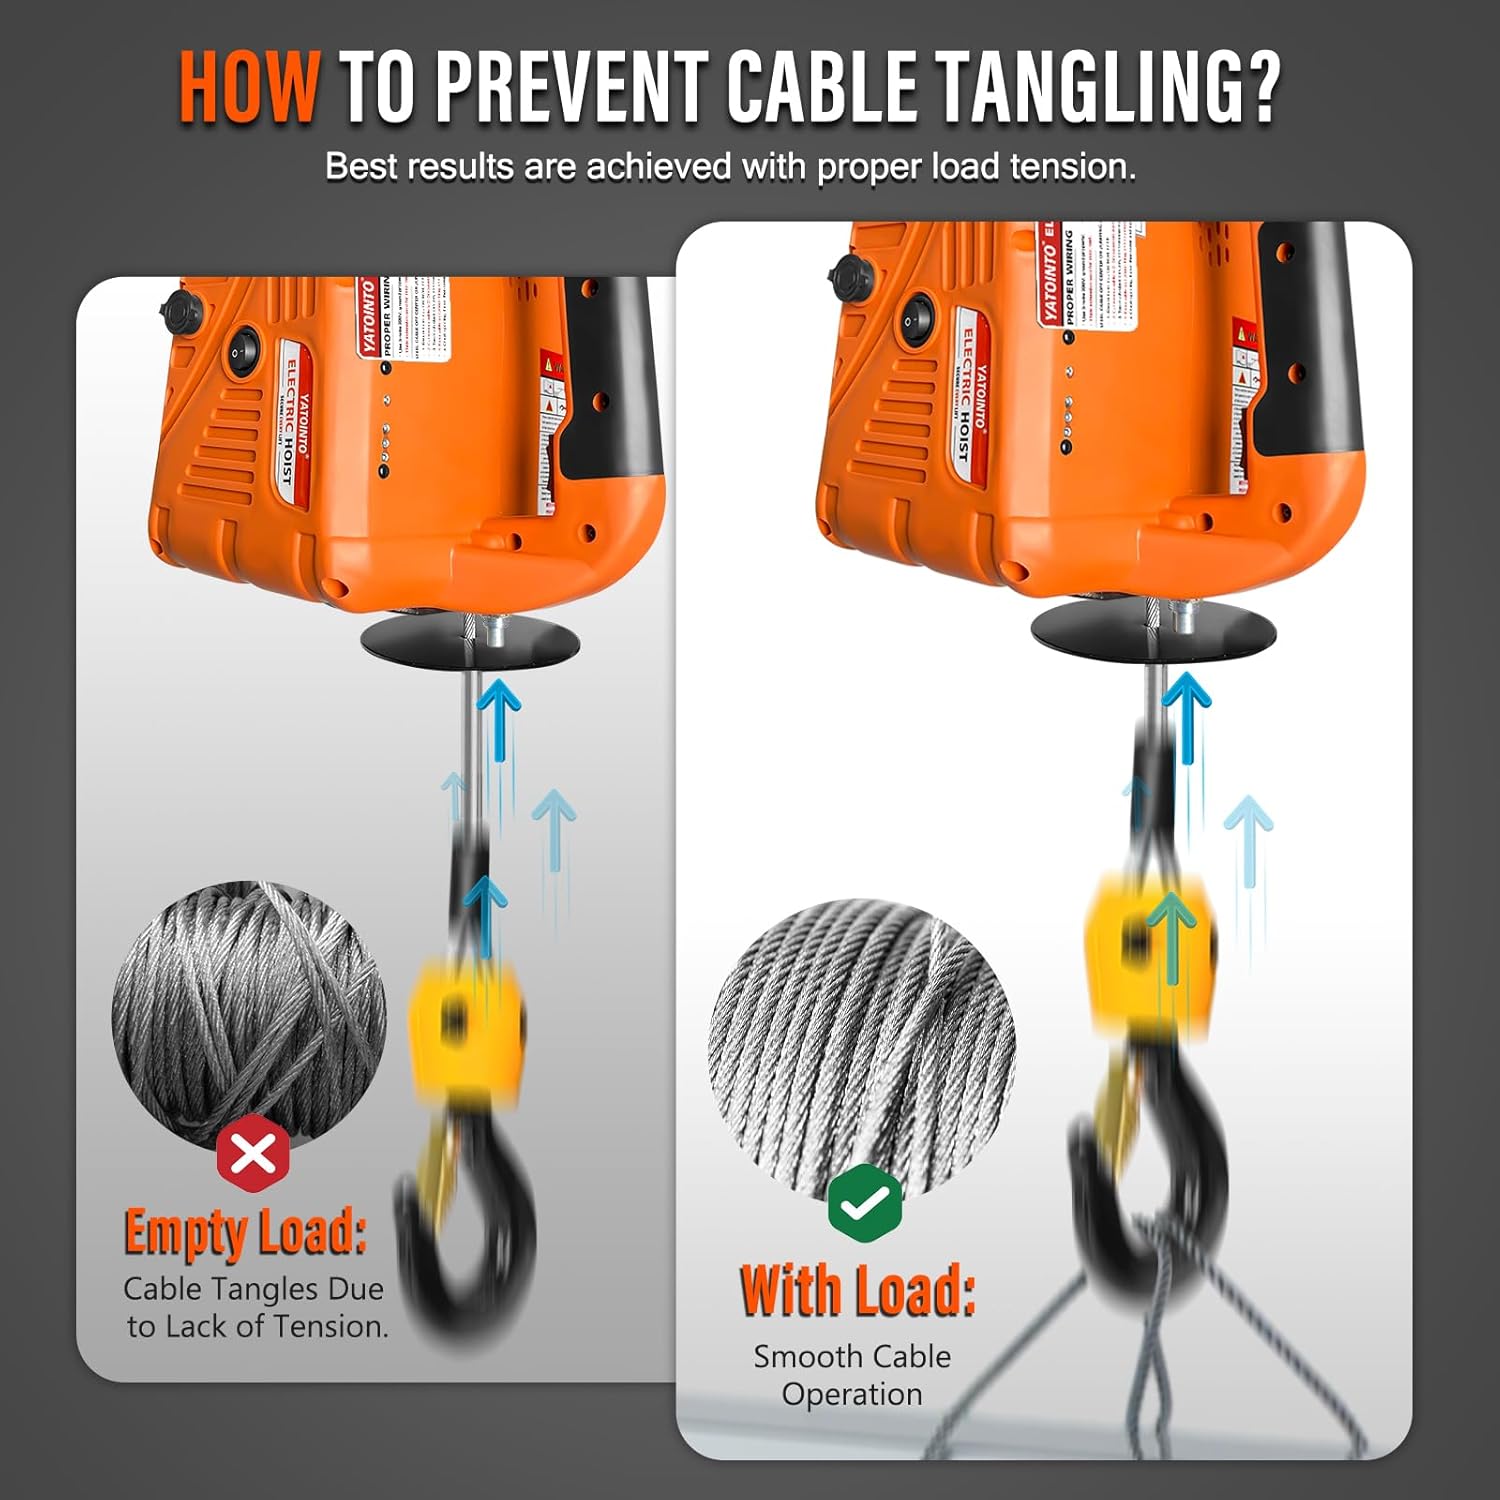
Figure 4: Proper load tension is essential to prevent cable tangling and ensure smooth operation.
5.4 Control Options Demonstration
Video 1: This video demonstrates the three control modes (manual, wired, wireless) and key safety features of a portable electric hoist, including the infrared limit sensor and robust hook.
Video 2: This video highlights the upgraded infrared limit sensor, robust heavy-duty hook, working status indicator panel, and industrial-grade control buttons of an electric hoist.
6. Maintenance
Regular maintenance ensures the longevity and safe operation of your electric hoist.
- Cable Inspection: Periodically inspect the galvanized anti-rotation wire rope for wear, corrosion, or damage. Replace if necessary.
- Hook Inspection: Check the forged alloy hook and its safety latch for deformation or wear. Ensure the 360-degree rotation is smooth.
- Motor and Gearbox: The hoist features a high-efficiency pure copper motor and an aluminum shell gearbox designed for durability. Keep the unit clean and free from excessive dust or debris.
- Connections: Ensure all electrical and control connections are tight and free from corrosion. The dust cap design helps maintain stability of handle connections.
- Bearings: High-strength bearings are used to extend the device's lifespan. No user-serviceable parts are typically required for bearings.
7. Troubleshooting
If you encounter issues with your YATOINTO Electric Hoist, refer to the following common problems and solutions:
- Hoist Not Responding:
- Check power connection and ensure the unit is plugged into a live 120V outlet.
- Verify remote control batteries (for wireless models).
- Ensure the emergency stop button (if present on wired remote) is disengaged.
- Load Not Lifting/Lowering:
- Check if the load exceeds the 1100 lbs capacity, triggering overload protection.
- Ensure the safety limit switch has not been activated (e.g., hook is at its highest point).
- Inspect the wire rope for any obstructions or severe tangles.
- Unusual Noises or Vibrations:
- Stop operation immediately.
- Inspect the hoist for loose parts or damage.
- Check the wire rope for proper winding on the drum.
For persistent issues or repairs, contact YATOINTO customer support.
8. Specifications

Figure 5: Key specifications and dimensions of the YATOINTO Electric Hoist.
| Feature | Specification |
|---|---|
| Model Number | PEH |
| Weight Capacity | 1100 lbs (approx. 500 kg) |
| Max Lifting Height | 25 ft (approx. 7.6 m) |
| Lifting Speed | 16.4 ft/min (approx. 5 m/min) |
| Motor Power | 1500W |
| Input Voltage | 120V |
| Wire Rope Length | 23 ft (for wired remote) |
| Item Weight | 10.9 kg |
| Color | Orange |
| Included Components | Electric Hoist x1 |
9. Warranty and Support
YATOINTO products are manufactured to high-quality standards. For warranty information, technical support, or replacement parts, please refer to the contact details provided with your purchase or visit the official YATOINTO website. Keep your purchase receipt as proof of purchase for any warranty claims.


